Wall cabinet with shelves
The most popular storage element in the kitchen is a row of cabinets that are located above the work area. They usually contain dry foods, dishes, and medicines. In a small kitchen, you should use the space as ergonomically as possible, and tall kitchen cabinets up to the ceiling are a good way. The more often shelves are installed in them, the better: storing dishes in a stack is not always convenient. We recommend placing items that are used least often on the top shelves.
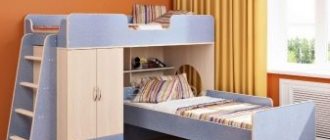
The photo shows an unusual wall cabinet with sliding fronts. This is an excellent solution for small kitchens: hinged doors are not always convenient and take up more space.
Materials
In the production of modern kitchens, a variety of materials are used: from the cheapest (chipboard) to the most expensive (natural wood). The following requirements are put forward for the finished product:
- strength;
- durability;
- reliability.
Most often, corner kitchen cabinets are made from the following materials:
- LDSP – laminated chipboard. The most popular building material with an affordable price. Thanks to the wide range of colors, you can choose furniture to suit almost any interior.
- MDF. This material has significantly better characteristics than chipboard. It can withstand air humidity up to 80%, which is important for the kitchen. MDF facades are strong, hold well on any hinges, and do not break.
- Natural wood. The cost of a kitchen made from solid wood is considerable, but here the environmental friendliness of the material used comes to the fore. Natural wood looks expensive and allows you to create exquisite designs.
An important detail in the kitchen is the countertop. It should not be afraid of moisture or mechanical stress. For its manufacture, natural or artificial stone, durable plastic or tempered glass are used.
laminated chipboard
MDF
Natural wood
Drainer
Another traditional filling for kitchen cabinets. The dryer is usually located above the sink behind the front doors: hidden dishes look more aesthetically pleasing than those placed in plain sight. Sometimes the drying cupboard does not have a bottom and water from wet plates flows directly into the sink. Otherwise, a pallet must be used. One of the best ways to keep your cupboard open is to install a door with a lifting mechanism that will stay up and out of the way when moving around the kitchen.
The dish dryer can also be located in the lower cabinet. It is more rational to use a deep drawer for this.
The photo shows a metal dryer, which is installed in the lower kitchen cabinet. This filling is optimal for dishwasher owners: clean plates can be removed immediately without getting up or reaching to the top tier.
Varieties of elements
A beautiful, stylish kitchen set that fits perfectly into the room is half the battle. Much depends on the contents of the kitchen cabinets inside. The more rationally the space is organized, the more convenient it will be to prepare food. Various devices and elements will help with this.
Drainer
A dish dryer can be either a stand-alone structure or located inside a cabinet. The optimal place is a wall cabinet above the sink. If you install it exactly there, it will allow you to wash the dishes without unnecessary movements and immediately put them back in place. A simple drying rack is designed for plates and consists of one floor with a tray. Two-story structures are more common. Deep and flat plates are placed on the lower one, cups and mugs are placed on the upper one.
Material of manufacture: plastic or metal. The second option is more reliable, durable, wear-resistant. It is important that it be chrome or stainless steel. The structure will constantly be in contact with water, so it should not rust. A tray of sufficient depth is required where water will drain from the plates. When choosing, you need to pay attention to the distance between the dryer grates. It should be sufficient for a comfortable arrangement of both flat and deep plates.
Lifting mechanism
For a cabinet with a lifting mechanism, the door does not swing open, but rises up. It is fixed at the top point, which prevents the sash from lowering spontaneously. The main types of structures are:
- Folding. The door folds in the middle, like a book. Compact and convenient.
- Folding. The sash tilts up and “slides” into the space between the cabinet and the ceiling.
- Vertical. The facade rises strictly vertically. Allows you to look at the entire contents of the shelves. But the device needs enough space. If the distance between the cabinet and the ceiling is too small, this option will not work.
- Turning. The door opens to a position parallel to the floor. Does not require additional space for opening. Usually it can be fixed in intermediate positions.
Mechanisms are also divided into mechanical and gas. The first allows you to install the facade in any position, used for opening up, down and universal. Gas lift ensures smoother operation of the sashes.
Such cabinets have multi-tiered shelves that can be pulled out towards you and down, and then returned to their place in a similar way. The device is a convenient option for upper cabinets. You don't have to stand on a stool to reach the contents. It is convenient to use even for short people.
Vertical
Folding
Rotary
Folding
Cutlery tray
Provides storage for forks, tablespoons, teaspoons, knives, and other small utensils. Divided into 3-4 sectors, maybe more. Made from durable plastic or stainless steel. It is more convenient to insert the structure into the top drawer. This way you will always have your supplies at hand.
Items that are used most often are best left for drawers under the countertop in the foreground.
Column
Both tall, floor-to-ceiling cabinets and cabinets allow you to build a column into them. This is a multi-tiered structure that extends on rollers. Its convenience is that all the contents are visible at once, so you don’t have to search for something for a long time. Suitable for storing dishes and any kitchen utensils.
The tiers are represented by baskets. The tall column can accommodate up to 6 containers. Metal ones can withstand up to 20 kg of weight each. To make it easy to pull out the heavy structure, the mechanism is equipped with closers.
Railing system
Allows you to store small kitchen utensils outside rather than inside. This is a hollow metal pipe attached to the wall with holders. It is installed under wall cabinets above the working surface of the table. On the railing there are:
- hooks;
- clothespins;
- small baskets;
- mesh shelves and other elements.
The advantage of the design is that it makes it possible to free up the surface of the table, drawers and shelves. Small items that are used constantly can be stored on it. These are skimmers, ladle, towels, potholders, spice sets, cutting boards and so on.
Vertical railing - a shelf with baskets for small items, fixed between the lower and upper cabinets or from floor to ceiling.
Basket
A mesh basket made of plastic or stainless steel is a popular modern filling for cabinets - an alternative to a drawer. Containers can be pull-out or attached to hinged doors. They are installed in both upper and lower cabinets. Suitable for storing cereals, flour, sugar, salt, tea, coffee, and small utensils.
Non-standard shaped baskets are used to organize space under the sink. Because of the pipes, this is not the most convenient niche. Therefore, retractable nets (U-, L-shaped and others) are the best solution.
Pull-out structures at the bottom of the kitchen unit are a more convenient organization of space than hinged cabinets. Allows you to easily access all content. There is no need to sit on the floor or kneel. There is no need to rearrange items located closer to the door.
Bottlemaker
In its principle, a bottle holder is similar to a column. Only narrow and usually located at the bottom of the headset. It has 2-3 tiers for storing bottles of wine, oil, vinegar, and sauces. It is also convenient to store cans here.
Carousel
A carousel is a structure where round or semicircular shelves rotate around a vertically located frame. The elements are made of plastic or metal, often lattice or with holes for ventilation. There are two options for the device, both are convenient for use in the kitchen:
- The system is completely hidden in a niche. The sections are round and rotate around a vertically located rod.
- The structure partially slides out when the swing door is opened. It is attached both to the sash and inside the niche, moving along the guides. Suitable for cabinet sections that are not very convenient to use because it is difficult to reach the far corners.
Metal carousels are more durable than plastic ones and can withstand significant weight. To protect against corrosion they are coated with a special compound. An excellent solution for corner cabinets.
Garbage bin
The place for the trash can is at the bottom of the unit, under the sink. The container can be built-in or attached to the door. On top is a lid that opens by pressing the pedal. An interesting option is a carousel with several containers for sorting garbage.
"Magic" corner
The so-called “magic corners” are placed in the corner cabinet of the kitchen unit, in the cabinet below or in the cabinet above. The design resembles a carousel, but with some differences. The corner section consists of 2–4 baskets. One or two of them move out along the guides when the door is opened. The rest rotate inside. This device allows you to rationally arrange your storage space.
There are various modifications of the device. They differ in the number of shelves and the way they are pulled out. Unlike a small compact carousel, the corner is more spacious and suitable for storing heavy dishes. Most often made of chromed metal. This material is durable, can withstand weight well, and does not corrode.
Cabinet above the hood
In small kitchens, in order not to lose useful space, you want to fill every free centimeter. When ordering kitchen furniture, you should think about the hood in advance: there is unused space on the sides of the air vent, but a cabinet with internal filling solves this problem. The pipe hidden behind the facades does not spoil the view, and small items can be stored on the shelves.
Advantages and disadvantages
The advantages of installing a cabinet of this type:
- The kitchen area is used to the maximum. Even corners that remain unused in a conventional set become the main place for placing household items and utensils.
- If you look inside the closet, you immediately notice a large, quite spacious space. In addition, it is also a multifunctional piece of furniture. You can place small items and non-standard kitchen utensils here by coming up with a special storage system for them.
- You can choose the design of the cabinet in accordance with the characteristics of the room. This includes a non-standard height, a different width, and a different depth of the product.
- A corner cabinet with a built-in bar counter allows you to replace a stationary dining table. At the same time, the room will not be cluttered, and the mobility of the structure will add lightness to the design. The stand can be ordered to a certain height to make it convenient not only for dining, but also for cooking. It can also be used as a room divider into zones.
- Installing floor modules with pull-out sections on wheels allows you to quickly get the necessary item and return the elements to their place.
Corner cabinets also have disadvantages:
- When installing furniture, especially floor structures, they are often faced with the problem of placing communications. As a result, you have to file, cut, and otherwise accommodate the set. This problem is especially relevant in Khrushchev houses. Protrusions and podiums are also common. In this case, it is recommended not to purchase ready-made options, but to order an individual project that takes into account the features of the kitchen.
- The standard opening of doors for corner cabinets is not always convenient and creates discomfort. Here you can offer a way out - make an accordion-shaped version. Many manufacturers make the bottom shelves in the corners of the cabinet open to prevent the housewife from accidentally hitting sharp edges.
Stages of assembling kitchen furniture, nuances of placement of the set
Spacious space inside the cabinet
Built-in bar counter
Pull-out sections
Drawers
The lower cabinets usually contain heavy objects - pots, cereal supplies, household appliances. Roll-out drawers are installed under the countertop of the kitchen unit, thanks to which you don’t have to sit down and look for the necessary utensils on the shelves. Such devices are expensive, especially if they extend to the very end. The structures can be located both under the sink, where it is rational to store detergents, and under the hob.
By ordering drawers separately, you can save money and get ergonomic kitchen contents.
Cutlery tray
A tray is a small drawer divided into compartments for storing spoons, forks and knives. Thanks to this organizer, placed inside the kitchen cabinet, the appliances are always in their place, easily accessible and do not take up space on the countertop. The tray can serve as a dryer: it prevents moisture from entering the bottom of the drawer. The most economical material is plastic, but pathogenic bacteria accumulate on its surface over time. The plastic filling needs to be washed and dried well, and over time, replaced with a new one. A wooden tray looks more noble, but only dry utensils should be placed in it.
The photo shows a kitchen set with built-in organizers and drawers for cutlery.
Area under the sink
An excellent solution for convenient cooking is a retractable garbage container. It can be built into a kitchen cabinet under the sink so that when the door is opened, the bucket comes out. There are models with a lid that rises automatically or after pressing the pedal. In addition to the trash can, you can store household chemicals under the sink using metal baskets - built-in or free-standing.
Carousel
It is not easy to manage space wisely in a corner kitchen: access to the spacious cabinet in the very corner is difficult due to its depth. One obvious way to solve this problem is to equip a carousel. Thanks to the rotating design, the path to the dishes will be greatly simplified. When purchasing a carousel, you should pay special attention to the quality and thickness of the metal, the reliability of the rotating mechanisms and the reputation of the manufacturer - the service life of the kitchen filling will depend on these factors.
The photo shows an example of a rotating carousel, which makes it easier to access the necessary things. The set is equipped with a special double door and internal lighting.
Color and design
For each interior, you need to choose a specific color scheme and cabinet design. The main varieties are presented in the following styles:
- Classical. Subtle and neutral tones are used, such as white, beige or brown. The design is dominated by wooden overlays, arches, vertical projections with capitals or cornices.
- Modern (loft, modern). Matte or glossy facades using plastic, film, metal or enamel are used. These styles are dominated by bright, but not provocative colors or combinations of two shades.
- High tech. A kitchen in this style is decorated with metal parts, glass, and lighting in cool shades. Current color solutions are gray, steel, white. The surface of the facade for this design is usually made glossy.
- Rustic (country, Provence). Wood furniture predominates in this style. The design includes painted details, antique finishes, textured materials and carved elements. In addition, the rustic style is characterized by handles made of wood or copper, hinged doors and square legs.
Types of corner kitchen cabinets, rules for choosing them
Color design can visually smooth out the transition from one cabinet to another. Glass or mirror surfaces are also used for facade decoration. Photo printing continues to be popular; furniture facades can be decorated with any image. Still lifes with fruit, photographs of the city at night, abstract patterns, floral and animal motifs are popular.
Shabby chic style has become popular lately. It consists of using expensive furniture with an aged effect. This style is suitable for those who prefer Provence or country, but want to try something more elegant.
Classical
Loft
Modern
High tech
Country
Provence
Shabby chic
Corner pull-out system
A special design called a “locomotive” will allow you to make maximum use of the angle. Its rectangular shape is more ergonomic than a round carousel, so the kitchen cabinet space does not remain empty. When opening, the shelves slide out one by one, and when closing, they snap into place in the reverse order.
You can also use the corner using a system of drawers: their number will depend on the height of the dishes.
Hanging structures
Wall-mounted structures will add functionality and uniqueness to the kitchen. These include:
- Tool stand . Here you can hang a colander, grater, ladle, can opener and all those little things that usually take up space in cabinets or racks for clean dishes.
- Magnetic board for cutting tools. Knives, kitchen scissors, and meat grinder parts are attached to it.
- Crossbar for pot lids. Screws to the wall or the inside of a drawer, saves space and helps keep dishes organized.
In order not to clutter up the kitchen space, it is advisable to place hanging structures at a distance from each other. Ideally, one on each wall.
Bottle storage
The modern filling of kitchen cabinets meets any needs of apartment owners. To store sauces, oils and wine collections, many cabinets have special shelves for bottles. It’s successful if you manage to use a narrow space that is usually empty. With the help of metal dividers and shelves, it is easy to organize a minibar or store oil for a long time, which must be kept away from sunlight.
Kitchen cabinet pencil case - features and purpose
A kitchen cabinet is a narrow structure, the height of which is much greater than the width. Due to the fact that it takes up little space and has an ergonomic design, this piece of furniture has become an integral part of most furniture sets. They can also be purchased separately.
Another advantage of the pencil case is its high functionality. It is used for:
- installation of household appliances. This design is equipped with a special place for equipment, where combines, multicookers, microwave ovens, minibars with a refrigerator are placed. A pencil case for household appliances is indispensable for creating interiors in a modern style;
- storage of kitchen utensils. The kitchen pencil case is perfect for storing dishes, various containers with bulk products, seasonings and other products. The storage product usually has sufficient height and many shelves;
- kitchen decor. Tall and narrow cabinets look quite elegant, and on the shelves of open structures you can store vases, decorative vessels, holiday sets, and textiles.
The kitchen pencil case is also convenient to use for storing canned foods, and the lower bottle compartment can easily replace the bar.
Backlight
The internal content is limited not only to a variety of containers for kitchen utensils, but also to a lighting system that makes it easier to access items. The most original lighting – with automatic switching on at the moment of opening. To find such a system, you should contact companies that supply high-quality furniture fittings. This type of lighting performs not only a practical, but also a decorative function. The most economical are LED strips, which are compact and can be installed in any area of the cabinet.
Every electrical appliance, including lighting, must have a power source. It is important to think about its location in advance, before ordering a kitchen set.
The photo shows kitchen furniture, where the lighting of the interior plays a decorative role, complementing the main lighting and adding lightness to the set.
Instructions for assembling the filling
Among the numerous devices, we chose the most necessary content - drying dishes. No kitchen can do without it.
Step 1 . Unpack the product and check the equipment list for completeness. In our case, there is a mesh for cups, a grid for plates, special metal profiles and plastic grid holders. Two trays are provided to collect moisture. Pay attention to the material the pallets are made of - it must be durable and resistant to chemical detergents, including those with aggressive compounds.
Start by checking the product configuration
Important. The device can be placed in a ready-made kitchen set cabinet, you just need to choose its width.
But many people prefer to make a separate frame for it; this solution greatly increases the comfort of using the dryer. In addition, it is mobile; if desired, it can be installed in various places in the kitchen, depending on the layout of the set, the architectural features of the room, the location of the sink and the desires of the owners. In our version, the frame does not have a solid bottom; instead, the kit includes two metal profiles. This design ensures maximum efficiency of natural ventilation.
Step 2 . Lay out the two profiles on a clean, flat surface and find the bottom plastic holders. They differ from the upper ones by the presence of special square protrusions. These protrusions are inserted into the holes of the profiles; they should fit tightly without any wobbling. Insert the profiles into the holders, pay attention to the back wall of the profiles, one of them has a groove. In the future, the DPV plate of the rear wall will be inserted into it. The profile, accordingly, should be distant.
Connect profiles with holders
Step 3 . Attach the connections with self-tapping screws; you can use a screwdriver. But experienced furniture makers, for several reasons, do not recommend using such a tool often.
- The master must always feel and adjust the tightening force of the hardware; the materials used to make furniture do not have high strength parameters, and the screws can turn.
- If the threads in the plates are damaged, then it is very difficult and time-consuming to restore. In addition, it will always be worse than that of the whole material.
- Furniture hardware is short, it is not difficult to twist them by hand.
As can be seen from the list above, the harm from using a screwdriver when assembling furniture is much greater than the benefits.
Screw the bottom frame with screws
Step 4 . Decide on the installation location of the assembled lower part; it can be screwed flush with the ends of the side walls or rise slightly upward. Make your decision taking into account the further placement of the dryer. You can free up space below and use it to store various items. If desired, the bottom can be closed and the frame turns into a full-fledged bedside table. There are many possible solutions, do not rush to make the final choice.
Trying the frame on the cabinet walls
Make installation marks for hardware; to do this, you need to perform several operations:
- measure the distance between the technological holes of the holders;
Measure the distance between holes
- find out the height from the center of the hole to the bottom horizontal bar.
Measure the distance from the mounting hole to the bottom bar
Practical advice. It is much easier to place the assembled element against the internal surfaces of the frame and make marks through the holes with a sharp pencil.
The vertical position is checked with a bubble level; if it is not there, then you can draw two horizontal lines at the same distance from the ends of the sidewalls.
Mark the location of the mounting holes
Step 5 . Drill holes for the hardware. Wrap tape or tape around the drill and make a depth stop. The hole should not reach the opposite surface by at least 5 mm. Take the diameter of the drill 1–2 mm less than the diameter of the hardware thread. Never screw a self-tapping screw into chipboard without a hole - it not only holds much worse, but can also split the material.
Holes are drilled according to the marks
Step 6 . Screw the plastic holders to the frame and perform identical operations on the other side.
Screw the holders to the sides of the cabinet
Step 7 . Place the aluminum profiles along the edges and secure their position with small screws. All hardware is sold complete with filling.
The profiles are moved to the edges and fixed with screws
Prices for cordless screwdrivers
Cordless screwdriver
Step 8 . Turn the product on its side and begin fixing the upper holders. First, make precise markings; you can check the distance with a ruler.
Mark the location of the top of the dryer
Step 9 . Drill holes and screw the elements. Insert metal grates and water collection trays into place.
After fixing the holders, install racks for dishes
All that remains is to install the back wall and attach the hinged doors. The dryer is assembled, you can put it in its permanent place and start using it. If desired, additional elements are inserted into the existing cabinet in the kitchen.