LiveInternetLiveInternet
–Categories
- audiobooks (1)
- batik (7)
- in the animal world (57)
- cats (8)
- dogs (27)
- felting (23)
- virtual travel (33)
- stained glass painting (21)
- bead embroidery (24)
- other embroidery (61)
- carpet embroidery (8)
- cross stitch (110)
- ribbon embroidery (73)
- crochet (1083)
- for children (287)
- for home (221)
- for women (397)
- bags (50)
- patterns and diagrams (159)
- knitting lessons (80)
- flowers (38)
- knitting (794)
- for home (91)
- for men (52)
- for dogs (5)
- bags (42)
- patterns (253)
- knitting for children (534)
- girls coats jackets ponchos (23)
- for girls dresses, sundresses, skirts (93)
- girls pullovers blouses (122)
- for girls hats scarves (177)
- for children up to one year (169)
- for boys (85)
- toys (27)
- booties socks slippers (41)
- knitting for women (1881)
- cardigans jackets bolero (307)
- socks slippers (43)
- coat poncho jackets (78)
- dresses sundresses tunics skirts (284)
- pullovers sweaters jumpers (546)
- tops vests sleeveless vests (265)
- hats scarves shawls signets (541)
- decoupage (27)
- denim alterations (37)
- painting (114)
- craft magazines (2)
- funny video (10)
- make money on the Internet (3)
- health (11)
- celebrities (6)
- illustrations (73)
- interesting world (73)
- interior (44)
- pictures for creativity (170)
- creative (27)
- culinary recipes (432)
- baked goods (101)
- desserts (33)
- blanks (59)
- snacks (30)
- mushrooms (8)
- chicken (20)
- made from meat (34)
- from vegetables (43)
- fish (22)
- from dough (41)
- drinks (11)
- Lenten dishes (10)
- salads (21)
- soups (15)
- cheeses (12)
- cakes (49)
- modeling (34)
- polymer clay (14)
- salt dough (22)
- master classes (621)
- the world in photographs (54)
- my photos (1)
- music (3)
- Required links (46)
- origami quilling (28)
- alterations (42)
- newspaper weaving (26)
- DIY gifts (201)
- DIY crafts (528)
- for children (26)
- beaded (27)
- made of paper (157)
- from plastic bottles (29)
- from natural materials (49)
- from other things (100)
- fabric (104)
- made of fabric and felt (30)
- lamps lampshades lamps (12)
- mosaic (3)
- usefulness (55)
- order in the house (4)
- holidays (576)
- September 1 (8)
- February 23 (4)
- March 8 (12)
- valentine's day (64)
- new year (408)
- Easter (75)
- educational books and toys for children (21)
- various handicrafts (41)
- plants in the house (6)
- painting (48)
- stained glass, on glass (20)
- on ceramics (7)
- on fabric, batik (11)
- painting on stones (9)
- spot (4)
- garden and vegetable garden (112)
- garden ideas (85)
- scrapbooking (33)
- countries and cities (42)
- diary diagrams (11)
- LiRu textbook (4)
- flowers and ribbon bows (110)
- sewing (577)
- for children (163)
- for women (176)
- for interior (70)
- for the kitchen (45)
- for men (6)
- toys (86)
- patchwork, patchwork (106)
- pillows (42)
- bags (74)
- humor (8)
–Search by diary
–Subscription by e-mail
–Interests
– Regular readers
–Communities
-Statistics
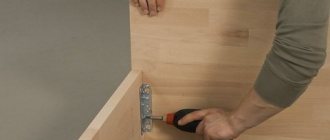
PUBLICLY AVAILABLE METHOD OF FINISHING A BED
Author – Olga Rogacheva
To move to a new place, we needed just a little bit to be completely happy—bedrooms for our daughter and grandmother. Or rather, the old “places,” of course, remained - grandma’s old sofa and a bed for Maria, our adult daughter. They served their 20-30 years with dignity and looked at us pitifully with their shabby upper trim and tattered backs, although we must give it their due, the basis of socialist furniture surprised us with the strength and reliability of the structure. The motto “to a new home with new things” was surely losing relevance, because the budget was planned down to every ruble, and the purchase of these household items was not included in that list. But I desperately didn’t want to put up with torn things in the new interior.
“We’ll re-upholster things!” — with this phrase from my husband, our bed-sofa experiment began. In the bookcase I immediately found a wonderful book, “Bedroom Decoration”, purchased back in 1996, which described the process of decorative upholstery of headboards. At that time, I leafed through and read it like a detective story, the realization of all that splendor seemed so unreal. But now everything was on sale: furniture staplers, fabrics, and it was no coincidence that the situation came up. Our experiment began with grandma's sofa, as it was the most damaged by time.
I want to show you our new old furniture! That's right: new old! Because old, faded, tattered and unattractive structures were transformed into practical new interior items in just a week.
Granny's sofa is our first born.
Don't judge harshly that he is a little simple-minded. But before resuscitation it was a set of four bare boards. One long winter evening - and the new product is ready, no worse, but better than even when we bought this sofa, because we built up the walls and armrests with foam rubber, not skimping on extra layers, so they turned out lush and soft.
The bed for daughter Maria is next in line, and I, inspired by success, decided to complicate the decoration and decorate the bed with a convex border:
For this bed it took us two evenings, equally long and wintery! We were simply “soaring” with joy! It may be hard to believe, but it created a feeling of unreality of what was happening, as if we were watching ourselves from the outside. We were so surprised by everything that came out of our hands, we were surprised by the speed, sufficient ease and accessibility of this technology.
Our next bed fell into this “bind” deliberately, because, strictly speaking, it did not need repairs, but it fell “under the distribution” and received its share of success. And in this last case, I already dealt with the draped border:
Bed makeover
Greetings to all visitors to my site! In this article, as you understand from the title, I will tell you how to remake a bed that initially did not meet the basic requirements of reliability and comfort. More precisely, it turned out to be a case when it was a pity to throw it away, but it was no longer possible to sleep. Money was spent on purchasing a bed that almost fell apart and took up a lot of space. In addition, the mattress was the most ordinary - cotton. In this case, everything came together one by one, and it was decided that we would not throw away the bed, but remake it. There was a single bed (1980x1240 mm) with a headrest (1350x700 mm), and there will be a single bed measuring 1923x960 mm with a headrest 960x900 mm. To work we need a tool :
- 10mm wrench.
- Drill with a set of drills + universal drill for confirmations.
- Jigsaw.
- Clamps (angled and straight).
- Woodworking machine (circular saw).
Of course, you can get by with a jigsaw, but then the work will take longer.
Material will be needed for the rework . Since we will use some of the material from an old bed, we won’t need much new. If the bed had been more complete, then even fewer parts would have been needed, but otherwise we had to bribe something. Details from new laminated chipboard (16 mm):
- 1923×900 mm – 1 pc. Back.
- 1923×100 mm – 1 pc. Shelf support for the back.
- 960×900 mm 1 pc. Headboard.
- 1923×230 mm – 1 pc. Front decorative false panel.
Parts from old laminated chipboard (16 mm):
- 325×960 mm 1 pc. There was a place at my feet.
For the mattress frame we also use old material made of laminated and sanded chipboard (16mm). Mattress frame:
- 1920×160 mm – 2 pcs. Side parts.
- 888×160 mm – 6 pcs. Transverse connecting parts.
Please note that the width of the frame parts for the mattress must be no less than 150 mm and no more than 300 mm.
- 380×45 mm – 10 pcs. and 888×45 mm – 2 pcs. Frame extenders.
We will also need wooden blocks to strengthen the frame for supports (legs) with dimensions:
Advice . It is better to use wooden blocks made of strong wood (beech, oak, ash). I used beech wood pieces from an old book table. Sanded chipboard (16 mm).
- 1920×910 mm – 1 pc. Mattress pad.
The most important component of the converted bed is, of course, the mattress measuring 1900x900 mm. It was from these dimensions that I proceeded when making the frame for the mattress. Actually, all the dimensions of the parts directly depend on the size of the selected mattress. Main characteristics.
| Mattress composition: Cover - deep stitched jacquard with antibacterial impregnation. Sheep's wool. Natural latex, perforated. Coconut coir. Spunbond. Spring block "Pocket Spring". Euroframe Spunbond. Coconut coir. Natural latex, perforated. Cotton. The cover is a deep stitched jacquard with antibacterial impregnation. |
Its price is about $250, which is quite consistent with the price-quality ratio. I wrote about why you shouldn’t save on a mattress in the article “Crib with drawers.” Advice. If you want to save money, it is better to use a frame than a mattress. A good mattress is your health! For decorative finishing we will also need a furniture MDF profile with the length:
- 1960 mm and 975 mm – horizontal,
- 590 mm – 2 pcs. – vertical.
But this is optional. You can not use the profile, but simply trim the ends of the laminated chipboard with a regular paper edge - it’s cheaper.
- Glue “Liquid nails” for gluing the profile – 1 pc.
- Furniture screw (M6×60 mm) – 14 pcs.
- Nut (M6) – 14 pcs.
- Washer (inner ø6.6 mm and outer ø16 mm) – 14 pcs.
- Supports (legs) adjustable height 100 mm – 2 pcs.
- Furniture support-nail ø14 mm H = 5 mm – 11 pcs.
- Confirmat – 54 pcs.
- Wood screw (4×25 mm) – 8 pcs. for attaching supports.
Step-by-step instruction
The work was divided into several stages:
- preparation and assembly of MDF parts,
- installation of an inset frame under the mattress,
- production of lifting mechanisms,
- Assembling a bed frame with a lifting mechanism with your own hands.
Preparation and assembly of MDF parts
- On a piece of paper I drew drawings of a bed with a lifting mechanism.
- On a sheet of MDF with a pencil, using a tape measure and a metal ruler, I marked the future parts of the body.
- The MDF sheet was cut into pieces convenient for cutting.
- On the workbench I secured parts of the MDF sheet with clamps.
- I used a jigsaw to cut out elements for assembling a bed frame 1600 x 2000 with a lifting mechanism.
- The ends of all parts were wiped with a damp cloth.
- Pressing the edge tape with an iron, I ironed all the ends except those facing the floor.
- I set up a headboard (1664 × 772 mm), two side drawers (2054 × 296 mm), a back wall (1664 × 296 mm) and a cross board (150 × 1608 × 20 mm).
- On the outside of the corner joints I drilled 2 holes for confirmations.
- Installed the fastener using a Phillips screwdriver.
- The heads of the confirmations were covered with plastic plugs using PVA glue.
- Inside the 4 corners, I installed plastic corners with a screwdriver.
- To ensure additional rigidity of the frame, I installed a transverse board, connecting it to the sidewalls with metal corners on screws.
- The fiberboard sheet was cut with a jigsaw to dimensions of 2054 × 1664 mm.
- The assembled frame was placed on its side. I secured the fiberboard bottom sheet with screws around the entire perimeter of the bed.
- I drilled holes in the bottom corners of the frame and in the middle of the frame. I inserted legs into them. Plastic supports ensure easy movement of furniture on the floor. When cleaning a room wet, the legs prevent the MDF from coming into contact with the wet floor.
Installation of an inset frame under a mattress
I bought the insert frame disassembled, which is convenient for transporting it in transport. Following the instructions, I assembled the retractable base without much difficulty. To do this you needed a wrench and a screwdriver.
Manufacturing of lifting mechanisms
Not everyone can make lifting mechanisms themselves. They can be purchased assembled at a construction supermarket. I decided to make the lifts myself. I made the lifts according to the drawing.
For the manufacture of mechanism components it was required:
- corner 32 × 32 mm, length 700 mm – 2 pcs.;
- steel strip 50 x 640 x 3 mm – 2 pcs.;
- ties 150 mm long – 2 pcs.;
- ties 430 mm long;
- articulated bushings – 8 pcs.;
- gas shock absorbers – 2 pcs.
The only difficulty was the formation of vertical deflections in the steel strips for the hinged fastening of the lower ends of the arms. I had them made at a metal shop using a small press.
Assembling a bed with a lifting mechanism with your own hands
The most difficult operation remained - assembling the bed frame and lifting mechanism into a single structure. For the final assembly, I asked two of my friends to help. The work was completed according to the items in the following list.
- With the help of two assistants who held the inset frame, I bolted the upper parts of the lifts to the frame.
- On the outside of the sidewalls, the bolt heads were covered with plastic plugs matching the color of MDF.
- I finally checked the reliability and correct fastening of the entire movable structure of the bed.
So, let's start remaking the bed.
✓We are dismantling the old bed. ✓We sort out what can be reused. ✓We make a frame for a mattress measuring 1920×920 mm, i.e. 20 mm larger than the overall dimensions of the mattress itself (1900×900 mm). Advice. When making a frame, we do not save on the number of stiffening ribs (lintels).
The bigger, the better. A clear example of inappropriate savings is the frame of an old bed. There was only one jumper, which led to the breakage of the chipboard backing under the mattress. A small note. Of course, the best frame is metal, then comes wood and finally chipboard. In my case, I could make a metal frame with lamellas, but special rigidity was required, which the lamellas could not provide. Well, a wooden frame was also not suitable, for a simple reason - the lack of high-quality hardwood timber in our region. ✓We expand the thickness of the frame parts around the perimeter using chipboard strips
The bed creaks - what to do and how to fix it
Many owners of beds made of chipboard or wood soon encounter a creaking noise that prevents even the neighbors below from sleeping peacefully. What does it say about a romantic relationship if the bed creaks from a slight rocking. But there is no need to take drastic measures and take the bed to a landfill; perhaps it can be repaired. In this article we will take a closer look and find out why the bed creaks and what to do to prevent it from creaking.
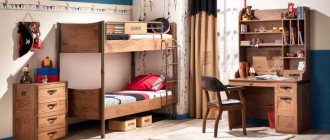
Disassemble the playpen bed
The simplest design, which should not be difficult to disassemble, is considered to be a playpen bed. This model is widely used when a child reaches six months of age. By this time, babies begin to sit up and become more actively interested in the surrounding space, and a playpen is the best option. Typically, assembling and disassembling the structure takes a little time. If you have a wrench and furniture wrench of the required diameter, then unscrewing all the joints is not difficult. The main thing is to remember, and to be sure, you can sketch or photograph what was installed and where. Some modifications will require the purchase and use of specialized tools.
Causes of squeaking at the bed
There is a wooden bed in the room and you don’t know what to do. Don’t despair, you don’t need to be a furniture maker to repair it, even any woman who can tell a bolt from a screw can handle it, but if you get confused, it doesn’t matter, the picture will help you. So what to do if it sticks and how to recognize where the sound is coming from.
Creaks in a wooden bed can be in different places; several different approaches will need to be taken to determine it. But let's first look at where creaking can be found:
- Connection of corner parts;
- Where the legs touch the bed frame;
- Wooden slatted base;
- From the contact of the mattress to the frame;
- The spring mattress creaks;
- Feet on uneven floor.
Let's look at how the creaking at the bed occurs. Many people probably know from their school physics curriculum that friction not only causes heat, but also generates sounds. Wooden furniture tends to shrink, thereby creating a gap between the parts that rub against each other, creating this unpleasant squeak. And if the furniture has a long service life, then it seems as if a whole creaky orchestra is playing. Therefore, when examining, you need to listen to each detail separately. The photo shows in red where you need to look for problem areas.
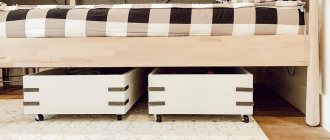
Troubleshooting spring mattress problems
The mattress is an essential part of the bed design that provides comfort. This item requires proper care. It is better to change it every 5 years, but if this is not possible, then it is recommended to correct the shortcomings that appear yourself. Standard beds use a spring mattress that deforms over time.
Instructions for making a bed with your own hands from different materials
For repair work you will need the following materials and tools:
- nails with a hammer;
- slats;
- upholstery fabric;
- furniture stapler;
- foam;
- spare springs.
Repairing a spring mattress involves the following steps:
- Preparation of the workplace. The product must be placed so that it can be approached from all sides. It is better to place it on stools placed in the corners. The base is freed from fasteners and paper clips.
- Replacement of internal parts. The fabric that insulates the springs is cleaned of dust. The old element binding is removed.
- Elimination of defects on the base of the mattress. The torn parts are sewn back into place.
- Restoration of springs. Each element must stand strictly vertically and rise 10 cm above the frame level. To fasten the parts, slats and belts are used.
- Strapping. This process requires a responsible approach. It is necessary to hammer nails along the edges of the frame. A thin rope is used to tie the top of the springs. First, the rows are processed across, and then along. Do not pull the string too tightly so that the springs maintain a vertical position and do not touch each other. Additionally, the strapping is done diagonally, after which the nails are bent.
- Finishing. A lining is placed on the resulting mesh, which is fixed to the frame with slats.
Lastly, the mattress is covered with facing fabric. Immediately after the restoration work is completed, the furniture is ready for use. Repairing a bed with your own hands is a completely feasible task. You need to collect the necessary tools and materials, and also determine the cause of the breakdown. If you cannot restore the product, then it is better to purchase a new model.
Prepare the workplace, lay the mattress and free it from fasteners and staples
Remove the old binding of the elements and clean the dust from the fabric
Eliminate defects on the mattress base
Install new springs or restore old ones, make binding
Place the lining and secure it with slats on the frame
Place the restored mattress on the bed
Determining the source of the squeak on the bed
Of course, it will be better to work in pairs, since it will be inconvenient for one person to “wobble” the bed and listen to sounds. To calculate the seats, you need to lie on the bed and turn over, simulating a standard night's rest. At this time, your partner should listen to where the creaking is coming from. It often happens that the source is in the joint of the corner frame or in the places where the legs come into contact with the base of the bed - how to get rid of a squeaking bed.
To fix the squeaking of the bed, we will need open-end or adjustable wrenches if the connection is bolted, or a screwdriver if there is a screw connection. Try to tighten all the connections, but not too much, so as not to crush the wood. If the bed continues to squeak, then you should look for other sources.
It happens that the mattress rubs against the bed - try to level it so that it does not come into contact with the walls of the frame. If the problem is not corrected, you need to move on to an orthopedic foundation. Remove the mattress from the bed to the floor and check it at the same time; sometimes the springs creak.
Lie down on the slatted base and fidget a little; the slats can creak from the pressure on them as your body moves. The bed creaks, what should you do? You can fix the creaking with WD-40. To do this, you need to carefully spray all the connecting places of the bed before tightening the bolts and nuts.
How to eliminate a squeaking mattress
Not only the wooden elements of the bed can creak, but also the mattress, spring or with polymer filling. Sometimes squeaking is caused by an incorrect position of the mattress, in which case it needs to be leveled on the base.
The mattress should lie on the base without distortion
Cheap models of mattresses with dependent springs - Bonnell blocks - squeak due to friction between the springs. The creaking of such a mattress will sooner or later arise and can only be eliminated by replacing the mattress.
Mattress with Bonnell spring system
More reliable and expensive models of spring mattresses are equipped with independent blocks. In them, each spring block is placed in a waterproof case, which plays two roles at the same time: it eliminates friction of the blocks against each other and does not allow moisture and sweat to destroy the steel of the spring, weakening it.
Mattress with independent blocks
Advice! If a mattress with independent blocks begins to squeak, it needs to be turned over - this will help reduce the load on the worn blocks and temporarily eliminate the squeak.
The mattress needs to be turned over from time to time
Springless mattresses filled with polyurethane foam can also make sounds similar to squeaking. This occurs if the seal of individual bubbles of the foamed polymer is broken and air flows from one to another when a load occurs.
Springless mattress with PPU block
The appearance of extraneous sounds in a PU foam mattress indicates that the polymer has lost its properties and it’s time to think about replacing the mattress.
Prices for different types of mattresses
Mattress
Preparation
If the above methods do not give a positive result, then you will have to move on to more serious work - dismantling the creaking bed. To do this, we may need a tool and auxiliary material to lubricate the rubbing particles:
A set of screwdrivers or wrenches, it depends on the fastener itself;
- Metal corners and screws (wooden reinforcing elements can also be used);
- Paraffin or candle;
- Ski lubricant;
- Graphite grease;
- Litol;
- Laundry soap;
- WD-40;
- Silicone spray;
- Rubber based adhesive.
We prepare all the tools and auxiliary equipment so as not to be distracted in the future.
How to fix a creaking bed frame
A wooden bed frame usually begins to creak after several years of use. In the dry air of an apartment, wooden elements dry out, their sizes decrease and micro-gaps form at the joints. When loaded, the wooden parts rub against each other, and the contacting surfaces gradually wear away, which further increases the gap. The creaking intensifies.
Advice! If your new bed squeaks, contact the manufacturer. Perhaps this is a manufacturing defect and it is better to replace it under warranty.
The easiest way to eliminate frame squeaking is to tighten fasteners: bolts, screws or self-tapping screws . This technique will give a temporary effect, the creaking will decrease or even stop completely, but with a high probability the fasteners will weaken again, and the wear of the wood will increase. Therefore, when a squeak appears, it is better to immediately resort to fully strengthening the frame.
Tighten fasteners
For small gaps, the use of lubricants . Anti-friction lubricants reduce friction and eliminate squeaking of wooden parts, and also reduce their wear. Lubricants are applied to all rubbing areas of the frame. The types of suitable lubricants and methods of their application are indicated in the table.
Use lubricant
Table. Anti-friction lubricants for wooden parts.
| Name, photo | Short description |
| WD-40 lubricant | Released in aerosol form. Metal fasteners are treated with WD-40 lubricant when assembling the bed to avoid squeaking when rubbing with wood. |
| Graphite grease | Gray paste, used for metal frame elements and fasteners. Eliminates squeaking, friction and prevents wear. |
| Silicone Grease | Available in the form of a spray, gel or paste. Waterproof, has good adhesion to any substrate. The lubricant is applied in an even layer to the rubbing surfaces. |
| Paraffin | You can take a regular paraffin candle. Rub the rubbing parts with it until an even sliding layer appears. From time to time the lubricant needs to be updated. |
| Soap | Wooden parts are rubbed with a bar of soap, just like with paraffin. Improves glide and eliminates squeaking. It is not water resistant and may impart an odd odor. |
Advice! Do not use grease and similar fatty lubricants. They will eliminate the squeak, but may leave stains on the mattress and linen.
If the gaps are more than 0.5-1 mm, use sealing gaskets . The pads are cut out of foamed polyethylene, rubber or felt of suitable thickness and placed between the rubbing elements of the bed. On vertical surfaces you can additionally secure them with glue.
Install felt pads
If the bed frame is not strong enough and sways even with a small load, you can use additional fasteners . The frame is reinforced from the inside using furniture corners and self-tapping screws. This method allows you to increase the rigidity of the structure, thereby reducing the mobility of individual parts and reducing their friction against each other. The connections remain collapsible, which allows you to disassemble the bed in the future during repairs or moving.
Install additional fasteners
Advice! Before installing additional fasteners, check the equality of the frame diagonals using a tape measure. If necessary, level it. Otherwise, the frame and mattress may lie crookedly, which will also cause squeaking.
In particularly difficult cases, they use glue to install the frame . Wood glue or PVA is suitable for gluing wooden parts. The frame is completely disassembled, dust is removed from all surfaces, the glued surfaces are degreased with alcohol or gasoline. Apply glue to the joints of the parts, as well as into the holes for fasteners and dowels, and assemble the frame. You can use the bed only after the glue has completely dried.
Assemble the frame with glue
Advice! Remove excess glue in a timely manner, before it dries, otherwise stains may remain on the assembled frame, which will ruin its appearance!
If the bed lift mechanism creaks, you should first check the tightness of all fasteners. If they become loose, remove the mechanism, apply WD-40 lubricant to the mounting holes and hardware, and then attach the mechanism back. If the mechanism itself creaks, it will have to be replaced to eliminate the creaking.
Bed lift mechanism
Advice! It is better to use lifting mechanisms on gas elevators; they are more reliable and less subject to wear, so they creak less often.
Dismantling the bed
To carefully disassemble the bed, you must first understand what fasteners are used on the joints. There are several types of fasteners:
- Bed tie - slats with hooks, in this case you just need to disassemble the bed like a construction set. It is important to remember that they are divided into left and right bars.
- Screw tie – consists of a barrel and a screw. This type of fastening is used for end connections. Unscrews using a hexagon.
- Canonical screed - used to connect chipboards with a thickness of 25 mm, 38 mm. It is unscrewed with a figured screwdriver.
- Euroscrew – this tie belongs to the economy class; a Euroscrew is screwed into a pre-prepared hole. Fastens thanks to a thread in the form of a screw.
- Dowel connection - this type of fastener does not require ties with bolts or screws. Dowels are glued into the drilled holes. After that, glue is applied to the end and the two parts of the chipboard are connected. If such a structure is wobbly, then you can open it with something thin, for example, a flat-head screwdriver. But this must be done evenly so that the gap is the same along the entire length of the sheet.
Disassembly begins with removing the slats and mechanisms (if the bed has a lifting mechanism). Next, the large headboard, which is located at the head of the bed, is unscrewed. After this, you can remove the small one, which is located in the legs.
All fasteners need to be unscrewed and looked at their condition, carefully inspect the threads and holes.
Replace the screw with a bad thread. And broken holes are repaired using glue and a dowel or a wooden chopper (chuck), which you can plan out yourself with a knife. The tree must be hardwood. A dowel soaked in glue is inserted into the broken hole. When the glue dries, the protruding part of the chop needs to be cut off. Then drill a hole in the same place.
How to make a hole - you need to drill a new hole in the center where the screw will go. The diameter of the hole must match the diameter of the screw.
There is an even simpler option; to do this, you just need to wrap electrical tape or tape around the part of the screw where there is no thread. Now you need to try how the screw fits into the hole. If there is no play (does not wobble), then this work is done and the screw will fit like new. Once everything is repaired, you can move on to another task.
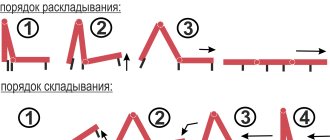
Disassemble the transformable bed
Modern manufacturers of children's furniture amaze with a huge variety of different modifications. Of course, one of the most multifunctional is the transformable bed. Usually it consists of several parts connected to each other. Assembling such a structure is a job for experienced professionals. Dismantling can be done independently:
• how to disassemble a bed consisting of a cabinet, a pendulum and a base, with drawers for linen located in it? Partial dismantling is possible. This option will be required when it is necessary to install the cabinet at the head of the bed and remove the base. Using a set of keys, completing the procedure is not difficult; • transformer options, when the models “hide” inside each other, are more difficult to disassemble. Without the appropriate experience and knowledge, it is better not to do the work on your own. The help of an experienced furniture maker will come in handy; • if the assembly instructions have not been preserved, then do not despair. You can search for a scanned document on websites on the Internet, contact the furniture manufacturer (every self-respecting company has a resource on the World Wide Web).
If you decide to carry out the work yourself, then the bed should be disassembled in a horizontal position, in a certain sequence, using specific tools. If you have instructions, this is easy to do; just follow all the assembly steps in reverse order.
Treatment of rubbing parts of the bed
When all parts have been removed and inspected, bad screws have been replaced, you can begin processing rubbing parts. To do this, you can take any lubricant and lubricate all the parts with it. This must be done carefully so as not to stain the front part of the furniture. Of course, liquid and thick impregnations will wear off after some time, and the squeak will appear again, but they will still serve for several years.
And if you use silicone compounds, this sound will disappear for a long time. You can use paraffin, all parts are rubbed, after which everything is put back in place.
There is a more reliable processing method, but it is only considered if you do not intend to disassemble the bed in the distant future. To do this, you will need rubber glue, which will create a reliable flexible gasket and at the same time glue all the processed elements together. The operating principle is as follows:
- All disassembled parts and joints of the frame are degreased with an evaporating substance, for example, alcohol.
- When the alcohol dries, you need to apply rubber glue to all prepared parts of the bed.
- The frame is immediately assembled, the legs and all other parts are screwed on.
- It is necessary to allow the structure to dry, after which it can be safely used.
But do not forget that such a variation does not imply a secondary disassembly of the bed. There is another option, gaskets - balsa wood. The cork spacer is cut to size and placed between the boards or parts during assembly. To strengthen the structure, it is recommended to install additional corner fasteners made of metal or wood.