Plasterboard shelves in the bathroom: advantages of use
Why is drywall used as the main material? The answer to the question is quite simple, and lies in availability, cheapness and ease of use. Let's consider all the advantages in detail.
Drywall is a universal, plastic material that allows you to create structures of a wide variety of shapes.
Plasterboard sheets intended for bathrooms are treated with a special solution that prevents the formation of mold, which is advisable, since this is where excess moisture and vapor formation are present.
Shelves made of plasterboard have the following advantages:
- You can specify any shapes and sizes that suit the interior of a particular bathroom, and not the standard models that are available in every furniture store.
- Thanks to the finishing materials that will be used for cladding, the shelves may have a non-standard appearance.
- Drywall is a durable material, and shelves designed from it are durable structures that can support a lot of weight.
- Due to the fact that the cost of plasterboard sheets is low, shelves made from it will have a low cost.
- Drywall does not contain harmful substances. This is a safe material that does not cause allergic reactions.
- Plasterboard sheets are easy to use, so there are no problems when designing and installing shelves.
First of all, you should make a frame that is attached to the wall. If lighting was planned during the design, it must be installed inside the structure. Then the frame is sheathed with sheets of plasterboard, while the corners are closed with perforated corners. The outer part of the shelf is puttied and lined with finishing material. The advantage of such a DIY shelf is that it can be installed not only in the bathroom, but also in any other room.
Mortgages
This method is considered the most suitable in terms of fixing plumbing fixtures to plasterboard partitions. The mortgage is a power traverse, which can be made of metal or wood. The crossbar is fixed to the wall, and the sink is hung on it. The point is wide fastenings that evenly distribute the load over a large area.
You can hang the sink on a plasterboard partition. However, it is important to understand that it is strictly forbidden to skimp on fasteners; take care in advance of installing reinforced sheets and additional guides for the frame. If possible, it is recommended to lay a power crossbar under the flooring and remove the fastenings from it to the outside.
A niche in the bathroom made of plasterboard is a convenient decorative element
Niches have been used since ancient times. This is a convenient structural element, which is an opening in the wall and serves as a place to store things. A niche allows you to relieve free space, make it more functional and convenient. In addition to its main purpose, a niche can serve as a place to place spotlights, making the interior more romantic and mysterious.
A niche allows you to hide communications elements that make the appearance of the bathroom less presentable. For example, water or sewer pipes can be hidden behind a wall.
To avoid that the usable space is not wasted, you should build a niche that can be used as a place to store household chemicals or hygiene items. If you do not want the niche to stand out from the overall stylistic design of the bathroom, it should be lined with materials that were used to decorate the walls. If you plan to highlight a niche, then bright colors and textured materials will be excellent assistants in this matter.
Before you start creating a niche in the wall, you need to pay great attention to its appearance, size and configuration.
Niches are:
- Round;
- Oval;
- Square;
- Rectangular;
- Trapezoidal.
If the width of the wall allows, it is better to organize 2-3 small ones rather than create one wide one. The free space in the niche can be filled with shelves made of glass or mirror. This way you can give the room a spectacular appearance.
When you plan to place a niche near a water source, then it needs to be designed at a slight slope. Splashes of water entering the recess will drain freely, which will prevent the occurrence of mold and unpleasant odors.
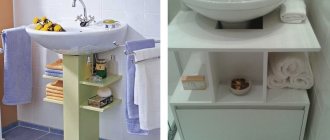
A plasterboard sink cabinet is a practical solution for any bathroom
A cabinet under the sink will not only make the most of the usable space, but will add charm to the room. Anyone can make a cabinet with their own hands; you don’t need to be a highly skilled craftsman to do this. If you put in a little effort, the work will go smoothly and won’t take much time.
If you want the cabinet to last for many years, you should take care of the plasterboard facing.
It is best to use tiles or mosaics as finishing materials. They look very harmonious in the bathroom.
Types of sink cabinets:
- Hanging. It will fit perfectly into the interior of a small bathroom. In addition, cleaning floor coverings will not bring much difficulty. However, the hanging model of the cabinet has one drawback: it does not hide the pipes.
- Floor-standing. Such a cabinet will easily accommodate plumbing communications. Of the minuses, it is worth noting that floor-standing models are only relevant in spacious rooms. In small bathrooms, they will look overly bulky and bulky.
- Corner. These models fit perfectly into small bathrooms. They are ideal for Khrushchev or small-family apartments. A corner cabinet will not only allow you to hide elements of drainage communications, but also create a place under the sink for storing household chemicals, which will significantly save space.
When choosing the type of cabinet, you need to clearly understand that not only the aesthetic appearance of the room, but also its functionality depends on your decision.
Facing
Regardless of whether we are talking about a TV stand or an aquarium, any design requires a final stage, such as cladding. Drywall is a fairly malleable material. Therefore, it can be dressed brightly and unexpectedly. For plasterboard cabinets the following are most often used:
- wood paint, it creates the feeling of a product made from natural material;
- they also often paint the surface of a plasterboard cabinet with bright, rich colors that blend advantageously into the interior;
- you can find plasterboard tables that are varnished, without additional decorative elements.
Some owners of houses or apartments create real masterpieces by decorating their cabinets with various patterns, stickers and other decorative elements. It is important to put your soul into the space of your own nest. Creating interior items with your own hands is an excellent opportunity to implement such a mission.
A few tips on how to make a countertop in a bathroom under a plasterboard sink with your own hands
You need to decide on the height and diameter of the tabletop. The best option is to draw a drawing that will help determine the required amount of materials. To create a drawing you do not need to have specific knowledge or be an artist. The main thing is to decide on the chosen model, take all the necessary measurements and put them on paper.
You should be careful when choosing a sink. The more intricate the configuration you choose, the more difficult it will be to make the tabletop.
It's time to move on to assembling the structure:
- The frame is mounted using metal profiles;
- Fastening is done using self-tapping screws;
- The resulting form is covered with plasterboard.
Drawing with dimensions
Before you start making the cabinet, you will need to decide on its location. The dimensions of the furniture will directly depend on this.
Advice : experts recommend purchasing a sink before starting all work.
When calculating the size of the cabinet, the following measures are taken::
- the free space near the washbasin is measured;
- the sink is measured;
- the height of the sink is measured;
- measurements of communications are made (here it is important to pay attention to the length of the section with pipes, the diameter of the pipes and the dimensions of their exit from the walls).
After all these activities, you can begin to create a diagram of the future piece of furniture. Standard sizes:
- height – 820 mm;
- depth – 430 mm;
- width – 580 mm.
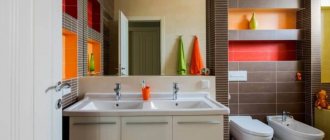
Drywall countertop - a new look for your bathroom
Nowadays, special attention is paid to bathroom design. In recent years, experts have created a huge number of design options in the most unusual styles. If earlier we looked at the bathroom exclusively from a practical point of view - we could wash and bathe in it, now everything has changed. Everyone wants this room to be truly cozy and beautiful.
Plasterboard table top
If you are planning to give your bathroom an unusual look and at the same time spend a minimum of financial resources, we recommend making your own functional and visually attractive countertop under the sink from plasterboard sheets. Such work will take you a little time, and even a very picky person will like the result.
To make a countertop under the sink with your own hands from the specified material, you will need to stock up on facing mosaics or ceramic tiles, an electric jigsaw, plywood sheets and plasterboard itself (regular, or even better, moisture-resistant), metal profiles for mounting the skeleton of the structure, epoxy glue, putty. All these devices and materials can be easily purchased at a construction showroom.
The countertop for the bathroom sink is made according to a pre-created design. Measure all the necessary dimensions, choose the optimal shape of the structure you plan to make, calculate the amount of materials required, and then start working on creating an elegant structure with your own hands.
Self-made countertop technology
The main stages of constructing a countertop with your own hands: thinking through and developing a plan (sketch), making markings at the work site, constructing a frame and covering it, decorative finishing. Let's look in more detail at how to assemble a bathroom countertop with your own hands from plasterboard and then finish it with mosaics.
Necessary tool
To perform the work you will need the following tool:
- Hammer or impact drill.
- Screwdriver.
- An electric jigsaw or a hand saw with fine teeth, a sharp knife for cutting plasterboard.
- Hacksaw or metal scissors for cutting profiles.
- Construction level, square.
- Marker and construction pencil for marking.
- Spatulas, fine sandpaper.
Marking
The first step is to transfer the drawing to the walls (marking). To do this, you will need the drawing itself with the indicated dimensions in millimeters, a tape measure, a pencil or marker, and a building level.
The drawing from paper must be transferred to the walls and floor.
Note! Since the sketch indicates the dimensions of the finished tabletop, when applying markings, the thickness of the sheathing (plasterboard sheets) and cladding (mosaics) is subtracted from the indicated values.
When transferring markings, the thickness of the cladding and finishing material is taken into account.
Frame assembly
Profiles are cut according to the markings made, taking into account the thickness of the plasterboard and finishing.
The guide profile is cut according to the markings.
Advice! When cutting profiles, it is better to sign them with a marker so that during installation you do not have to look for where each one goes.
Next, the frame is assembled. This is done in the following sequence:
- In all guide profiles, holes are drilled with a metal drill every 30–40 cm, but at least 2 in one profile, with a diameter of 6 mm.
In each profile you need to drill holes for fastening with self-tapping screws. - Then the profiles are applied to their places, and fastening points are marked on the walls.
Points for making fastenings. - Then holes with a diameter of 6 mm are drilled at the marked points in the wall to install dowels. If the wall is tiled, before drilling into the concrete with a drill, the tiles are drilled through the tiles with a pen.
Preparing holes for dowels. - The profiles are fastened to the wall and floor using dowel-nails: first, a plastic chop is inserted into the holes through the profile, into which a metal nail with a thread is then driven with a hammer. Before finally hammering in the nail, the profile is checked with a level so that there are no deviations in the vertical and horizontal plane.
Fastening profiles using dowel nails. - When the guide profiles are secured, proceed to further design of the frame. It is recommended to make vertical posts and reinforcing horizontal lintels from a double profile: this way the structure will be more rigid and durable and will be able to withstand the weight of a sink of any size. A double profile is made from two single profiles, which are inserted into each other and connected at the ends with screws - small self-tapping screws.
Connection of two profiles to strengthen the structure. - To attach the cross member to the protruding post, a bracket cut from the profile is used.
Bracket for fastening the front cross member of the frame.
Advice! When screwing the screws into the end at the edges, the profiles must be held with pliers so that the lower end does not bend, but is drilled and tightened with the self-tapping screw.
The final stage of frame assembly is the installation of the upper support jumpers. They are installed at such a distance from each other that the edges of the washbasin must rest on these jumpers. When making lintels, the ends of the profiles are trimmed slightly to create ears for fastening with self-tapping screws on top and bottom of the structure.
Installation of upper lintels for installing a sink on them
Frame covering
When the frame is completely assembled, they begin to cover it with plasterboard. This is done in the following order:
- According to the dimensions of the frame, two blanks are cut out of a sheet of plasterboard: one will be attached to the top, and the second to the bottom of the frame.
- On the top sheet, using a template, the location of the sink is marked: the template is placed in the right place and outlined with a marker or pencil.
Marking the location of the washbasin bowl. - The marked workpiece is placed on the frame and screwed with self-tapping screws. The second blank (without markings) is mounted at the bottom of the frame. Fixation with self-tapping screws is carried out every 15–20 cm.
The marked blank is installed on top and fixed with self-tapping screws around the perimeter, and the unmarked blank is installed at the bottom of the frame frame. - Now a hole is cut for the sink. To do this, use a jigsaw or a hand saw. Two sheets are cut at once.
The cut begins with a hole drilled slightly to the side.
Advice! To start cutting, drill a hole in the sheet (slightly away from the cutting line), and then go to the marked line and continue cutting along the markings.
- The ends of the plasterboard sheets forming the countertop are first treated with tile adhesive on white cement. When the glue has set a little, the end is covered with a strip cut from plasterboard. The plank is attached using tile adhesive and additionally secured with self-tapping screws. This makes the end of the tabletop more rigid, durable and strong, resistant to mechanical loads.
Front end trim. - Then the side parts are sewn up. To do this, blanks are cut to size, which are then attached to the frame with self-tapping screws.
Covering the sides with plasterboard.
Note! A gap of 5 mm is left between the plasterboard and the floor. To do this, plastic pegs are installed under the bottom of the blanks.
The covering of the frame is completed by sewing up the “legs” of the table top. To do this, strips of drywall are cut out, coated with tile adhesive and secured with self-tapping screws.
Covering the legs of the tabletop with plasterboard.
The box for the table top is ready, you can start finishing!
Built-in washbasin - manufacturing diagram
Draw the outline of the sink on the future countertop and make a basic template based on it. Using this pattern, cut out one shape from plywood and another (similar) from plasterboard. The last one requires cutting out a section of the surface for the washbasin.
- Attach two metal brackets to the wall.
- Mount the plywood form prepared earlier to the installed fasteners.
- Attach a plasterboard product with a finished cutout for the sink to the plywood form.
- At the bottom of the structure, install a sheet of drywall of the required dimensions (there should be no cutouts in it).
Worktop with built-in washbasin
The next step is making the concave end. It is made with your own hands, again from plasterboard. Take a strip of this material and make small cuts along its entire length (the distance between them is approximately 1 cm). Now it will be easy for you to bend the plasterboard sheet.
The part made in this way should be attached to the inner end of the tabletop (use stainless steel screws or self-tapping screws). Be sure to treat the mounted element with moisture-proof putty. It is advisable to prime the end before applying it. A simple bathroom countertop is ready! You spent a minimum of effort and got a very convenient and functional design.
Tabletop-cabinet - let's complicate the task
If you want to have a multifunctional plasterboard cabinet with a built-in washbasin at your disposal, you should take care to create a reliable frame for such a design. It is made of metal profiles, providing the entire structure with high stability.
You need to buy lightweight metal profiles marked 27x27 (for installation around the perimeter of the future tabletop) and 67x27 (this product will be adjacent to the previous one). If desired, you can work with profiles that have other parameters. The cladding of the frame can also be made from simple wooden slats. But do not forget about the need to apply special compounds to their surface that protect the wood from moisture, steam and high temperature. The plasterboard frame must be adjacent to the walls of the bathroom. It is secured to the floor with dowel nails.
Tabletop cabinet made of plasterboard
The tabletop itself in this case can be made of MDF. You definitely need to decide in advance on the height of the structure. It must be such that it is convenient for you to use the sink.
In addition, you should consider what material you plan to use to decorate your homemade bathroom cabinet. In situations where the countertop is covered with ceramic tiles, you need to choose the optimal height of the structure so that there is no need to trim the tile products. This will greatly simplify doing the work yourself.
The installation diagram for a plasterboard cabinet with a countertop is as follows:
- Install the guide metal profile on the wall.
- You form the contours of the structure from metal products, and immediately prepare plasterboard sheets to fit the dimensions of the frame you have made.
- Cut out the shape for the washbasin (as described above).
- Place profiles (load-bearing) along the edges of the cutout under the sink. They are needed to provide fixation points for capital lower supports and high strength of the structure.
- Supports are mounted below, and they are connected to the drywall with self-tapping screws.
- Making the bottom trim. It is the bottom sheet of material that is first attached and secured to the metal frame.
- Attach guides to the lower metal profile and to the wall. To make a full-fledged support brace, you need to close the edges of the triangles. To do this, simply mount another guide.
- The two triangles that are obtained after all the steps described must be sheathed with gypsum fiber or plasterboard (moisture-resistant).
At the last stage of work, it is necessary to install several more metal profiles. They are placed with shelves down over the corners that secure the braces. Then screw on the top sheet of plasterboard, finish the ends of the cabinet, install the sink (be sure to secure it with sealant) and enjoy the design you made for your bathroom with your own hands. If desired, you can hang the doors on the installed structure. Make them from MDF sheets and mount them on the structure using small hinges.
We implement plans
Today dictates its own rules, and today the design of bathrooms is given special importance. After all, after the Soviet stagnation of design thought, bathrooms became a real treasure trove for the embodiment of various ideas, both in style and in design.
Now the bathroom is considered not only from a practical point of view, but also from an aesthetic one, so that both the owners and their guests can appreciate the comfort. Therefore, even the smallest element of the interior in the bathroom is important.
As for the countertop, it is much easier to make it at the stage of construction or renovation of an apartment - the design can be included in the design project in advance.
Advice! Before you begin assembling the structure, you must complete a drawing. With it, it will be much easier for you to carry out basic types of work and decide on the location of the countertop (shelf).
An example of a drawing of a future countertop
The procedure for making a table top from plasterboard
Like any other design, a plasterboard countertop for a bathroom has its own technological features.
List of materials and tools required for installation:
- metal profile for assembling the frame (the quantity depends on the complexity of your design);
- brackets;
- plasterboard sheets (moisture-resistant and regular);
- moisture-proof putty;
- several sheets of plywood;
- epoxy adhesive;
- jigsaw (jigsaw);
- epoxy-based protective solution;
- ceramic tiles or mosaic (for cladding).
Note! In small bathrooms it is unlikely that you will be able to leave the countertop as an independent piece of furniture, so you should immediately think about a built-in sink. Sinks built into the countertop can transform the entire room and emphasize its elegance and uniqueness.
Modern bathroom with plasterboard countertop
Related article: How and with what to close a balcony
Now let's take a closer look at the tabletop manufacturing process:
- To begin with, you should measure your workspace and decide on the size of the table top . It is important to determine the most accurate dimensions of the countertop in order to know whether a built-in sink or something else will fit into it. By the way, many people prefer to use a countertop to hide the washing machine. After taking all the necessary measurements, we begin assembling the frame from a metal profile for plasterboard. This frame can be made from wooden slats, but immediately a problem arises in treating them with moisture-proofing compounds and other chemicals. The main thing is that the frame does not wobble and serves as a solid base for the drywall.
- In order for the plasterboard bathroom countertop to fit perfectly in size, before installing it, you must immediately outline the outline of the future sink and cut it out using a jigsaw . Now we apply a pattern (pre-made as a template) and cut out two shapes: one from plasterboard, the second from plywood. Then we make a cutout on the plasterboard form for the new sink.
Sink cutout
- Next, we attach two brackets to the wall as firmly as possible . We attach a form made of plywood to them, then a form made of plasterboard, with a cutout for the sink. The remaining plasterboard form, which we left intact, should be attached to the bottom of the structure.
- After you have securely fastened the two forms, you need to start making the concave end . It is quite simple to make from a strip of ordinary drywall. In order for the sheet to bend, it is necessary to make cuts on it every centimeter along the entire length. The resulting end must be firmly screwed to the inner end of the tabletop. As a further treatment, the end should be coated with a primer and a layer of moisture-proof putty.
- This completes the installation work. Now you should cover the finished tabletop with a special liquid waterproofing mixture (it is necessary to coat the finished surface in two layers). This way we can more reliably protect the countertop from moisture and make it durable. After the finished surface has dried, you can begin exterior finishing. For example, lay out a beautiful decorative layer of mosaic.
Related article: How to properly cover a sofa with your own hands?
Beautiful countertop finished with mosaic tiles
Types of profiles - making an eternal frame
Profile for drywall
In order for the frame under the tabletop with cabinet to last for many years, it is necessary to competently approach the selection and installation of profiles.
For example, there is a profile for plasterboard 27×27, which is mounted around the perimeter of the structure, and a profile measuring 67×27 fits perfectly into the above. The entire structure made from a plasterboard profile is fastened and tightened together with self-tapping screws.
It turns out that with proper use of even such seemingly unstable materials, it is possible to build a fairly strong and durable structure. Despite the fact that the profile is made of metal, special screws easily penetrate the surface and securely fasten the parts.
Pay attention to the fact that the U-shaped profile is very light. When installing a frame under drywall, you don’t have to worry about the cladding of the walls and ceiling - even if you touch it, the lightweight profile will not be able to cause any serious damage.
Installation of walls and further cladding
Worktop with cabinets and a niche for a washing machine
If you decide to make not just a shelf-tabletop, but an entire cabinet, then the walls of the structure can be made according to the same principle as the tabletop itself. The wall frame is attached both to the wall and to the existing corners of the tabletop, and is also attached to the floor with dowels and nails.
The doors can be made from MDF boards and hung from the walls of the structure on convenient hinges.
Now we move on to tiling the cabinet itself (in our case, with mosaic tiles):
- Initially, we treat the outer surface of the walls of the countertop and doors with a special moisture-resistant glue.
- Then we glue and press the mosaic tiles to the surface of the countertop and other surfaces for which cladding is planned. If the mosaic has a paper protective layer, it should first be soaked and removed.
- In order to veil unsightly joints in the corners, you will need a special rubber squeegee tool and moisture-resistant grout that prevents moisture from entering the structure of your structure.
- If you have not already attached the countertop to the main structure, you should secure it and insert the new sink into the pre-prepared slot.
- We fix the sink. For this task, you will need a sealant, which should be poured into the gap between the sink and the countertop. After hardening, the glue will securely fix the sink.
- If you are a fan of new designs, then you can place a mirror in the niche of the resulting cabinet - this will visually increase the space in the bathroom.
Recommendation! Pay attention to ready-made acrylic countertops, which you can simply buy in the store. They have only one drawback - when you buy a countertop, the price of your entire project will increase significantly.
The countertop can be covered not only with mosaics and ceramic tiles. For example, if the external decoration of your bathroom is made of PVC panels, then facing the countertops and cabinets from PVC panels will come in handy.
Related article: Tips for housewives: decorating a doorway with curtains
The plasterboard tabletop serves as a niche for a washing machine and sink, as well as a functional shelf for bathroom accessories.
The most important thing is that the resulting design is moisture-resistant and practical (a symmetrical appearance and the presence of shelves are the secret of success). After finishing work on the countertops and cabinets, you can choose several beautiful and useful bathroom accessories that will complement the overall design.
Laconic countertop for sinks, facing – blue mosaic
Finishing with mosaic tiles - brief instructions
The lining of a do-it-yourself bathroom cabinet is made with different materials. Most often, mosaic tiles are used for these purposes.
Mosaic countertop
The finishing work scheme is as follows:
- Coat the doors of the building and the countertop itself from the inside with moisture-resistant special adhesive for tiles.
- Remove the protective paper layer from the mosaic products (it should be soaked briefly in plain water) and press them against the parts of the cabinet to be treated.
- The joints between the tiles are rubbed with a special compound intended for these purposes, using a squeegee - a special rubber device.
Instead of mosaic tiles, you can use plastic panels that are not afraid of moisture, ceramic tile products, and any other material you like to decorate the countertop. Only one thing is important. The cladding products used must be practical and not destroyed upon contact with water.
What kind of furniture can be made from HA?
A plasterboard board is a kind of “sandwich”, the layers of which are gypsum with additives (core) and thick cardboard (core frame). In this case, the cardboard takes on the role of a kind of frame for the internal contents with a looser structure. The layers have reliable adhesion to each other, which is very difficult to damage when simply moving the sheet and even when installing it without special application of physical force.
Furniture made from plasterboard is distinguished by such qualities as practicality, reliability, and durability. Arches, niches, shelves, tables, bar counters, cabinets and cupboards, and even an entire kitchen set - this is not a complete list of what can be constructed from plasterboard sheets. At the same time, no special skills are required to assemble any of the interior elements. But knowledge of working with drywall will come in handy.
The main thing is to have before your eyes a drawing with indicated dimensions, to be able to “hold in your hands” a hammer drill, metal scissors, and a screwdriver. Well, many people have been able to take measurements with a ruler and tape measure since school. Experienced craftsmen recommend starting to gain experience working with drywall, choosing not the most complex furniture elements. These include shelves, countertops, mini-cabinets. Below is a short guide to making a vanity cabinet.
Drywall doorways
Indoor buildings from gypsum plasterboard are made on a frame basis.
We recommend: How to make a plasterboard arch with your own hands: step-by-step instructions
To make an arch from gypsum board, you need:
- dismantle the door and prepare the base of the walls for installation (clean from dirt and dry);
- use self-tapping screws to secure the profile for gypsum boards in the upper part of the passage;
- According to the measurements taken, cut out two side panels from a sheet of plasterboard and secure them with self-tapping screws to the profiles, slightly recessing the self-tapping screw;
- to close the void between the side panels, bend a thin sheet of drywall and attach them to the profile of the desired shape with self-tapping screws;
- the connecting corners are covered with sickle tape, puttied and sanded (treat plasterboard protrusions and gypsum board joints with reinforcing material).
Scheme 4 - Two ways to bend drywall
Thanks to several bending methods, you can make gypsum plasterboard from a sheet:
- oval;
- wave;
- circle;
- sun with lighting for the living room;
- flower for the nursery;
- spiral ceiling for an office or conference room.
- columns and podium made of flexible gypsum board.
Photo 12 - The entrance to the bathtub is made in the form of an arch in the interior from Otkidach Vera
Photo 13 - Delicate interior of a children's room by Roman Spiridonov
Photo 14 - Original ceiling in the nursery from N-Kub
Drywall dressing room
Floors, i.e. The frame for this type of structure is best made of wood, and it is supplemented with metal guides.
The junctions between guides and other surfaces (floor, walls, ceiling) must be lined with reinforcing mesh. Reinforcement is needed to dampen wall and floor vibrations.
The rack-mount elements of the frame are mounted in a guide profile.
IMPORTANT! The larger the cabinet, the smaller the step should be between the profiles.
Photo 15 - You can’t do without a wardrobe in a children’s room either. Interior from SILK PLASTER
Photo 16 - Small but spacious wardrobe with mirrored facades from Amos Goldreich Architecture
The wardrobe can be sheathed in either one or two plasterboard sheets. After installation work is completed, the surface of the gypsum board can be painted in any color, covered with wallpaper or plastered.
It is not necessary to allocate a free corner in the room for a wardrobe. You can use the space under the stairs. This space will be enough, the dressing room will be compact, and the stairs will be covered with sheets of plasterboard.
Using the same scheme, the hallway can be divided into zones or finished with gypsum plasterboard, the living room and kitchen, bedroom and loggia can be connected (by organizing a new partition or finishing the bay in place of the demolished wall).
Scheme 5 - An example of organizing a plasterboard wardrobe in the attic
Photo 17 - Plasterboard wardrobe in a classic bedroom interior from PlatFORM Design Studio
False fireplace made of plasterboard
To imitate a fireplace at home, use a frame made of gypsum plasterboard, in which you can embed a false fireplace (luminous panel or wall picture).
You can find out more about installing a false fireplace in the article: Installing a plasterboard fireplace with your own hands
Photo 18 - A fireplace doesn’t have to be real to create a cozy atmosphere. Interior by Rikki Snyder
Photo 19 - Fireplace in the bedroom interior from INNA ZOL src=»https://etotdom.com/wp-content/uploads/2013/07/Foto-20-Kvartira-v-skandinavskom-stile-ot-Mebius-Group-700 ×500.jpg" class="aligncenter" width="700″ height="500″[/img] Photo 20 - Scandinavian-style apartment from Mebius Group
Furniture and decor ideas made from plasterboard
Furniture made from plasterboard is very practical, but surfaces subject to constant mechanical stress must be made of a different, more durable material. Those. It’s possible to make plasterboard cladding for an attic or a wall for a TV, but walls higher than 10 m and gypsum board shelves for the entire library collection are not.
Photo 21 - Picture gallery on the ceiling using plasterboard construction from estudio gutman lehrer
Photo 22 - Perfectly planned space by Peter Pokrovsky
Photo 23 - Unusual, but very cozy sleeping place in the nursery from Design Studio Lavrik Irina
Photo 24 - Illuminated ceiling visually increases the height of the ceilings in the room from the Architectural Bureau SL*project
Photo 25 – Nursery for twins from Deluxe Design & Construction
Photo 26 - A decorative arch separates the sleeping area from the working area in the bedroom interior from Cozy Houzy
Photo 27 - Bright bedroom for a teenager from N-Kub
Photo 28 – A small decorative niche is the highlight of the interior from Xenia Design Studio
Photo 29 - Useful niche above the headboard with two spacious cabinets from Denis Furmanov
Cost of work with drywall
Depending on the type of drywall work:
- in Moscow: ceiling work - from 280 rub/m², wall work - from 190 rub/m², installation of partitions - from 300 rub/m².
- in Kyiv: ceiling work - from 65 UAH/m², wall work - from 45 UAH/m², installation of partitions - from 80 UAH/m².
Photo 30 – Original minimalist interior by Dmytro Aranchii
What elements does the cabinet consist of?
The process of assembling a cabinet under the sink is considered not the most labor-intensive of the many options. Especially if you have a ready-made sketch with all the markings. When assembling a product, it is important to understand its structure as a whole and the design features of individual parts. The cabinet's components are:
- the frame is constructed from wooden blocks;
- the tabletop (upper surface of the product) is constructed both from GC panels and from wood, stone, glass and other materials;
- the end walls can be either plasterboard or lighter plywood, which is not particularly important from the point of view of load perception (they are not load-bearing elements);
- additional parts of the structure - shelves, drawers, hanging components - are made from a material that is most capable of absorbing the functional load (glass, plywood, drywall).
The following assembly tools are required:
- electric jigsaw;
- hammer;
- drill;
- hacksaw;
- screwdriver;
- pliers;
- sandpaper;
- screwdriver;
- pencil and tape measure;
- chisel.
Manufacturing technology step by step
Knowing what parts the entire structure is assembled from, you can begin construction by preparing each component separately. First, each element is copied from a paper drawing and its dimensions are transferred to the material, measuring the required parameters with a pencil. Next they work with a saw. The opening for the sink in the countertop is cut out with an electric jigsaw. The boundaries of the opening on the material are drawn using a cardboard blank - a pattern, which is a flat model of a hole in an ordinary sink. Armed with a drill, a hole is drilled along the outlined border. The hole should clearly follow the copied outline of the bottom of the sink.
Cutting an overlay strip from a HA sheet to cover the top of the cabinet is the next stage of work. This strip is responsible for the external decorative appearance of the product. When compiling its dimensions, be sure to take into account the dimensions of the valves. There should not be a gap between the latter, but they should not overlap one another either. The thickness of the tabletop is made equal to the height of the sink. The main thing is that when the doors are opened, it is not exposed.
Assembly and covering of the base
Sequentially attaching each element to the frame begins when all parts are prepared. However, the wooden frame itself, made of bars, should be ready by this time.
Despite the fact that the plasterboard cabinet is made from moisture-resistant sheets (GKVL), processing of their end cuts in order to prevent moisture from penetrating inside is still necessary. Here the choice of means may vary. This is either a moisture-resistant adhesive composition, or special moisture-repellent primer compositions, and in addition to them - slats. The edges are cleaned with fine-grained sandpaper. And after that they prime or apply glue to them.
Then they proceed to attaching the end walls to the frame support, using glue or self-tapping screws. When using the latter, holes are first made. After applying the glue, the treated areas are pressed with clamps, allowing the adhesive to better adhere.
The stability and reliability of the structure is imparted by means of eight cut out corners. They are attached to the end walls and frame from the inside and behind the base.
Making a bathroom vanity cabinet from plasterboard with your own hands
It is most convenient to install the sink next to the sewer and water riser, so as not to stretch the drain and water supply too far. Most often, in adjacent bathrooms, such a place is located between the box with the vertical pipeline and the bathtub. If you wish, you can make an original vanity cabinet for your bathroom from plasterboard covered with tiles.
The advantages of this cabinet are that it is not afraid of moisture, has individual dimensions, thanks to the use of identical tiles it fits into the interior, and will cost much less than a ready-made cabinet.
Materials
- guide profile KNAUF PN 3000x50x40x0.6mm – 2 pcs. (260 rub.)
- moisture-resistant plasterboard (left over from the box for the riser)
- Square leg 700x25x25 mm – 4 pcs. (244r.x4=976r.)
- tiles (remnants from bathroom tiling)
- screws, rivets
Tools
| Metal scissors | |
| Link to metal scissors |
| Riveter | |
| Link to riveter |
| Rivets 3.2mm | |
| Link to rivets 3.2mm |
| Drill | |
| Drill link |
| Drill 3.3mm | |
| Link to 3.3mm drill |
| Jigsaw for plywood | |
| Link to jigsaw for plywood |
| Device for cutting holes in tiles | |
| Link to tool for cutting holes in tiles |
| Crowns for drilling holes in tiles | |
| Link to bits for drilling holes in tiles |
| Tile cutter | |
| Link to tile cutter |
| Square | |
| Link to square |
| Roulette | |
| Roulette link |