ShareLikeClass TweetPinSubscribeWhatsappTelegram
This article is intended for those who independently decided to figure out how to hang a door on hinges, find out what types of hinges exist and which ones are better suited for certain interior doors.
If you are planning to install doors yourself, you need to know how the door leaf is hung on the hinges. In general, this work is simple and can be done by any beginner in construction; the main thing is to understand the theory, know and follow the recommendations of general specialists.
What and how to install hinges on the door
What types of door hinges are there, and which ones should we choose for our doors? This is the first question that needs to be dealt with. Such fittings for interior doors, such as hinges, come in the following types:
- Overhead hinges are attached directly on top of the door leaf and door frame, and they differ in shape, and when the doors are closed, they fit into each other.
- Mortise hinges are screwed over the door leaf and frame into specially prepared recesses in such a way that the screwed hinge does not rise above the surface of the door or frame. They are the most commonly used and considered the simplest.
- Hidden loops are not visible from the outside, because... are recessed into the thickness of the door leaf, in specially cut recesses.
- Screw-in loops look like pins, not plates; they are also not visible from the outside, since they are screwed into the thickness of the fabric.
Interior doors are most often hung on mortise or overhead hinges, but exterior doors are hung on hidden and screw-in hinges. It may seem to an inexperienced builder that using hidden hinges is very difficult, however, this is not so. Installing hinges on a door is possible without outside help and without any experience.
Hinge Installation Instructions
To install the hinges correctly, you need to collect all the necessary materials and tools and follow the step-by-step instructions, observing the steps for installing furniture hinges.
Materials and tools
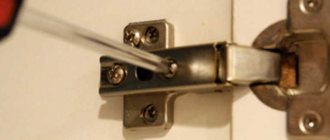
Before installing furniture hinges with your own hands, you need to remove the door leaf: first, unscrew the side of the door hinge adjacent to the structure, and then, from the already removed sash, remove the old one that is out of order. As a rule, furniture manufacturers use overhead hinges in the manufacture of products. With their help, the facades are fixed to the body.
Based on the method of closing, doors are divided into spring doors and those with a closer system. Less popular are corner, semi-overhead and internal ones.
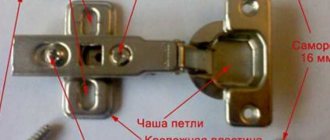
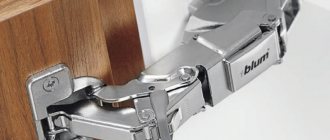
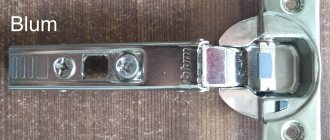
The four-hinged model of overhead-type door hinges comes in different sizes and consists of the following parts:
- strips (connects the door and the cabinet body);
- mounting cup (which is attached to the facade of the canvas);
- shoulder (acts as the skeleton of the part).
For installation, in addition to a simple or black pencil and ruler, you will need the following tools:
- building level;
- drill;
- screwdriver;
- screwdriver;
- screws;
- cutter
Marking
At the next stage, it is necessary to accurately mark the future holes on the door leaf. They retreat from the edge of the façade slab by 8-12 cm, depending on the number of fasteners. The key condition is that the distance between the loops (and therefore the centers of the holes) should not exceed 50 cm, the minimum - at least 45-46 cm.
Hole preparation
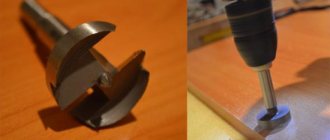
The next stage is inserting furniture hinges. To do this, you can use a drill or screwdriver. You also need to install a wood cutter, this will eliminate chips and deformation of the facade surface.
The maximum permissible depth of the hole for the cup should not exceed 12-13 mm. Otherwise, a crack may form on the front side of the door.
Hinge Attachment
Loops are placed in the prepared holes. The correct position is corrected using a regular ruler, building level or tape measure. If the canopy does not fit tightly to the surface of the rear side of the facade, the door will also not close tightly, protruding obliquely along the edge.
How to properly install hinges on a door?
First, you need to prepare the tool:
- Pencil for outlining.
- Ruler.
- Blade for precise cutting of contours.
- Chisel.
- Hammer for chisel.
- Screwdriver.
Installation of the hinge part on the canvas
The first step is to install the upper hinges on the canvas; this is customary because this is the most optimal solution. And since card mortise loops are most often used, we’ll start with them.
Take a pencil with a ruler and mark the exact position of the top loop. It should be 20 cm from the top edge of the door leaf. The bottom one should be at a height of 30 cm from the bottom edge of the door. In order to correctly install hinges on a solid wood door, the weight of which is quite large, it makes sense to install a third, middle hinge.
Each loop is disassembled into two halves, each of which is applied to the designated place. Then the place where the loop is attached is carefully traced along its contour with a pencil.
After this, using a chisel, carefully remove a layer of material equal to the thickness of the loop along the marks. To do this, first make neat cuts along the contour with a blade, and only after that the work with a chisel begins. The material is removed little by little by lightly tapping the chisel with a hammer.
In this way, proceed with all the hinge halves that need to be installed, both on the door leaf and on the frame. When all the parts fit into the recesses flush with the surface, the hinges can be screwed on. This is done with self-tapping screws or self-tapping screws, the only difference is that you need to prepare holes for the screws.
Installation of the bottom (box) part
After the hinges are installed on the door leaf, begin installing the corresponding hinge parts on the frame. In order for the door to open and close freely, without touching the floor or the top of the frame, the door leaf must be adjusted correctly - installed exactly in the opening.
Then, having opened the door in this position, you need to mark with a pencil the place where the lower (boxed) halves of the hinges are attached, taking into account that the hinge installed on the door leaf will fit onto the boxed part of the hinge.
After the extreme position marks of the box halves of the hinges have been marked, the door leaf is removed from the opening and the operation is repeated - the hinge is applied to the mark and the outline is completely outlined. Using a blade, cuts are made along the contour, and notches are made with a chisel and hammer. The hinges are screwed on with screws or self-tapping screws.
Doors
137 votes
+
Vote for!
—
Vote against!
Installation of the door frame is accompanied by the work of installing the door on the hinges. It is quite possible to perform this process on your own, but only if you become familiar with the technology for its implementation. There are several methods for installing a door on hinges. We'll look at how to embed hinges into a door and how to remove a door from its hinges below.
Table of contents:
- How to hang a door on hinges: features of the professional method
- How to put a door on hinges using a homemade method
- How to install hinges on a door: features and technology of the process
- How to weld hinges on a door made of metal
- How to hang hinges on a door: features of choosing hinges
How to hang a door on hinges: features of the professional method
This method of installing a door on hinges is easy to implement. It is most often used by professional workers due to the speed of work. Therefore, during the work you will need a special tool. First of all, to insert the loops you will need to use a manual milling machine. With its help, it is possible to perform work on arranging a clean cut. Also, you should prepare a tool with which you can cut the hinges.
This device has the shape of a lining that prevents mechanical damage to the door leaf. In addition, with the help of some professional tools, it is possible to completely set the dimensions of the hole for the hinges on the door leaf. In this case, it is possible to significantly simplify the process of installing the door on the hinges.
Please note that there is equipment that can be used to create a groove both on the surface of the door leaf and on the door frame. With its help, the two parts of the door frame are connected together, so the process of aligning the groove joints is no longer necessary. It is with the help of this equipment that it is possible to speed up the installation of hinges on the door.
If you don’t have such tools, you shouldn’t give up, because with the help of one milling machine, you can also do the job of installing a door on hinges. This tool, if you have the skills to work with it, allows you to build a groove connection for hinges, both on the door and on the door frame. However, the disadvantage of its use is the low quality of the result obtained and more time to complete the insertion.
Also, if you are careless with the mechanism, there is a risk of scratches on the door and spoiling the attractiveness of their appearance. Therefore, the foot of the router should be covered with a protective material such as felt.
How to put a door on hinges using a homemade method
This method is characterized by a lower quality of the result obtained than the previous option. To carry it out, a chisel and a hammer are enough. The popularity of this method is explained primarily by the availability of materials for its implementation.
If the door has a laminated coating, then as a result, the edges of the hinge groove will be sloppy and aesthetically unattractive. Instructions on how to install hinges on a door with your own hands are given below:
1. At the beginning of work, markings should be made for installing the groove. To do this, install the canopy on the end part of the canvas, outline it with a pencil. Please note that at this stage you should be especially careful, since the hinges must be installed in proportion to the door leaf. Incorrectly installed hinges will not be able to rationally distribute the load and will lead to premature failure of the door.
2. Next comes the process of edging the groove joint. A hammer and chisel are used for these purposes. The chisel should be installed a few millimeters inside the door leaf. This edging should be done in relation to the previously completed markings.
3. Next comes the process of selecting the groove joint itself using a chisel. In this case, the chisel is installed with a slight slope. The groove connection is knocked out with a hammer. Particular care must be taken at this stage to avoid damage to the face surface.
This method of installing hinges is suitable for a wooden door that is subject to further painting. Since after its implementation, sloppy chips and selections are formed. Coloring will help eliminate and improve their appearance.
How to install hinges on a door: features and technology of the process
If you do not have experience installing doors on hinges, then it is best to use this option. Using a certain type of canopy allows you to avoid cutting them into special grooves. There are two ways to do the work:
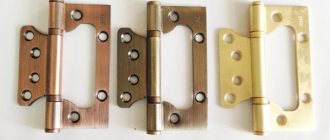
1. Use of hinges without inserts. To install this kind of hinged mechanisms, you will not need to cut grooves either on the door or on the frame. Their design is quite simple and allows them to be installed directly on the door. After the door is closed, they are installed into each other, since the thickness of one part of the hinge is no more than 0.25 cm, a technological gap is formed between them. To install this hinge, simply screw it onto the door and the door frame. Among the disadvantages of using this method is, first of all, the unaesthetic appearance of the door after installation.
2. The use of screw-in hinges is also important for beginners. In this case, the grooves on which conventional hinges are attached are replaced with holes. To install such a hinge, you will need two holes in the door frame and one in the door itself. To install the canopy, simply screw it into the previously prepared holes. Please note that the holes must be located in the correct order in relation to each other. The appearance of such loops is more attractive than that of the previous version.
In addition, another alternative option for installing a door is the use of pin hinges. They are inserted directly into the canvas. However, the specific design of such a loop hides the place from the insert, so the aesthetic side of the issue remains at the proper level.
This loop consists of two plates, the rotation of which is carried out around an axis. This device is installed at the bottom and top of the door. In some cases, the top hinge is still visible, but only if the door is left open.
How to weld hinges on a door made of metal
To perform these works, electric arc welding is used. At the same time, it is necessary to have skills in working with these tools. Properly installed and welded hinges on the door will ensure high-quality and silent opening.
In addition, during the work process you will need to have:
- steel door hinges;
- records;
- welding;
- electrodes;
- mechanic's type hammer;
- Bulgarians;
- special clothing, masks and protective gloves.
Most often, the loops have the shape of a cylinder or are distinguished by the presence of hexagons. The first version of the hinge is simpler to make and easier to weld to the door. To weld the hinges, special plates are used.
All work is carried out outdoors; the surface for laying the door must be strictly horizontal. scarves must be welded to the loops using a continuous seam. Otherwise, the quality and reliability of the connection will be compromised.
In addition, the plate must be selected in relation to the size of the loop. Also, you should take into account the load from the door, its weight and dimensions. With the help of these elements it is possible to equip a so-called working platform on which welding work will be carried out. In addition, they will serve as a support between the door and the hinge.
Before installing the hinges on the door and before starting welding, the doors are installed in a vertical position. Next, their position in relation to the loops is checked. After checking and marking the welding points, the welding process on the door frame follows. It is with the help of plates that the welding process can be facilitated for people who have no experience in performing this work.
To check that the door is installed correctly, use a laser level. It is he who will help determine the installation location of the second of the loops, after welding the first. This is followed by attaching the hinge, pressing the door to the leaf and continuing to work. After welding the loops is completed, the seams are processed using a grinder.
How to hang hinges on a door: features of choosing hinges
When the need arises to hang hinges on a door, people who have never done this turn to specialists and spend quite a lot of money to complete this process. However, before attaching hinges to the door, we recommend that you familiarize yourself with the recommendations that will help even beginners complete this process.
First of all, installing hinges begins with their selection. You should also determine the number and direction of hinges on the door, if they did not come with it. If the door is double-leaf, then for its installation you will need two hinges for each of the leaves.
There are several options for door hinges:
- card;
- mortise;
- hidden;
- Screw-in type hinges.
Each of these loop options has individual advantages and disadvantages. Card loops can be either removable or non-removable. The second version of the hinges provides two-way opening of the door. However, if you need to remove the door, it is best to use removable hinges.
The mortise version of the hinge is used if the total weight of the door leaf is more than twenty kilograms.
To install hinges on a single-leaf door, you need to determine its opening type. The number of hinges is determined based on the weight of the door, the material from which it is made and the operational load that is placed on it. To fix a door consisting of one leaf, two hinges are enough; if it is an entrance door, then it is better to use three hinges.
Tip: When purchasing hinges in a store, ask the salesperson to open them for you. Since quite often you come across mechanisms with deformed rods inside.
In addition, make sure that the color of the hinges is in harmony with the overall tone of the door, fittings such as handles and locks. The screws must also match the color of the hinges. To carry out the work of hanging a door on its hinges, you will need:
- plumb line;
- level;
- drill or screwdriver;
- chisels;
- hammer;
- measuring tape;
- carpenter's pencil.
The hinges are installed in relation to the top and bottom of the door by 20-30 cm. If there is a third hinge, its installation is carried out directly in the center of the door leaf. If you plan to install four hinges, then the total length of the door should be divided into five parts and the installation location of each canopy should be marked.
One part of the hinge is installed on the door leaf, without rods. The second part of the hinge is installed directly on the door frame.
In order to fix the hinge on the door leaf, follow the instructions on how to install hinges on the door:
1. Place the hinge on the surface of the door and trace it with a pencil.
2. Using a chisel, remove the hinge installation outline. The depth of the layer being removed should be equal to the thickness of the loop itself.
3. Using an electric drill or screwdriver, secure the hinge using the previously purchased self-tapping screws.
4. When choosing the diameter of the drill, choose an element that is half a centimeter smaller than the screw itself. Thus, it will be possible to increase the reliability of fastening.
5. Next comes the installation of the door into the frame. The door should be opened slightly and the lower part of the second canopy should be installed into the canopy. The installation location of each hinge is indicated on the door frame.
6. In these areas you should also remove the top layer using a chisel. Fix the second part of the canopy in these recesses. Make sure the rods are horizontal. Otherwise, it will not be possible to achieve smooth opening of the door.
It is possible to change the order of actions. In some cases, the hinges are first fixed to the frame and then to the door.
If, when checking the door for operability, a squeak is observed, then use machine oil, technical petroleum jelly or grease to lubricate them. If the loops are too deep, special pads based on rubber or thick cardboard are installed under them.
If there is a problem with the door leaf being too low, then to raise it, you should install washers between the canopies. If, while installing the hinges, you get stuck with a screw that cannot be pulled out, use a drill to remove it. The place where the screw was installed should be sealed with a wooden dowel, which was previously soaked in glue.
Installing hinges on a door video:
How to hang a door on hinges
The last necessary installation step is to hang the door on its hinges. Before we do this, we need to make sure that our new hinges do not creak. To do this, you need to lubricate all the rubbing parts of the hinges with grease or graphite. After this, the hinges need to be brought into the open position of the doors, the door leaf should be brought up and the grooves of the door hinges should be carefully placed on the axles that are located on the box hinges. At the end, an obligatory step is to check the correct level of installation; if this is not done, the door may warp in the future.
In principle, there is nothing complicated in installing doors on hinges, but during work annoying mistakes can happen, especially for beginners. Many such defects can be easily eliminated. For example, if you worked too hard with a chisel and the recess turned out to be deeper than required, then you can put a pad made of plywood, cardboard or rubber under the hinge.
If the door leaf has sagged and clings to the threshold, the hinge rod can be increased with an additional gasket. In case of serious errors, it may be necessary to completely remove the plate and move it. Then the recess and hole from the screw are exposed. This problem can be solved using a dowel plug and wood putty.
To ensure that the installation of doors goes without problems, it is better to invite an assistant for this work, and even better - if it is a specialist.
Source Share LikeClass
TweetPinSubscribeWhatsappTelegram
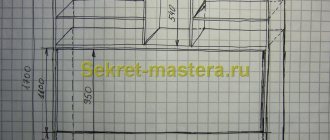
Stages of work
First of all, start assembling the door frame. Cut the side posts and top crossbar to suit the size of the canvas. If you leave a gap of 5 mm, you can prevent the door from rubbing against the frame and jamming. Using self-tapping screws, fasten the structural parts together.
Screwing the hinge to the door frame
Now you can begin installing the hinges. First of all, cut them into the door leaf at a distance of 20 cm from the top and bottom edges. If the door you purchased is heavy, then install a third hinge. It should be fixed 20 cm below the top loop.
Exactly circle the loop
To make a recess for the hinge, attach it to the end of the door and trace along the contour.
Inserting hinges into a box
Now work with a chisel, and the depth of the notch should exactly match the thickness of the loop.
Transferring the hinges to the door
Do the same operation with the door frame. To determine the location of the recesses on the box, you need to attach a canvas to it. Secure the hinges with self-tapping screws.
The hinges are screwed
Note!
To avoid splitting the canvas, pre-drill mounting holes for self-tapping screws.
Inserting hinges into the door leaf
Note!
Be careful, because the loops must be positioned very precisely!
Door frame assembly
After assembling the box, proceed to installing it and securing it in the opening. Remove the remaining plaster and cement that remains after dismantling the unusable door. At this stage, be extremely careful, because the service life of the new door will depend on how you install the frame. Even the smallest mistake will lead to the door jamming and rubbing against the frame, and this is fraught with unpleasant consequences.
Box installation
After you have inserted the box into the opening, you need to accurately level it using a level, and it is important to do this in both planes. Moreover, you must ensure correct installation by measuring the sections between the side posts near the hinges. The indicated distances must correspond exactly to each other. To secure the structure, drive wooden wedges into the resulting cracks in the corners.
Now drill the mounting holes. Using anchor bolts, secure the box in the opening. To disguise the resulting holes in the structure, you can use decorative plugs. This way you can maintain the aesthetically attractive appearance of the door. If possible, make holes for the anchor bolts under the hinges, where they will remain invisible.