Product features, advantages and disadvantages
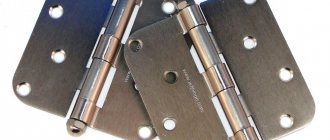
First you need to understand the essence of the design of butterfly loops. They belong to the category of card models; in appearance, these parts resemble a butterfly, which is why they received their name.
Standard mortise hinges are installed flush, that is, it is necessary to make a recess in the door and frame by removing a few millimeters of material. Overhead types in this regard have fundamental differences; they can be attached directly to the lining of the canvas itself, without preliminary preparation of the surface.
Such installation of overhead hinge models without insertion is possible thanks to a number of nuances. The fact is that when closing the door, both halves of the fasteners must ensure a tight fit of the end of the leaf to the door. In this case, this is possible due to the design features of the plates. In ordinary products they are straight and therefore need to be deepened into the material. Here, the two halves are elements of a whole plate; they are cut in such a way that when closed, one part fits into the other without forming gaps.
The main advantage of overhead hinges is their ease of installation; you just need to determine their position and secure it with self-tapping screws. However, it is worth considering a number of disadvantages.
- the doors cannot be removed from the hinge, that is, if such a need arises, the hinges will have to be completely unscrewed;
- Over time, distortions may occur that impede the movement of the canvas;
- These models are only suitable for installing lightweight doors;
- their installation requires a perfectly flat surface.
The special design of these models allows installation without insertion, but this installation method has its disadvantages
It is for these reasons that mortise models are mainly used. If you are installing doors for the first time, overhead options will be the best choice for you.
Installation of hinges. Step-by-step instruction
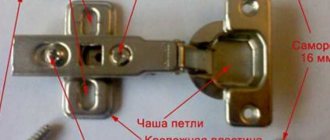
Installation of the cover part
includes the following stages:
- Using a ruler and pencil, mark on the door and frame the areas where you will attach the hinges (about 20 cm at the top and bottom).
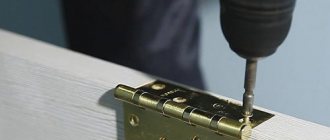
- Using a drill, make holes for the fasteners.
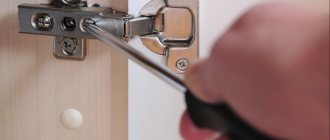
- Use a screwdriver or screwdriver to secure the part to the door, and then to the jamb.
Procedure for installing a mortise hinge
:
- Make markings.
- Use a chisel to prepare recesses for the part in the jamb and door.
- Use a drill to drill holes for the fasteners.
- Insert the loop and fasten with self-tapping screws.
Required number of loops
Installing a screw-in hinge
:
- Mark and drill holes for the pins on the door and frame.
- Screw the hinges: first to the door frame, then to the door leaf.
- Adjust the part.
- Decorate the design with special caps.
Installation of products that secure a glass door requires the use of special tools and precision in work. For this reason, it is better to entrust the installation, as in the case of hidden fittings, to a professional craftsman - regardless of what kind of hinges you have for glass doors (without drilling or with it). For such structures, the gluing method is sometimes used. In any case, in order not to damage the glass, it is necessary to use special rubber gaskets.
Advice. It is more convenient to install any type of hinges in the company of a partner.
Installation method
Let's look at how to install such fasteners. To install butterflies you will need a minimum set of tools:
First, you need to determine the places for screwing the hinges, to do this, use a tape measure to measure approximately 20-25 centimeters from the top and bottom edges of the door, this will be the starting point for each hinge. It is better to attach the bottom one further from the edge to reduce the load on the upper part of the fittings.
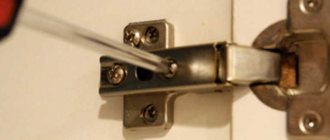
Since the installation of hinges is carried out without insertion, immediately attach the plate to the end of the canvas and mark the location of the holes with an awl. Then carefully drill them so that you can easily screw the screws into the door.
Butterfly hinge installation sequence
After the initial installation, you need to determine the location of the plates on the door frame. To do this, you need to attach a canvas and roughly outline their positions. Then unscrew the hinges and more accurately mark the places for drilling.
After all the holes are ready, simply attach the sheet to the opening and screw both plates with self-tapping screws. Check the door movement, as in some cases defects may occur, which, however, are easy to eliminate.
Possible problems and solutions
Since it is possible to ideally install butterfly hinges without insertion only if there is a flat canvas and a straight slit, some shortcomings may arise during the work. One of the most common problems is the formation of a gap between the plate and the box. In this case, the door will not close tightly, and over time the entire structure will become loose and will rub against the threshold.
To solve this problem, you will need a gasket; it can be made from wood chips, cardboard, rubber, or use a regular match. Of course, this will somewhat affect the quality of the connection, but you will be able to bring the loops to the desired position.
If the installation rules are followed, the door will fit tightly
Some overhead hinges have an additional part in their design that allows you to move the sides of the product to ensure a tight fit between the halves of the plate.
If this method does not suit you, you will have to slightly modify the design, turning the overhead “butterflies” into semi-overlays. In other words, one part of them will have to be drowned a little. Usually a large plate is cut into the box. Making such a small cut is quite difficult, especially considering the shape of the product.
If the installation was done correctly, the doors will move silently and close tightly. Otherwise, it is better to replace the “butterflies” with standard mortise products.
We recommend watching the video:
Adjustment
So, let's look at how to adjust card hinges on an interior or metal door? If the structure is loose, it is necessary to tighten the screws. Modern products have a mechanism in their design that is adjusted using a hex key and allows you to tighten the door to the required level.
Now let's look at how to adjust hidden door hinges. This can only be done in the open position. You must first remove the decorative trims, then tighten the screw using a hex key. Thanks to the design features, the door position can be adjusted in three planes.
Inserting door hinges is a rather troublesome task, but nevertheless quite simple to do it yourself. By following our recommendations, each of you will be able to properly secure and adjust any type of door hinge.
We recommend watching the video:
Types of canopies
A variety of door hinges allows you to choose which way the door will open. Therefore, in order not to regret the decision after its installation, it is important to decide in advance on the type and operating principle of the hinges.
Hinges are a fairly simple device that allows you to do all the work yourself.
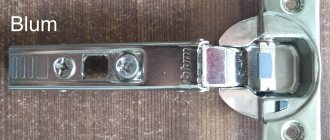
Butterfly loops
They are the most practical for interior doors. Butterfly loops got their name because of their characteristic shape - when open, they resemble the wings of a butterfly. When folded, the canopy is one card thick. This is achieved thanks to a special shape ─ when closing, one “wing” of the butterfly is precisely marked into the cutout of the second.
Related article: How to make a compartment door to a room
When installing such hinges, it is very important to select suitable screws. Since the two parts of the butterfly’s “wings” will be in direct contact with the wood, you should use screws whose heads will be ideally hidden in a special groove in the hinge. With the right choice, the sash will close well and no additional difficulties will arise during its use.
Experts do not recommend installing butterfly canopies on large and medium-heavy doors, since the thin metal and the very openwork of the structure are more suitable for using them as a decorative element.
Simple mortise
This is the most widely known type of awning. It is used in almost every home. It consists of two parts and is secured with ordinary wood screws.
Since doors can vary in size, such hinges must also meet operating requirements.
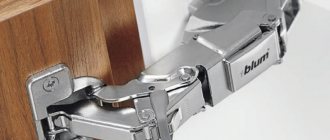
Invoices
Structurally, they are not much different from the previous ones, but there are still some differences. The main nuance that should be taken into account when installing these canopies is the installation method. If the previous option is simply attached to the end of the door, then for this type of hinges it is necessary to make special recesses (embed in). This is necessary in order to hide the fastening plates and create a smaller gap between the door frame and the jamb.
Materials of manufacture and dimensions
Due to the fact that technological progress has come quite far, butterfly loops are made from a variety of materials. The structure is made according to your own drawing, as well as from various materials. But it is important to take into account the characteristics of the metal.
- Brass is resistant to external factors.
- Steel is resistant to temperature changes and high humidity (no corrosion).
- Zinc hinges are relatively inexpensive, but there are a few things to keep in mind when installing awnings on interior doors. This metal is susceptible to corrosion and may break if used frequently. Therefore, it is necessary to ensure that the product does not get wet. And if squeaks or noises appear, it is necessary to lubricate the hinges.
Zinc butterfly hinges Source baucenter.ru
Based on size, hinges are divided into two types: 10x3 cm and 12.5x3 cm. In two versions, the thickness of the fasteners is approximately 2-3 mm. They are also called “four” and “five”, respectively, but these names are used mainly by craftsmen or sellers. This indicates the dimensions in inches.
For a regular interior door, two parts are needed, but if the door is heavy and made of heavy material, then it is advisable to install three or four fasteners.
Four-piece loops are made for lightweight fabric Source plitochkin.ru
See also: Catalog of companies that specialize in doors, windows, related fittings and works
Installation of overhead hinges
This work is not particularly difficult due to the simplicity of the hinge design. Outwardly, they are quite simple: two parts (“male and female”) are connected into one, which makes installation easier. In order to secure the door smoothly and correctly on the awnings, you first need to screw the hinges to the door frame. This installation must be done extremely accurately, otherwise the result will be curvature and they will not be able to open normally.
Next, you should correctly install the door on the substrate of the required height and at a slight angle relative to the overhead awnings. Then you need to open it and lean it against the end of the frame. It is important to accurately fix the position of the door. This can be done with a regular plumb line. After final adjustment, you can fix it with self-tapping screws.
They need to be tightened firmly, but carefully so as not to disturb the structure of the wood.
Universal hinges are quite simple in design. Their main difference is that they are made one-piece. They are often small in size, which undoubtedly gives them a certain elegance. Their installation will not take much time, because it does not require any additional work. Such hinges are thin, so even when the door is closed, the gap between it and the opening lining is small. When using universal canopies, the beauty of the doorway and the inconspicuousness of the joint are preserved.
How to install hinges correctly
No matter how beautiful and attractive the door is, incorrectly installed hinges will ruin not only the impression. If it does not close, the benefit will be small. Therefore, at the marking stage it is important to take the work seriously. Many people do this work either in a hurry or hastily. But more often than not, after this you have to twist the awnings many times and damage the wood of the door. To avoid this, you need to know some nuances regarding the installation of hinges.
Number of loops. It all depends on the size and weight of the door being installed. Since its weight can vary from 2.5 to 8 kg, the number of canopies will also vary. The standard height of interior doors does not exceed 2.3 m; the most correct solution would be to install two canopies.
However, there are designs that have large dimensions. In this case, you need to increase the number of loops.
If there are three of them, you can combine them as follows:
- Two on the edges of the door (15-20 cm from the edge), and one in the center;
- Two at the top (the second is 10 cm lower than the first);
- Two below (the second is 10 cm higher than the last).
It is recommended to carry out marking in several stages. To make work easier, it is best to divide the loops into two parts - upper and lower. The second canopy element (the one with the pin) should be mounted on the door frame, while the first (with a special groove for the pin) will be mounted on the door frame.
When starting directly to marking, it is advisable to arm yourself with a sharp pencil. In order to make the markings on the door frame with your own hands as correctly as possible, you can simply attach one of the parts of the canopy in the place where it will be attached. Then you should trace it along the contour with a pencil.
It is important to do this as close to the edges of the loops as possible. Since special recesses are often cut out for them on the frame and on the door frame, the further operation of the interior door will depend on the accuracy and quality of the markings.
After the markings are made on the frame, you can proceed to the door frame. In order to select the correct height for the second part of the canopy (the one with the pin), you can resort to one trick: place a board under the door, the width of which corresponds to the height of the desired gap between the door and the floor; after which you need to transfer the dimensions of the canopy to the door jamb so that they coincide with the first part of the hinges screwed to the frame.
What to look for when choosing hinges
Only high-quality mechanisms are able to function properly and for a long time. To avoid mistakes during the purchase, you need to study the opinions of professionals. Their recommendations cover key points when choosing reliable overhead hinges, namely:
- manufacturer - it is better to choose well-known and reputable manufacturers (Arni, RENZ, Allure, etc.). Fly-by-night companies produce products based on quick profits at the expense of quality and compliance with standards;
- materials - the operation of the hinges depends on the maximum permissible load (MPL). For lightweight interior doors, you can use a hanger made of brass and other non-ferrous alloys. If the doors are massive (entrance), you need to install hinges made of high-strength steel that can withstand heavy loads;
- dimensions - determined by the weight of the door leaf: the heavier the leaf, the larger the hinges are needed. If the product is certified, the recommended level of load on the loop is noted in the passport. Small hinges (from 85 to 100 mm) are designed for doors weighing 10–15 kg. Mechanisms over 110 mm are designed for wooden doors up to 25 kg;
- number of hinges - sometimes, due to the weight or unusual dimensions of the door (with non-standard height and width), it is advisable to increase the number of hinges from 3 to 5. This strengthening of the suspension contributes to the stable operation of the doors and evenly distributes the load on the rotation axis.
But it should be noted that experts differ on the number of hinges on doors. Some believe that increasing the number of loops has a beneficial effect on operating time. Others argue that wear is distributed only on the two outer hinges - the top and bottom. Be that as it may, it is better for the average consumer to adhere to generally accepted standards and listen to the recommendations of the direct door manufacturer.
Video: comparison of universal overhead and mortise hinges
In modern production, a standard has been adopted according to which high-quality hinges can withstand 500 thousand opening and closing cycles.
Inserting hinges into interior doors
To make the awnings look beautiful, they can be embedded into wood - both the door frame and the door itself. Many people choose to do this work with their own hands, because there is nothing complicated about it. It will require several tools:
Before you begin, it is important to correctly and accurately outline the canopy on all sides. Next, using these measurements, you need to make a recess with a depth equal to the thickness of the hinge material.
The whole process is clearly shown in the following video:
If you do the work yourself, it is recommended to use the help of a friend, because at some stages the insertion is impossible without this.
Related article: Is it possible to paint varnished doors with paint?
In order to make the grooves efficiently and correctly, it is important to take your time and approach this matter responsibly. It is necessary to make exactly the depth that will ideally correspond to the thickness of the plate. After all, if the groove is deeper, the frame protrusions will catch and opening and closing will not be smooth. And vice versa - if it’s too small, then there’s simply no room left for loops.
So, having more complete knowledge in the matter of choosing loops, you can make your choice more confidently. It is worth remembering that no matter the quality of the hinges, timely lubrication of the rotation elements will only extend their service life. Moreover, installing and inserting canopies will serve as a good experience and will be useful in the future.
How to install overhead hinges on interior doors with your own hands?
Interior doors today are not a luxury, but a very important and necessary part of an apartment interior. A correctly selected design and size will delight you and others with its quality for many, many years. Installing a door can be both a simple and a very complex task. Especially if you've never done this. It is better for the craftsmen to install the door first, and for you to observe the process. But what to do if your interior door starts to creak or sag? A possible cause is the door hinges.
Overhead hinges require careful installation, since the normal opening of doors depends on it.
How to install hinges on interior doors?
In order to install awnings on the door, you will need:
- pencil;
- loops;
- construction corner;
- cutter (not needed for butterfly loops);
- screws, self-tapping screws of the required sizes and diameters (often included with hinges);
- center punch;
- a metal drill of the required diameter (just in case; usually take a drill with a diameter of 2 mm);
- electric drill or hammer drill;
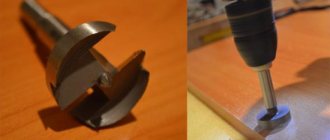
- Forstner drill with diameters of 35 mm and 26 mm (depending on the size of the loops).
Loop installation diagram.
The next step is to choose the type of loops, material of manufacture, their quantity, and so on. As for the type of hinges, there are three of them: overhead (H), mortise (B) and screw-in (Vv).
The most commonly used are overhead loops. The prevalence of card canopies lies in their general availability, ease of installation, and ease of product design. The material of manufacture is either brass or steel. There are several types of overhead hanging parts: butterfly hinges, double-sided, with two regular plates.
A few words about “butterflies”
If you decide to go with the easiest-to-install hinge option, it is advisable to purchase them in specialized stores. When purchasing, make sure that the sides of the structure fold correctly, otherwise unevenness will form during installation and the door will not fit well or begin to spring.
USEFUL INFORMATION: How to choose an iron entrance door for an apartment? Noise and heat insulation, lock and hinges
Interior doors, according to their characteristics, must be suitable for installing overhead butterfly hinges on them. Installation of this type of canopy is carried out only on the places of the door leaf intended for this purpose, suitable for tightening screws.
Due to the overhead installation method and structural properties, butterfly awnings are intended primarily for lightweight interior doors. Thanks to their aesthetic shape and clean installation, which takes place without disturbing the decorative finish of the door leaf, they are excellent for hanging modern doors with an original design.
How to install butterfly hinges?
Below are step-by-step instructions for installing the butterfly hinge yourself. Decide on the placement of the door in the space. How would it be better and more convenient for you to open the door structure: on the left or on the right, inward or away from you? To prevent doors from sliding, place something made of stable material under them. For example, stretch film, a sheet of thin rubber, etc. The hinges must match the weight of the door. Heavy structures are mounted on hangers with five gaps for self-tapping screws, lighter ones - with four.
Before installing the hinge, you need to make the markings correctly.
An important fact remains the fastening of the hinges on the door so that it remains solid, does not sag, and so that the load on the hinges is uniform. Basically, for this, a gap of 20 cm is taken from the bottom and top. And an indentation is made along the surface to accommodate loops 21-22 mm long. If there is a third loop, it can usually be placed in the center or closer to the top. You can attach the loops to the markings and circle them. You can also attach with screws and make markings. Choose for yourself. Of course, the best option is considered to be one that does not involve damage to the door surface.
Use a pencil to mark the initial placement of hinges on the door leaf and on the door frame. When you are sure of the accuracy of the measurements, aim them using a center punch. Try not to confuse the loops, top with bottom or middle. When making markings, they must be placed with hinges to the front of the doors.
How to install butterfly hinges on doors yourself
For those who do not know how to embed hinges into an interior door, let us explain that this process consists of the following steps:
- applying special markings for hinges to the surface of the door leaf, as well as to the surface of the door frame;
- using a drill to drill holes for hinges in pre-marked places;
- checking the tightness of the door connection;
- checking the functionality of the door.
How to secure the door frame and install butterfly hinges on the interior door will directly determine their service life. The color range is not that wide. Most often there are imitations of various metals. In particular, copper, gold, bronze, or nickel. Butterfly door hinges can be either matte or glossy.
For those who do not know how to install hinges on an interior door, we provide detailed instructions.
Apply markings to the surface of the door leaf and the surface of the door frame;
- Install the rotary axis, which is the main structural element and which ensures the functioning of the entire mechanism.
- Measure 20 cm from the top and bottom edges of the door.
We make markings
- Place the loop at the mark.
- Attach the plates using self-tapping screws.
We attach the hinge to the box:
- insert the canvas into the box, in the same way mark with a marker the location of the other part of the loop on the outer border;
- place one part of the butterfly in place, circle the points for the holes with a marker;
- carefully drill holes, place the product in place and fasten it with screws;
- unscrew the loop from the end, then attach it to the outer area, use an awl to mark the locations for the holes;
- make holes and secure the hinges with self-tapping screws, first attaching the inner part of the hinge, and then attaching the outer side to the box.
This design is suitable for almost any type of door leaf, with the possible exception of heavy solid oak doors. Hinges for heavy doors are slightly different from ordinary ones; they have a thicker flange and have built-in bronze bushings.
For greater clarity, we recommend watching a selection of videos on installing butterfly hinges.
Video:
Video:
Solving possible installation problems
Since the ideal installation of this type of fastener is possible only with a perfectly flat door leaf (which is rare), some shortcomings may arise during the work: non-critical, but nevertheless requiring correction. We'll tell you how you can correct possible defects that appeared during the installation process.
It is important to correctly set the gap between the door and the frame
The most common problem when installing butterfly hinges is the gap between the hinge plate and the door frame. If there is such a defect, this means that the door will not be able to close tightly, which over time will lead to loosening of the structure and rubbing of the threshold. A small spacer made of cardboard, wood chips, or rubber band (even a match can do) solves this problem. The presence of such a gasket will slightly worsen the quality of installation, however, it will successfully solve the gap problem. If you are not satisfied with the fact that the butterfly hinge plates close too tightly, you can “drown” one part of the hinge a little into the thickness of the door frame.
Necessary recommendations
Installing hinges directly on the door means that you need to attach the hinges exactly to the marked markings. This will prevent the wood from splitting. After this, you can tighten the screws from the kit. If you tighten the hangers with screws, then a center punch will help you. A slight recess will not allow the screws to “move” to the side.
The uniform arrangement of the loops is measured using a construction angle.
For long-term operation of structures, it is very important that these parts are at the same level. If they do not fit tightly to the plane of the door leaf or door frame, then we adjust the uniformity using spacers or selecting hinges with a slight spread.
Do the same procedures on the door frame. Fasten the second part of the loop and connect the canvas to the box. That's it, installation of overhead hinges on interior doors is complete. Which hanging parts to install is up to you and no one else to choose. Overhead butterfly loops are considered the most convenient models in this case. A small disadvantage regarding the uniform distribution of the loop on the surface can be easily minimized with linings. We hope that these tips from experienced specialists will help you at the right time, because now you know how to install hinges.
Installing door hinges
It doesn’t matter what kind of hinge you have in your hands – a permanent hinge or a hinged overhead hinge, because the principle of their installation is outrageously simple. To attach the hinges, follow the guide:
- Attach the hinge to your markings made earlier, make sure it is aligned correctly, then drill holes in the door for screws through the holes in the hinge.
Drilling holes through a hinge
- Secure the hinge using a screwdriver and screws, tightening them gradually to prevent the hinge from becoming skewed, which will be very problematic to correct.
Screwing door hinges with screws
- Repeat steps 1 and 2 for all hinges that need to be installed on the door.
- After all the hinges are screwed onto the door, secure the leaf in the doorway using wooden wedges and check its position with a building level.
- Repeat steps 1 and 2 for the hinges, placing them against the box and securing them with screws.
After this, we can assume that the door hinges have been successfully installed. Check again whether the fittings are securely fastened, make sure there are no gaps between the hinges and the door leaf. You can watch an educational video about installing overhead hinges below.
Carefully monitor the position of the door relative to the door frame when installing the hinges. The slightest deviation will bring all your efforts to naught: a door that is incorrectly oriented in space will eventually begin to creak and allow air flows through - through.
Overhead hinges
It is believed that door hinges are unreliable and are only suitable for light interior walls. However, today the most advanced and reliable materials are used in their manufacture: steel alloys, brass, stainless steel, which expand the scope of their application. In order to achieve smooth opening of the blade, as well as to increase service life, the product can contain from two to four ball bearings.
The butterfly loop is treated with high-quality galvanic coating. Available in the following colors: bronze, copper, chrome, matte. After installation, they take on the appearance of ordinary hinges. But still, some serious professionals are wary of such innovations and prefer traditional overhead hinges with a door insert.
Design features, pros and cons
First we need to consider the design of these models. In appearance they resemble a butterfly, which is why they got their name. They belong to the category of card models, as they consist of two integral parts.
What are the differences from regular mortise hinges? Standard samples are installed on pre-treated surfaces. First you need to remove a few millimeters of material, make a recess on the door and frame, and then proceed with installation. Overhead types do not require preparation and are attached directly to the facing of the canvas.
This installation without insertion is ensured by a number of nuances.
When closing the door, both halves of the product should result in a tight fit of the end of the door to the door. This plate design allows this to be done. Conventional models have straight and solid surfaces, which requires them to be deepened into the material. The butterfly hinge consists of two parts of one plate; when the door is closed, one fits into the other without leaving any gaps, reminiscent of a puzzle.
Advantages of hinges without mortise:
- The main advantage of a door product without a mortise is the ease of installation; you just need to mark their location and fasten it using a self-tapping screw.
- They are not divided into right and left models, they are universal.
- Aesthetic appearance without traces of wood manipulation.
- They are made from high-quality materials, so they are practically not in danger of abrasion.
- Cheap and widespread.
- Reliability during long-term operation.
It is worth considering the disadvantages, which are as follows:
- The canvas cannot be removed from the hinge. If such a need arises, the hinges will have to be completely unscrewed, that is, in essence, dismantled.
- Over time, distortions are possible, which are an obstacle to the movement of the door.
- Such products are only suitable for light door installations.
- For installation, butterfly hinges require a perfectly flat surface of the doors and frames.
Therefore, due to the list of disadvantages, some still prefer mortise models. If you are new to installing door leaves, then the overhead option is just for you.
Types of fastening loops
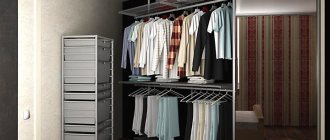
Various hinges are used in cabinet assembly. The most common fastening devices are those with four hinges. In everyday life they are called frogs. These mounts fit all cabinets with doors:
- clothes;
- children's;
- kitchen;
- for equipment;
- bookstores
They are divided into subtypes, depending on how they will be installed. The products have a wide range of applications and are used for all types of cabinets.
For children
For kitchen
For bookish
For clothes
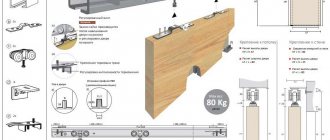
Before installing the fastening device, you need to take into account the features of the doors:
- for corner cabinets or cabinets of any configuration, choose hinges that will be fastened at an angle of 45° during installation;
- for a cabinet in which the doors are installed on the internal walls of the furniture without closing it, you need to choose an internal hinge;
- for cabinets in which both doors overlap a common side wall, you need to embed a semi-overlay hinge;
- the door designed to cover the sides of the niche is secured with overhead hinges;
- In addition to hinges consisting of 4 hinges, in furniture assembly practice they use fastening devices consisting of 2 parts that are connected by an axis;
- in order to be able to open the doors at an angle of 180°, you need to secure the device with inverse hinges;
- piano hinges with a simple mechanism are used for kitchen cabinets. They consist of steel or brass strips connected with wire. This type of fastening elements can only be installed in kitchen cabinets, since for other furniture this fastening will be fragile.
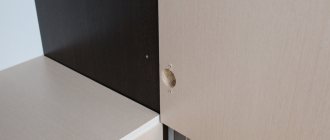
When choosing furniture fittings, it is important to remember that when installing hinges with four hinges, they are mounted to the side walls of the cabinet with self-tapping screws measuring 4x16 mm. In this case, the cup mount should have a diameter of 26 mm, and the holes will have the same diameter.
Installation
How are such products attached? To install butterfly hinges you will need the following tools:
First you need to choose a mounting location . To do this, use a tape measure to measure about 20-25 cm from the top and bottom edges of the canvas. This will become the starting point for each loop. To reduce pressure on the top hinge, attach the bottom one further from the edge.
Since installation is carried out without insertion, immediately attach the plate to the end of the door and mark future holes with an awl. After this, carefully drill them, this is necessary so that the screws can be screwed into the canvas without effort.
Then you need to decide where to attach the plates to the door frame. To do this, attach the door and roughly outline their location. After this, unscrew the hinges and more accurately mark the drilling points.
All the holes are ready, which means it’s time to apply the sheet to the opening and secure both plates with self-tapping screws. Check the movement of the door , because in some cases defects occur, however, they are not difficult to eliminate.