Due to changing demographics in the family at the beginning of this century, one of the rooms became a guest room. In addition to the standard set of furniture, the room contained a single bed, occupying almost two square meters of the small area of the room. I decided to get rid of a bed that wasn't used often and install a stationary lift-up bed instead. I wanted to buy a folding bed at a brass store. The price of such a bed would not only surprise, but shock. If these were still high-quality products made from real materials, then the conversation about purchasing could still be had, but these were some clumsy and cumbersome options. Financial assessments have shown that it is very profitable not to buy a bed, but to make it yourself. A trip to the building materials store confirmed the implementation of the plan to build a homemade bed, but one snag arose: in 2006, I was unable to purchase any mechanisms for building a lift-up bed. Over the course of a month, I drew up various sketches of lifting beds, from simple ones to mechanized ones with electric drive. The requirements for the bed design were as follows. 1. Maximum compactness. 2. Parallel use of the bed for other purposes. 3. Easy to open and close. 4. Reliability of the mechanism for unfolding and fixing the bed in the raised state. 5. Use of environmentally friendly materials. 6. Easy to manufacture.
See the result of my work, drawing, instructions and manufacturing diagram with photos and videos are attached.
Bed sketch
Lift bed materials
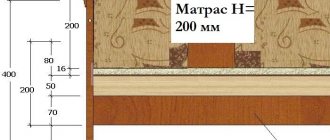
In order not to delay the manufacturing process, the construction budget had to not be reduced at all. For the frame, ready-made laminated boards with a cross-section of 250x28 and a length of 2.5 meters were purchased and cut to size right in the store. Two boards 1700 mm long and two boards 2000 mm long. The shelves at the top of the bed are cut from three laminated spruce boards with a cross-section of 250x17 mm. Although the boards were planed and glued, they needed additional sanding. Be careful when purchasing boards. The first grade mark is placed on all lumber. Among the laminated boards there are specimens with severe curvatures and defects in the canvas. The sketch does not show three pieces of support for the mattress when it is raised. These boards were cut from unplaned boards and machined to size using an electric planer. Plywood of the required size was not sold in construction stores and therefore was purchased at a wholesale warehouse. Two piano hinges were purchased as hinges. The situation with fasteners in 2006 was also different from the current one (2011); dowels and long screws were purchased to assemble the bed. During the installation of the bed, additional corners and screws were purchased.
Frame assembly and installation
Boards with a cross-section of 250x28 mm were placed on a flat horizontal surface and fixed by family members in a stationary state, then holes were made with an electric drill for dowels and guide holes for long screws. The joints and dowels were smeared with PVA glue and tightened with self-tapping screws. See photo. It is important to carefully check all dimensions and angles and constantly monitor the geometry during the assembly process by measuring the diagonals. A day later, the frame was lifted from the floor and moved to the installation site. Under level control, the frame is installed strictly horizontally and attached to the wall using corners.
Attaching the top board
Attaching the second board
Attaching the shelf stand
The shelves were attached to dowels
Attaching the frame to the wall
Attaching the frame to the floor
How to make a lifting mechanism for a bed with your own hands
Before you make a bed with a lifting mechanism with your own hands, you need to draw up a drawing. It must reflect all the dimensions of the product, indicating the thickness and distances, the parts and mechanisms used, the places and order of their fastening. To make a high-quality bed with a lifting mechanism with your own hands, the drawing must be made in two projections and contain only carefully calculated parameters.
When preparing the necessary material for the manufacture of a sleeping bed, it is worth taking into account the load created by the mattress on the shock absorbers, mechanical device strips, frame and fixation points.
Selection of tools
The design of a bed with a lifting mechanism involves the use of the following tools:
- pencil, tape measure and ruler necessary for marking;
- a screwdriver, which is used to fasten frame parts;
- a drill, which drills holes in the metal elements of the lifting mechanism;
- drills for metal and wood;
- a key and a drill for confirmations, with the help of which the body is assembled;
- a jigsaw used to cut MDF;
- an iron or an industrial hair dryer, which is used to perform edging with melamine tape;
- clamps used to secure the body during assembly;
- a knife used to cut off excess tape;
- a hacksaw used to cut boards;
- wrenches and sockets;
- hammer.
Necessary materials
For work you will need the following materials:
- self-tapping screws;
- confirmations;
- metal corner;
- furniture corners;
- fiberboard sheet;
- edged board;
- MDF sheet;
- mattress insert frame;
- melamine tape of the required shade;
- gas shock absorbers from 800 N;
- furniture legs;
- bolts, washers, nuts;
- metal strip;
- screeds;
- PVA glue;
- metal bushings.
Note! Instead of MDF, you can use chipboard, which is more affordable.
The process of creating a mechanism
Lifting mechanisms for different bed weights can be purchased ready-made, but if you make them yourself, you can be confident in their quality and reliability.
If you are doing this kind of work for the first time, it is better to use ready-made furniture assembly drawings.
The working process is as follows:
- Screw the top strip to the bottom of the base. For fastening, a strip is formed from rolled metal corners.
- Install the lift bases, consisting of a pair of planks, onto the frame elements.
- Attach a pair of bars responsible for adjusting the lifting height and maintaining the grille in the raised position.
- Install the lower bar, which serves as a support and makes the movement of the hinge supports easier.
Making a bed with a lifting mechanism should begin with the preparation of drawings, materials and tools.
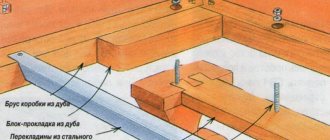
Important! At the junction of the strip with the hinges, it should have slight deviations in shape from the plane angle.
To form the deflections of the metal strips necessary for hinge fastening, it is convenient to use a small press. You can find it in locksmith shops.
First, a strong, reliable base for the intended bed is built.
Assembling bed bottom supports
One of the bottom supports (when the bed is lowered) is attached to the wall, this assembled support is 120mm thick, 720mm long and 300mm high. The second support was planned to be made in various ways, but I settled on the simplest, making a stool with my own hands from waste materials of the bed - it became the second missing support of the bed in the lowered state.
Right support
Right support without cover
Right support strut
Left bed support
Required Tools
But it is recommended not to skimp on tools, since the durability of the structure depends on high-quality assembly. You can borrow something from friends, but replacing screws with nails will be extremely inappropriate. So, if you decide to make a transforming bed-wardrobe with your own hands, then you will need everything from the list below:
- sandpaper of different grain sizes;
- special furniture screws;
- ordinary carpenter's pencil;
- drill or screwdriver;
- saw or hacksaw;
- jigsaw;
- pliers;
- file;
- self-tapping screws;
- screwdriver;
- level;
- roulette.
Remember that this is only a minimum set of tools. Most likely, you may need other items as you work. In this case, try to get the necessary tool rather than using improvised means.
Diagram of assembly and installation of the bottom
The installation of hinges must be taken with full responsibility. Important! When lowered, the bottom of the bed should rest on a lower support made of plywood with a section of 300x20 mm.
1. From the bottom of the bottom, mark a line at a distance of 150 mm from the edge - this is the axis of rotation.
2. Align the line with the axis of rotation of the piano hinges and mark the centers of the holes for attaching the hinges.
3. Use a thin drill to drill guide holes to a depth of 10-15 mm.
4. Fasten the loop with self-tapping screws. 5. Attach the lower support to the bottom. There should be contact between the support and the bottom.
6. Mark the centers of the holes. Drill pilot holes. 7. Fasten the loop with self-tapping screws. 8. The support should rotate on its hinges without any problems. 9. We attach the mattress support board to the bottom with self-tapping screws, which we additionally reinforce with triangular gussets. 10. To lower the bed, we make a bed pulling loop from a strong tape, which we staple to the inside of the bottom.
Mattress support and gusset
Fastened loop
Hinge Attachment
Bed pull loop
11. We try on the bottom and support to the frame; if all dimensions are correct, then the bottom should fit into the frame with minimal gaps. We attach the lower support to the frame. 12. The lower support in the center is additionally secured with a block. 13. Check the operation of the mechanism. By moving the center of gravity of the bottom inside the frame, a bed clamp is not required .
Attaching the lower support
Additional fastening
Checking the work
In the process of constructing the bed, it was planned to attach counterweights to the mattress support board to make opening and closing the bed easier, but they were not needed.
Old as new: a bold solution to make furniture more stylish with varnish
If you decide to varnish the furniture, then use an oil-based material. This coating will last longer and lay down in a more even layer. In addition, this type of coating is suitable for all types of wood. You don’t have to worry about ruining an oak table that is not only dear to your heart.
The only disadvantage of this varnish is the length of time it takes to dry. It may take more than 12 hours to dry completely.
A few rules for handling all types of varnishes that will help you make new furniture from old:
- Apply the mixture with a flat brush or soak a piece of thick, lint-free cloth in it.
- You will need to create at least 5 layers of varnish. It is necessary to apply a new layer only after the previous one has completely dried.
- Remember to regularly clean your brush and remove any remaining material from it. This can be done with alcohol.
Attaching the mattress
To secure the mattress in the raised state of the bed, two woven belts are used. One end of each strap is attached to the bed using a stapler, and the other end is attached to the Velcro attached to the back of the bottom and support board. Velcro is attached to the boards with a stapler.
Belt Attachments
Velcro belt fastening
The mattress is fixed
Talking module
The emptiness of the internal volume of the stationary support against the wall aroused the imagination. A life-worn soft talking toy with long-dead batteries came to hand. After dissection, the circuitry of the electronic unit was removed from the donor's body and, after several trials and errors, was connected to the bed. The contact sensor is replaced with a reed switch hidden in the top cover of the support. The reed switch is controlled by a strong magnet from the HDD hard drive (for more details on how to get them, see here ). The magnet is glued in a carefully selected place with double tape. The talking unit electronics are also taped to the bottom of the pylon cover. The acoustic emitter of the toy turned out to be weak in sound and was replaced by a multi-band block of acoustic heads from a car speaker. The head block lies freely on the bottom of the support.
Reed switch and electronic unit
Magnet mount
Acoustic head unit
The use of a reed switch made it possible to obtain clear operation of the device when lowering the bed and silence of the module when raising the bed. Watch the video.
Simple DIY folding bed