0
172628
When arranging a room, you should not only think about the proper furnishings and stylish decoration, but also choose comfortable furniture. When choosing furniture elements, especially cabinets, you should pay special attention to door hinges. It is important that the structures can be opened and closed with ease. When assembling cabinets, you should carefully inspect all the component elements, and it is better to independently adjust the hinges to the required level. A process such as adjusting hinges on cabinet doors is not at all complicated; the main thing is that you need to carefully study all its features.
Why do you need to adjust the hinges on cabinet doors?
The work is not difficult, it will take no more than 20 minutes and does not require additional skills.
A common cause of warping and sagging cabinet doors is incorrect adjustment of the hinges or operation for a long time. Therefore, door leaves need to be adjusted to the optimal position from time to time. The design of the most common hinge options allows you to adjust the façade in three planes.
Before adjusting the hinges, it is advisable to work with a building level. It is applied to three planes: to two sidewalls and to the front. This way you can determine in which direction the door deviations relative to the body occurred.
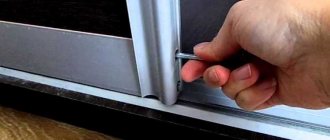
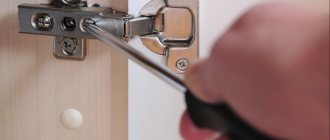
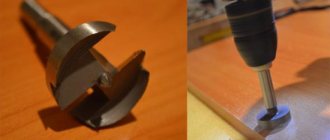
To adjust, you will need a shaped screwdriver.
How to care for fittings
In order for the furniture to last a long time and not cause discomfort during use, you need to regularly care for the hinges.
4 simple rules will help with this:
- The first adjustment of the hinges is carried out immediately after installing the door on the cabinet.
- The interval between the following adjustments depends on the correctness and intensity of use of the cabinet door. If you use the cabinet daily, you need to adjust it 4-6 times, and if you use it irregularly, 2-3 times a year.
- The cabinet facade is regularly inspected for distortions, sagging and door deviations. If deviations appear, adjustments must be made.
- In order for the hinges to last longer, not make sounds, and open doors easily and smoothly, they need to be lubricated. For this purpose, motor and diesel oils and lubricants are used: “Ciatim”, “WD-40”. The hinges are lubricated 1-2 times a year.
In order for the hinges to last longer, not make sounds, and open doors easily and smoothly, they need to be lubricated
Vertical adjustment
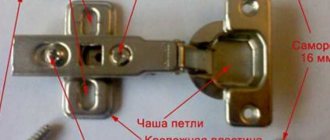
When adjusted vertically, the sash moves back and forth. This allows you to align the vertical and diagonal sagging of the canvas, and align its edges with the side wall of the furniture body. A fastening screw located on the counterplate is responsible for this process.
A fixing screw located on the strike plate is responsible for vertical adjustment.
Algorithm:
- first, set the screws on all hinges to the same position, slightly loosening them;
- press the facade to the body;
- tighten the fastening screws, ensuring that there are no gaps between the door and the facade.
After this, close the door and check for unevenness. Then they act according to the situation. For example, when the upper part of the facade is tilted, the fastening bolt on the upper hinge is tightly tightened. At the bottom, loosen slightly.
By adjusting the bolts, the door is optimally positioned at the same level as the cabinet body. Next, we begin to adjust the doors according to their height.
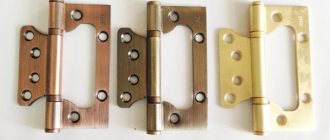
Hinges "BOYARD"
Such a small detail as a furniture hinge plays a significant role in creating functional and aesthetic furniture. Hinges not only set the doors and facades in motion, but are also responsible for the convenience of the opening and closing process, and also ensure the impeccable appearance of the facades.
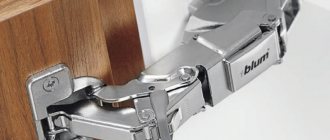
The range of BOYARD furniture hinges includes options with different hinge cup diameters for different facade materials, including glass doors. Particularly popular are modern models of furniture hinges with a closer, which ensure smooth, soft and silent closing of the door.
BOYARD furniture hinge systems meet the most stringent requirements for quality, practicality and aesthetics. Hinges undergo serious testing before being released for sale - for the strength of fastening the hinge to furniture, for the rigidity of the fastening and for durability.
Furniture hinges are made from high-quality alloy, have a nickel-plated coating, made using classical electroplating technology with a copper underlayer that provides protection against corrosion and exposure to aggressive environments.
The service life of BOYARD hinges is 8-10 years under active use conditions.
In the “Hinges” section of the catalog, products are divided into two currently relevant categories: hinges with a shock absorber and hinges without a shock absorber.
| Principle of code formation |
| Types of loops |
| Key-hole system hinges: translated from English as “keyhole”. The hole in the arm of the hinge body, through which the hinge body is attached to the mounting plate, is made in the form of a keyhole, which is where this system gets its name. Easy to install, reliable in operation. | |
| Slide-On system hinges: the most successful type of hinge in terms of price and quality, as well as ease of use. The name of the hinge reflects the design features of the fastening: the screws of the strip are easily inserted into the grooves of the hinge, only one simple movement is required. The Slide-On system hinge is one of the most popular on the furniture fittings market by all cabinet furniture manufacturers due to its universal technical characteristics, which allow the use of the hinge of this system in furniture of a wide variety of design solutions. | |
| Clip-On system hinges: quick installation hinges. They are the standard in the production of high-quality furniture. The specific system for attaching the hinge to the mounting plate does not require tools - just a finger press is required for installation. | |
| Adjusting hinges during installation | |
| Hinge height adjustment | |
| Adjusting the hinge depth | |
| Lateral hinge adjustment |
| Calculation of the required number of loops for installation |
| Scheme 1 | The question of the number of hinges required for installation on one door does not have a clear answer. The dimensions of the door, as well as its weight, are of great importance. In special cases, such as glass doors, doors with aluminum profiles or unusually wide doors, a trial installation of the fastening hardware is necessary. Door designs in which the width is too large in relation to the height should be avoided. For normal doors made of normal materials, the data given in diagram 1 can serve as guide values. | Scheme 2 |
In extreme cases, one additional loop should be planned. For loops with a reduced cup diameter, you can use scheme 2, also not forgetting about an additional loop for non-standard sizes or weights.
| Preparation for mounting the cup |
| H — drilling depth for cup D - drilling diameter L - center-to-center distance (distance between the centers of holes for fasteners) F - offset of holes for fasteners (relative to the center of the hinge cup) |
| Methods of fastening during installation and drilling for various types of fasteners |
| M4x16 mm screw , without pre-drilling | ||
| for Euroscrew 6.3x13 mm , with pre-drilling of the plate | ||
| for a foot with a diameter of 8 mm , with pre-drilling of the plate | ||
| for a foot with a diameter of 10 mm , with pre-drilling of the plate |
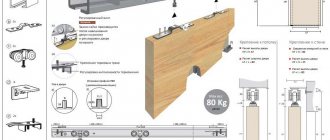
| Installing the hinge on the body |
| For Slide-On hinge: The upper part of the hinge body is slotted under the pre-assembled striker screw (1) and secured in position. | |
| For the Key-Hole hinge: The upper part of the hinge body with the hole is lowered onto the pre-mounted screw of the strike plate (1), inserted under it (2) with a translational movement and fixed in the desired position. | |
| For the Clip-On Hinge: The top body of the quick-release hinge is inserted into the slots of the pre-installed strike plate (1), secured by pressing at the top (2) and adjusted with the mounting screw. |
| Methods of fastening during installation and drilling for various types of fasteners |
| M4x16 mm screw , without pre-drilling | ||
| for Euroscrew 6.3x13 mm , with pre-drilling of the plate | ||
| for a foot with a diameter of 8 mm , with pre-drilling of the plate | ||
| for a foot with a diameter of 10 mm , with pre-drilling of the plate |
← Back
Horizontal clearance
By tightening the two screws located on the ears of the strike plate, you can move the doors up and down. This eliminates sagging or upward displacement of the doors relative to the body.
By tightening the two screws located on the ears of the strike plate, you can move the doors up and down
Algorithm:
- loosen the screws on all hinges;
- raise or lower the canvas (as appropriate);
- tighten the screws almost to the limit.
Tightening the screws too tightly may cause the threads to strip.
The best option is to select self-tapping screws with fine threads; they are tightly fixed in the door leaf and help to most accurately adjust the height of the facade.
Reasons for door misalignment
Here it is no longer the craftsman who installs the furniture and adjusts the hinges, but the environment and operation.
- Let's say there is a cabinet door under the kitchen sink. Most often there is a garbage container there. The constant presence of water causes the door to swell, causing deformation and weakening of the hinges. Frequent opening, closing, and slamming of the door also disrupts the hinge settings.
- Small children riding on locker doors. And also the creation of physical force, which leads to the door sagging.
Attaching the cabinet door to the door
Hinges on kitchen cabinet doors
Time to correct door hinge adjustment
There are times when it is necessary to adjust the hinges, even if everything is in order with the door. The first point is the newly purchased furniture. When installing it, it is necessary to adjust the hinges so that the furniture can be used for a long time without side effects.
The principle of adjusting cabinet doors
The second point is moving. Transported furniture receives certain vibrations in transport, which cause the screws to become loose. And also when loading and unloading furniture, there is careless handling by movers who do not place, but throw furniture accessories.
By plane
The adjusting screw is responsible for changing the position of the facade along the plane; by turning it, you can move the sashes to the right or left. This eliminates distortions of the door relative to the body and the adjacent door.
To eliminate distortions to the right or left, you need to tighten or loosen the adjusting screw. Carry out opposite manipulations with hinges located at different heights until the door is perfectly aligned.
To eliminate distortions to the right or left, you need to tighten or loosen the adjusting screw
Recommendations for long-term operation of hinges
In order for cabinet doors to serve for a long time and not become loose, squeak, or deform, proper care is required for the hinges:
- The first adjustment is made after they are fixed in place.
- Time of continuous use. If the cabinet door does not open very often, then the adjustment is carried out 2 times a year. Otherwise, loop maintenance may increase up to 5-6 times.
Hinge design option for cabinet door
In general, adjusting the hinges does not take much time, but you should not rush it. Unscrewing and tightening the screw only costs half a turn no more. This way the door will stay in place and not come off.
What is important to consider when setting up loops
There are 4 conditional laws for adjusting loops, which are important to consider during operation:
- Before work, check the evenness of the cabinet on the plane; it must be leveled.
- First of all, align the door vertically.
- In some cases, optimal results may not be achieved when adjusting the height. The reason is that the door width is too wide. Therefore, tighten the screw that adjusts the width of the gap. It should be no more than 5 mm.
- When working with modular furniture stacked on top of each other, work begins with the upper cabinets. In this case, the weight is distributed correctly, and the adjustment will be most accurate.
To prevent the screws from quickly unscrewing, anaerobic thread lockers are applied under their heads.
If an anaerobic fixative is not available, enamel or paint can be applied.
To prevent the screws from quickly unscrewing, anaerobic thread lockers are applied under their heads.
Care and prevention
To avoid having to constantly adjust cabinet doors, it is recommended to carry out preventive measures that will help protect the product from rapid wear and distortion.
Care instructions:
- the first adjustment is made immediately after installation and assembly of the furniture (cabinet);
- if the furniture is used infrequently, then adjustments and tightening of bolts are carried out 2-3 times a year, with frequent use - once a month;
- It is recommended to inspect the appearance of the door panels for distortions, deviations, and other defects;
- for better operation and prolongation of the functions of the adjusting mechanism, it must be lubricated with motor or other suitable oil;
- To prevent impacts, you can install a special oil closer; it promotes smooth closing and prevents the canopies from coming loose.
After lubricating the mechanism, it is recommended to open and close the door several times to better penetrate the oil into the device.
The process of correcting distortions in the design of door panels takes little time, and inspection and preventive actions take even less.
Comparison table of popular manufacturers of adjusting loops
| Firm | Characteristics | Prices |
| Bloom | The fittings allow you to adjust the hinges in 3 planes - width, depth and height. |
The depth of the door frames for CLIP top models is adjusted by rotating the support screw located on the hinge arm. Adjustment mechanisms such as MODUL, CLIP allow you to correct the depth of the door leaves using a fixing screw.
The width is adjusted the same way for all models - using the 2nd screw, which is located on the hinge arm.
The height is adjusted by strike plates and depends on the type of specific model.
The fittings come with or without eccentrics.
The price for awning slats is up to 60 rubles.
Sensys and Intermat class fittings are easy to install and adjust. They have an integrated damping system. Equipped with an electrical and mechanical opening device.