Scraps and remnants of various fabrics are not garbage, but a real treasure in the hands of a needlewoman, which can be turned into amazingly beautiful and useful things, for example, rugs for a nursery, hallway or bathroom. There are so many ways to make rugs and rugs that you don’t even need to know how to sew and knit, you just need to choose the most convenient option for yourself.
DIY rugs made from scraps of fabric
After getting acquainted with the methods of making chair covers and sewing rugs, think about whether it is worth throwing away old T-shirts, jeans, towels, woolen sweaters and scarves. After all, all these things, even if they are shabby, with holes, faded in the sun, can be given a second life.
Patchwork fantasies
Bright rainbow rug
Preparation of flaps
Depending on the chosen technique for making the rug, scraps of fabric of different sizes and shapes may be required. It is better to select and cut the required amount in advance so as not to be distracted while working.
Preparing long strips of fabric for knitting or weaving a product can cause some difficulties: sewing them together is a long and tedious job. And if you tie them in knots, the rug will turn out rough and sloppy. But there are ways to avoid this.
Cutting continuous tape
This method is used when preparing fabric strips from old clothes: T-shirts, turtlenecks, T-shirts and even tights.
Step 1.
We cut off the rough bottom seam, the cuff of the sleeve or the toe part of the tights. For a T-shirt or turtleneck, cut off the top part right below the armholes.
Trimming seams
Step 2.
Place the product on a flat surface with the side seam facing you and cut it into strips of the required width, without cutting a couple of centimeters to the opposite seam.
Cutting strips
Step 3.
Thus, we cut the entire workpiece into fringe.
Workpiece cutting
Step 4.
We straighten the workpiece so that we can see the entire uncut part, and cut it not in a straight line, but at an angle, directing the scissors from one slot to the adjacent one on the other side of the product.
Cutting fabric
As a result, we get a closed ring, which to obtain a tape you just need to cut across one of the seams.
Blank for making a rug
Blanks can be wound into balls
Connection without node
If the length of the tape is not enough or you need to connect many short pieces with each other, the simple technique shown below will help you do this.
| Image | Description |
Step 1 | We cut small holes at the ends of adjacent strips that need to be connected. |
Step 2 | Place the strips on top of each other, aligning the slots. |
Step 3 | Pass the second end of the top strip through the slot from below and pull the entire strip through it. |
Step 4 | Tighten the connection. If necessary, repeat these steps to further lengthen the tape. |
Advice. If scraps of fabrics of different thicknesses and densities are used, then thinner ones should be cut into strips of greater width to even out the thickness of the weaving.
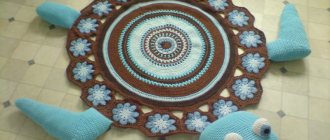
We knit a beautiful rug from unwanted clothes
Today we will learn how to use old unwanted clothes and make something new, unusual and bright.
Everyone still has old unnecessary things - T-shirts, worn-out socks, old jeans. If you haven't thrown out all of these things yet, wait a little. See what you can make with them!
The first step, of course, is to wash all the things so that our rug is suitable not only for a rug at the entrance, but can also decorate a chair or stool.
Then you need to take scissors and cut the prepared things into narrow strips. The width of the strips may vary. Depending on the density of the fabric, I cut strips 2 - 5 cm wide. I advise you to cut not immediately, but as you knit, when you see what color will be good to use next, so as not to cut unnecessary strips from unnecessary things. My rug used both knitted fabrics (T-shirts, socks) and woven ones - jeans and chintz fabric, and the density of the fabrics was different. I believe that the more diverse the fabric, including in structure and density, the more interesting the result can be.
All you have to do is stock up on threads and you can start. The main requirement for threads is that they must be strong so that the rug will last longer. As for the color, you don't have to worry too much. The color of the rug will depend on both the color of the patches and the color of the threads, and you can safely combine a variety of colors. For example, I tied blue denim with red thread and it turned out quite well!
In my rug pattern, it is important to alternate colors - after light (white, yellow), use a darker one, and then light again, or some contrasting one. Then the pattern will sparkle even when using old, worn things. And your old things will find new life. It's a practical approach to make something good out of almost nothing, and very cheaply. But we can be driven not only by economic motives - some, especially sentimental individuals, even specially knit rugs from T-shirts that are especially dear to their hearts, which are no longer suitable for going out, but which they cannot even raise to throw away. And the T-shirts in the rug will remind you of the past...
Usually, scrap knitting comes down to rather boring knitting in the round. Today I will introduce you to new knitting techniques that allow you to create unusual patterns.
I crocheted with a fairly thin crochet hook, but you can use a crochet hook that is comfortable for you.
Watch the video tutorial! For your convenience, I have compiled a brief summary of the video tutorial, indicating at what minute and second in the video the knitting of each new row begins:
- first row (central part), yellow fabric, yellow thread... 0 min :36 sec;
- rows 2 and 3, denim, red thread... 6 min :45 sec;
- row 4, white fabric, white thread. We knit 6 “ears” ... 9 min: 36 sec;
- row 5, white fabric, white thread. We tie it around... 14 min :23 sec;
- row 6, brown stripe, red thread. We make 3 ears on each white ear... 16 min :36 sec;
- row 7, brown stripe, red thread, tie around... 19:56;
(20:10 joining two strips of fabric)
- rows 8,9 yellow stripe, yellow thread. Connecting the ears... 21 min :58 sec;
- row 10, green stripe, green thread... 25 min :04 sec;
- row 11, green stripe, green thread, knit 7 “ears” in each group... 25 min: 28 sec;
- row 12, white stripe, white thread... 27 min :56 sec;
- row 13, brown stripe, yellow thread. Filling the gap... 28 min :05 sec;
- rows 14 - 17, final binding... 34 min :26 sec.
When knitting the rug, I used different techniques:
- knitting “ears” that knit by themselves, they seem to stick out from the warp;
- knitting rings;
- knitting the rounded parts of the pattern on which you need to add loops;
- knitting with decreasing stitches, forming internal corners, in which it is necessary to tighten the strip of fabric;
- connecting parts of knitting (knitting on both sides);
- filling the space between parts of the pattern.
All these techniques are shown in the video.
It is important for me to know the opinion of my viewers, how clear all these knitting techniques are. Perhaps in the future I will prepare small master classes covering each of these knitting techniques.
Enjoy watching and new creative ideas! If my master class inspires you to be creative, I will be very glad to see your works made based on my master class. Write your opinion in the comments and private messages, and send photos of your work!
Knitted rugs from patches
From scraps joined into long ribbons, a rug can be crocheted, just as napkins are crocheted from ordinary yarn. True, for such work you need a large hook, 6-10 mm thick.
Begin work by tying a braid of 5-6 air loops, which are closed into a ring. Then the fabric is knitted in a spiral with double crochets, periodically knitting two stitches from one loop to increase the diameter. After each row, the work must be laid out on a flat surface to control the plane.
Crochet
Crocheting a rug
Video - Crocheting a round rug from cut fabric strips
Such a simple round rug does not require any special skill; even those who have picked up a crochet hook for the first time can knit it. If you have experience, you can create real masterpieces of any form.
Crochet rug
Handmade children's rug
Bright knitted rug
Multicolored rug
Braided rugs
You can weave a rug in different ways, and to do this, the scraps again need to be joined into long strips.
Braid rug
This method is very simple, it does not require any tools or equipment other than a needle and thread.
Step 1.
Sew three patchwork strips together.
Sew three patchwork strips together
Step 2.
We braid them into a regular braid. It should turn out to be quite long, so the strips will have to be extended as you work.
Braiding
Step 3.
We secure the end of the braid with a pin and begin to roll it in a spiral on a flat surface.
Twisting a braid
Step 4.
We fasten each turn to the previous one on the reverse side, sewing it with threads.
Sewing a braid
Step 5.
You can do it differently: first twist the entire braid, and then carefully sew the turns in a spiral.
Making a rug
An oval rug is made in the same way.
Braided rug
Terry mat-braid
Curly rug made from braids
Rug made of towels
But if you need a rectangular shape, it is better to weave several braids of the same length, lay them close to each other and sew them in a straight line. And weave the ends with cord or sew on a typewriter.
Scheme for making a rectangular rug
Rectangular woven rug
Advice. Such a rug will hold its shape better if you add a lining to it on the back side.
The lining can be an old towel
Braided rug
To make such a rug you need to make a frame for weaving. Its size should be slightly larger than the desired size of the canvas. Nails with small heads are placed on two opposite sides or wooden pins are installed to secure the base. The distance between them is 2-2.5 cm.
Weaving frame
Advice. If you add another intermediate crossbar to the frame, which can be attached at different levels, you can make rugs of different sizes.
Step 1.
We begin work by securing the warp threads. This can be cord, twine, thick yarn, or scraps tied into a long ribbon. The end of the tape is tied to the upper corner stud, after which it is snaked around all the pins of the upper and lower crossbars in turn. You need to stretch the base well, but not too tightly.
Fastening the warp threads
Step 2.
Preparing working threads. They should not be too long so as not to make weaving difficult. It is better to attach the next strip as you shorten the previous one.
Preparing working threads
Step 3.
We begin weaving by alternately passing a strip of working thread over and under the stretched warp threads.
Let's start weaving
Step 4.
Having reached the end of the row, we wrap the working thread around the outer warp thread and continue weaving in the other direction.
Weaving from the edge
Step 5.
Every few rows, compact the fabric by pulling the woven rows up. To do this, you can use a special device in the form of a wooden fork or simply use your hands. The denser the weaving itself and the smaller the distance between the rows, the less noticeable the warp threads will be.
Thread compaction device
Step 6.
We make the required number of rows, periodically increasing the working thread or changing it to a strip of a different color.
Weaving a rug
Step 7
If the color of the working thread needs to be changed at the edge of the rug, it is cut close to it and hemmed, or the next strip is tied to the cut end, and the knot is left on the wrong side. But you can do it differently: tie the strips on the edge, leaving long tails. In this case, the edges of the rug will be fringed.
Weaving a rug with fringe
For reference. The fringe on the other two sides can also be done at once, if you do not wind the warp threads around the pins, but tie them to each pair with separate strips.
Chair cover with fringe
At the end of the work, the canvas is carefully removed from the nails.
You can complicate the weaving by taking two working threads instead of one at once, and interweaving them both with each other and with the warp threads.
How to weave a rug without a loom
Video - Rug made of shreds on a frame
You can also weave a round rug in a similar way. A hoop can serve as a frame for it.
Round wicker rug
The process of weaving a rug on a hoop
Use of weave
Prepare a frame according to the size of the future carpet product, fill the nails on two opposite sides. Set the distance to 2.5-3 centimeters from each other.
The following instructions will help you learn how to weave a rug from old things with your own hands.
Pull the strips of material taut. It is advisable to take it in colorless shades. This will be the basis.
Pull the working strips first above the thread, then under it.
At the end of the row, pull the strip under the warp thread and work in the opposite direction.
Related article: Crochet kitten patterns
When weaving a rug, sometimes move the finished rows towards the starting row. At the end of the work, hide all the knots on the wrong side. Now the finished product can be removed from the frame.
Knotted rug
To make such a shaggy rug, you don’t need to sew the scraps into ribbons. They just need to be cut into strips 8-12 cm long, depending on how long the “pile” you want to get.
In addition to them, the work will require a crochet hook and a special mesh for carpets, which can easily be replaced with a synthetic construction mesh. The base of the desired shape and size is cut out of it.
Carpet mesh
Then the strips folded in half are slipped under the mesh, and their ends are pulled out to the front side on both sides of the cell wall using a hook. All that remains is to tie them with a strong knot.
Blanks from an old T-shirt
Stripes tied into knots
The longer the ropes, the fluffier the rug.
All grid cells are filled in the same way.
Using scraps of different colors, you can create patterns and ornaments from them according to a pre-designed scheme.
Soft patch rug
Heart shaped rug
Patchwork pompom rugs
Very soft and cozy rugs are made from patchwork pompoms filled with holofiber, padding polyester or foam rubber. You don’t have to buy filler either - you can “get it” from old jackets, blankets and stray pillows.
The choice of patches depends on the purpose of the rug. For children, old knitted T-shirts and T-shirts in bright colors are best suited.
To work you need to prepare:
- a large number of scraps or old unnecessary knitwear;
- needle and thread;
- scissors;
- filler;
- thick fabric for the base;
- glue gun
Step 1.
We cut out circles of the same size from the knitwear according to the template. Their diameter should be approximately twice the intended diameter of the pom poms.
Cut out circles
Step 2.
Using a simple stitch, we quilt the blanks in a circle, stepping back a little from the edge.
Quilting the workpiece around the circumference
Step 3.
Place filler in the middle and tighten the thread. We get a soft ball.
Filling included inside
Step 4.
We make such balls from all the blanks.
Preparing pompoms
Step 5.
We cut out the base for the rug from the fabric and use a glue gun to sequentially glue patchwork pompoms to it. They can also be sewn on.
Attaching pompoms to the base
To make a similar rug for the bedroom, you can take a coarser and more wear-resistant fabric, and for the bathroom - old terry towels.
Rug made of pompoms
Old rugs and bedspreads of strict monochromatic colors will make an interesting rug in the shape of flowers or a clearing. If the fabric is thick and dense enough, you can even do without filler or use very little of it.
Rug "Polyanka"
Rug made of pompoms in the shape of a leopard skin
The manufacturing algorithm is the same, with minor nuances.
| Step, no. | Description |
1 | We cut out a base from the fabric in the shape of the future rug. From working fabric and scraps we cut out rounded oval and round shapes to create “stones”. We make them quite large. |
2 | We bend the edges of the blanks inward and sew them on the wrong side. If they are not voluminous enough, put a little synthetic padding inside. |
3 | We prepare the required number of parts so that they fill the entire area of the cut base. It is advisable to make “pebbles” of different textures, shapes and sizes to make the rug look more natural. |
4 | We lay out the blanks on the base in the required order and sew the adjacent ones together. |
5 | Sew the “pebbles” to the base fabric. |
6 | We especially carefully fasten all the parts around the perimeter of the rug together. |
7 | We cut out the backing from thick fabric according to the size of the resulting product, making small allowances for the hem. And we sew them together along the edge. |
Original ideas for interesting rugs for children's rooms
It’s easy to create interesting and original rugs from scrap materials for a child’s room, to decorate a sleeping or play area. Bright, colored accents and crafts with unusual textures will appeal to children of any age; they can be used to organize games and relaxation.
Rug made of pompoms
To make such a craft, you will need a mesh with small cells; it is best if it is made of durable polymer material. Thick and soft woolen threads are used to make pompoms; a large amount of them will be required, corresponding to the size of the finished product.
Pompoms of the same size are carefully tied to the base using the loose threads remaining after tying the threads and fasten the structure.
Soft felt stones
It is convenient to work with felt, because this material does not fray when cut and is available in a wide range of colors. Circles of different diameters are cut out of the canvas (it is better to choose colors that imitate the shade of natural stones), the blanks are stitched along the larger edge with large stitches and the threads are filled with padding polyester before tightening.
Soft and different shaped “pebbles” are sewn one to another, which will help to form a soft rug that has the appearance of a stone path.
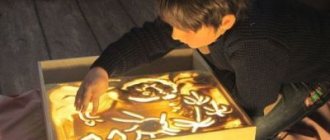
Educational mats
Active games and the process of learning about the world around you can be diversified by a playful form, and different toys are used for this. Any home craftsman can create an educational mat with his own hands; to do this, the blank canvas is divided into several zones, which are decorated with various elements.
An interesting solution would be to fill several pockets on the mat with loose elements with different textures (small and large cereals, beans and peas, smooth pebbles). Multi-colored caps from plastic bottles, strips of faux fur and wool pompoms are attached to a separate zone.
By spending a little time and things that have already lost their marketable appearance, you can make many useful and interesting crafts. The proposed techniques will help give a second life to old T-shirts and children's clothes, home textiles and men's shirts, jeans of various models.
Small floor coverings of different shapes, sizes and configurations will decorate the house and bring an atmosphere of comfort and warmth to it, and help complement the interior design.
Rugs made from patchwork corners
This method is suitable only for craftswomen who are good at machine sewing.
Rug made of triangles
To make such unusual and very beautiful rugs you will need scraps of fabric of the same density.
| Step, no. | Description |
1 | We cut identical squares from the fabric with a side of about 10 cm and fold them twice diagonally. |
2 | We pin the resulting corners to the fabric, forming the middle of the rug. And we attach them along the edge using a typewriter. |
3 | We lay the next row so as to close the seam, shifting the corners relative to the ones already hemmed. |
4 | Having sewn the second row, we form the third and subsequent ones in the same way, gradually expanding the circle. |
5 | We attach the last row close to the edge and finish it with bias tape. |
In the example described, the corners of the patches look into the middle of the rug. But you can do the opposite: start sewing the triangles not from the center, but from the edge of the product, turning them outward. In this case, you will have to decorate the middle with a round patch.
From the scraps you can make not only corners, but also other shapes - petals, scales, beaks, etc.
Beautiful rug in the shape of a flower
Such different rugs are made from scraps of fabric and old things that no one wears anymore. Instead of adding to the amount of waste on the planet, you can put old things to good use, while decorating your home and saving money on buying rugs, pet bedding and kitchen stool covers.
Denim rug
Rugs made from old jeans