0
110587
The work of assembling furniture is considered completed as soon as the hinges on the cabinet door are installed, because the front side is very important. People always pay attention to it when entering a room, so a self-respecting owner will not allow any flaws in the installation. A millimeter of inaccuracy in the calculations - and the entire effect of the new furniture is down the drain. No matter how insignificant and simple the work may seem, it is an illusion. To carry it out efficiently, you need to be a master. The aesthetic perception of finished cabinet doors is only 50 percent of success. It is important that they are installed correctly: the period of operation of the cabinet without repair depends on the balance of the doors.
Features and types
The simplicity and functionality of the door hinge mechanism has given rise to many of its varieties, designed for use in various types of products for the home interior. Now such devices are found in the following versions:
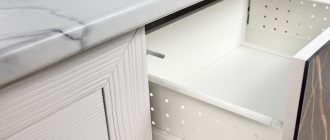
- Invoices. Used in wardrobes and cabinets with hinged doors;
- Deposits. For small cabinets with low weight doors;
- Heel. More often used in interior doors, they can serve well in cabinets with small fronts;
- Pianos. Found in folding tables with a book design;
- Adit. Suitable for doors of false panels and fixed panels of sliding wardrobes;
- Angular. Designed for the appropriate types of compartments installed in the corners of rooms and having limited space for opening doors;
- Semi-overhead. Used in cabinets with a large number of fronts;
- Mezzanine. They are also “horizontal” hinges used in hanging cabinets in the kitchen.
The use of a particular type of door hinge in a closet depends on many factors, including its style, dimensions, weight of the doors and the method of their fastening. In some cases, due to the physical placement of the door relative to the frame, the compartment requires the use of exclusively corner hinges, which have a greater range of movement compared to traditional overhead hinges. In products with a classic texture, only such mechanisms can be used that will correspond to this style.
Frequently asked questions about hinges and their answers
What basic settings do you need to know for adding hinges? What diameter are the hinge cups?
The hinge cup is attached to a facade made of solid wood, particle board or MDF, in a pre-milled hole, the diameter of which follows the diameter of the cup and is the same for all manufacturers: 35 mm for standard or 26 mm for facades of smaller sizes and with low weight . The strength of the cup's fixation in this hole is achieved due to its tight fit and fastening with screws or other fasteners into the cup's mounting holes. Recently, cups with a diameter of 40 mm have appeared for thick facades.
The edge of the hole in the facade for the cup is located at a distance of approximately 3-7 mm from the edge of the facade. This value is called the distance to the hinge cup from the edge of the facade. The same type of hinge may differ in the way the cup is attached to the facade - fastening with screws (4 mm in diameter and 13 mm in length) or fastening with foots with a diameter of 8 mm or a diameter of 10 mm, as well as a Euro screw measuring 6.3 mm x 13 mm.
What are the center-to-center distances between the hinge cup mounting holes?
The distance between the centers of the holes varies from manufacturer to manufacturer. For Italian hinge manufacturers, this distance is 48 mm and is the most common on the market. In the assortment of the Austrian company, most of the hinges have a center-to-center distance of 45 mm, while the German manufacturer has 52 mm. As a rule, the assortment of these companies also includes hinges with center-to-center distances of 48 mm, but the majority of the assortment consists of hinges with these dimensions. BOYARD manufactures hinges to all major additive standards.
What drilling patterns are used to install the hinge?
Fastening elements for fastening a cup, even of the same type of loop, can be located at different distances relative to each other. This must be taken into account when pre-drilling mounting holes for the cup in the façade. There are several hole drilling patterns that are expressed by two numbers (values in millimeters), the first of which shows the distance between the centers of the mounting holes, and the second - the distance between the center of the cup hole and the straight line passing through the centers of the mounting holes.
Basic schemes:
- 52 / 5,5
- 48 / 6
- 45 / 9,5
What are the hinge installation angles?
The standard angle between the sash and the body wall to which the hinges are attached is 90° (right angle). This value is taken as the reference point and is the installation angle of 0°. A negative installation angle shows how much it is reduced, a positive angle shows how much it is increased. Examples: 45°, 90°, 115°, 120°, 135°, 180°, 270°.
How to calculate the parameters for installing an overhead hinge?
In order to correctly install the overhead loop, you must use special installation formulas. These formulas are in the BOYARD technical catalogue.
Let's look at the example of loop H100A02, which has the formula H=15+KD, where:
- K – distance to the cup from the edge of the facade;
- D – door overlay (distance from the inner surface of the side wall to the edge of the facade);
- H – basic installation height of the hinge body (height of the mounting plate).
Below the formula is a table in which:
- The K value is acceptable in the range from 3 to 7 mm (selected depending on the desired overlap and the values of D and H).
- H value – from 0 to 4 mm.
- Let's look at how to decipher the table using the example of installing H100A02/0112 in a cabinet with a side wall thickness of 16 mm.
- Deciphering the article, we see that for this loop H = 2.
- Let's choose the size K=3 mm.
- Substituting H=15+KD into the installation formula, we get 2=15+3-D. D=16 mm.
This means that the front will completely overlap the side wall on the side where the hinge is installed.
We can determine the height of the hinge strip H100A02 to be ordered if we know the required overlay size D.
- Example: D=18 mm, K=3 mm.
- We substitute the values into the same formula H=15+KD.
- H=15+3-18=0. It turns out that the height of the bar is H=0. This means you need to select article H100A02/0110.
The table helps you find the desired values without making additional calculations, just by looking at the result in the table at the intersection of columns and rows with known values.
How to calculate the parameters for installing an inset hinge (C)
Now let's look at the rules for installing an inset loop (C). To do this, you need to use special formulas for installation, which are located in the BOYARD technical catalog.
For example, let's take loop H306C02, which has the formula H=K+A-6, where
- K – distance to the cup from the edge of the facade;
- A – reveal (distance from the inner surface of the side wall to the edge of the facade);
- H – basic installation height of the hinge body (height of the mounting plate).
Below the formula is a table in which:
- The K value is permissible in the range from 3 to 7 mm (selected depending on the desired reveal A and the H value).
- H value from 0 to 2 mm
Let's look at how to decipher the table using the example of installing H306C02/5010 in a cabinet with a facade thickness of 16 mm.
- Deciphering the article, we see that for this loop H = 0.
- Let's choose the size K=4 mm.
- Substituting H=K+A-6 into the installation formula, we get 0=4+A-6. A=2 mm.
- This means that the reveal (the distance from the inner face of the side wall to the edge of the façade) is 2 mm.
We can determine the height of the strip for the H306A02 hinge that needs to be ordered if we know the required reveal size A.
- Example: A=1 mm, K=5 mm.
- We substitute the values into the same formula H=K+A-6.
- H=5+1-6=0. It turns out that the height of the bar is H=0. This means you need to select article H306С02/5010.
The table helps you find the desired values without making additional calculations, just by looking at the result in the table at the intersection of columns and rows with known values.
The installation dimensions for the hinge strip are different compared to the dimensions for overhead and semi-overlay hinges. For overhead (A) and semi-overlay (B) hinges, the strip is installed at a distance of 37 mm from the edge of the side wall, and for the inset hinge (C) the installation size is 37 + B (where B is the thickness of the facade).
Let's look at an example:
- H=16 mm
- It turns out that in order to install the mounting strip it is necessary to retreat from the edge of the side wall 37+16=53 mm.
Required materials and tools
Installing a door hinge will require disassembling the mechanism, so you will need tools to perform delicate, neat procedures. In addition, other manipulators will be required for general work with the door. A complete list of all tools for installing an overhead hinge model is as follows:
- Screwdriver with a Phillips bit.
- Set of screws.
- Building level.
- Ruler or tape measure.
- Screwdriver.
- Drill.
- Pencil or erasable marker.
- Cutter with a diameter of 35 mm.
The standard layout of a door hinge involves its disassembly into three components:
- The base is in the form of a strip, which is responsible for attaching the hinge to the cabinet panel.
- Cup, which is mounted on the working door.
- The hinge body is a moving part that connects the door to the cabinet body.
The door hinge mechanism is installed using mounting screws screwed into the holes of the mounting plate and cup. The operating parameters of the device are determined by the adjusting screw in the housing. Thus, the hinge mechanism has up to six mandatory fasteners, which are best prepared in advance as spare ones.
Design features and operating mechanism
The loop consists of the following elements: cup (1), shoulder (2), striker (3). The cup is inserted into a blind hole in the door, which is drilled with a milling cutter and fixed with two self-tapping screws through holes located on the flange (5).
A counterplate is fixed to the furniture wall with self-tapping screws, which is attached to the arm (2) and the cup using a mounting screw (6) and a mounting groove (7). An adjustment screw (8) is located on the arm to adjust the height of the arm relative to the strike plate and align the door after installation.
Design features of furniture hinges
To work you will need:
- drill: thin drills, milling attachment with a diameter of 35 mm;
- pencil, tape measure (ruler);
- screwdriver or Phillips screwdriver;
- building level.
Marking
Marking is an integral part of the cabinet layout for the correct installation of the door and the correct operation of its hinges. Mistakes made at this stage will, at a minimum, spoil the appearance of the product, and at maximum, make it impossible to correctly use the swing door mechanism. During the marking process, you will need a pencil or marker to mark the areas for creating holes for the cups of the mechanisms. Therefore, it’s worth starting with the main points of the markup instructions:
- Depending on the weight and size of the door leaf, the number of hinges installed can vary from two to five.
- You should not install the mechanism cup on the very edge of the door facade. It is recommended to maintain a margin of 2–2.2 cm.
- The average distance between hinges on a meter-long door leaf is at least 50 cm. In this case, you need to take into account its weight, which may require a larger number of fastening mechanisms.
Make sure that the areas for installing hinged awnings on the façade are not opposite the cabinet shelves. Otherwise, there is a risk that the door will not close completely due to the fact that the body rests on the shelf platform.
Drilling holes
Installation is carried out with all the rules:
- The depth of the hole for the furniture hinge should be about thirteen millimeters. If possible, the insertion of furniture hinges should not be deeper, otherwise the front side of the canvas may crack;
- The diameter of the hole depends strictly on the cup of the loop. Tools must be completely aligned with their axis to prevent damage to the surface;
- A sharpened cutter will help protect the blade from damage and chips;
- Do not rush while drilling, otherwise there is a risk of doing it sloppily;
- It is worth paying attention to the dimensions of the cups and their dimensions when installing furniture hinges;
Having drilled one hole, proceed to the next and so on until all the holes for laying the hinges are prepared.
What tools should I use for this?
The bowl must be secured to the facade, and the bar to the body of the bedside table. The furniture hinge must be inserted into the hole, which must be made in advance. The shoulder of the loop becomes a kind of bridge, now connecting both parts. To make holes for such loops, you need to prepare the following tools:
- screwdriver or drill;
- special drill-mill;
The diameter of the cutter for the hole for a furniture hinge is 35 millimeters or 25-26mm. It is selected depending on the size of the loop cups. To create holes for such hinges, you can also use a simple drill.
A multifunctional drill, with attachments that are easy to replace, is quite suitable for such work.
The middle spike must be installed in the center of the circle, outlined using a specially prepared caliber. Automatic calibration is used on the corresponding machines, but at home the master cannot do without a specialized electric tool.
During installation, hinges require a high level of care and precision. The chance to complete exactly the required niche is the most important advantage of the so-called Forstner drill. It can provide a stop that will prevent you from penetrating further than required. And the teeth of the drill do not allow it to deviate from the intended “course”. The end result is an almost perfect hole. And due to this, the cup fits into the recess quite tightly.
But the above-mentioned drill also has one significant drawback, which manifests itself when working with a solid piece of wood. This is low quality, which is to be expected if the instrument was not made in a factory. This is why you should choose tools exclusively from official companies. And, of course, don’t forget about warranty cards.
Depending on the type of panel you are working with, the cutter can get quite hot. Due to this, it can burn the edges and wood that is removed from the recess. That is why, when working with such a foundation, you should not forget about breaks in work. So that the drills have time to cool down at least a little. Working in three or four sets will be ideal. Particular attention should be paid to breaks when working with MDF sheets. If the activity is carried out with chipboard sheets, parts made of strong alloys can make recesses for hinges really quickly and without much stress.
Hole preparation
Holes are created using a drill based on the markings. An electric screwdriver with an appropriate attachment is also suitable as an alternative tool. In addition, the use of a cutter is a must, which ensures that the structural integrity of the door facade and cabinet panel is preserved. Otherwise, drilling a hole can lead to chipping and deformation of the wood panel. The insertion should be made with a depth of no more than 12 mm, which will be enough for a reliable hole for the loop cup platform. It is better to select the drilling speed yourself, based on the density of the material from which the facade and cabinet are made. While chipboard panels are fairly easy to process, natural walnut or ash are distinguished by high strength. For the same reason, you need to ensure that the drill works strictly at an angle of 90 degrees, from which it can easily deviate if you are dealing with hard natural wood.
Stages of installing furniture hinges, marking and fastening
Many furniture is equipped with doors. The correct location of the hinges ensures convenient use and long service life of the door. Sometimes it happens that the door does not open well or is slightly askew. Such moments cause unpleasant emotions when using the closet. Therefore, it is worth paying more attention and more seriously to the fact that when furniture hinges are installed, the installation and markings must be carried out taking into account all the rules.
Hinge Attachment
Due to the fact that the door leaf is a moving object, unlike the cabinet, you need to start attaching the hinge from there. This will make your work easier by eliminating the need to adjust the facade to the hinges when you have to hang it. Installation work with swing mechanisms can be carried out in accordance with the following instructions:
- At the stage of installing the door hinge, all the flaws in marking and work on the holes may appear if you first place it on the site of future installation. Try to carry out a similar check first, making sure that the platform of the overhead hinge cup fits tightly to the surface of the door leaf over its entire area. Even the slightest deviation can cause the door to warp in the future.
- Using a pencil and applying a loop, new markings are made for the screws so that they fit evenly into the grooves of the loop.
- After this, you can install the platform last by screwing in the fasteners using a screwdriver or screwdriver.
Installation
First, mark the location of the loops in height. The number of furniture hinges depends on the dimensions and weight of the door leaf.
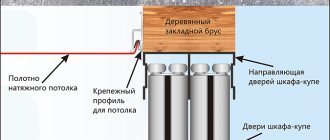
The distance from the top and bottom edges of the fabric to the loop must be at least 70 mm. Otherwise, the lower and upper horizons of the box may touch the loop.
It is convenient to make markings using a special device - a conductor
Then mark the location of the hole for the cup on the facade. To do this, at the required height from the edge of the blade to the center of the drilling, measure 21-23 mm.
The blade is placed on a hard and stable surface, and they begin to drill a “blind” hole with a milling cutter. All holes are located perpendicular to the plane of the facade and have a depth of 11-12 mm. After work, small shavings are collected with a vacuum cleaner.
If you have no experience working with a cutter, especially with centering tenons 3 mm long, it is advisable to practice on scraps of board.
And another option is to shorten the tenon using a grinder or sandpaper. Otherwise, you can drill through the canvas.
The cup is inserted into the holes, aligning the loop perpendicular to the edge. The holes for the screws are marked with a pencil, the hinges are removed, and the markings are deepened with a thin drill. The cups are placed into the holes and secured with self-tapping screws.
If you have no experience working with a cutter, you need to practice on scraps
Now you need to attach the facade to the cabinet frame, align it vertically and mark the places where the striker is attached. They are deepened with a drill, and the counter plate can be screwed on with self-tapping screws.
To ensure that the hinges are installed as level as possible, they can be supported with a wooden or metal strip.
Next, the façade is installed. A shoulder groove is inserted under the mounting screw of the bar. At the same time, make sure that the adjusting screw matches the groove on the strike plate.
Hanging the facade
The complexity of this stage of work lies in the need to manually hang the door leaf with installed hinges so that their bodies fall under the platforms fixed to the cabinet panel. All installation work is carried out in the following sequence:
- If possible, it is worth turning the cabinet into a horizontal position. This will simplify the process of trying on the façade for further installation.
- Using a pencil, create markings for future mounting strips into which the hinge mechanisms will be installed.
- Place the planks exactly according to the markings and secure with self-tapping screws using a screwdriver.
- Install the door on the side of the cabinet, being careful not to deviate from the marked positions for the hinges.
- You can begin to fully assemble the hinges by connecting their front and base platforms using the housing. The result is finished swing mechanisms, ready for work.
- At the last stage, you will need to adjust the hinge using a screwdriver. The main role in this task will be played by the corresponding screw in the housing of the central component of the mechanism.
Types of internal loops
The main classification of internal loops is their division by purpose. Highlight:
- internal hinges designed for furniture assembly. This hinge allows you to open the façade by 90º. Internal hinges can only be installed on cabinets whose doors are located inside the cabinet (a sample of a furniture hinge is shown in the figure above);
- internal door hinges. The fittings can be installed on interior doors, entrance doors to residential or utility rooms. An entrance door with internal hinges will provide reliable protection against penetration;
Internal hinges used for installing interior doors
- garage internal hinges and hinges used for installing gates and gates. Simple cylinder hinges can be strengthened using small metal plates.
Types of internal hinges used to install gates
All hinges can be divided by overall dimensions, which are selected based on the weight of the door leaf or furniture facade.
Adjusting the hinges
Despite the fact that some users carry out the adjustment procedure “by eye” when the cabinet door leaf has not yet been installed on the furniture structure, this approach cannot be called correct. By starting the adjustment stage after hanging the facade, you will get a complete picture of how your manipulations with the hinge adjustment screw will affect both the appearance and ease of use of the door. Prepare in advance for the fact that you will need to unscrew and tighten the screw in the mechanism body several times before you achieve the ideal location of the door leaf. In the process, it is recommended to use a manual rather than an automatic tool, which is why it is better to give preference to a Phillips screwdriver. A screwdriver, although capable of manipulating a screw much faster, can put too much stress on the component and wear out its head. You will need to make adjustments based on three parameters of the facade location, which will be discussed in more detail below.
Adjustment for horizontal discrepancy
The position of the door leaf is adjusted by moving it to the left or right. Your ultimate goal is to eliminate too large gaps between the front and the cabinet panel. Please note that too narrow a gap will make it impossible for the door to move along the axis of its hinge. Also, adjustments are required in rooms with non-standard walls, where the cabinet may be located at some angle.
Vertical adjustment
Unlike horizontal adjustment, vertical adjustment in the up and down directions is made by manipulating the oval fasteners in the hinge mechanism. The next difference from the horizontal adjustment procedure is the fact that the vertical position of the facade may “sag” over time due to the constant influence of gravity. For this reason, vertical adjustments have to be made on a regular basis.
Door depth adjustment
Depth means adjusting the position of the door relative to the cabinet body, which also affects the gap between them. For most users, provided that the installation is correct and the markings are correct, this type of adjustment is almost not required. Most often, façade adjustments are made in rooms with uneven floors, which can cause difficult door movement.
Preparing for installation
In terms of popularity of use, four-hinge hinges for furniture facades, codenamed “frog,” are by far the leader. Durable, easy to install, they have a lot of varieties for all types of facades, and most importantly, they make it possible to adjust the installed door horizontally and vertically in order to achieve the ideal result.
The first step is to determine the number and size of hinges that will be used for each door. Depending on the height of the facade, the following calculation is recommended:
Furniture hinges have a so-called cup; for its installation, a blind recess is cut into the thickness of the door. The standard cup diameter is 35 mm (the most popular), 40 mm (for heavy structures), 26 mm (if there is not enough space for the standard). Therefore, when choosing fittings, it is important to take into account the exact dimensions of the furniture for which it is selected.
Attaching hinges to glass doors
With the growing popularity of tempered glass furniture, the range of fittings that can work properly with this material has also expanded. Despite the increased strength indicators compared to traditional glass, tempered glass is still much more vulnerable to mechanical stress than wood and chipboard panels. Therefore, for doors made of this material, certain types of hinges with a fundamentally different type of fastening element are produced. The first difference between these mechanisms is their increased strength and load-carrying capacity due to the high weight of the glass. The following metals are used as the basis for glass door hinges:
- Bronze;
- Aluminum;
- Zinc alloy;
- Stainless steel alloy.
According to the principle of fastening, hinge mechanisms can be overhead or mortise. The latter traditionally require the creation of holes for fixing screws, when the former rely on holding the glass facade by applying high pressure to it. In this case, overhead hinges can work on the principle of clamping with platforms on both sides of the glass door or using fixing screws that press the facade inside the hinge mechanism.
Installing hinges on cabinet doors
Now you need to attach the second part of the structure to the cabinet door. Let's consider the sequence of work.
All work should be carried out slowly and consciously in order to avoid defects and mistakes, and also not to insert a self-tapping screw into an unnecessary place, thereby ruining the facade.
Marking and drilling
Using a pencil and marker, you need to mark the places for drilling. To do this, take the second part of the device and attach it to the board. To do everything correctly, you need to place the structure on a flat surface.
Before attaching the hinges, carefully check that you have positioned the interior of the cabinet correctly.
Attach the door to the frame where part of the hinge is already attached. Mark a place for future fastening. It is better to use a corner and a level so that the loop is level, without tilting.
When installing fasteners, it is better to ask for help in order to prevent flaws.
Installation
Attach the loop to the intended location, and use a screwdriver and screws to attach the structure. It must be held firmly and pressed well against the door. Upon completion of work, check reliability. To do this, loosen the loop a little; if it holds well, then everything is fine and you can proceed to the final stage.
Here it is also necessary to be precise, otherwise the door will open with difficulty at the slightest defect.
Description and purpose
Wall-mounted furniture is in demand because thanks to it it is possible to save space on the floor and organize the space more functionally. Such furniture mainly includes cabinets equipped with various doors. The set is secured using furniture awnings for kitchen cabinets or for garden furniture, which are usually included in the kit if the structure is purchased from a reputable manufacturer.
In cases where kitchen furniture is made by hand or made to order, you can independently choose the optimal canopies for wardrobes or other furniture that are suitable for attaching door frames of the lower tier. The choice is made taking into account:
The key purpose of furniture canopies is to collect loads from doors and adjust the opening of the doors. Also, with the help of awnings it is possible to give the structure an attractive appearance. To do this, you can use unusual mechanisms.
Furniture canopies come in different types. The mechanisms differ in size, shape, and design. The method of mounting the mechanism is determined by the type of selected element.
Canopies for hidden structures are especially popular. With the help of such parts it will not be possible to damage the furniture structure in any way or spoil its appearance.
Adjustment
The final stage of installing furniture canopies is regulation. After the door is attached to the body, it is necessary to make adjustments in three planes. Of course, you will have to unscrew and tighten the screw several times, but a favorable outcome is guaranteed. Three planes are vertical, horizontal and relative to the depth of fixation:
The adjustment step can be performed when the cabinet is not yet hung. But, in order to immediately find your bearings regarding the walls and ceiling, it is best to hang the cabinet on the wall.
It turns out that you don’t need any special knowledge or skills to attach hinges. Installing a furniture hinge is not difficult at all. The main thing is that when installing a furniture hinge, marking and installation were carried out taking into account all the rules. This allows you to avoid the appearance of cracks on the facade, gaps between the body and the door, and friction when opening. Moreover, work done with your own hands brings a lot of positive emotions.
READ How to establish where a child lives with his father
Types of furniture canopies and secrets of their installation
Furniture canopies are a special type of mechanism, small in size and made of steel. They are used to open or close doors. There are many types of such elements. It is worth taking a closer look at all the available types of canopies, as well as familiarizing yourself with the features of their use and installation.