Making furniture with your own hands can only be done by real craftsmen, each of whose products is a real work of art. But, sooner or later, the service life of a table, cabinet or bedside table expires: the furniture becomes unusable and loses its appearance. There are other situations: the furniture is still in good condition, but is tired: you want brightness, a holiday, so that the apartment is decorated with original things, and not a dull standard wardrobe, table or chest of drawers. And here a wide field of activity opens up for those who can and want to make things with their own hands.
Self-improvement and restoration of furniture at home has a number of advantages.
The benefits of decorating furniture with your own hands
Self-improvement and restoration of furniture at home has a number of advantages:
- you can choose the most suitable decor that meets your beauty requirements;
- purchasing materials is much cheaper;
- there are no restrictions on the timing of work;
- savings on purchasing new furniture.
Making furniture with your own hands can only be done by real craftsmen, each of whose products is a real work of art.
Deciding on the design
Restoration of old furniture will inevitably entail a change in the design of the room, and here you cannot “just like that” introduce new forms or unusual furniture decorations into the established interior of the apartment, which will stand out from the overall harmony. It is worth noting that there are design techniques that allow you to “fit” a product of another decor into the overall picture of the room’s design.
It is worth noting that there are design techniques that allow you to “fit” a product of another decor into the overall picture of the room’s design.
Before you start decorating, you need to decide on the design and elements of its renovation. For this you can use:
- decoupage;
- glisal;
- fabric, including tulle;
- painting;
- artificial aging using craquelure;
- stencils;
- mosaic;
- self-adhesive film;
- other methods.
Aging is one of the ways to restore furniture in a vintage style.
Each of them has its own advantages, but the home master will decide which one to choose.
There are no restrictions on the timing of work.
Vintage furniture doesn’t fit well with the current decor of most apartments, and this is something that home crafters need to take into account.
Craquelure
An original way to age furniture. Furniture is painted on the prepared surface with two types of paint - the top layer shrinks greatly, the coating cracks and looks “old”.
In combination with decoupage, amazingly beautiful drawings and wonderful vintage furniture are obtained.
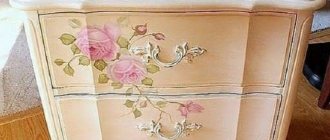
Decoupage of old furniture
One of the most interesting decoration options is decoupage. It makes it possible to decorate household items with a variety of images, photographs, and drawings. But most often special decoupage napkins are used for this.
Before you start decorating, you need to decide on the design and elements of its renovation.
The decoupage technique is not complicated, but it requires attention and accuracy, just like any other work. To decorate a product using it you need:
- free the furniture surface from varnish, old paint, drawings, pasted pictures;
- clean it until it is perfectly smooth;
- prime with acrylic paint;
- dry completely;
- then apply PVA glue to the surface;
- carefully place the napkin or other material chosen for decoration;
- To make the furniture shine, the decoupage image and the rest of the surface can be varnished;
- dry completely.
Restoring old furniture will inevitably entail changing the design of the room.
Unfortunately, not everyone can refine furniture by decorating it with original drawings.
Decoupage
The technique is that transparent (and not very transparent) paper with drawings is glued onto a surface painted with white paint using PVA glue. Then the entire surface is covered with varnish in several layers.
Depending on the selected patterns, you can design exclusive furniture for any style. Regular paper napkins with a pattern are often used.
Sometimes napkins are glued to glass - the technique is called reverse decoupage. A detailed description of decorating methods using the decoupage method can take more than one page.
Note!
Door decor: TOP-170 photos and videos of door decorating ideas. Selection of equipment, materials and tools. Preparing the surface for decoration
Ceiling decor: TOP-160 photos and videos of ceiling decor ideas. Necessary materials and tools. Reviews of Core Technologies
- Ideas for decor: TOP-200 photos and videos of interior decorating ideas. advantages and requirements for decor. DIY Decor Instructions
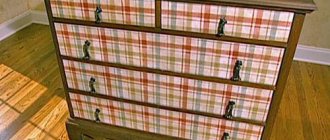
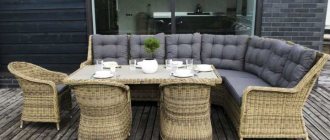
Restoring a closet using wallpaper
Many people will find the method of decorating old furniture with wallpaper unacceptable, but this is not so. Today the market offers the widest selection of these products, made in various colors and textures, providing the opportunity for flights of fancy to decorate furniture with your own hands. Wallpaper can be used to update any piece of furniture, depending on this, using different materials and patterns. But the most impressive look are cabinets, a large surface of which can be decorated with wallpaper with a spectacular bright pattern.
One of the most interesting decoration options is decoupage.
How to create a design and implement an idea correctly
Painting furniture with your own hands is a long and painstaking job. The process may take a long time. Sometimes it takes more than one day or even a week. It is especially difficult if there is no experience in such a matter, it does not matter whether we are painting old furniture or giving a new look to modern objects.
For beginners, a few tips will be useful:
- Any work begins with a sketch or outline. You can develop the design yourself or borrow the idea of painting furniture from a photo on the Internet. In any case, transferring the drawing from paper will be easier than inventing everything on the fly;
- If you have no experience, you should not immediately take on a large amount of work. To begin, paint a small object;
- If it is possible to disassemble the furniture, do it. Individual parts are much easier to work with;
- Free space. There should be enough space to work. Furniture may need to be rotated, tilted or moved;
- Do not neglect the quality of surface preparation. Grinding defects can ruin the appearance of even a very talented painting. Dust and small particles lead to the same result;
- Primer is a must for painting or painting. It is easier to work on a surface covered with soil;
- Each layer of primer, paint or painting requires careful drying. Minimum - a day for each layer.
The process of implementing an idea itself consists of several stages. The first of them is preparation for priming and painting. The classic option with old wooden furniture involves removing the paintwork. To do this, you will need coarse and medium-grain sandpaper or a special chemical agent - a remover and a spatula.
- After cleaning the varnish and paint, the surface must be sanded with fine sandpaper. This will get rid of excessive roughness and minor scratches. If there are large chips and cracks on the furniture, they are puttied and sanded;
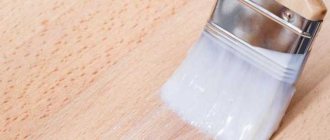
- The next stage is applying primer. This is done using a brush or roller. The formation of drops and streaks should be avoided. As a last resort, you can get rid of them using a sponge, or wait until the layer dries and sand it with sandpaper;
- Next comes painting. The paint is applied in two or three thin layers. The result should be a smooth and even surface. After drying, you can begin the most interesting, but no less time-consuming stage - drawing;
- Painted furniture does not necessarily mean an antique wardrobe or chest of drawers, covered with patterns on all sides. More often it is a small design or a repeating pattern. To apply identical patterns, use a stencil or template. These can be simple stencils of butterflies, small patterns, or large templates with complex patterns.
There is more than one way to apply a pattern to furniture. Hand painting is especially appreciated. Painting can be considered the pinnacle of mastery. By combining various painting methods and techniques, it is possible to create truly unique things:
- Those who do not own a brush can use the decoupage technique. This method is usually used on small pieces of furniture, but large surfaces can also be decorated;
- The final stage of work is covering the painting with transparent varnish. It is advisable to apply several layers. This will protect the design from accidental damage and make it possible to wipe or wash the furniture.
The art of painting makes any item unique. You can paint furniture using any traditional or modern direction. Furniture painting in the Russian style is very popular: Khokhloma, Zhostovo, Mezen. Each of them is unique in its own way. And of course, nothing prevents you from creating your own, no less unique style.
Removing old paint
Padding
Painting
painting
Varnish coating
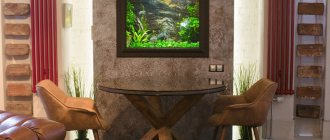
Surface decor with glissal
Some people consider coating products with translucent paint, which is called glisal, glaze, or azure, as a special chic when decorating. With its help you can decorate any surface, including furniture, regardless of whether it is made of wood or glass.
But most often special decoupage napkins are used for this.
It easily “lays” on the material, has no odor, but is distinguished by many color shades. It can be applied with a roller, brush or sponge, just like regular paint. The procedure for using paint is as follows:
- first you need to treat the surface: clean, remove dirt, degrease;
- then apply a primer: on wooden surfaces of furniture - one or two layers, on glass - four to five layers of primer, which creates the effect of frosted glass.
Before use, glisal is diluted with water in the proportions corresponding to the instructions. You can create a drawing within half an hour after applying the mixture; otherwise, it will freeze and it will be impossible to “draw”.
The decoupage technique is not complicated, but it requires attention and accuracy, just like any other work.
Furniture painted with plain paint with a white openwork pattern applied to it using a stencil will look impressive.
Required tools and materials
Coating paint
The final result directly depends on the choice of paint. The basis for the coating is a primer. It must be designed for woodworking. Acrylic-based primer material does a good job.
Any latex or acrylic paint will be suitable for the top layer. It is better to make the surface matte. Gloss doesn't always look good. A good option would be spray paint. This will allow you to apply it in an even layer.
Artistic paints
Acrylic paints are often used for painting furniture. They are good for drawing various patterns. You can also use oil mixtures. Their traditional purpose is painting.
Varnish
It acts as a protective covering. It is possible to use alkyd or acrylic varnish for furniture. Just like paint, it can be matte or glossy. Applying a layer of varnish over the design is the final stage of the work.
Brushes and roller for painting
A roller may be needed to apply the primer and coat of paint over a large area. A wide brush will help with curly elements.
Paint brushes, pencil, paper and ruler
It is convenient to draw small patterns and lines using thin art brushes. For acrylic paint, it is better to use brushes with synthetic bristles. It won't stick together. Oil paint will require a brush with natural bristles.
A simple pencil, paper and ruler are useful for creating sketches and marking the surface for the drawing. In addition, you may need to make templates or stencils for painting.
Surface preparation tool
You can remove old varnish or paint from furniture by sanding it with sandpaper. You will need sandpaper of different grain sizes for more thorough surface treatment. In some places, the old coating will have to be removed with a spatula.
To remove dust, you should stock up on rags. A brush with long, stiff bristles will help sweep dirt out of crevices and other hard-to-reach places.
Decorating facades with acrylic paints
Using paint is one of the ways to decorate furniture. This is not just “refresh”, as some put it, but an opportunity to ennoble it and breathe new life. In this case, you can not just paint the surface with a single color paint, but paint it with different patterns and apply any ornament. If a home master has the skills of an artist, then his creative imagination will turn an ordinary cabinet or table into a work of art.
Many people will find the method of decorating old furniture with wallpaper unacceptable, but this is not so.
Typically, acrylic paints are used to decorate furniture, which are absolutely harmless to health, bright and rich. But you can also use plain paint so that any piece of furniture will look elegant and impressive. To do this, you can take several colors and decorate the facade in the form of multi-colored stripes of different sizes, squares, triangles, circles, ovals - this does not require much skill. And even if the figures turn out to be not entirely geometrically accurate, they will look very perky.
Many home craftsmen use craquelure to help achieve a cracking effect.
The procedure for decorating with acrylic paints using templates is as follows:
- the surface of the furniture must be cleaned to a perfectly smooth state; if there are any irregularities, sand them;
- paint and let it dry completely;
- attach a stencil and paint it in the appropriate colors;
- carefully remove it and let it dry completely;
- To make the surface of the furniture shine, it needs to be varnished.
But the most impressive look are cabinets, a large surface of which can be decorated with wallpaper with a spectacular bright pattern.
Decorating old furniture is a great chance for a home craftsman to show his creativity and save the family budget.
Aging
Any instructions for beautiful furniture decor include a description of aging methods. The surface of the furniture is treated with special compounds, painted with stain and paint.
Then some of the paint is removed or sanded - the furniture looks shabby. Hard types of wood are treated with special compounds - the effect of fading, mossy, faded color is achieved.
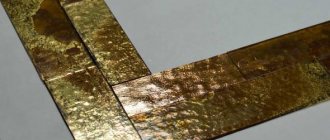
Coating furniture with craquelure
Many home craftsmen use craquelure to help achieve a cracking effect. It is achieved as follows:
- You need to carefully apply craquelure varnish to the paint that has not yet dried;
- it is prepared from egg white or PVA glue; sometimes vinegar or gelatin is used.
- for the cracking effect to be most vivid, the paint must be applied twice;
- The second layer is applied immediately after the first has dried: then the “cracks” that appear will be visible through the top one.
Some people consider coating products with translucent paint, which is called glisal, glaze, or azure, as a special chic when decorating.
Renew old Soviet furniture in a few steps: 20 interesting ideas
Soviet furniture is often of good enough quality to serve its owners for years.
You can throw it away only because the interior has become old-fashioned or boring. Many items are made of natural wood and could serve their functions for a long time, but this design! Fix the look of grandma's dresser or mom's wall by getting something really interesting. There are several effective techniques that will completely change the appearance of a Soviet headset and allow it to last longer. Choose one, or combine them all.
Repair and preparation for refurbishment
If the table or chest of drawers you received was not particularly popular, its design can be left unchanged. After all, it will not necessarily be furniture that sets one’s teeth on edge, and in combination with modern furnishings it will look quite appropriate. But it will hardly be possible to do without repair work. Over time, the furniture dries out, and some parts will have to be re-adjusted to each other.
Be sure to pay attention to the following operations:
- Cleaning furniture from dirt, dust and soot (pay special attention to corners);
- preventive lubrication of locks;
- adjustment of parts (if the furniture has dried out or is warped during transportation);
- grinding and puttying of damaged surfaces;
- change of furniture fittings
In some cases, restoration of damaged surfaces and major repairs will be sufficient. If you decide to completely change the appearance of a particular item, this stage will be preparatory.
Restoring damaged coatings or applying new varnish
The least radical method of alteration, which borders on restoration. You can slightly update the damaged coating, or completely change the type of furniture. It all depends on the type of varnish and processing methods.
It is most appropriate to use in cases where furniture made of good wood species is subject to restoration. A classic design that will be appropriate in any interior needs to be treated delicately.
Some useful tips:
- The easiest way is to use oil-based varnish; this is what was used to treat old furniture. In some cases, you can do without removing old layers.
- Apply the varnish with a sponge rather than a brush, this will prevent the formation of streaks and lint on the surface.
- Dry each layer for at least 12 hours.
- If you want to completely change the appearance of the furniture, use a two-component craquelure varnish. It will create a cracking effect on the surface and make the furniture look like an antique.
Some pieces of furniture should not be completely remodeled. It is enough to restore the old layer of varnish and slightly restore the fittings.
Craquelure varnish goes well with painting, decorative painting and decoupage.
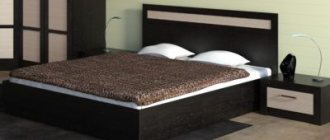
Painting old furniture
Choose this technique if you want to completely change the design. Be that as it may, natural wood furniture can look a little bulky and heavy. And while this may be a plus for a spacious office, in a small apartment you want lightness and air. Repainting will help make the design more democratic.
Some useful tips:
- Use this type of remodeling also where the wood is severely damaged, or where we are talking about inexpensive wood species.
- Be sure to remove the old coating from the surface.
- Sand the wood thoroughly, then apply putty and a coat of primer. This way you will significantly reduce paint consumption and achieve better results.
- After applying the first coat of paint, dry the furniture and go over it with a sander and sandpaper. This process may seem ineffective, since a significant part of the paint will be removed. But with repainting you will achieve the perfect result.
- It is easier to work with matte paints; they hide surface defects better.
- Use artistic painting or ready-made templates to apply interesting designs.
- Combine painted details with natural wood.
Light shades and laconic fittings will make the furniture more democratic.
White color and weightless fittings completely transformed the old chest of drawers.
Plain paint that hides the texture of the wood looks light and modern.
In some cases, a light background combined with contrasting fittings works great.
Bright accents can be applied using masking tape.
You can use an old curtain with an ornament as a stencil for applying paint.
Another option for “lace” painting.
Master the decoupage technique
This type of finishing has long been adopted by needlewomen. But why not apply it on a more serious scale? Use ready-made images and apply them to a painted or sanded surface.
Some useful tips:
- Be sure to prime the surface before sticking images onto it.
- As a material, use any drawings printed on thin paper, napkins, or even newspaper clippings.
- Thick paper must be soaked in water or decoupage solution before gluing;
- Do not limit yourself to surface treatment with glue. After the decoupage coating has dried, coat the furniture with durable varnish.
Decoupage works great in combination with matte paint.
A large drawing can be printed on thin paper.
Decoupage combined with craquelure varnish and painting.
Replace individual parts with more modern ones
Reupholster old chairs with new, more technical fabric. Completely change the fittings, or even add panels from modern materials. Finally, cover the surface of the furniture with film. When you have nothing to lose, the results can be pleasantly surprising!
Mirror surfaces can transform any furniture.
Film combined with metallic paint.
When choosing a film for processing, give preference to high-quality material. It will last longer and give the furniture a decent look.
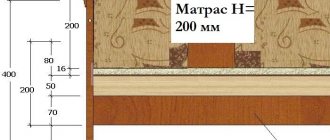
Decorating furniture by aging
Aging is one of the ways to restore furniture in a vintage style. If you plan to decorate it in this way, you need to prepare the furniture as follows:
- sand: first with coarse-grained sandpaper, and then with fine-grained sandpaper;
- You can even not completely wash off the paint on certain areas of the surface, which will enhance the aging effect.
Using paint, you can decorate any surface, including furniture, regardless of whether it is made of wood or glass.
Vintage furniture doesn’t fit well with the current decor of most apartments, and this is something that home crafters need to take into account. Therefore, modern design finds can be included in its design, which will allow it to harmoniously fit into the existing interior.
You can create a drawing within half an hour after applying the mixture; otherwise, it will freeze and it will be impossible to “draw”.
Self-adhesive film
This method is distinguished by its simplicity and accessibility. Using film you can update:
- chests of drawers;
- tables;
- shelves;
- kitchen sets;
- cabinets;
- cabinets.
This decor is suitable for furniture made of wood, plastic, or metal products. During the decorating process you may need:
- directly self-adhesive film, it can be of any shade and texture. The colors must be selected based on your preferences and tastes;
- degreaser for the surface being treated;
- scissors;
- putty knife.
The work progress will be as follows: prepare the furniture, remove the paint from it using a spatula. Then clean and degrease the surface.
You can proceed to the final stage: cut the film into strips of the desired size and carefully stick it on the furniture. Make sure that the film lies flat, does not bulge or bubble.
Stencils for furniture decor
Unfortunately, not everyone can decorate furniture by decorating it with original drawings: not everyone is given the gift of being an artist - not all home craftsmen know how to draw, but there is no reason to be sad: drawings can be applied using ready-made or homemade stencils with various ornaments. The patterns are applied with paint using a template, and they can be fixed with a special varnish.
Using paint is one of the ways to decorate furniture.
Templates can be made:
- from thin plywood, having first applied a pattern to them, and then cut them out with a jigsaw, manual or electric;
- thick paper;
- plain film.
If a home master has the skills of an artist, then his creative imagination will turn an ordinary cabinet or table into a work of art.
In addition, you can use self-adhesive film on which a pattern is applied. It can be cut out along the contour and outlined with a pencil, and then carefully painted. Furniture painted with plain paint with a white openwork pattern applied to it using a stencil will look impressive.
Typically, acrylic paints are used to decorate furniture, which are absolutely harmless to health, bright and rich.
The procedure for decorating using a stencil is as follows:
- the surface of the product is cleaned; if there are irregularities, it is polished;
- all elements are painted over, after which they need to dry completely;
- make a stencil, carefully attach it and paint it with the appropriate color or several colors;
- Carefully remove the template and let the furniture dry completely;
- To ensure that the restored product retains its appearance for as long as possible, it can be varnished.
And even if the figures turn out to be not entirely geometrically accurate, they will look very perky.
Decorating old furniture is a great chance for a home craftsman to show his creativity and save the family budget.
You can take several colors and decorate the facade in the form of multi-colored stripes of different sizes, squares, triangles, circles, ovals - this does not require much skill.
Nuances of decoration in various techniques
Furniture decor can be used on all parts of the product or its fragments. There are many techniques for decorating various designs:
- decoupage;
- wallpapering;
- painting with glisal or acrylic paints;
- aging;
- craquelure;
- use of stencils;
- fabric pads.
Before decorating, you need to prepare the necessary materials. You need to work in compliance with safety rules.
Decoupage
Decorating furniture using decoupage involves the use of drawings, photographs or other images that are applied to the surface in a special way. The master does not need to spend a lot of money to get an exclusive product. The image can be applied to any surface. The following tools and materials are required for decoupage:
- magazines;
- newspapers;
- multi-colored napkins;
- PVA glue and brushes for applying it;
- scissors;
- colorless varnish.
The work is carried out in stages:
- The surface of the furniture is cleaned of old finishes.
- The base is sanded, after which an acrylic primer is applied to it.
- When the canvas dries, it is coated with glue, and decorative napkins or pictures from magazines are laid out on top and straightened.
- The excess fixing solution is removed and the furniture is allowed to dry, after which the surface is covered with a layer of colorless varnish.
If the base is made of glass, then decorative napkins need to be glued on the reverse side.
Today you can find ready-made kits for decoupage, but you can also make do with improvised means. All the work can be completed in one day.
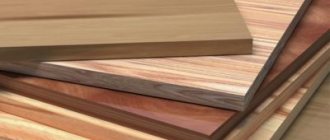
Variety of furniture panels, their advantages and main parameters
Wallpapering
Furniture decor in the form of wallpaper is not very popular, although now there are a lot of materials with different patterns and textures. More often this method is used to decorate cabinets. To complete the work, you will need a minimum of materials - 1 roll or old pieces left over after repairs are enough. To decorate furniture with wallpaper, you will also need wallpaper glue, sandpaper and clear varnish.
If you plan to use the product intensively, you should choose a material that can be washed. If the canvas is paper-based, then it must be protected with a layer of transparent varnish. You can decorate the entire surface or some element. If there are defects, a furniture plug is used to eliminate them.
When the product is prepared, you can proceed directly to work:
- Try on the wallpaper and decide on the size of the canvas - it should match the similar parameters of the surface being treated. It is also necessary to leave 5-7 cm on each side of the material for reserve.
- Next, cover the workpiece and the surface of the furniture with a thin layer of glue. You need to wait about 5 minutes for the material to become saturated with the fixing agent.
- Place the sheet on the surface of the furniture and smooth it using a roller from the middle to the edges.
- Now you need to wait until the wallpaper is dry, then remove excess material and sand the edges.
- The final touch is to coat the furniture with 2 layers of varnish.
Painting with glisal or acrylic paints
The technique of decorating furniture using glitz is considered in demand. This is a translucent, shiny paint that can be applied to any substrate. It is characterized by the following properties:
- has no smell;
- provides a smooth layer;
- its color can be changed.
The work is carried out like this:
- The surface is cleaned of dirt and dust and degreased.
- Then a primer is applied (depending on the type of material, the number of layers varies from 2 to 5).
- Glizal is pre-diluted with water, observing the proportions specified in the instructions.
You can draw for 30 minutes after preparing the mixture, then it loses its properties and hardens. Acrylic paint is often used to decorate furniture with your own hands. Moreover, you can use not just one color to apply a monochromatic coating, but several (to create a pattern). The material for work is completely safe. The pigment shades are rich and varied. This decoration technique involves the following steps:
- Clean the surface of the furniture and level it.
- Apply one layer of paint, which will act as a background.
- After it dries, paint the base. To do this, it is allowed to use templates, which are then carefully removed.
- To ensure a glossy effect and also protect the surface, a transparent varnish is applied to it.
Purpose, features of basic types of furniture hinges, installation nuances
Furniture decorative moldings will help to further decorate the product. It is recommended to glue them along the edges of the object. In addition, they can be used to create various designs.
Aging
For decoration, it is allowed to use overlay decor for furniture. But if you want to decorate objects in a retro style, then the use of aging techniques is encouraged. Before starting work, the surface should be sanded, but it is not necessary to completely remove the paint in certain areas. The master will need stain, antique wax, gold paint, paint brushes, a spatula, sponges for cleaning the surface, and a scraper.
If the base is wooden, then you need to remove the old finish from it and degrease it. After this, apply stain to the surface and leave for 6–8 hours so that everything has time to dry. If there are particles of a substance on the tree that have not been absorbed, they should be removed. After this, you can rub in antique wax. Use “gold” paint for applying monograms or finishing accessories. Lastly, coat the base with colorless varnish.
Prepare furniture
Add color to paint
To create abrasions you will need steel wool. Rub the painted surface with steel wool.
Wipe away dark stains with a damp cloth until the desired effect is achieved.
Wipe the surface with a dry cloth
Ready
Craquelure
You can decorate any piece of furniture by using decorative overlays or stickers, which do not need to be varnished. But to give the product a special charm, you should use the craquelure technique. This is a method of artificially aging objects, allowing you to create a network of tiny cracks on the surface of the furniture. Wood, metal or plastic materials are suitable for processing. The technology provides for the following actions:
- Treat the base with a metallic color primer.
- Apply craquelure varnish after the base layer has dried.
- Use matte paint.
- To achieve the effect of cracks, a brush with artificial bristles is passed over the surface while the finish has not yet hardened (you need to work carefully so as not to spoil the design).
To prepare craquelure varnish, use egg white or PVA glue. If “cracks” appear due to the interaction of the second and third layers, then in this case the use of a brush is not necessary.
Apply paint
Wait for it to dry completely. Apply PVA glue to a small area with a sponge.
Apply a layer of light paint to the wet PVA
Do the same on the next section. Fill the entire surface in this way. Cover the dried cracked surface with two layers of acrylic varnish.
Stencils
Using stencils for furniture decoration allows you to get original items if you want to paint them, but don’t have the artistic skills. Thick paper, thin plywood, and film are used to make templates. If you don’t want to draw yourself, you can use self-adhesive elements with an ornament on them. This technique involves the following steps:
- First, the surface of the base is leveled and polished.
- A main layer of paint is applied to it, which serves as a background.
- Then a stencil is attached to the product and painted with different shades.
- As soon as the pigment sets, the template is carefully separated from the surface, and the product is dried.
- At the final stage, the base is varnished.
For work, it is better to choose paint with a thick consistency. Apply it with a brush or roller. As for the theme of the images, it all depends on the style of the room. To complete the appearance of items, decorative molding is used. Most often it can be seen on cabinets, bedside tables and beds. No less popular are polyurethane profiles or decorative tape.
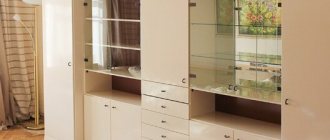
Types of furniture facades, their design options
Fabric pads
Silicone decorative plaster is well suited for decorating wooden or plastic products. But if you need to restore upholstered furniture, then fabric upholstery will come in handy. Fasten it using a construction stapler. You can use this decoration technique on tables, chairs, cabinets, and chests of drawers.
The work can be divided into several stages:
- Preparation. The surface should not contain old finishes. To do this, it is cleaned and degreased. The fittings are first removed.
- Laying the material. For decoration, plain furniture fabrics or multi-colored fragments are used. A piece of material is first soaked in PVA glue. The duration of the procedure is 40 minutes. Then the fabric is applied to the surface of the product. Additionally, decorative buttons and lace are used.
- Consolidation. To preserve the original appearance of the headset, it is covered with a layer of colorless varnish.
Excess parts of the fabric need to be trimmed and the edges secured to make the facing neat.
Clean the countertop surface and apply stain
Glue the fabric with PVA glue and dry
Apply a second layer of glue
Apply acrylic varnish, seal the edges well
Ready product