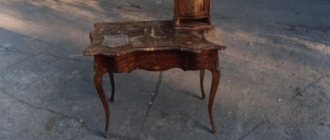
A long time ago, during our first visits to our site, we made a table and a bench for outdoor use from ordinary unplaned boards. At this table we had lunch, and drew sketches of the future house, and also used it as a workbench. But now the construction is finished, and our old outdoor furniture began to stand out from the overall picture of the new country interior. That's when we decided to make a new set of outdoor furniture.
We decided and got down to business. We quickly drew a sketch and determined the main dimensions (height, width, length) of the table and bench. We selected materials from the remains of construction: remnants of 30 and 22 mm floorboards, scraps of bars, self-tapping screws, PVA glue, furniture nails, foam rubber, linen or other suitable fabric, a scrap of leather. We prepared the tools: electric saw, plane, sander, hand-held electric router, screwdriver, hammer, stapler and scissors. And they got to work.
First, we glued two furniture panels together using wedge ties from tongue-and-groove floorboards. We used standard 30 mm thick boards for the bench, and 22 mm cedar boards for the tabletop to make the product lighter.
What legs!
The legs of a table, chair or bench are a critical moment in terms of design and aesthetics. The stability of the furniture depends on the correctness of their manufacture, and the beauty and comfort depend on the design. Before making the legs, it is important to think through the design of the attachment point for the legs to the tabletop and seat. For the table we took blanks of bars 60×60 mm, and for the bench 80×30 mm. We got creative with the routing and tapered the lower ends of the legs for elegance and stability.
According to our plan, the legs for the table should not be perpendicular to the tabletop, but should go at a slight angle - the lower ends are slightly exposed outward. To attach the legs to each other and then to the tabletop, we used a classic “skirt” type tabletop design made from boards 20 mm thick and 12.5 mm wide. The ends of the boards were left wide and the middles narrowed. So, later, it will be more convenient for us to sit at the table. At the upper ends of the legs, we used an electric router to select grooves for a “skirt” with a depth of 15 mm. And here we made a small mistake - we chose the grooves not on the two inner sides, but only on the outer ones. What to do? To remake the leg - there is no suitable workpiece. We decided to make grooves in the legs on four sides, and then make small triangular inserts that would fit into the outer grooves. This will make it more convenient to attach the tabletop, and the overall structure will be more rigid and durable. In general, “every cloud has a silver lining.”
The legs for the bench were made of a simpler shape with protruding “flags” at the top. “Flags” serve to more firmly attach the legs to the bench seat, but they also look good. Leg blanks were cut out from 30 mm planks according to the sketch using a jigsaw, milled with a round cutter and finally sanded. Now the legs of our headset are ready! Now we return to the blanks for the tabletop and bench.
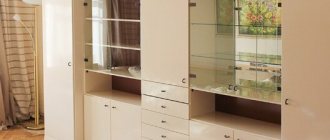
Making a wooden table with your own hands
DIY wooden table
As the simplest option, you can consider making your own wooden table with a height of 75, a length of 120 and a width of 70 centimeters from a planed edged board 40x140 mm or from a flooring strip of a suitable size, for example, 36x135 mm.
Materials and tools needed to make a wooden table with your own hands
You will also need:
•
two bars with a cross section of 40x60 mm and a length of 70 centimeters.
•
Self-tapping screws,
•
furniture screws (4 pieces) 100 mm long, with a flat head with a diameter of 8 - 10 mm.
Tools for wooden table
From the tool it is enough to have:
•
electric jigsaw (hacksaw),
•
plane,
•
chisel,
•
grinder or block with sandpaper attached to it,
•
screwdriver,
•
set of drills.
DIY wooden tabletop
Let's take a closer look at how to make a wooden table with your own hands. The tabletop is assembled from five boards, cut to size, which are attached to the bars using self-tapping screws.
DIY wooden table
The length of the screws should be selected in such a way that they securely fasten the tabletop board to the block and do not protrude onto its surface. If you use a tongue-and-groove board, then the tabletop is assembled solid, and it is better to remove the tongue from the end board with a jigsaw and plan the side.
When using planed boards, when assembling the tabletop, you can leave a gap of 3–4 mm between them, which will not interfere with the use of the table, but will facilitate maintenance and prevent dirt from accumulating in the area where the boards that make up the tabletop meet. It is easy to ensure that all gaps are identical: when assembling the tabletop, it is enough to lay a strip of the required width between the boards. You can use a metal corner for this.
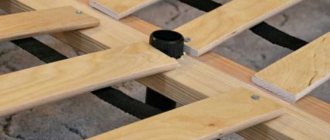
Attaching the leg to the tabletop
DIY table legs
The table legs are made of the same material as the tabletop, with two parts of one leg being connected “half a tree”. You can mark the boards for making the “legs” as follows.
I recommend: Features of buying kitchen furniture
•
On a sheet of plywood or fiberboard you need to draw a rectangle, size “A” x 600 mm, where A = 750 – b (tabletop thickness in millimeters);
•
By placing the board diagonally across the rectangle so that different edges of the board are in opposite corners, you can easily mark the cutting line of the boards and the “junction”, both on one board and on the other.
DIY table
The marked parts of the legs should be cut to length, select “half a tree” on each, fit and assemble using PVA glue with fine sawdust and a pair of self-tapping screws. The assembled legs are attached to the tabletop bars with furniture screws, the stiffener between the table legs is attached with long self-tapping screws. Both ends of the tabletop can be covered with bars, securing them with nails with “bitten off” heads and recessed into the wood with one blow of a hammer on a punch (Fig. 1).
As an addition to such a table, you can make a bench from the same material and in the same way (1400x420, height 450 millimeters). You can also make a chair and/or stool with your own hands, which we describe in detail in the links.
Painting and protecting table parts
To paint products, you can use stain and clear water-based acrylic varnish, which will protect them from precipitation.
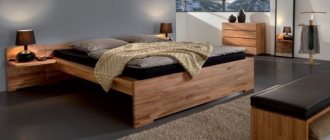
Varnished table
Table top and bench seat
We marked and cut out the glued and dried blanks. We carefully sanded and milled the edges of our furniture parts on both sides. A bench seat made from hard northern spruce boards is sanded quickly and easily, but light and loose cedar is more difficult to sand. A belt sander (colloquially a “locomotive”) pulls fibers at standard speeds. Therefore, without a vibration-driven sander at hand, the final sanding was done by hand using a wooden block and fine-grained sandpaper.
Furniture assembly
The table top fits well on the legs. We secured it with self-tapping screws - and our table is ready! It is stable and durable. This means that everything was calculated correctly and done well.
We secured the legs to the seat of the bench. Despite good screws and PVA glue, the fastening did not turn out to be rigid, and we decided to modify the design. It was possible to make cross-shaped slats or additional corners, but we decided to make a shelf similar to a seat that would connect the legs together. Using a well-established method, we quickly made a furniture panel for the shelf. Its perimeter dimensions were 8 cm smaller than the perimeter of the seat (the width of the leg was 4 cm and 4 cm - the leg was spaced from the edge). We secured the shelf with PVA glue and self-tapping screws, and got the expected result - a strong, rigid and, at the same time, beautiful structure.
We make stools using the technology of our shop: seat, legs and shelf. We glue boards from the remains of floorboards. For beauty and convenience, we decided to make stools with a soft top. We still have linen fabric from covering the fronts of the kitchen table. We covered the stools for her. We used discarded and ugly boards for the stool seats. The legs of the stools were made the same as the legs of the bench. To assemble the stools, we used self-tapping screws and PVA glue. Half a day - and we already had four stools ready. Before covering the wooden structures, we tint them in a soft brown “peach” tone and cover them with one layer of yacht varnish. At the same time we paint the dining table and bench.
Bedroom table made from old boards
When scraps of old boards are collecting dust on the farm, it’s time to start making furniture from natural wood.
Beginning craftsmen are often afraid to use natural wood, especially if they have previously had to deal with MDF, chipboard and plywood. However, working with wood is a pleasure. Get down to business and see for yourself. The author used a tree of the same species. But if you have several boards of different shades and different textures, feel free to experiment! This type of furniture is quite popular and looks great. However, when making a frame, try to use wood of approximately the same density. For example, maple, ash, oak or linden, alder, poplar. Pine in this case is more versatile.
So, in order to make a table for the bedroom with your own hands you will need:
Materials:
- short pieces of rectangular block for the frame;
— 4 square blocks for making legs; - wide boards 25-35 mm thick for tying the frame around the perimeter; - 15-20 mm boards for the drawer frame; - a sheet of plywood 6-10 mm on the bottom of the box; - several massive boards for making a tabletop; - drawer handle; — oil or special liquid wax for wood processing; - furniture glue; - nails; - screws or self-tapping screws; — fittings for a drawer. Tools:
- miter saw;
- Grinder; - electric drill; — pneumatic nail gun; - hand-held circular saw or jigsaw; — a washcloth for applying oil and a lint-free cloth; - square or ruler, construction tape, pencil. Step one: preliminary preparation of wood and drawing
Cutting boards are perfect for making furniture. If the surface of the wood has acquired a gray tint or there are traces of fungal development, it should be planed and pre-sanded.
Mark those parts whose dimensions are known. Sand all cuts. The author uses a miter saw to cut the wood. This way she can be sure that even without careful marking, the parts fit snugly together. Prepare a drawing of the table according to your dimensions.
Step two: making the frame
To assemble the frame parts, the author uses offset joint-to-joint joints. Short pieces of timber in the corners are the basis for flush fastening of the trim parts.
The frame is assembled using furniture glue, screws and nails. Thanks to the glue, the structure will last much longer, and the product will ultimately be stronger.
To prevent the wood from splitting when screwing in the screws, pre-drill holes. Assemble the two side panels as shown in the photo. Already at this stage you can screw the guides for the drawer. Connect the sides with a rear jumper. The structure is not yet very stable. At this stage it should be so.
Step three: assembly and installation of the box
From boards of smaller thickness, assemble a box frame from 4 parts.
Using a hand saw or jigsaw, cut a piece of plywood to the shape of the bottom of the box. Secure it using glue and small nails. Screw the pull-out fittings with self-tapping screws and place the drawer in place. If everything is assembled correctly, proceed to the next step.
Step Four: Final Assembly
The drawer inside the table will provide you with a level geometry while you screw the tabletop, so leave it there. Boards for tabletops must be pre-sanded on all sides.
For secure fixation, be sure to use glue. Screws or self-tapping screws are not necessary; nails are enough. Secure the front board of the countertop and check the smooth movement of the drawer. Screw the remaining boards.
Step five: finishing the bedside table
If the quality of grinding does not suit you, it’s time to go through the grinder where it is necessary. Remove dust from the surface of the wood and begin painting.
The author used quick-drying oil from Varathane. In addition to oil, it contains solvents and waxes, thanks to which the wood acquires reliable protection from moisture, as well as a special silky shine. Such coatings dry completely within 12-24 hours. If a surface of ideal quality is required, the wood is sanded again with a grain of at least 220-240 and liquid or semi-liquid furniture wax is used to consolidate the result. Thanks to this technique, the surface of the wood acquires the density of bone.
So, apply the oil with a kitchen sponge, thick foam rubber, or just a cloth. Be sure to remove any leftovers. Let the oil dry at room temperature according to the instructions.
All that remains is to screw on the drawer handle, and the bedside table for the bedroom is ready! The cotton table for the bedroom is ready!
Source
Become the author of the site, publish your own articles, descriptions of homemade products and pay for the text. Read more here.
Let the furniture be soft
First, we covered the seats with 30mm thick foam rubber and carefully secured it with staples using a stapler. The remaining foam rubber was removed to make the seat neat. Next, we cover it with linen fabric, shooting it with staples. The first stool is ready, the next one is upholstered faster. It turned out beautiful, but something was missing. We decided to make a leather rim around the edges of the seats. To do this, strips 20 mm wide were cut from a piece of leather. Then they were carefully nailed to the edge of the seat with decorative bronze furniture nails. Even before we finished working on the first stool, we realized that our little design idea with leather and bronze simply transformed the furniture and gave it a finished look.
And then we made another dining table for the outdoors. Now we have two sets of furniture: one took its place in the kitchen, and the other outside.
Alexander Isakovsky, Grigory IsakovskyPhoto by Grigory Isakovsky
“Garden Affairs” No. 7 (32), August 2009
Types of countertops
Countertops can have different designs. They are made from solid wood and can be prefabricated, glued, or a panel made of wooden plates.
Important : glued countertops are made from boards (lamellas). You can take lamellas from different types of wood - then the tabletop will look very decorative.
Glued tabletops are practically not deformed, since there is no deformation of the wood fibers.
- tree;
- MDF boards;
- chipboards;
- veneer.
A wooden tabletop is considered the best option from a practical point of view and in terms of durability and beauty.
The main requirements for a wooden tabletop are that it must be durable. Accordingly, you need to choose a suitable type of wood that can provide strength and durability.
The most suitable breeds are:
Important : today you can even choose exotic wood species. Just keep in mind that they will cost much more. You can purchase boards made from exotic woods at hardware stores.
How to make a tabletop from boards
An original tabletop made from boards with your own hands will decorate the interior of a kitchen, living room or terrace. How to make a tabletop from boards so that it lasts a long time? What type of wood should I choose and what size? Consultants will tell you about this.
ADVANTAGES OF WOODEN BOARD TABLETOPS
For a wooden tabletop you can use the following materials:
- wood;
- MDF and chipboard boards;
- veneer.
Surfaces made from MDF boards, chipboard and veneer have an aesthetic appearance, but are inferior to wooden boards in practicality and durability.
Wooden boards are the most popular material for countertops, as it has a number of undeniable advantages:
- environmental friendliness and safety;
- presentable appearance;
- resistance to mechanical damage;
- resistance to moisture, sunlight, temperature changes;
- ease of processing, creation of various shapes and designs;
- possibility of surgical restoration.
To make a tabletop, you should take boards from durable and flexible wood, such as larch, teak, oak, walnut or cherry. It is not easy to qualitatively process harder types of wood at home, which can lead to rapid deformation (drying out, swelling) under the influence of temperature and humidity changes.
TYPES OF TABLETOPS
The dimensions and design of countertops may vary depending on the installation location, operating conditions and functional purpose of the products. Among the main types of countertops are:
- prefabricated structures;
- glued products;
- made of solid wood;
- carved from furniture board.
Thick boards for countertops are more often used in luxury interior design, since the cost of the material is high. To create a tabletop yourself, the best option would be a prefabricated or glued structure made from boards (lamellas).
HOW TO ASSEMBLE A TABLETOP FROM BOARDS
Assembling a tabletop yourself will not be difficult if you are familiar with woodworking technology. Before making a tabletop from boards, prepare the necessary materials, equipment and read the step-by-step instructions for assembling the product.
You can make a tabletop from boards, which you can buy at:
- planken (20×90, 20×140) – a larch board that has a smooth surface and its edges are beveled or rounded;
- deck board (28×110, 28×140, 45×145) is a universal material of increased strength that can withstand aggressive environmental influences and mechanical damage.
To create a monolithic product, the tabletop boards must be the same dimensions (thickness, length and width). You can use one type of wood or combine it, which will help create an exclusive tabletop design using different colors and textures of lamellas. Boards should be treated with an antiseptic to protect the material from fungus, mold, moisture, temperature and small pests.
Before starting work, the board for the wooden tabletop must be dried and sanded. To treat the surface you will need sandpaper or a sanding machine.
There are several ways to connect tabletop boards:
- carpentry;
- edge-to-edge gluing;
- bonding using the tongue-and-groove method;
- on wooden dowels.
Bonding using the edge-groove method is the best option for ensuring the strength and durability of the glued structure. Before gluing the boards for the tabletop, you need to make grooves on them with a router. You need to glue a special ridge (slat) into the groove of one board, onto which we put the next board. We glue subsequent boards in a similar way.
If desired, the tabletop is covered with a solid wooden block. The assembled tabletop must be sanded, varnished and allowed to dry for 36 hours.
OUR SERVICES
If you need advice on choosing material for the countertop, call or write to the manager in an online chat. We offer high-quality larch deck boards and larch planks, as well as cutting and processing services.
Pros of wooden countertops
So, the advantages:
There are very few disadvantages to wooden countertops. And if you consider that a table made by yourself is environmentally friendly and safe for human health, then the number of advantages significantly prevails.
The size of a homemade table depends on the area of the room and the purpose of the product. But, as a rule, its standard height is 70 cm.
Required Tools
- jointer;
- saw;
- thicknesser;
- clamps;
- cutter
- wooden boards;
- antiseptic impregnation;
- sandpaper;
- wood glue;
- varnish, paint.
The easiest way is to make a table with your own hands from a piece of furniture. Assembling a shield at home from boards is not so difficult - you don’t need any special tools or complex technologies.
The wood must be dried before assembly. Then you need to saturate the wood with an antiseptic and let it dry.
Next comes assembling the shield with your own hands - joining the board with the glued strip to the board with the groove. The boards are glued together to form a furniture panel-tabletop. Sand the finished table top.
After the surface becomes perfectly flat and smooth, you can cover the tabletop with paint or varnish.
Simple tables for a summer house and a workshop can be assembled in the same way, only the boards are fastened from below with screws using timber. Such tables look distinctly rough, which allows you to create beautiful stylized country furniture.
If the tabletop is made from a sheet of fiberboard or chipboard, then it will be necessary to protect the edges of the tabletop from moisture. Otherwise it will quickly warp.
How to make a classic wooden table
For fans of fundamental classical forms, we can suggest how to make a wooden table that meets their requirements.
Necessary materials for making a classic wooden table
The set of tools you will need is the same, but the list of materials that should be prepared has changed, since the table will have four legs. Everything you need.
•
four pieces of timber with a length of 710 mm and a cross-section of 100x100 mm;
•
board with a section of 100x20 mm, cut as follows: two pieces of 1600 mm, two pieces of 800 mm and two more of 750 mm;
•
board with a section of 250x40 and a length of 2 meters - 4 pieces.
Making classic table parts
Wooden classic table
Since two sides of the tabletop have a rounded shape, it is necessary to give this shape to the wood. For marking, an aluminum gymnastic hoop or other object of a suitable shape and size is used, which is placed on boards laid out tightly to each other, first at one end, then at the other, after which each board is cut at both ends with a jigsaw (Fig. 2).
Now all the table parts have the required size. They are cleaned with coarse sandpaper, sanded and impregnated with stain (three times). Then several layers of varnish are applied to ensure resistance to moisture.
I recommend: How to choose a bed with a lifting mechanism
DIY table assembly
A wooden table is assembled with your own hands in strict sequence.
1.
The base box is assembled from parts 1600 and 800 mm wide. Galvanized wood screws 4x60 are used. Before assembly, the joints are carefully coated with good wood glue or waterproof PVA glue. It is worth noting that the short parts of the “box” are attached to the long “end”;
2.
The tabletop boards are laid out on a flat table or other surface with gaps with the work surface facing down. The finished box is placed on top, centered, its internal contour is outlined with a pencil, after which the box is removed;
Assembling a wooden table with your own hands
3.
Inside the outlined contour, departing from the corners 110 mm (space for table legs), boards are attached to the boards of the tabletop using glue and galvanized screws 4x45, ensuring its integrity;
4.
The box is installed on the tabletop taking into account the previously drawn contour and fastened with 4x16 mm self-tapping screws using steel corners, remembering that the space for installing the legs must remain free;
5.
The table legs are installed in the corners of the box using glue and “screwed” from the outside with self-tapping screws (4x60). The durability and strength of the structure depends on how tightly the table leg is placed in the corner of the box, therefore, before using self-tapping screws, you should try to fix the leg in the corner using a clamp or other method.
After the wood glue has dried and the structure has acquired the necessary strength, the table can be used.
Invite your friends and show them your product in action. Have a nice feast! You may also find materials on how to make a chair, stool or other furniture useful! Good luck to you and good luck to your family! Leave your tips and comments below. Subscribe to our newsletter. Good luck to you and good luck to your family!