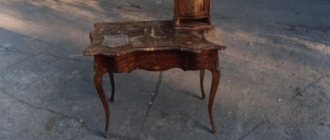
Decoupage of a stool can give it a second life and make an outdated item in demand again. The design of the chair may vary. It all depends on the imagination of the master.
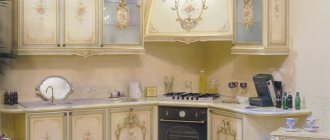
Everyone in their home has old, but still strong furniture that it’s simply a shame to throw away. A creative approach will help you find a way out of the situation, and then even ordinary kitchen stools will become an integral part of your interior.
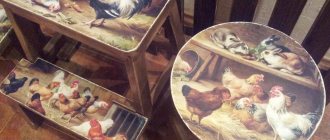
Decoupage stools with painting
Painting can transform ordinary kitchen chairs into stylish and eye-catching decorative elements. In order to paint, you first need to prepare the surface. For this you need:
- sandpaper;
- chisel;
- paint solvent.
Using a brush, the solvent is applied to the old paint. After 5-10 minutes, remove the top layer of coating using a chisel and thoroughly wipe all surfaces with sandpaper.
Chips and cracks must be filled with putty. To do this, use wood putty, which is applied with a rubber spatula.
You need to go over the surface with sandpaper a few more times until the surface becomes smooth and without any defects. After this you can start priming.
If light shades predominate in the drawing, use a regular primer. If you plan to use dark colors in the painting, it is better to tint the mixture. To do this, use black acrylic paint. For 100 g of primer you need 30 g of paint. The primer is applied in 2 layers.
Directly for painting you will need:
- brush;
- acrylic paint;
- varnish
First, you need to use a pencil to apply a pattern or design directly to the ground. Any image is allowed, but decoupage with Khokhloma painting looks best on kitchen furniture. This painting is dominated by bright floral patterns. It helps fill the interior with other colors.
If you are unable to apply the drawing yourself, you can print the picture on a printer. The contours are outlined with a marker. Then the surface of the stool is moistened, and the image is applied face down to the furniture module.
Under the influence of water, the marker is imprinted on the primer, after which the design is simply traced along the contour with a pencil. Using a thin brush, draw the lines of the patterns. When the outlines are dry, you can paint over the entire space of the stool.
Step-by-step process for decoupaging a stool
When the necessary stool has been found and all the necessary materials have been prepared, you can begin to work. Carefully inspect the surface of the stool that you are going to decorate; if it is smooth, then skip the first step.
So:
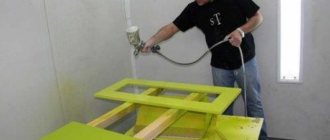
- Thoroughly clean the surface of the stool with coarse sandpaper and polish the top with fine sandpaper. If you have a sander, you can use it. The master class will teach you how to use it. After this, cover the base with one layer of primer and let it dry.
- The next stage is painting. You can use brushes or a sponge. It is better to apply white paint in several layers to avoid gaps.
- Once the paint has dried, you can glue the design. It is better to choose a napkin according to the size of the chair, but you can cut out individual parts from it and place it as you wish.
- The napkin must be divided into layers and only the top layer with the clearest pattern should be used to decoupage the stool.
- The entire surface of the design is carefully covered with liquid PVA glue. A sponge can also be useful here to evenly distribute the glue, as well as to get rid of bubbles under the picture.
- When the glue is completely dry, you can coat the stool with varnish. For reliable fixation, apply several layers.
- Your first decoupage stool is ready.
Related article: Making stencils for a children's room (+40 photos)
The whole process takes a lot of time, but it is not too labor-intensive. Usually, the first experience inspires people to remake many items with their own hands. You can master different decoupage techniques from your own experience. A master class on the most ordinary stool can reveal abilities in you that you didn’t even know you had. With your own hands you can create a hobby that will bring you pleasure.
Video gallery
Photo gallery
The best posts
- Creative refrigerator using decoupage technique
- Bottle decor: decoupage, painting, master class (photo)
- Decorating a bucket using decoupage technique: step by step
- Increase the space in the apartment with the help of mirrors [top ideas]
- Cross-stitch pattern of a girl: a man and a woman in a hat, sets in red, with a jug and on a bicycle, with an umbrella
- Master class on three-dimensional bead weaving of Baroque beads
- How to decorate heating pipes
- How to make a bead bracelet with your own hands from fishing line and beads with video material
Vintage decoupage on a stool
Decoupage of a stool in this style is carried out using the following materials and tools:
- acrylic varnish and paint;
- putty;
- several brushes;
- napkins with a pattern;
- sandpaper.
Using sandpaper, thoroughly polish the entire wooden chair. After this, check the piece of furniture for unevenness and cracks. All defects are covered with putty. Then paint the chair with white paint. The primer is applied in several layers. Each layer must dry well.
Using patterned products, a design is created on wood. To do this, cut out the desired silhouette on the canvas and carefully apply it to the surface to be treated. A little glue is poured into the middle of the picture, then smoothed out thoroughly.
When all the pasted napkins are dry, draw the outline of the cut out design. To complete the finishing, paint the piece of furniture with acrylic varnish. Photos printed on a color printer are also used as decoration.
Choosing a stool decoupage technique
The decoupage technique has centuries-old roots. Over the years, people come up with something new and add their own twist. This is how several varieties of decorating stools and other objects with drawings were formed.
Before you start decoupage with your own hands, you need to study each type and choose the most convenient one:
- Classic pasting consists of simply applying a pattern to any surface, opening it with varnish and sanding it. Here you can add colors as you wish, create bulges and irregularities, or artificially age the image;
- The technique, on the contrary, involves covering a chair with a picture from the reverse side. This technique will only be appropriate if the stool is made of glass or has glass inserts;
- The artistic technique of decoupage is the combination of separately cut out drawings and background colors into one complete harmonious picture. It requires artistic skills and good imagination;
- deco patch - a technique often used in decoupage that involves tightly covering the surface of a stool with small pieces of paper that can imitate fabric, fur or other materials;
- voluminous equipment on the seat of a stool will be inappropriate, but the legs, if desired, can be decorated with relief structures. To learn how to do this, watch a detailed master class.
Related article: Creative refrigerator using decoupage technique
Simple decoupage of an old stool
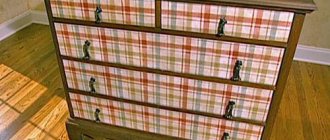
The simplest way to decorate old furniture is to apply wallpaper to its surface. Decoupage of an old stool is made from the remnants of various unnecessary wallpapers that lie idle in almost every apartment. If you can’t find them, you can buy a covering with any pattern.
It is important to know: before you start decoupaging a wooden chair, you need to thoroughly clean it. All cracks are covered with putty, and irregularities are sanded with sandpaper.
The final result depends on a clean and smooth surface of the furniture. Even a small crack can ruin the appearance of the product and shorten the life of the finished item.
The easiest way to decorate furniture is with patchwork technique. It is the simplest and most pleasant. Whole pieces of wallpaper are used for it. Glue the sheet onto a cleaned and flat surface and leave it until completely dry. When the wallpaper is dry, it can be varnished so that the design does not wear off over time.
Newspaper decoupage stool
Decorating a wooden chair with newspapers is the most economical option. Furniture finished in this way looks attractive.
To decorate a stool with newspaper you will need:
- newspapers;
- decoupage glue;
- clear primer or acrylic clear varnish;
- several brushes of different sizes;
- sponge.
Master class for beginners on decoupage with newspapers:
- First, prepare a chair for work. The entire surface is cleaned with fine-grained sandpaper. After this, decoupage glue is applied with a wide brush.
- Before you start gluing newspapers, you should put them in a bowl of warm water for a few minutes.
- Wet newspapers are placed on the stool.
- All irregularities are immediately smoothed out from the center to the edges.
- The pasted piece of furniture must dry for at least a day.
- After drying, a transparent primer is applied to the newspapers in 5-6 layers.
The process of preparing a stool for decoupage
There is no home where there is not an old but beloved standing stool. And it’s a shame to throw it away, but there’s no way to fit it into the new interior. There is only one way out - you need to radically change its appearance, taking into account the design features of the room. This is not difficult to do if you learn the basics of decoupage technique.
After watching the master class, you can safely get down to business, but you need to arm yourself in advance:
- a stool, preferably disassembled for ease of DIY decoration;
- quick-drying white acrylic paint;
- primer;
- PVA glue;
- different sizes of brushes and sponge;
- sandpaper;
- napkins with your favorite image;
- varnish;
- craquelures if desired.
The craquelure effect looks like cracks in paint layers; it can be used on any material. Don't try to get it the first time, it's not that easy. A master class will help you in this matter.
Stool in Provence style
A Provence style stool can be an unusual and beautiful decoration for a garden or kitchen. To create interior items in a similar style, you will need:
- putty;
- sandpaper;
- acrylic based paint;
- napkins;
- wax;
- varnish;
- several brushes;
- glue;
- scissors.
Using sandpaper, you get rid of the previous varnish coating on the surface of the stool. It is recommended to use coarse sandpaper first, and after removing the top layer, fine-grain paper can be used.
The chair is covered with putty and the product is allowed to dry. The stool is painted in a color a couple of tones darker than the top layer. The selected picture is cut out and glued to the chair. The drawing must be carefully smoothed with a brush from the center to the edges.
Wax is applied to the area where the dominant color should appear. When the pattern is completely dry, apply a second coat of paint. This layer should be slightly lighter than the previous one.
After the paint has dried, the areas covered with wax are wiped with sandpaper. The bottom layer will appear on the surface of the chair, which will give the product a worn effect. The work is completed after applying several layers of acrylic varnish to the stool.
Master class on decoupage on wood: Country style bench
Author: Oksana Lebedeva
Oksana Lebedeva Studio
Yara Capraro (her website) owns the Daiara store and laboratory in Brazil, where art products under the same brand are produced. During the conference, she demonstrated her craquelure compositions, noting that they are significantly different from those offered by other manufacturers. This is true! Reverse decoupage on a plate with large cracks looks very good. And even a beginner can do such work - Yara’s materials are so simple and unpretentious.
Unfortunately, I don’t know Portuguese or Spanish, so I can perceive the information from Yara’s video master classes by following her hands. Now I’ll try to “repeat” the stages of its work from one of the published MK. Of course, this will be my variation on the theme (after all, the materials are different). But you can follow the master’s hands, read my adaptation and create your own unique thing!
Step 1 – clean the wooden surface, sand off old varnish, remove any remaining dust.
Step 2 – painting with white acrylic paint. Yara's paint is quite thick and she applies it with a spatula in two layers with intermediate drying. When I do something like this, I'll use my white paint and just brush over the surface in two coats.
Step 3 – additional tinting of the edges of the bench. A pale olive color is mixed in and applied closer to the edges of the bench (again with a spatula). In my opinion, you can simply “smudge” the edges with a sponge with a small amount of paint (semi-dry). This is exactly what Yara does at the next stage.
Step 4 – moisten the surface with a damp brush, dip the sponge in a dark olive color and rub along the edges, at the joints and in the depressions. After drying, we see the “dirty” effect - a patina of time.
Step 5 – paint the edges and ends of the bench with dark olive paint.
Step 6 – time for stencils. Using stencils with a semi-dry brush, Yara Capraro applies drawings. Notice how the master first knocks off the excess paint, and then draws the motif in a circular motion along the edge of the cut out stencil. The result is not a bright, but a sort of half-erased motif - just in the country style.
One more thing: look - Yara is cutting out a stencil of grass leaves from a thick file! This drawing is applied brighter than the previous one.
Now flowers and butterflies: the principle of working with stencils is the same - with a semi-dry brush, in a circular motion. But keep in mind the sequence of colors: from light to darker tones.
Step 7 – varnish with matte varnish.
PS In my opinion, stencil flowers can be replaced with decoupage motifs. Only then, after creating the main background (stained white), would I cover the work with a protective layer of varnish. Then I would do decoupage. Re-varnishing. And then - stencils. And at the end there are a couple of finishing layers of varnish.