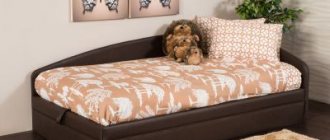
Tables by product design
- Table on wheels
- Sliding table transformer
- Folding table
- Console table.
Manufacturing materials
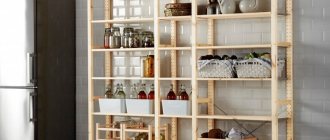
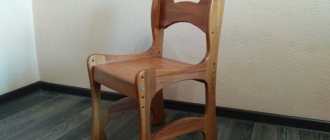
- Wooden table
- Metal structure
- Glass table
- Stone table
- Furniture with leather elements
- Combined design from a variety of materials.
A do-it-yourself coffee table is exclusive furniture for the living room; no one will have a second copy of it.
Set of tools for making a table
To assemble a coffee table yourself from scrap materials or creative blanks, you may need the following tools:
- Drill/screwdriver
- Jigsaw
- Sander
- Construction hair dryer
- Screwdriver Set
- Saw
- Glue gun
- Roulette
- Construction knife.
Most of the tools from the list are included in the standard set of every man.
From a variety of available materials, you can assemble creative coffee tables with your own hands in loft, country, and minimalist styles.
Vintage style suitcase table
An old suitcase that has absorbed the aroma of travel can unexpectedly decorate the interior of a living room, office, or bedroom. This item can be used to make desks, coffee tables, and coffee tables. They will become rare guardians of the hearth. Suitcase tables combine two opposing qualities: settledness and passion for travel.
What you will need
To successfully implement this idea you will need:
- unnecessary suitcase;
- furniture legs (can be wheeled for a mobile table);
- plywood or chipboard;
- wooden blocks;
- screws (self-tapping screws);
- sandpaper;
- spray paint;
- felt seals;
- roulette;
- screwdriver
This simple and simple kit will help you make a table with your own hands.
How to make
When the available materials and tools are ready, they begin to work.
- To strengthen the base, plywood or chipboard is placed on the bottom of the suitcase.
- Plywood (chipboard) is fixed using wooden blocks. 2 strips are screwed with self-tapping screws to the side walls of the suitcase.
- Masking tape covers metal parts.
- Painting is carried out using a spray can.
- The legs are prepared: sanded with sandpaper and painted.
- A felt seal is attached to each leg at the bottom to prevent scratching the floor.
- The mounting tape is removed.
- The legs are screwed on.
- The front parts of the suitcase are decorated.
- The table is installed on legs.
Decorating it with stickers will give the suitcase tables a more original appearance. Their role can be played by stamps, magnets, and souvenir images. The range of decorations used is the widest.
It is not necessary to attach legs to a massive suitcase. It is enough to restore its appearance (paint it or cover it with clear varnish). This suitcase table looks truly impressive.
By choosing graceful legs and painting an old suitcase in a delicate color, you can make a comfortable coffee table. Otherwise, the technology for turning a suitcase into a piece of furniture remains the same.
Having shown remarkable imagination and used ingenuity, the suitcase is turned into a desk like a secretary or bureau. Shelves are attached to it, small drawers are mounted, and a retractable (folding) board is fitted. By attaching folding legs, this structure is turned into a portable item.
There are many options for wonderfully transforming a suitcase into a table. A hand-made suitcase table fits well into the interior of various styles: from retro or classic to high-tech. People who think outside the box can turn old suitcases into a unique piece of furniture and decor.
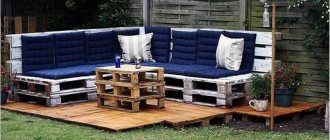
Coffee tables made from pallets
For a bold loft or eco-style, you can use a commercial pallet as a working material. To design the product you will need the following materials and tools:
- A pallet of a suitable size or a couple of blanks.
- A couple of boards or remnants of 10x10 timber after construction or repair work.
- Wheels or legs according to creative concept.
- Glass tabletop (transparent or black plexiglass).
- Screwdriver with self-tapping screws.
- Wood saw.
- Hammer, nails.
- Sandpaper sheets of different grits.
- Water-based varnish, stain, acrylic paints.
Option #1
The surface of the tray should be cleaned and lightly sanded so that paint and varnish coatings adhere better.
An additional stiffening rib is created in the center of the pallet. To do this, you need a piece of board the width of the pallet or several blocks, which are secured between the layers of the pallet with screws or nails.
We perform similar actions with the second pallet. We connect the two modules into a single structure with screws, installing one on top of the other.
We cover it with stain, lightly sand it to knock down the raised lint, and apply several layers of varnish. Screw on the wheels.
We lay the acrylic glass tabletop, and the table is ready.
Option No. 2
How to make a coffee table with your own hands at minimal cost? Use materials that are lying around idle in the shed. For example, a couple of pallets, paint for walls after repairs and trimming of bars. A screwdriver and self-tapping screws will be found right there. All that remains is to buy wheels and paint colors of dark blue or black, as well as red.
Processing and assembly of pallets is carried out similarly to the first option. The pallets themselves are painted black or deep dark blue, and a British flag can be painted on the surface of the tabletop in a vintage style. The creative process is completed by varnishing and screwing on the wheels.
Table from a suitcase
An original table can also be made from an old suitcase. For such a piece of furniture, you will need to purchase furniture legs. They can be either metal or wood. If you use special wheels, you can get an original model of a mobile coffee table. You will also need a screwdriver, screws and a piece of plywood for the job.
Related article: Do-it-yourself installation and fastening of a bathtub to the wall
First of all, you need to cut a rectangle out of plywood, the dimensions of which must correspond to the width and length of the bottom of the suitcase. Plywood is placed on the bottom of the suitcase and markings are made for the legs. Using a screwdriver and screws, the legs are attached to the base of the suitcase. Then felt is glued to the base, inside the suitcase. The table is ready. There are many different options for turning an old suitcase into a coffee table. By choosing the right legs, the table can be made in a classic or retro style.
Option #3
Coffee table made of pallets on high metal legs. You can buy a structure for the legs at a furniture fittings store or use old parts from another product. They can be left chrome or repainted to match the style of the table.
Note!
- Do-it-yourself screen: a step-by-step master class for creating it yourself. Types of screens, manufacturing materials + design ideas
- Do-it-yourself installation of interior doors - preparation of the structure, selection of doors, installation step by step + instructions from professionals
- DIY shoe rack - types of designs, manufacturing materials, step-by-step master class with simple diagrams and drawings
The tabletop from the pallet must be cleaned of dust and lightly sanded.
In the center of the pallet between the layers we place a jumper that will divide the space into two niches for books and magazines, and will also serve as an additional stiffening rib.
The boards can be coated with several layers of colorless varnish to preserve the unusual texture of the material.
The legs are mounted on self-tapping screws. The product is ready for use.
Pallet table
Even the most ordinary pallets that can be found on each one will make an excellent coffee table. To work you need to prepare:
• Wooden pallets; • Hammer; • Drill; • Nail puller; • Clamps; • Glue; • Screws; • Screwdriver; • Legs or wheels; • Primer; • Soap.
First of all, the surface of the pallets must be cleaned of dirt. To do this, you can use a drill with a wood cutting attachment. You should also use a nail puller to get rid of old nails and disassemble the pallets into pieces. All damaged and broken pieces of boards must be glued together. Gently clamp the boards with clamps and let them dry thoroughly. Then glue the prepared parts of the tabletop on the back side and again with clamps. After complete drying, the surface of the table must be coated with a layer of primer and then varnish. Wheels or legs must be attached to the back of the resulting table. To make it easier to attach the screws to the table, their surfaces can be rubbed with regular soap.
Related article: Painting wooden products: we paint the table and walls with our own hands
After all the work done, you will get a functional, stylish and compact table.
Tire mini table
A do-it-yourself coffee table made from scrap materials based on a tire will look surprisingly stylish and original.
To work you will need:
- Assembly adhesive
- Jute rope of desired thickness
- Screwdriver with self-tapping screws
- Tire
- Two sheets of plywood 5-6 mm across the width of the tire
- Jigsaw.
Before use, the tire should be washed and dried.
We cut out a tabletop from plywood to the diameter of the tire and a base a couple of centimeters smaller.
We place the plywood on self-tapping screws; additionally, you can apply mounting adhesive along the edges for reliability.
Let's start wrapping the base with twine. Glue the end of the rope to the center of the tabletop and let the glue set. The winding starts from the center. We fix each turn with glue.
To protect the surface from moisture and stains, the twine should be coated with several layers of varnish.
Making your own coffee table from scrap materials
A favorite topic for many creative people is how to use available materials for practical use. Products made from tires are especially popular - they are convenient to install in dachas and verandas, and from suitcases that have served their time as travelers.
Tire table
There are different ideas on how to use tires as a table. The good news is that such products are durable, original and take minimal time to manufacture.
A whole furniture ensemble is achieved thanks to a creative approach
If the entire wheels remain, they are screwed to each other and the glass is secured to the top wheel
Step-by-step photo instructions for creating an interesting table
Tires can be painted in colors that match the interior
For home use, the tabletop can be made of wood
Here are a few instructions for creating a garden furniture set with a small table at the head.
| Illustration | Description of action |
| Prepare 11 tires of the same diameter. We take two tires on the chair and connect them using a screwdriver and self-tapping screws. For the table we take three tires. | |
| We cut out 4 circles from plywood (pressed shavings) slightly larger than the inner diameter of the tire, and one large circle for the tabletop. | |
| The result is a cute garden set. |
Suitcase table
Do you happen to have an old suitcase? How wonderful!
You can't take an old suitcase with you on a trip. But using it in the interior is easy!
If you attach the legs from an old Singer sewing machine to it, the result will be just a sight for sore eyes.
What do you think of this decor option?
It’s easy and simple to make a massive coffee table from a spacious suitcase
So, what is needed for such a rapid transformation? Four stable legs of any type - the main thing is that they are combined with the final decor option and easily support the product. Legs can be bought on Avito or torn off from old unnecessary furniture and made on a lathe. You can use white enamel for painting, as it is easy to decorate. But, in general, the color can be any, even gilding. If the exterior of the suitcase is perfectly preserved, then you don’t have to paint it. If desired, you also need PVA glue, decoupage napkins, brushes, sandpaper, gold or silver acrylic.
First, paint the base and let it dry. All irregularities are sanded and a second layer of enamel is applied. Now we paint the legs and, as soon as they are dry, glue them to the base with furniture glue. That's all the work! We turn the table over and admire the result of our labor.
Option #1
The console table made of laminated chipboard is easy to assemble and perform; it consists of rectangular parts of different sizes. All elements are connected using self-tapping screws and confirmations.
The material for production can be doors and walls from an old wardrobe. The edge is selected to match the chipboard tone. It can be bought both in furniture fittings stores and in construction supermarkets. 4 wheels for product mobility. And 4 plastic corners for attaching the tabletop to the legs.
In order to avoid the formation of chips on the laminated surface during cutting, we stick masking tape on the cut site, and only then we cut with a jigsaw with a special file with fine steps.
We cut out the table top, shelf and bottom. 4 strips for the height of the table minus 2 thicknesses of the chipboard sheet.
It is necessary to cut grooves on the shelf so that the part is connected to the strip, which acts as a leg.
The table top is connected to the slats using corners and self-tapping screws. We place the shelf in the center and secure it with confirmations. We also plant the base on the confirmat.
We screw the wheels or legs at a distance of 3 cm from the edge.
We hide the fastening points and open edges under self-adhesive melamine edges and plugs.
Option No. 2
Every girl can make a DIY coffee table with a shaped plywood tabletop. To do this, the store purchases 15 mm thick plywood and three decorative legs with fasteners.
The tool kit includes a jigsaw, 120-grit sandpaper, and a pencil. The paint can be chosen in any color.
On a piece of plywood we draw the outline of the tabletop of the desired shape. A perfect circle is created using a makeshift compass made from a nail, thread and pencil. If you get creative, you can cut out a tabletop of a more original shape.
The cut tabletop must be sanded and only then covered with paint. The “designer” decides whether to paint the legs or not.
When the parts are dry, the legs and tabletop are combined into a single ensemble.
General recommendations for constructing the structure
The work begins with the choice of material, shape, size and design of the product. In the absence of experience, combined with high demands for exclusivity, the design and/or production of this furniture is entrusted to professionals. In other cases, you should use a ready-made drawing of a coffee table or develop it yourself, taking into account other people’s or your own ideas.
Selection of materials and tools
A variety of materials are used to make your own coffee table, including:
- Wooden beams (solid or glued), tree cuts. Coffee tables made of timber are in perfect harmony with loft-type interiors, fireplaces, stone cladding, and brick. This option has many advantages, but is not always suitable for beginners - for all its attractiveness, natural wood needs proper processing and protection from cracking.
- Wood panel materials (chipboard, MDF) are an ideal option for beginners; the design is light, practical, and stylish. Processing these materials does not require expensive equipment; cutting slabs for a coffee table can be done in a store.
- Tempered glass from 5 mm thick. Not everyone can work with it correctly; most often this material is combined with wood, chipboard or metal and used to make countertops.
- Metal. With the highest processing complexity, this material outperforms others in decorativeness, durability and strength. When forged, it is ideally combined with wood or glass.
- Natural wicker or polyrottan. If you have a stable base, any beginner can weave a coffee table with their own hands. Frameless volumetric structures require more experience, but they look very beautiful.
Coffee tables made with your own hands from scrap materials look especially stylish: vintage suitcases, barrels, pallets, logs, wheels, old books. Due to the low cost of raw materials, this option is ideal for beginners.
A standard set of tools when working with wood and its derivatives includes a jigsaw, drill, screwdriver, saw, hacksaw, clamps, screwdrivers, hammer, level, and ruler. If it is necessary to cut glass, a glass cutter is added here; for metal processing - a grinder, a welding machine, and hacksaws with special blades. Fasteners, edges, fittings, protective, adhesive, paint and varnish compositions, decorative inclusions are selected separately, taking into account the type of coffee table.
Wooden beam laminated chipboard MDF
Tempered Glass Metal Vine
Polyrattan Tools for work
Dimensions and drawings
When creating a drawing, you need to take into account that the dimensions are selected based on the furnishings and the purpose of the product. So, if possible, place a small table 40 × 40 or 50 × 50 cm near the upholstered furniture, ideally round. If it is necessary to accommodate a large number of people, its dimensions are increased (but not more than half the length of the sofa and 2/3 of its total dimensions). In general, the parameters of hand-made tea tables and art decor elements vary from 30 to 80 cm in length (tabletop side) and from 50 to 85 cm in height, but there are no clear standards.
Creating original round tables with your own hands, tips for craftsmen
When drawing up sketches yourself, you should remember the following nuances:
- dependence of the stability of structures on the area of supports;
- the need to reveal the beauty of the material - if, for example, a glass coffee table made by yourself can be anything, then with wicker products the tabletop looks more elegant with dimensions of more than 50 × 50 cm, and the larger the wooden structure, the better its natural appearance will be visible structure;
- The purpose of the coffee table is that the structures to be served should not be very small.
Small-sized products with complex configurations are perceived as objects of art decor, and models with a regular geometric shape of the tabletop are, on the contrary, as functional furniture.
There are quite a lot of ready-made drawings for making coffee tables from wood with your own hands, the same applies to glass, wood or improvised materials. But the number and method of fasteners for them are not always indicated; this point should be clarified separately. Cardboard table templates help to check the correctness of complex designs.
Option #3
The search query for do-it-yourself wooden coffee tables photo returns stunning products made from exotic wood, or stacked tabletops made from saw cuts. Most often, the basis of such furniture is made of ordinary plywood or MDF.
Shelves, square legs, crosshairs are covered with wood veneer. The whole highlight of the product is in the tabletop.
Cut out the base for the table top. We attach a veneered border frame along the edges. We fill the internal area with wood cuts, end cuts of the remains of timber and other planks, and sanded lamellas from old boards or parquet. Each element is placed on glue. Epoxy varnish is poured on top.
Model-specific assembly steps
When independently assembling coffee tables from plywood, solid wood, laminated chipboard or MDF and other available materials, it is worth thinking through the algorithm of actions in advance, preparing tools and fasteners. The minimum level of complexity is for products made of panel materials with rectangular or square shaped parts. The maximum is for type-setting or figured structures.
From laminated chipboard
For the simplest coffee table made of chipboard with a laminated coating, in addition to the panel itself, you will need at least 8 confirmations and 16 screws, 4 plastic corners (can be replaced with minifixes), wheels or edges for closing the legs. The production of furniture from laminated chipboard is carried out according to the following algorithm:
- The panels are marked and cut.
- Holes are drilled on the racks, bottom, and shelf, and the elements are fixed with self-tapping screws.
- The racks are strengthened with plastic corners, the structure is turned over and attached to the tabletop.
- If possible, homemade furniture is installed on wheels in order to increase its functionality. All exposed areas are protected with a laminated edge.
The finished table does not need additional decoration; it already looks laconic and stylish. If desired, the inner shelf can be made of glass, but in general this is not necessary. If there are children in the house, the top tabletop is rounded.
From a wooden barrel
To make a homemade table you will need: a wine barrel with hoops in satisfactory condition, solid wood or boards with a thickness of 20 mm or more. You also need to prepare bolts, screws, wood glue, abrasive and paint materials and a set of tools (tape measure, circular saw, clamps, jigsaw, drill, screwdriver). Cutting and assembly are carried out in the following sequence:
- The barrel is cut longitudinally into 2 halves with a circular saw.
- The metal surfaces of the rim are cleaned of rust and covered with fresh paint, the wooden surfaces are sanded, if necessary restored with oils or wax, and covered with stain.
- 2 stable fastenings are prepared: on a wide board, a sketch of the part is marked with a pencil, taking into account the diameter of the barrel, the need for centering and at least a 5-centimeter offset from the floor in the central part. The cut is carried out with a jigsaw after checking the size compliance. To avoid mistakes at this stage, you should use cardboard templates.
- The sawn legs are strengthened from below with a strong horizontal bar, screwed with self-tapping screws. The structure is assembled and reinforced with at least one board in the center (holes for it are made in advance, at the cutting stage).
- The base of the tabletop is prepared: 4 flat, wide boards are adjusted to each other, coated with glue and clamped in clamps. After drying, the tabletop is reinforced with two transverse boards.
- A frame for the tabletop is prepared, with matching dimensions and cutting the butt elements at an angle of 45°.
- All surfaces are sanded again and covered with stain.
- Using bolts and screws, the entire structure is assembled: a barrel is screwed to the base, after which the frame is attached to it. To provide access to the spacious interior, the tabletop remains removable (later this part is simply placed on the frame).
How to make a kitchen table with your own hands from wood or wood boards
Wooden surfaces are coated with stain or coloring compounds in advance and only then screwed. The assembled wooden coffee table is varnished or tinted again. Old, dry barrels are cleaned extremely carefully and, if possible, soaked in oils. To enhance the decorative effect of your countertop, look for wood with a beautiful texture. Beech, oak, walnut or ash boards have suitable characteristics.
Cut the barrel into 2 halves Sand the wooden surfaces, cover with stain Clean the metal elements, paint Prepare the fasteners Strengthen the legs
Assemble the structure, reinforce it with a board according to class=”aligncenter” width=”650″ height=”866″[/img] Prepare the base of the tabletop, reinforce it with two transverse boards Make a frame for the tabletop
Sand all surfaces, cover with stain Assemble the entire structure Finished table
From an old suitcase
To work, you will need a minimum of tools and materials: a vintage suitcase, 4 stable curly legs, nuts and washers for fixing them, a drill, paints with brushes, a tape measure. Assembling a coffee table with your own hands begins with preparing the suitcase. A product in good condition is simply washed and dried; in poor condition, it is strengthened from the inside and along the edges, and painted. The further course of action is simple:
- Holes for the legs are marked and drilled on the bottom of the suitcase.
- The legs are sanded, painted in the desired color and screwed on (the main washer is hidden inside).
- The structure closes and turns over.
The above scheme is relevant when working with old leather products in good condition; if serious restoration is necessary, the algorithm becomes more complicated. To strengthen leaky walls, ordinary plywood or wooden planks assembled into a lattice are best suited. External surfaces are painted with acrylic paints using spray cans, fabric, a washcloth or film (brushes leave traces of drips).
An interesting effect is achieved by upholstering a suitcase with fleecy furniture fabrics or eco-leather.
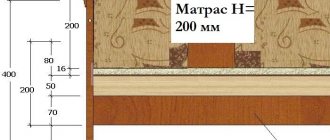
Transformer
For a transforming coffee table, in addition to a set of standard tools, you will need a spring transformation mechanism (MT-2 from the Glazov Metal Products Plant or its analogues), a sheet of laminated chipboard 22 mm thick, bolts, and screws. When choosing a folding mechanism, preference is given to products from Russian manufacturers who include drawings with the dimensions of the recommended type of transformable table in the box. To mark laminated chipboards, you should use applications or programs for cutting furniture (PRO100, Astra Cutting, Master 2). Panel cutting and edging of parts can be done in the store or at home.
Step-by-step making of a desk with your own hands, examples of decor
Immediately before preparing the holes for the hardware, you need to assemble the coffee table without them to check the dimensions. After this the following is carried out:
- Drilling holes for confirmations (on dark laminated chipboard this is easier to do with the help of stickers).
- Assembling the main box of the coffee table.
- Fastening the transformation mechanism to through hardware.
- Assembly and fastening of legs. At this stage, the coffee table is turned over, the side of the legs must cover all technical holes, and the bottom edge must be laminated.
- Placing the panels of a larger tabletop on hinges. Drilling holes for fastening, sequential installation of small and large parts.
If there is no space in the room, it is best to make your own table from solid wood with a folding tabletop and legs. This design can be made from any available materials, including pallets.
Solid wood products
A wooden coffee table is assembled with your own hands using slabs or end cuts.
Slab – longitudinal layer-by-layer sawing of a trunk with a bright wood texture. Ready-made countertop in eco style. All that remains is to coat it with clear varnish or oil and screw on the legs. Slabs on metal legs look elegant and elegant.
The end cut is a large-diameter stump with a height of no more than 5-10 cm. The saw cut, sanded and coated with transparent varnish, automatically turns into a tabletop. Metal structures or driftwood of suitable shape can be used as legs.
Decorating with epoxy resin
A beautiful do-it-yourself coffee table made of wood is made from a textured board with defects in the form of deep cracks, if they are filled with multi-colored epoxy resin.
The boards are glued together into a single panel for the table top. After the glue has dried, the surface is sanded, defects are cleaned, dust and shavings are removed.
Before pouring epoxy resin, the ends are covered with plastic stops, and the bottom of the tabletop is glued with acrylic film.
Filling is carried out in several layers to ensure complete filling of the holes.
After the resin has hardened, the tabletop is sanded and coated with transparent polyurethane varnish.
For support legs, you can use thick acrylic glass and elegant metal structures.
An original do-it-yourself coffee table photo presents unusual design solutions from PVC pipes, a glass aquarium, old window frames, stone blocks combined with glass, a grandmother’s chest or grandfather’s suitcase.
A creative approach to familiar things and creative imagination will help you create a unique interior element for the living room and preserve memories by breathing new life into old things.
Unusual table made of epoxy, wood and glass
Greetings, Samodelkins!
After reading this article to the end, you will learn how to make such an interesting and very unusual table with your own hands.
In addition, the author of the YouTube channel “Likhoy Topor” (the author of today’s homemade product) will demonstrate the technology with which you can combine glass with epoxy resin, and also, in a practical way, establish what happens to alcohol ink when it comes into contact with epoxy resin.
The first step
is to make the underframe, although in fact, it will partially serve as a tabletop.
Two types of carpentry joints are used here: a miter joint through a tenon, and a butt joint at an angle of 45 degrees. Using a miter saw, we trim the workpiece to size at the required angle (in this case, 45 degrees). The next step
is to make a nest for the tenons on the tenon-cutting device at the ends of the parts. Then you need to make the spikes themselves. To do this, we will resort to using an edge cutter. We will make blanks for the spikes from these lamellas. Now we trim the tenons to size and remove a small chamfer with a plane.
Next, using a simple template and a copy sleeve, we mill out the socket for the tenons for a butt joint. Using a marking thicknesser, we mark the position of the socket on the workpiece. Now we fix the template, drill a hole and finally mill it.
Next, using a groove cutter, select the groove. Later, glass will be inserted into this groove. The groove must be selected first to a small depth, and then to the entire volume. By doing this, you will be able to avoid chipping.
When all the necessary elements are ready, you can start gluing. We fill the nests with glue and hammer in the spikes. After this, once again thoroughly lubricate everything with glue and tighten it with clamps. Excess glue must be removed. A damp cloth works great for this. The glue sets very quickly, do not waste time on dry assembly, adjust and check everything in advance. At this stage, it is also necessary to check the angles in order to avoid various types of mismatches in the future.
Before you begin assembling the entire frame, you need to install support platforms on the lintels, sawn at an angle. This will allow the clamps to engage and tighten the entire structure evenly.
Now let's move on to the most interesting part -
we will pour epoxy onto the glass.
But first you need to properly mix the two components (the resin itself and the hardener). To do this efficiently, it is imperative to first stir the composition in one container, and then pour the mixture into another clean, dry container and mix everything again. This is done so that the entire solution is evenly mixed, and there is no unmixed composition left on the walls of the container, since it can eventually get into the fill and remain there as a sticky spot, thereby ruining the whole work.
The resin is ready, now we have to do the formwork. First of all, let's take 2 PVC pipes and cut them into three-centimeter rings. These rings will form an independent formwork. Just a little patience and everything will fall into place. Then we need glass 10mm thick. It is necessary to stick a film on it, which in fact will serve as a disposable stencil.
We glue strips of tape along the edges of the glass in order to understand the boundaries beyond which you should not go, otherwise the glass simply will not fit into the groove that was made earlier.
As mentioned earlier, each ring will be an independent formwork. Now you can lay out the composition as follows. Next, you need to cut out the film in the places where the resin will join the glass.
Then the glass must be frosted. This can be done using 180 grit sandpaper. This is exactly why such a stencil was made, since it greatly helps to frost the glass in strictly specified places. This work is not fast, since the glass does not wrap very well. As a result, the master spent about an hour on this task. And this is what we ended up with: Now we put the rings in place and secure them with hot glue. Then thoroughly coat the outer contour with sealant.
Everything is ready, you can fill the rings with resin. To be on the safe side, you can use a hairdryer, but in fact, Wood-PRO resin is very liquid and air bubbles come out on their own. Then we start adding alcohol ink to each “well”, they give a very interesting effect and according to the idea, inside each circle there should be a whole world of dyes, but this is only in theory. In practice, everything turned out to be a little different. After a couple of days, having turned the glass over, the master was, to put it mildly, disappointed. The intended effect did not work out at all. As it turned out, it was all about the white dye. It is too thick for these purposes, which is why the drops fell in one white spot. Well, okay, let's move on to plan B. To do this you will need new glass. We mark 2 smooth lines using this flexible profile. Next, the selected shape must be matted using sandpaper.
Then, using a plastic profile, we repeat the outline of the shape that was previously matted with sandpaper. We attach the plastic with hot glue. This way you can repeat a smooth line without any problems. We cover the ends with wooden slats and get this formwork.
Now it is necessary to ensure complete tightness of the structure. In order to be sure to isolate all the joints, the master decides to use two-component automotive putty. Of course, the method is not entirely convenient and also not very cheap, but it is 100% working. Everything is ready, you can pour the resin into the formwork. Now you need to wait for the resin to thicken a little, this will take about 10 hours. After this time, the resin has become thicker, and you can take up alcohol ink again. Pour them and stretch them with a plastic disposable fork.
Thus, the dye gets deeper into the resin and leaves a trail behind it. As a result, it should look very interesting from the reverse side. But as we know, not everything that is supposed to look interesting ends up looking interesting. Indeed, in this case, this is practically a kind of experiment and improvisation, so one can only hope that everything will work out.
Three days later, with bated breath, we remove the formwork and turn the glass over.
In principle, it turned out quite well, you will agree. All that remains is to sand off the top layer of the fill, since most of the dyes remain on top, they look like a mess and do not allow you to see the pattern and stains. Now you need to make the resin transparent again. To do this, it needs to be coated with glossy varnish. While the varnish is drying, saturate the underframe with oil. This is a very affordable and most importantly effective method of processing. Now all that remains is to put everything together, although assembly is a strong word in this case. You just need to insert the glass into the groove and coat the joint with transparent sealant.
This is the interesting table we ended up with. Thank you for attention. See you again!
Author's video:
Source
Become the author of the site, publish your own articles, descriptions of homemade products and pay for the text. Read more here.