What is a stopper
Stopper
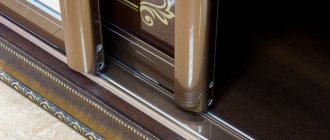
A closet stopper is a device that helps fix sliding doors in the right place on the guide rail. Owners of closets with two sliding doors do not particularly need stoppers, but if there are 3 or more doors, the need for this device is extremely necessary, because after each opening, you will need to install all the doors (3, 4, 5) evenly, and this takes time and it doesn’t always work out the first time. This happens because without stoppers there is free movement along the lower rail.
How limiters work
Quite an interesting question, since not everyone can immediately understand how exactly the limiter fixes sliding doors on sliding wardrobes in the position specified by the user. Although in practice everything turned out to be quite simple.
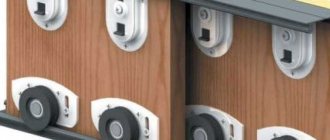
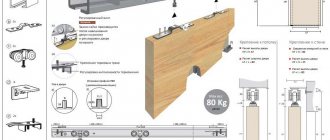
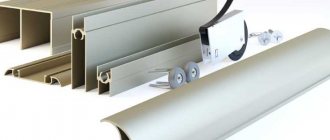
The stopper has certain spring characteristics or properties. The top plates are curved, allowing them to rest against the top of the door track on the rails. And in the middle of the limiter between the plates, which are curved, there is a gap.
The door roller moves inside the track, rides onto the bent plate of the regulator, and ends up in the gap, that is, it seems to fall into it. This allows the roller to lock. Thus, when closing, the doors are fixed in the position required by the user of the wardrobe.
To open the doors, you only need to apply a little more force, pushing the door in the direction in which you want to move it. So the roller comes out of the gap, and the door again moves freely along the rails.
Installation
Installation or replacement of the device in a sliding wardrobe can be done in a few minutes. All you need to do is place it in the recess of the bottom guide. How many stoppers are needed depends on the actual number of sliding doors. Installation does not require much effort.
How to install?
Anyone can install the device independently, without the help of specialists. For this:
- Before the guide is attached to the cabinet, we insert a stopper into the recess from the end of the line.
- With the bifurcated parts facing up, we pull it into the track to the place where the door wheel is planned to stop.
- Then we screw the rail to the guide.
Closer for sliding system
Closer for wardrobe
This is a whole system that includes stoppers, limiters, latches and other elements so that the doors automatically close smoothly and are comfortable to use. Every third model requires several closers at the same time due to the need to close the doors in different directions. Adapters that regulate the operation of the system are installed in the upper part of the cabinet, and the closer is installed in the upper part of the guide yard.
It is worth noting another significant role that is controlled by the automatic system - security. This device minimizes the likelihood of injury when closing the cabinet abruptly.
In addition to providing safety to the owners, the structure itself has an increased level of protection against loosening. This opportunity arises due to the shock-absorbing effect that is introduced into the automatic door closer systems.
To select an automatic closer system, you should pay attention to the following factors:
- dimensions and weight of the wardrobe;
- directions for closing and opening the sliding system;
- material of manufacture of the system itself (aluminum structure or steel).
The installed systems are in demand and extremely popular due to the fact that they combine:
- Ease of use. You just need to push the door and it will smoothly close on its own. Children or pets will not be able to do this. The effort that needs to be made is not noticeable for an adult, but for children even an animal will cause difficulties.
- Aesthetic appearance. The door is always in the right position and closed for a fee.
- Safe to use. When closing the doors, neither children nor pets will be harmed. Often when playing, children can sharply push the door, and the system slows it down 5-7 centimeters from the wall itself and slowly closes it, preventing injury and damaging the cabinet body.
- Reliability. Steel and aluminum structures allow the mechanism to be used for a long time.
You can learn how to install a stopper with a shock absorber on a sliding wardrobe from the video.
How to adjust wardrobe doors
To adjust the door leaf vertically, find a bracket with a bolt near the bottom (where the moving mechanisms are located).
If you turn it counterclockwise, the door leaf will rise (one turn of the bolt will raise it by approximately 1 millimeter). And vice versa - if you turn the bolt clockwise, the sash will lower.
If, after closing the wardrobe, the door does not press tightly against the frame, then you will additionally need to adjust the horizontal stroke. Next to the first bracket, find the second one (it is often located on the vertical side wall at the bottom or in the middle).
We turn the bolt in the same way and adjust the door travel. Be sure to check after completing the procedure whether the cabinet opens and closes normally, whether it is stuck anywhere, and so on.
Some models provide additional adjustments to the wardrobe doors. For example, STERKH cabinets still have a sealing frame in the middle on which the shutter lock is placed.
There is also a bracket that adjusts the door movement back and forth. Sometimes there are cabinets where adjustment is carried out entirely by rails. That is, it is necessary to select the height and clamp for the rails. True, such models of cabinets have not been produced for a long time, so it is unlikely that you will come across them.
And do not forget that the placement of the door is also affected by the wear of the moving mechanism. At least twice a year, it is necessary to completely overhaul the rollers and lubricate them with machine oil or mechanical lubricant.
Otherwise, the mechanism will fail. And replacing it is very difficult, since spare parts are quite difficult to find. To be sure that the adjustment has been made correctly, simply test to see if the door wobbles back and forth.
If there is even the slightest play, which was not there before adjustment, then look for your mistake and continue adjusting the mechanism.
How to align closet doors
The most common problem caused by sagging of one of the sides of the door is the skew of the door leaf. It is determined by the gap formed at the top or bottom between the end of the closed sash and the side rack of the cabinet.
The cause of the problem is the loosening and unscrewing of the adjusting screw, which is responsible for the verticality of the side edge of the doors. A similar defect occurs due to vibration of the movable sashes during their movement.
- It is easy to adjust the position of the canvas and eliminate its distortion, following the following instructions:
- First you need to find a bracket with two screws at the bottom of the side end of the door. If it is located under the pasted buffer tape, it must be carefully lifted and moved aside.
- A key of the appropriate shape and size is inserted into the lower adjustment screw of the installed bracket, the slot of which is usually a recessed hexagon.
- By rotating the key clockwise or counterclockwise, the door is adjusted, as a result of which its side can be lowered or raised. One full revolution usually corresponds to a vertical displacement of the blade by approximately 1 mm.
- In this way, the distortion and resulting gap are eliminated. For a closed door, select a position in which its end and the side pillar of the sliding wardrobe will be parallel.
Don’t forget about the gap between the bottom edge of the door leaf and the guide, which ideally should be no more than 6 mm.
Sooner or later, you will notice that when closing the cabinet, the door no longer fits tightly against the side wall and rolls back slightly. This defect is most likely caused by a slight slope of the floor surface, which is not visually detectable. In order for each sliding wardrobe panel to take its place, you will need to adjust the locking stopper.
- To do this you need:
- install each door so that it fits tightly to the side surface of the cabinet;
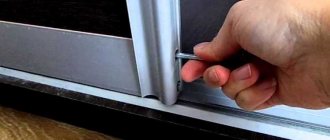
- on the lower guide, make marks with a pencil in the place where the center of the roller falls - either left or right, depending on the location and orientation of the adjustable blade;
- move the door to the side, and then use a knitting needle or screwdriver to move the stopper so that its center coincides with the previously made mark.
If the stopper is installed correctly, the door roller that runs over it will be locked in the desired position. In this case, the canvas will tightly adhere to the side of the cabinet.
Some models of sliding wardrobes have several door panels in their design, which during operation displace the initially installed stoppers. You can set the correct stop of each leaf relative to the width of the cabinet in the same way as described above.
How to remove wardrobe doors
- How to remove wardrobe doors step by step:
- If there is a door closer installed on the doors of your closet, then you first need to remove it. It will be enough that you unscrew the closer from the door leaf. It is better not to disconnect it from the cabinet box. Then you will not have to re-adjust the closer when re-installing it.
- There are stoppers on both sides of the wardrobe doors, on top. You should unscrew the bolts on them one by one and remove the stoppers. Then they will not interfere with the doors moving off their guides.
- The wardrobe doors should be removed one at a time.
- Close the closet doors and lift the bottom corner of one of them. Using a screwdriver, spring the lower roller so that it pops out of the groove.
- Carefully lifting the door, gently pull its lower part toward you until it comes out of the mechanism.
- Lower the bottom of the door to the floor. And pull its upper part out of the guide.
- After you remove one sash, the same actions should be performed with the second, third, etc.
- If your closet doors are very heavy, it would be better to have someone else help you when dismantling them.
How to put wheels on a wardrobe
To install the rollers, you need to decide on the method of their fastening. To do this, it is necessary to properly fix the guides, since they guarantee simplicity, ease and high quality of opening and closing the doors of the structure.
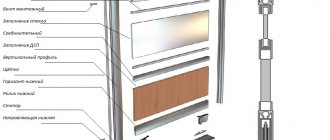
The main elements of the system are the rails, since the sash moves directly along them in a horizontal position.
- The system additionally includes the following elements:
- roller bearings;
- plugs intended for the profile;
- high-quality seals;
- reliable fasteners;
- other small fittings;
- other devices, and their availability depends on the characteristics of the selected videos.
The mounting depends on the type of system chosen. If an upper sliding system is made, then the doors are suspended on a control located at the top of the opening. The rollers roll along this guide.
The lower guide in such a system acts only as a latch along which the rollers move. If the installation is done correctly, there will be no vibrations in the blade.
The advantages of such a system include the fact that it gives the cabinet an attractive appearance and also ensures ease of opening the doors.
The lower system has a similar device, but the lower profile acts as a support. The upper rails and rollers are only necessary to ensure that the sashes do not fall out.
The combined system involves installing supports at the top and bottom. This option for fastening the sashes is considered the most reliable and high-quality, but installing and adjusting all elements is a complex process.
Thus, fastening can be performed in different ways, which are selected after studying the material of the doors, their weight and other parameters. The choice depends on ease of use and financial capabilities. If you have a cabinet of large size and weight, then it is advisable to focus on installing a combined system.
Rollers for sliding wardrobe doors are mandatory elements if sliding systems are used to open the doors. They can be made from various materials and can also be presented in different types. The safety and comfort of using all furniture depends on their proper selection and installation.
At the same time, it is important that no extraneous or loud sounds arise during the operation of the structure. If you carefully understand its structure, installation and regulation can be carried out independently.
Adjusting the rollers on the wardrobe door
Roller mechanisms in modern wardrobes are divided into hanging and supporting ones. Accordingly, if the bracket wheel has a load and moves at the top of the structure, then a suspension system is installed on the doors. The movement of the roller along the lower track of the guide is the support.
Inexpensive hanging roller systems are often used for installation in economy class wardrobes. They differ in the type of lower brackets, which slide in the lower guide and keep the door from falling out.
Often purchased when creating a wardrobe with your own hands, the ease of installation deserves special attention from home craftsmen. In adjustment, the roller plate is raised or lowered in relation to the bottom bracket.
The world famous IKEA furniture features cabinets with a hanging roller mechanism. Let us turn our attention to the PAX storage system; the doors are equipped only with high-quality components of our own production.
In luxury, for example, Italian furniture, you can also find a hanging roller - this is a massive mechanism with a bearing and an adjusting screw, the bottom bracket is equipped with a latch - an additional device with a wheel for smooth movement of the door.
Heavy large doors in exclusive cabinets are equipped with an adjusting pin located inside; tightening or loosening this element allows you to align it with the end.
Coming closer to the topic, I would like to remind you that the adjustment of doors on a sliding wardrobe is directly related to the cabinet body. The entire structure must be installed at a level, or close to this value, and not wobble; the parts are connected smoothly - the wardrobe has been correctly assembled according to the technical instructions from the furniture manufacturer.
A standard roller mechanism can only adjust the gap a small distance from 5 to 20 millimeters, depending on the configuration.
In the guides along which the roller moves, limiters or bumpers are installed - they stop the door at a certain value and prevent a hard impact from the doors moving in one direction. The mechanical closer catches and smoothly brings the blade to a fixed position. Adjustments to these parts are also related to the functions of the doors.
Let us take a special look at wardrobe doors, where the basis of movement is the bottom roller. Our market is saturated with manufacturers of these products. The main suppliers of the mechanisms used for sliding wardrobe doors are KOMANDOR RAUMPLUS ABSOLUT ARISTO KRAUSS. The most common ones are COMMANDER and RAMPLUS.
The door is adjusted by a screw installed on the mechanism. The leaf rises or falls relative to the side of the cabinet; if the gap between the sash and the side is at the bottom, the roller closest to the side rises; if the gap is at the top, then the far door roller is from the sidewall.
A bracket is installed in the lower guide for fixing the roller; moving the bracket helps stop the door in the desired place in the guide.
The rollers of the KOMANDOR system are located behind the doors and are visually accessible if you look into the closet. The mechanism is equipped with a screw, a Phillips screwdriver, when unscrewing counterclockwise, the door angle rises, counterclockwise, it lowers. The screw has a locking nut, which we loosen for adjustment and tighten after work.
How to install a stopper for a sliding wardrobe
Installation or replacement of the stopper is done in a couple of minutes. It fits in the recess of the bottom track. The question of its quantity depends on the number of doors.
- Installation proceeds as follows:
- Before the guide is screwed to the cabinet podium, a stopper should be inserted into the recess at the end of the track;
- we insert the stopper into the track, with the spread parts upward;
- we stretch the stopper to the desired place on the track, where the door wheel will subsequently be locked;
- after that, we screw the guide to the cabinet podium.
Author: Sergey Vladimirovich, electrical engineer. More about the author.