The easiest and most convenient way to mount a universal-type ceiling cornice for curtains to the ceiling is on vertical support stands and a transverse horizontal rod. In practice, the last thing you have to think about is how to more conveniently hang a cornice on the ceiling; most often you have to choose a cornice structure for hanging curtains, while simultaneously focusing on the design style of the window opening and the interior of the room.
Modern plastic cornice
Design and dimensions of ceiling cornices
Traditionally, curtain retention systems have always been installed on the wall above the window opening. Only relatively recently, with the advent of large plastic windows, ceiling structures began to be used as more convenient and technologically advanced. For those who like the idea of attaching a ceiling cornice for curtains to the ceiling, several successful schemes with baguettes have been invented:
- A universal rack-mount cornice on holders or vertical transverse posts, the length of such a structure can reach 4 m, it can only be installed if intermediate supports are used;
- Wide ceiling cornice made of plastic or aluminum profile. The dimensions of this type of structure are not limited in any way; if you correctly follow the ceiling mounting technology, it is quite possible to assemble several ceiling slats combined into one system of curtains and tulle.
- Broken cornices, two-row and three-row slatted structures with round ends.
In this case, rounded ceiling cornices provide safe, convenient and very comfortable movement of curtains into the side space of the window opening. Curtains or drapes end up hidden on the sides of the window sill, which seriously affects the durability of both the hanger itself and the fabric material of the curtains.
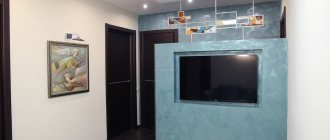
Ceiling three-row model, distance from the wall up to 30 cm
Width of ceiling curtain rod
One of the problems that one has to face in the process of selecting the optimal cornice structure is the size of the indentation of the supporting rod or profiled rail from the vertical surface of the window opening and window sill. For wall cornices this is indeed a difficult task. A rod, string or profiled box must ensure that the curtain fabric is removed at least 2-3 cm from the edge of the window sill.
String hanger for light curtains
If you attach the cornice box directly to the ceiling, then the amount of indentation can be made unlimitedly large. Most often, the plane of the curtains is chosen based on the capabilities of the ceiling, so that the bracket for the ceiling cornice does not run over the baseboard or ceiling molding. In some cases, the amount of indentation has to be increased artificially. For example, if you install a profile that is too wide on a PVC ceiling, you will need to use an embedded element and increase the distance from the wall to 20-25 cm.
Fastening elements for installing a ceiling cornice
To install cornice structures on the ceiling, three types of fastening are used:
- Ceiling stand-holder for rod models of cornices;
- Wall bracket for slatted ceiling cornices;
- Direct mounting through holes in the housing.
The ceiling holder for the curtain rod is usually designed to install a double rod system. A very simple and reliable design, easy to install on the ceiling even without experience. The only condition is good quality of the ceiling surface.
Rod model on vertical stands
Important! The ceiling curtain rod holder must not be installed directly onto drywall, plastic, vinyl or fabric ceiling cladding.
Corner brackets allow you to attach the ceiling cornice to the wall so that the body is almost under the ceiling without touching it. That is, a clearly wall-mounted cornice structure is used as a ceiling version, although the installation of brackets is essentially no different.
Direct mounting of the housing to the ceiling is considered the most difficult to implement. The installation problem lies in the need to accurately secure the body, without deforming the guides for hanging curtains. This not only spoils the appearance, but can also cause the runners to jam when moving the curtains. An example of how you can install a ceiling curtain rod is shown in the video:
How to attach a cornice if the ceiling is already stretched
The previous methods involve preparatory work before installing the canvas. But sometimes it is necessary to hang the ceiling rail after stringing. Removing the film is not only difficult, but also not always possible. When using a harpoon fastening, the material is carefully removed from the baguette and then placed again. This is impossible with clip or glazing beads. But there are solutions for such cases too.
Wall mounting with brackets
This is a fairly simple and inexpensive option. If the installation is carried out carefully, the ceiling will not be damaged and the manufacturer’s warranty will remain, as well as the waterproofness of the canvas, since there will be no holes in it. If necessary, the cornice can be easily replaced with another model.
Attention! Before installation, you need to make sure that the partition material is strong enough to withstand the additional load.
For installation you need:
- Screw the brackets to the crossbar using countersunk screws (the nuts should be located at the bottom). Depending on the weight of the cornice and curtains, the distance between the brackets is about 30-50 cm.
- Place the product against the wall and mark the mounting points (use a level so that they are at the same height).
- Drill holes with a hammer drill.
- Screw the cornice.
It is important to determine the height correctly from the very beginning, since re-hanging will leave noticeable holes in the wall.
Installation to the floor slab
If you need to hang a cornice from a suspended ceiling after the installation has already been completed, the fastening method with spacers will help out:
- The tire is applied to the surface, checking that the distance from the wall is the same.
- Mark the location of the fasteners.
- Glue the tread rings (the diameter is chosen less than the width of the cornice so that the strip covers the hole).
- Cut out the fabric inside the ring with a sharp knife.
- Using a hammer drill, holes are drilled in the rough ceiling.
- Install plastic dowels.
- Take a piece of polypropylene water pipe with a diameter slightly smaller than the ring, measure the distance from the ceiling to the film and cut it off. Such blanks are made for all attachment points.
- Insert the pipe sections into the holes and screw the tire to the ceiling through them with long self-tapping screws.
Note! Due to the unevenness of the floor slabs, the length of the pipe sections may be different; it is necessary to measure the distance at each attachment point.
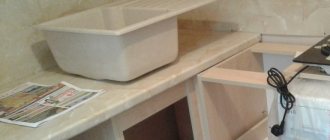
How to assemble a ceiling cornice
The simplest, quite popular design for the ceiling is a prefabricated product of three parts - a central plastic box with two guides for hanging curtains and side plugs with turns. In addition, the kit should include self-tapping screws with plastic plugs, plugs and hangers.
The first step is to make sure that the purchased version of the curtain rod holder is suitable in length for the given room. Before this, it is enough to attach the central profile above the window and make sure that there is at least another 25 cm of free space on the sides. If the central part turns out to be too long, then you will need to carefully cut the excess with a hacksaw to the required size.
Assembling a cornice body for a ceiling turns out to be no more difficult than a children's construction set.
Initially, we install a decorative facade tape on the body. We sequentially insert the flexible plastic strip onto the guides and carefully, slowly, stretch the tape along the entire length of the body.
After which you can install the side parts; they are simply inserted into the grooves and snapped into place. In principle, the baguette is ready for installation on the ceiling.
The sidewall also needs to be put into the tape
If you plan to install a rod or rack cornice, then this design does not require preliminary assembly and preparation.
Installation of a ceiling cornice to a concrete floor
The procedure for attaching a ceiling cornice is not too complicated, but if the length of the product is more than two meters, an assistant will be required. In addition to the fasteners, you only need a drill and a screwdriver with a suitable slot.
This is what an installed ceiling cornice with curtains should look like
Preparation
Before attaching the ceiling cornice, it is necessary to carry out some preparatory work. The first thing we do is adjust the length. If everything suits you, great. If you need to cut off excess, you will need a hacksaw. It is advisable to use a cloth for plastic, but it is also suitable for metal. If the cornice is assembled, remove the plugs and turns (if any), cut off the excess, then return everything to its place - the turn, the plug.
Adjusting the length
If the holes for the fasteners are not drilled at the factory, you will have to make them yourself. Let's start with the markings. Mark so that the distance between adjacent screws is no more than 50-60 cm. If there are joints, then retreat 5-10 cm from the joint on both sides. For better load distribution, it is better to stagger the mounting holes.
After the marks are set, we drill mounting holes in the plastic. Use a drill that is equal in diameter to the size of the fastener. More is undesirable, but less is also not good - when twisted, the plastic may crack.
Even for a single-row cornice, it is better to place the holes in a checkerboard pattern
After all the holes are ready, if the cornice is prefabricated, assemble all the parts. You don't have to install the decorative trim (if any). For now she will only get in the way.
How to attach
In most apartments and many private houses the ceiling is a concrete slab. Accordingly, we take a drill for concrete. The diameter of the drill should be taken according to the size of the dowel. Then we proceed according to plan:
- We apply the assembled cornice to the ceiling and level it.
- Use a simple pencil or marker to mark the attachment points.
- We drill holes, trying to hit exactly the marks. The depth is equal to the length of the plastic insert. To make control easier, you can stick a strip of electrical tape on the drill. Already fixed, but without curtains
- We insert the plastic part of the dowel into the hole. It should be flush with the ceiling. The protruding parts will interfere with installation, so we either deepen the hole or cut off the excess plastic.
- After all the plastic parts of the dowels are installed, if the decorative strip is attached to the grooves (not with Velcro), install it. It is not always possible to “latch”, so you should not hope that you will install it “later”. Most often you have to put on this bar gradually, moving along the grooves as if on rails. This cannot be done on the ceiling; you have to remove the already mounted cornice. As you understand, this does not improve the mood.
- We attach the assembled cornice to the marks. First we install the fasteners along the edges and in the center. If the cornice is long, we fasten the two halves with an additional one or two dowels. So that the plastic does not sag. The following installation order is arbitrary.
That's all, actually. You know how to attach a ceiling cornice to a concrete floor. If the floor is wooden, everything is even simpler: there is no need to pre-install dowels. After all, wood screws are usually used. In this case, the cornice is leveled and screws are immediately placed in the mounting holes. It’s more convenient to follow the same order: along the edges and in the center, and then - as it turns out.
How to attach a ceiling cornice - common methods
Typically, the included instructions suggest installation using the screws and plugs included with the cornice. It is not necessary to do this; each master decides independently how and on what fasteners to install the ceiling curtain rod.
How to screw a ceiling cornice through the holes
For all structures installed directly on the ceiling, the housing must have holes for self-tapping screws. It is enough just to transfer the location of the holes with markings to the ceiling and perform the fastening as is done for any suspended structures.
Attaching the ceiling cornice to the wall using brackets
Mounting the case on wall brackets is somewhat more complicated, since, in addition to ensuring the strength of the fasteners, it is necessary to maintain the horizontal alignment of the cornice relative to the window or ceiling. In this case, they resort to a little trick.
Ceiling model with adjustable bracket shelf reach
One of the brackets is placed on a horizontal rod and fixed using a screw built into the shelf, the second is mounted in advance on the wall. The entire structure is lifted to the ceiling, connected to the installed support and the optimal location on the ceiling is found. Then all that remains is to transfer the points through the bracket to the wall.
Next is a matter of technique, the holes are drilled, the remaining bracket is hammered in and attached to the wall. The cornice is returned to the installed support, the horizontal position is checked again with a building level and fixed with screws on the supports.
How to attach a cornice to the ceiling with glue
The use of adhesive compositions could be considered the most convenient and simplest option for installing a curtain rod body on the ceiling. But, despite all the temptingness of the idea, the scheme is not popular, since the strength of fastening to the ceiling with glue is inferior to fastening with self-tapping screws.
This is largely due to the low quality of the glue and non-compliance with the technology for gluing the body to the ceiling. If you have good glue and know exactly how to use it, then you can glue it, but if you only have “Liquid Nails” or “Moment” on hand, it’s better not to risk it.
Mounting methods
Installing a cornice on the ceiling is done using different methods. There are several types of fasteners.
On brackets
Cornices on brackets are chosen for installing heavy curtains.
A typical method for round cornices. Brackets are mounted on the ceiling surface, to which a rod, pipe, and strings are then attached. The work must be done very carefully, since the brackets remain visible and form part of the curtain composition.
With mounting holes
The cornice is mounted directly on the ceiling. The structure is applied to the surface, a hole is drilled and the product is fixed with self-tapping screws. It is better to drill holes in reinforced concrete floors in advance. This method is used for installing profile and baguette structures.
Hanging mount
It differs from the bracket method only in the fastening feature - special hangers. Such installation is more complicated and requires accurate calculation of the weight of curtains and drapes.
There is another installation method - with glue. This is how plastic profile models designed for light curtains and curtains are mounted.
How to hang a ceiling cornice correctly
Before you begin installing the curtain rod housing on the ceiling, you must make sure of the following:
- The body and all parts of the cornice are assembled in accordance with the instructions. The sides are seated in the grooves until they stop and click;
- The surface on the ceiling is prepared for installation.
You also need to check the availability of all the required tools, fasteners, hangers, plastic plugs and screws, in general, everything that will be needed to install a plastic housing on the ceiling with minimal effort and without wasting time searching for the necessary materials.
Tools for fixing ceiling cornice
For installation you will need a minimum set of tools and accessories:
- Hammer drill or impact drill with carbide drill bit;
- Several plastic plugs with self-tapping screws, they are usually included with the cornice, so you don’t need to look for anything;
- Painting cord, pencil, tape measure;
- Phillips screwdriver or screwdriver with appropriate bit.
Sometimes you have to use a laser level to install very complex multi-tiered curtain rods on the ceiling. If you need to install a rod curtain rod on the ceiling on homemade rack holders, then without a cord or a laser level it is almost impossible to place the mount correctly and evenly on the ceiling. How exactly to fasten and how to check the position of the rack on the ceiling, each master decides independently; in this case, you can get by with a regular marking cord.
Preparing the base for installing a ceiling cornice
Before installing the assembled cornice body, it would be correct to additionally check how well the ceiling surface corresponds to the horizon level. If the apartment or house was built in good faith, then there are no problems. But it often happens that the ceiling slabs are laid with a slope. Therefore, a simple installation on the ceiling will look crooked relative to the window.
In this case, you will need to measure the deviation of the horizon ceiling plane and make several shim washers that can be used to align the plastic body with the window opening.
Marking the places where the cornice is attached to the ceiling
Initially, you need to pull the marking cord along the conditional installation line on the ceiling, always exactly parallel to the plane of the window. Since the housing is placed directly on the ceiling, and not on the wall above the window opening, it is difficult to guess how level and parallel the structure will be relative to the window and window sill. You will have to navigate exactly by the cord.
Punching holes for plugs
Next, we simply place the assembled cornice on the ceiling and align it with the stretched guide. Using a regular pencil, we transfer the markings to the ceiling surface through the holes in the body.
How to install a ceiling cornice
For fastening, you will need to drill holes in the ceiling according to the markings. You can use a hammer drill or impact drill; the depth for the plugs should be at least 35 mm. Next, blow out the dust, remaining plaster or concrete, soak the plugs in glue and hammer them into the holes.
The best mounting option
Carefully cut off the part of the plastic protruding above the ceiling surface with a knife. If the plugs fit tightly, then you don’t have to wait for the glue to dry, but immediately lay the cornice and wrap the screws in plastic bushings. After that, all that remains is to install decorative plugs on the heads of the screws and the end roundings of the body, and lay the curtain hangers.
Installation
Installation depends on the type of coating.
They are:
- Reinforced concrete.
- Wooden.
- Plasterboard.
- Tensioned.
- Hanging.
Special preparation is not required when installing curtains on a reinforced concrete or wooden ceiling.
To work you need to purchase:
- Curdin.
- Electric drill or hammer drill.
- Locksmith's hammer.
- Roulette.
- Screws with dowels.
Work instructions:
- Use a tape measure to find the middle of the window opening. If the curtain is placed across the entire width of the wall, its middle is marked and transferred to the ceiling.
- The fixation points of the structure are marked.
Tip: Usually plastic and wooden curtain rods have ready-made holes for their fastening. Marking the installation of the structure with your own hands should be done along these holes.
- When using plastic tire curtain rods, the mounting points of the structure are marked in increments of up to 60 centimeters.
- Holes are drilled at these points on the curtain itself with a drill, and on the ceiling with a hammer drill.
- Plastic dowels become clogged.
- The cornice is secured with screws.
Installation of ceiling curtains
Attaching a cornice to a plasterboard ceiling
How to attach a curtain in a room with a suspended ceiling made of plasterboard or polyvinyl chloride wall panels?
This can be done in three ways:
- Plan to install the curtains on the ceiling at the stage of assembling the frame on it. The CD profile strip is attached to the wall with hangers to the ceiling and horizontal sections at the places where the curtains are fixed.
The cornices are fastened with self-tapping screws to the existing frame through plasterboard or a plastic panel.
- If there is a small distance between the decorative and main ceilings, the curtain can be secured with long anchors. Holes are drilled directly through the suspended ceiling.
Fastening curtains to a plasterboard ceiling
Tip: Anchors for fastening should be chosen with a screwdriver, and not with nuts.
- When attaching curtains to a previously installed ceiling, special elements must be used. In this case, the strength of the suspended structure is compensated by installing a large number of fasteners with a pitch of no more than 250 millimeters.
Installation of curtains on a suspended ceiling
How to hang a curtain on a suspended ceiling?
Advice: When installing a fabric stretch ceiling or PVC film with harpoonless fastening, this cannot be done in any way. In this case, you need to choose a regular curtain against the wall.
When planning the installation of such a ceiling, there are no problems with attaching the cornice. But, preparation is required.
For this:
- A ceiling niche is being installed. The stretch ceiling canvas is fixed to a rigidly fixed profile, spaced from the wall at some distance. The curtain rod is mounted to the base of the ceiling and is completely hidden from view from the room.
Installation of a niche on a suspended ceiling
Tip: The cornice should be fastened before the canvas is tensioned. This will reduce the risk of damage to the thin film.
- The mortgage is being installed. This can be a beam fixed along the entire length of the curtain, or several plywood platforms mounted on drywall hangers, as in the photo.
Installation of mortgages on the ceiling
- The timber provides greater strength. But over time, it may suffer from fluctuations in humidity, which will affect the appearance of the structure.
Installation of beams on the ceiling
- Plywood platforms on galvanized hangers are not affected by temperature fluctuations and high humidity, but in this case the weight of the structure is lighter.
Board for fixing curtains
- After installing the curtain at the points of its fixation, the film is reinforced with special rings or strong tape, then the curtain is attached directly to the mortgages.
The video shows in detail how to attach ceiling cornices.
How to hang a cornice on plasterboard and suspended ceilings
If the question arises about how to fix the ceiling cornice on a suspended ceiling, then you need to properly think through all the features of the future design. The most important question that you need to decide right away is the type of fastening, which can be visible or hidden.
The selected type of fastening directly affects the technology of cornice installation:
- Before attaching a visible ceiling cornice to the ceiling, you need to install a wooden block before stretching the canvas. The mortgage is installed on metal hangers so that its surface is pressed tightly against the stretch ceiling. The final fixation of the cornice is carried out with self-tapping screws after the canvas has been installed. To prevent the suspended ceiling from becoming unusable, the holes for fastenings should not be cut, but burned and reinforced with plastic rings.
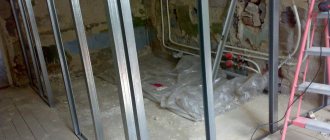
- To install a hidden cornice, you need to install a molding around the perimeter of the room. A wooden beam is mounted at a distance of about 15 cm from the window, i.e. a niche is formed in the space between the baguette and the wall. In this niche, with the help of metal hangers, platforms are mounted, to which, after stretching the canvas, the cornices will be attached.
In the case of plasterboard ceilings, there is one complication - such structures cannot withstand heavy loads. In this case, installation of cornices can be done using butterfly or umbrella-type dowel screws - they will distribute the load over the entire surface of the ceiling. In addition, before screwing the ceiling cornice, you can screw anchor bolts or mortgages into the concrete, made using the same technology that was used to install profiles in the suspended ceiling.