What you need to remove a crack on a mirror with your own hands
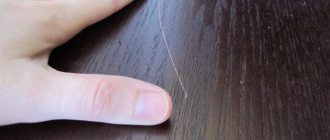
If a mirror cracks, it always upsets the owners. The search for a solution to the problem begins. There's just one caveat. It will not be possible to completely remove a crack in the glass. At home, not a single available remedy will help with complete restoration.
Some try to correct the situation with sanding, foil or even toothpaste, but all this will not make the crack disappear, but will only mask it for a while. For some, this will be an excellent way out of the current situation.
The question often arises - how to decorate a crack in a mirror with your own hands.
It is dangerous to carry out complex work at home, since a mirror is a rather whimsical object and only loves careful professional handling. But you can always find a way out of any situation.
If you can’t remove the crack, you can decorate it beautifully. This will not only save the mirror, but also refresh the interior. This may require various materials.
The most common techniques used for decorating a reflective surface are stencil designs, or their framing, the craquelure method, applying various designs and interesting frames. As you can see, there are really many ways and each of them is good in its own way.
Repair
It is possible to restore a mirror surface even if cracks appear , and the repair can be carried out in such a way that no defects will be visible even with the naked eye. But it is better to carry out this process only with those mirrors that have historical value. Thus, it is not advisable to restore a simple household mirror on the wall - such repairs can be quite expensive.
Do-it-yourself restoration work is carried out only if it is justified, for example:
- minor scratches;
- small chips;
- abrasions;
- cracks in amalgam.
Let's look at some methods that can be used for recovery at home.
Tarnished surface
If a mirror hangs for a long time in a damp room or during prolonged use, its surface may become dull. If a similar situation occurs, then there is no need to throw away the piece of furniture; it can be returned to its original state, or rather polished.
This is a universal restoration tool that is used very often. The process will remove dark stains, minor scratches and abrasions from the surface. Polishing can be done completely or partially ; in some cases, preliminary polishing is allowed.
When polishing, it is important to choose the right special products and their dosage, otherwise the mirror surface may darken even more.
Scratched canvas
If there are scratches on the mirror, you can get rid of them by sanding the surface using abrasive materials. The process works as follows:
- remove the mirror from the frame;
- wash well with soapy water;
- clean surfaces with a degreasing chemical;
- take an abrasive material with optimal particle size, it all depends on the depth of the scratches;
- After this, polishing is used to add shine.
But when carrying out this operation, you need to be very careful, as you can wipe the canvas to holes and the mirror will be damaged.
Attention! If you are not confident in your skills, it is better to look for an experienced craftsman who will bring the piece of furniture into proper shape.
How to restore amalgam?
Amalgam is a metal layer that creates a reflective surface that can peel off or crack over time. This damage looks very unsightly - bald spots all over the surface.
It is worth immediately noting that the restoration of amalgam is a long and multi-stage process, which is carried out using foil, special tools and chemicals.
We invite you to watch a video of how amalgam restoration is carried out using foil:
Required materials and tools
There are two sets of tools and materials for restoration , for minor damage and significant defects. In the first case you will need:
- alcohol;
- water;
- napkins and soft rags;
- sponge;
- silicone sealant.
In the second you should prepare:
- brush;
- rags;
- glue for glass and metal;
- wiper;
- alcohol;
- tassels;
- foil;
- sponge and scissors.
Once everything is prepared, you can start working.
Step-by-step instruction
Let's look at how to restore a mirror surface with your own hands if the amalgam is damaged:
- remove the mirror from the frame and carefully place it on a surface previously covered with a soft cloth;
- Clean the defective surface well with a brush;
- wash the mirror with glass cleaner and dry;
- degrease areas with defects with alcohol;
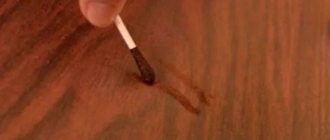
- cut a piece of foil that should be slightly larger than the damaged area;
- apply glue to the defective area and lay it down with the shiny side down;
- press it with a napkin and level it from the center to the edges;
- Carefully remove excess adhesive with a sponge;
- leave the canvas until completely dry;
- install into frame.
The mirror has been restored and is ready for further use.
How to remove scratches and chips?
The algorithm of actions is as follows:
- wash the surface and degrease with alcohol;
- dry the surface with soft cloths;
- fill the scratches with sealant; for convenience, you can use a toothpick;
- after the composition has completely dried, it is polished;
- The restored mirror is installed in the frame.
Decoration
If the frame in which the mirror is located has lost its presentable appearance, then it can be updated:
- sand and paint;
- decorate with shells;
- cover it with a mosaic made from broken dishes and so on.
How, with a little imagination, you can get an updated piece of furniture of the required design.
What are the advantages of do-it-yourself mirror restoration?
There are several simple ways that anyone can do.
Not everyone immediately decides to restore a mirror with their own hands. This most often occurs due to ignorance of all the advantages of this process. But independent mirror restoration has a lot of positive aspects that can encourage you to carry it out. These include such aspects as:
- In small towns, or even villages, you can rarely find a master who can properly repair a mirror. Not everyone can restore amalgam. Decorating small flaws yourself is much easier than looking for a specialist restorer of this profile.
- Repairing damage to a cracked mirror is not a cheap pleasure. Most often, such a procedure will cost more than buying 3 new mirrors. And decorating with your own hands involves spending only on a minimum set, which often consists of one stencil.
- If a crack on a wooden surface can be easily covered with wax and this does not require special skills, then restoring glass is a completely different matter. Therefore, again, it is much easier to repair the crack with an interesting pattern that would match the interior. This definitely doesn’t require any special skills or knowledge, just paint and desire.
- It's no secret that a small scratch can turn into a big chip. This most often happens due to the transportation of the mirror to the workshop. And when the piece of furniture has already been delivered, it turns out that it cannot be restored. It is for this reason that it is better to leave the structure in its original place and take advantage of interesting ideas for independent restoration.
Even a slight blow is enough for a crack to appear on the surface of the mirror.
Where to start
First of all, it is necessary to prepare the mirror for restoration. To do this, remove it and place it on a flat surface.
Doing it directly on the wall or in any other position is too risky. The mirror should lie on a flat area that is stable.
The fact is that even a careless movement can lead to it simply breaking. All of the following techniques can be done with your own hands, the main thing is to remember the fragility of the mirror.
How to repair a crack in a mirror with your own hands
Not everyone knows how to repair a crack in a mirror with their own hands. There are several ways to fix the problem. To do this, you will need a minimum set of tools, a little time and desire to bring the mirror into proper shape.
You can try to disguise the crack using various decorative elements.
Important! Since the methods involve the use of decor, you need to choose the right one for your interior.
How to remove using stencils
Stencils are a universal thing that can save you in different situations, and a crack in glass is no exception. There are many variations of stencils and they will suit every interior. To bring the idea to life, you need to purchase brushes of a suitable size, acrylic paints, a simple pencil, a regular sponge, masking tape, acetone (you can use nail polish remover) and, of course, a patterned stencil.
One of the most effective and simple ways to disguise small cracks in a mirror is to cover them with paint.
You can use this method as follows:
- Preparation of the workplace. It is necessary to lay out all the tools and materials in front of you at once so as not to be distracted by missing ones. Everything should be conveniently located so that work does not cause discomfort.
- It is more convenient to use ready-made stencils purchased in the store. If you wish, you can make them yourself. To do this, you will need the selected pattern and thick cardboard that will not allow paint to pass through.
- Before applying paints to the surface of the mirror, they are checked for color matching. It often happens that the shade in the jar is very different from the applied stroke. This can be done on any piece of paper.
- The stencil is attached with masking tape to the selected area. If the drawing suggests the presence of several colors. Then, for accuracy of execution, they are sealed with tape to prevent other paint from getting in. Without tape, only the place that will be signed first remains.
- There are two ways to apply paint: with a brush or sponge. Many masters who have already done this note that doing this with a sponge is much more convenient and faster. After applying all the colors, you need to correct the contour. A thin brush is used for this.
Now on the Internet you can find a lot of beautiful stencils with butterflies, flowers, patterns and various ornaments.
Stencils
As you can already see, the method with stencils is quite simple and effective. Under a layer of paint, cracks and even small chips will become less noticeable. The advantage of this method is that the stencils can be different, from flowers to cartoon characters. No special drawing skills are required, since the task will only be to paint a finished drawing.
This is one of the most effective and inexpensive ways. An undeniable advantage is that the drawings can be changed whenever you want. They can be easily washed off if you use acetone.
In order for the pattern to be clear and not smudged during the process, the stencil must be firmly glued to the mirror with masking tape.
Important! If the stencil is attached to the mirror with ordinary tape, then traces from it will have to be wiped off for quite a long time and using chemicals. They, in turn, can erase the applied drawing.
Craquelure
Craquelure is one of the most popular and beautiful methods. In addition to mirrors, it is also used for aging furniture. The method is suitable for those who are not afraid to add more cracks to the mirror surface, only this time artificial ones.
As you know, it is best to hide something in a visible place. You can also hide defects on the mirror in this way.
The craquelure technique is to give the mirror texture in the form of small irregularities. This way you can not only hide the resulting flaw, but also add an independent object to the interior, which gives it its own peculiarity and sophistication.
This is done using craquelure varnish and acrylic paint. The color of the paint should harmonize well with the wall or mirror frame. Although the technique does not involve complex machinations, it still requires caution in performing all actions.
This decoration technology is quite simple, but it must be performed with special care.
The first layer of paint is applied to the mirror surface. It must dry completely. Only after this the second layer of craquelure varnish is applied. The two components will begin to interact, forming artificial cracks. The mirror is not damaged in any way. It looks very beautiful, since the mirror surface will look out through the new irregularities, reflecting the light.
Removing a crack using a drawing
The method with a pattern is almost identical to the method with a stencil. Only here you will have to come up with the plot of the picture yourself and draw it.
Anything can be depicted on mirrors. These could be trees, birds, flowers or ordinary geometric patterns. If you used acrylic paints before, now you will need stained glass ones. They are made specifically for painting mirror surfaces.
You can also cover a crack or scratches on a mirror using a drawing.
Frame
If a crack appears on the side, then it can be covered in an original way using a frame. She can be anyone. There are no restrictions in this type of decoration. The main thing is to build on the possibilities of the mirror surface. It is better to refrain from decorating with large massive objects. And they won’t look very nice on a light reflective surface.
Materials such as buttons, beads, shells, decorative stones, clothespins, textured rope threads and even antique coins are often used. The pattern is arranged in such a way as to cover all defects. For fastening, it is better to choose reliable glue.
An original frame will help hide the damaged area on the mirror.
Procedure
When restoring a mirror, it is recommended to follow step-by-step instructions. Following the exact procedure will help you avoid mistakes and get the job done efficiently.
Scratches and chips
To eliminate detected cracks and chips, you can resort to different methods, using improvised and specialized tools. The most common options are the following:
- Toothpaste. A small amount of paste is applied to the product and lightly rubbed with a flannel cloth, making rotational movements. After the toothpaste has dried, the surface is thoroughly polished, as a result of which all minor defects become invisible.
- Mustard powder. Dry mustard powder and vinegar essence with a concentration of 9% are mixed in a container, maintaining equal proportions. The components are mixed and the resulting mass is applied to the damage. Excess mixture is carefully removed and the product is polished with a soft cloth until shiny.
- Cerium oxide. A specialized chemical allows you to visually hide chips and scratches. The product is often called jewelry blush due to its property of optically smoothing the mirror surface. In powder form, cerium oxide is dissolved in liquid and applied to the product. Then polishing with a damp cloth is required. If necessary, the procedure can be performed several times in a row.
- Nail polish. Deeper chips and scratches must first be filled with a substance and then polished. Due to its special consistency, transparent varnish is excellent for this purpose. First, a layer of varnish is applied to the damage, the excess is removed and wait until it dries. After this, wipe the surface until shiny with a soft cloth.
- Paste GOI. The substance is crushed to a powdery state, applied to a piece of cotton wool and spread in a thick layer over all defects. After waiting 1.5 minutes, rub the product into the surface and wipe with a clean, dry cloth. After completing the procedure a second time, the duration of polishing is increased to 15 minutes. To prevent the paste from becoming dull, you should not rub it intensively into the product to repair the surface.
See also
Reasons and what to do about shoes that squeak when walking, how to get rid of the sound
DIY decoration
Large cracks in the mirror can be repaired using decorative elements. The advantages of decorating yourself are the ability to not only hide defects, but also transform the appearance of the product, showing your imagination. The easiest method is to use transparent stones. Having chosen the stones you like, they are glued to the surface by dropping a drop of silicone sealant onto the back side. The design of a mirror looks most original when using transparent and translucent stones, which can be monotonous or colored.
You can also decorate the defect with painting. This requires special materials, including:
- Glass outline. It is a colored or transparent composition in a container with a pointed spout. The substance is applied to the mirror in a thin strip and the contours of the invented design are drawn. The circuit can be with or without firing, but in everyday conditions it is easier to use the second option.
- Stained glass paints. This type of paint differs from simple ones in that after drying they become transparent. Paint is applied with brushes or squeezed out of a tube and distributed over the mirror with cotton swabs.
- Glitters. Small shiny elements can take the form of different geometric shapes - stripes, circles, polyhedrons. Glitters are added to paints and varnishes, which gives them an original shine. A substance with glitter is applied to the crack, drawing a pattern.
Tarnished surface
As a result of exposure to high humidity and sunlight, characteristic stains and tarnishing appear on mirrors over time. You can restore the natural shine of a tarnished product using a mixture of water, vinegar essence and crushed chalk.
To make a surface treatment solution, first add a tablespoon of essence to a glass, and then a similar amount of chalk.
Before use, the solution is heated and allowed to brew, and then a few drops are added to a fluffy rag and wiped over the mirror. It is important to consider that this method is only suitable for mirrors with an aluminum reflective layer. To remove tarnished stains and ensure the original shine with a hint of blue, you can clean the products with a solution containing blue. In case of strong darkening of the mirror, treatment with a mixture of water, magnesia or ammonia mixed with gasoline is required.
See also
How to properly plant an item made from various materials, step-by-step instructions and recommendations
Amalgam restoration
If defects appear on the amalgam on the back side of the product, you can visually hide them and restore the condition of the surface by gluing foil. To do this, carefully remove the mirror from the frame or other structure and place it on a flat, soft surface with the front side down. Then a piece of foil of suitable dimensions, which should be slightly larger than the defect, is smoothed out and glued to the surface of the amalgam.
How to remove scratches from a mirror
In addition to decorative designs, you can also use the good old traditional methods of getting rid of cracks. True, as has already been said, they will not remove it completely either, but will only disguise it.
You can use toothpaste and flannel cloth. The product is carefully rubbed into a shallow scratch. Then it dries and polishes. And for deeper cracks, colorless silicone sealant or foil is suitable.
It is quite possible to hide problem areas on your own.
Materials and tools required for mirror restoration
For major damage:
- glue for metal and glass;
- brush;
- soft fabric;
- glass cleaner;
- gasoline or alcohol-containing product;
- foil;
- brush;
- scissors;
- sponge.
But you can repair minor damage with your own hands.
Polishing, as a separate method of mirror restoration, is also performed in case of clouding of the reflective surface.
In modern interiors, mirrors often play an important role.
For small scratches and chips:
- water;
- alcohol;
- sponge, soft napkins;
- silicone sealant.
But over time and improper care, the appearance loses its reflective ability.
If abrasion or a shallow scratch appears, the mirror can be ground, and the top layer is removed from the reflective plane using coarse abrasives.
Mirrors not only have a utilitarian meaning, but also serve to decorate the interior and visually enlarge the space.
Beautiful ways to decorate a mirror
A beautiful mirror decoration will not only cover cracks, but will also interestingly complement the interior. For this you can use any means and materials. You can often find ways to decorate using shells. They look beautiful next to the mirror surface and give it a special mood.
They are not attached to the mirror itself, but to a specially made frame that will match the shape of the mirror.
Additional Information! By decorating with filled frames, the mirror can be visually enlarged or reduced. Its dimensions will depend on how exactly to place the beautiful frame.
In addition to shells, wine bottle corks can also be used. They are also placed on the mirror in any order, creating beautiful patterns. If you want to add a little depth to the mirror surface, then the plugs are attached in their original form without cutting. A mirror framed with hemp rope looks beautiful in all interiors.
In this process, it is important not to get carried away and not to overdo it with the number of elements so that the frame looks organic.
Step-by-step instruction
How to restore a mirror with large amalgam damage?
You need to carefully remove the mirror from the frame and place it on a table covered with a soft cloth. Thoroughly clean the damaged surface with a brush. Then wash with glass cleaner and dry. Now degrease the damaged area with gasoline or alcohol and dry again. Using scissors, cut a piece of foil slightly larger than the size of the damaged area. Apply glue to the treated area of the mirror, apply the foil with the shiny side down and press. Use a napkin to smooth the surface of the foil from the center to the edges. Carefully remove excess glue with a sponge and dry the mirror for several hours. Place the restored mirror back into the frame.
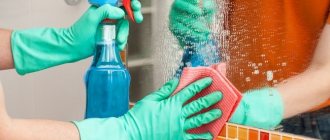
Mirror care rules
The rules for caring for the mirror must be followed. Otherwise, there is a risk of re-appearance of various cracks and chips. It is important to follow the following rules:
- The mirror surface does not like humidity.
- It is better not to place mirrors in direct sunlight.
- Mirrors can only be wiped with soft, lint-free cloths (it is better to purchase a specialized one, this will reduce the risk of scratches).
- There is a thin layer of silver on the mirror, so the surface should never be wiped with products designed to clean glass. They contain ammonia, which harms the surface.
After familiarizing yourself with all the possible ways to decorate a mirror, everyone can easily repair a crack in a mirror with their own hands.
The result can pleasantly surprise and even bring some novelty to the design of the room.
Drawing
You can also cover a crack or scratches on a mirror using a drawing. You can depict anything: a tree, birds, flowers, or even a whole plot. To create a unique creation, you will need stained glass paints designed specifically for glass painting. They create a transparent film on its surface that shines effectively, emphasizing the texture of the product.
If you use the cracks on the mirror as outlines of the image and outline them with contour paste, then the defect will be completely invisible.
Cracks and chips on the mirror are not yet a reason to get rid of this significant piece of furniture. It is quite possible to hide problem areas on your own. At the same time, the result can pleasantly surprise and even bring some novelty to the design of the room.
Photo 50 options for original mirror decoration
First way
The easiest way is to use glass cleaner. To remove a scratch in this way, you need to perform a few simple steps:
1. Take a glass cleaner (it’s better not to skimp on it).
2. Apply to the surface and wipe thoroughly.
3. If the canvas is clean and dry, you need to take silicone sealant and distribute it into the groove of the scratch. For these purposes it is better to use a toothpick.
4. You must wait until the mixture dries.
5. When everything is dry, the excess must be removed with a sharp knife.
It is important to apply the sealant carefully and remember that it must completely cover the area of the crack. You should not knock it down with a rag; in this case, all the work may be useless, since the sealant will simply fly out of the crack.
Using broken glassware
You can easily make mirror decor from broken glassware with your own hands. Did your favorite cup or plate break? Don’t rush to throw away the fragments, because you can use them to make decorations for a mirror frame.
Cut the mosaic pieces using the appropriate tool. Prepare in advance a project for your future creation and a field for creativity.
Glue the mosaic components on top of the workpiece using regular glue; small beads and pebbles with mother-of-pearl will not be superfluous, in addition, you can use other details at your discretion. At the end of the process, it is necessary to grout the frame surface and wipe it with a soft cloth.
Mirror decorating ideas
Perhaps almost everyone knows the amazing property of mirrors - expanding the space of a room, making it visually larger than its actual size, and the role of stylish interior decoration.
You can decorate mirrors with various materials, available in sufficient quantities for everyone. And your irrepressible imagination and great desire will bring any ideas for decorating mirrors into reality, moreover, made with your own hands, which will make your creation truly priceless and unique.
The main field for creativity in decorating mirrors is not the mirror surface, but its framing, i.e. frame. To decorate it, you don’t need any special knowledge or work experience; this process is quite accessible to everyone, the main thing is to have good taste and a creative approach to the design process.
To decorate a mirror frame, you can use: seashells, pieces of broken glass or ceramics, tile shards, paper, newspapers, jewelry elements, mosaic remains, bamboo sticks, tree branches and much more.
Car side mirror
If the mirror element is broken or torn off, you can attach it to its original place - at least with tape - the cheapest replacement from a domestic car.
To set the mirror at the desired angle, place a crumpled rag under it. Again as a temporary measure. If the mirror element is broken or torn off, you can attach it to its original place - at least with tape - the cheapest replacement from a domestic car. To set the mirror at the desired angle, place a crumpled rag under it. Again as a temporary measure.
Examples of decor for round and oval mirrors
First, let's talk about the decor, which is “built” around the mirror. The circle is beautifully decorated. You can make a sun, a flower, a star, etc. from it. Lots of options. Most often, the decor is also built in the form of a circle, but it can be a square, a multi-pointed star or any arbitrary shape.
Examples of round mirror decor
From sticks or paper tubes
You can decorate a round mirror with Chinese chopsticks or tubes twisted from sheets of newspaper or magazine. If the tubes are rolled from newspaper, they will have to be painted. Made from thin glossy paper on which magazines are printed, they can be used without painting. The sticks can also be painted, or left as is.
To paint, find acrylic paint of the desired color in a can, lay the tubes on a sheet of waste paper, and paint on one side from a distance of 20-25 cm. Once dry, turn all the tubes/sticks over and apply paint on the other side.
DIY mirror decor in the shape of the sun
Next you will need silicone. Apply glue to the back of the mirror. You can - in a short strip (so that it doesn’t have time to harden while you lay out the rays), or in drops. If the back of the mirror is not protected by anything, the silicone must be neutral. The acid will dissolve the amalgam and the mirror will be damaged. Place the rays on the glue and wait until the glue sets. After 24 hours, you can safely hang the unique mirror in place.
Using the same technique, but using ice cream sticks and twigs. If you add mirror drops to the rays, it turns out very beautiful. With other materials, the look is different.
The mirror can be with or without a rim - your choice. Instead of sticks/tubes, you can use strips of glass, wood, plastic, etc.
From plastic spoons
In this version, a circle of larger diameter is cut out of thin fiberboard or thick cardboard. how much more - choose for yourself. Place the mirror in the center and trace it with a pencil or marker. The decor should not extend beyond this line.
We take plastic spoons, cut off the handles from them, and glue the scoops around the perimeter of the mirror. Three or more such layers are made. They look like petals. When gluing, try to place them very tightly to each other so that the backing does not show through. They can be placed straight or slightly turned to one side.
For a better effect, they can also be painted. The paint can have a metallic effect; you can paint the entire decor one color or different.
DIY mirror decor: using plastic spoons
After the frame is ready, glue a mirror onto the same silicone in the center and admire it. After drying, you can hang it on the wall.
Using the same technique, you can decorate the mirror with buttons, shells, and branches of different diameters cut into circles. They even use trailers and model cars. They are painted in some unusual color and also placed in a circle.
The decoration of this mirror is toy cars
You won’t immediately understand that the decor is made of wooden clothespins
Different versions of the two described techniques
Something similar can be done with a rectangular mirror. In any case, it will look good with branches and buttons cut into circles. The other options are hardly suitable.
Variations on a theme
From plastic or cardboard rings
You can also decorate a mirror using rings. They can be cut from plastic pipes or glued together from cardboard. The sizes of the rings can be the same diameter or different, their width is about a centimeter or a little less.
Another way to decorate a mirror
If the rings are made of cardboard, you will need a base on which to fix them. For these purposes, a plastic cover with a slightly smaller diameter than the mirror is suitable. We will glue the first row of rings to the sides of the lid. The second and all subsequent ones are attached to them. We additionally secure one of the rings of the first row with a screw with a ring. We will then hang our mirror on it.
After the entire structure is glued together, take the sequins and glue them to the ends of the rings. The work is painstaking and requires time and patience. It’s easier to hold and move sequins with tweezers and better with thin tips. This mirror decor is universal - in winter it is associated with a snowflake, in summer - with the sun.
Options with rings
Using the same technology, rings from a plastic pipe are glued. But they do not need a foundation, since they themselves are quite rigid. From them we assemble a ring of the required diameter and glue it together. When choosing glue, make sure it is intended for plastic. Actually, there is a special glue gun and glue sticks for it. They are much more convenient to work with, but you can get used to regular silicone.
The edges of the rings do not need to be covered with anything. They look good themselves. But in this case, they must first be treated to remove irregularities and burrs that remain from the saw. If they were cut with special scissors, there will be almost no unevenness, but the edge will still be straight, and a rounded one looks better. The ends are processed with fine-grain sandpaper. Then they are wiped from dust and degreased (wash in water and detergent, wipe dry or dry). Only after this can you start working with glue.
From the rope
We take a thick rope. It can be synthetic or hemp. For larger sizes, you can even use a rope. We also cut out a base from cardboard or fiberboard that is larger than the size of the mirror. A thin layer of glue is applied to this base, and the rope is laid out turn by turn.
Rope mirror decor
In this case, it may be better to first glue the mirror in the center and “wrap” the ropes around it. This way it turns out to be recessed in the frame.