For those who are familiar with tools such as a tape measure, hammer and screwdriver, installing wardrobe doors will not be a problem. Most often, the necessary components are initially supplied with the cabinet, so the buyer only needs to intelligently arrange the rails and rollers, and then install the doors themselves. We will tell you how to do it yourself in this article.
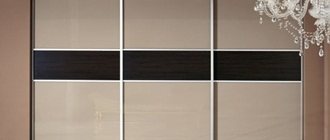
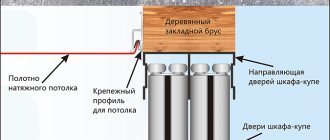
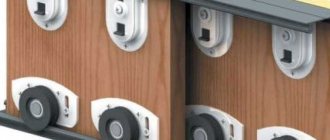
Sliding door diagram with fittings
You need to start installing compartment doors when the rest of the structure has been assembled and placed in a permanent place.
Details
Installing sliding wardrobe doors with your own hands begins with disassembling the required components:
- Rails. Mounted in the main parts of the structure from below and above. These are the main mechanisms that are needed for the free movement of the valves. Its function depends on the location of each guide, so the approach to fastening is different.
- Rollers and stoppers. They promote smooth movement and fixation of the door structure, which prevents premature deformation of the door leaves.
- Closers. Needed to ensure the movement of the canvas before closing in automatic mode. Not always used.
- Buffer tape. Attached to the door frame, it makes the impacts when opening and closing the doors softer.
How to assemble a door
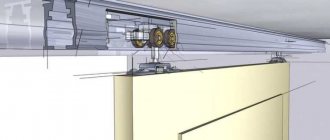
The W-shaped upper guides keep the door from falling out; most often they come with two grooves, regardless of the cabinet model. The compartment doors move along the bottom rail; they are attached to the bottom of the structure or to the floor covering for built-in models.
Wheels for the bottom, on ball bearings, take on the weight of the door. The upper ones keep them in the correct position. The stopper is inserted into the groove on the bottom rail and prevents unauthorized movement of the door.
Installation
The process of installing sliding doors is simple and consists of assembling all the components, parts and fittings included in the purchased kit. In this case, the apartment owner himself decides whether he will order sliding panels separately or purchase them together with a set. Any person with minimal plumbing skills will be able to perform the installation work independently. However, the assembly process itself requires special care and precision. The first step in installing any horizontally sliding panels is to install and secure the support profiles.
The reliability of the operation of sliding doors and the ease of their operation depend on the qualified and careful installation of the guides. This applies to both top and bottom rail systems and longitudinal opening types. In case of poor installation, the possibility of the sash coming off cannot be ruled out. Of course, such a situation will not lead to tragic consequences, but the work to restore the functionality of the doors is quite labor-intensive.
The simplest option is installation with a single-strip support rail.
This option is used for installing single-leaf interior doors or double-leaf ones, when the leaves are installed without overlap, but end-to-end and slide apart in opposite directions. Let's look at the fastening process using their example.
The assembly of any sliding system begins with fastening the upper support profile. Typically, this operation does not cause problems. For installation, in most cases it is necessary to attach an additional beam to the wall, above the doorway. For a single-leaf door, its minimum length should be equal to double the width of the opening. If double-leaf interior doors are installed in a living space, then the length of the beam should be equal to four times the width of the opening.
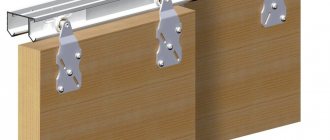
After fixing the upper profile, pre-assembled sashes are hung on it. For most industrially manufactured kits, this operation is performed by simply “winding” the door rollers through the end of the support profile.
The hung canvas is aligned vertically, using a level or laser plumb line. Next, you need to secure the bottom guide to the floor. Its installation and fastening depends on the sliding door system (hung or supported), the type of rollers and the nuances of the purchased kit. Usually, at the first stage of installing the lower or fixing profile, it is not rigidly fastened. Having secured it “live”, they check the functionality of the entire structure and only after making sure that the assembly is correct and the panels slide freely, they finally fix it.
Often the fastening of both parts is carried out before installing the rollers on the canvas. The sequence of work is similar to that described above. The alignment of the rail in the vertical plane is controlled using a building level, and the distance between their surfaces is controlled with a regular tape measure. After installing the support profiles, the door leaves are assembled, which are then hung in the usual way.
The video clearly shows the process of installation and installation of sliding wardrobe doors.
Of course, there are other assembly schemes. Some “craftsmen” generally refuse to purchase a full set, purchasing only videos. At the same time, there are more options for creativity, both in the choice of panels themselves and fastening parts.
Guides and stoppers
Before installing the door on the cabinet, you need to measure the opening for the top rail. If the guide is cut out yourself, then you need to carefully saw off the excess length from the back side, avoiding the tool slipping and scratches on the profile. The length of the guides must be the same as the width of the cabinet opening, otherwise there will be gaps in which dust will collect.
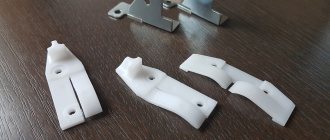
From left to right: guides; brush seal (schlegel); wheels, stopper.
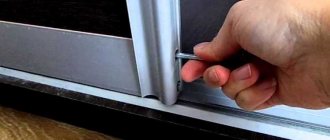
To install cabinet doors, secure the guides using self-tapping screws with a 4.2×16 press washer. You need to start with the top guide, placing it at the same level with the ends of the side walls of the structure. To do this, you need to make equal holes parallel to each other. After they are ready, it is better to clean the drilling site with sandpaper to avoid burrs on the metal that will interfere with the blade. You can also use universal countersunk screws.
We place the bottom guide approximately 20 mm deep into the cabinet. In order to correctly calculate the desired position for the bottom rail, it is necessary to measure the door in advance using a building level. The door leaf must be in a straight, vertical position. Once the location of the guide is marked, you need to remove the door and install the stops. Next, using a drill, make holes in the guide in increments of 300 mm.
Locks for the cabinet door are located in each groove of the bottom guide. They need to be installed on the correct sides, in the recess on the right - for the right blade, in the opposite - for the left. Once they are positioned, the guide is screwed on and the doors are installed to adjust the closing tightness. To do this, the door leaf must be completed and the center of the wheel on the rail must be marked; this is where the stopper should be secured.
Rollers
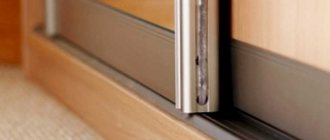
- The lower ones, with pressed bearings, are responsible for silent sliding. When choosing them, there must be increased requirements for strength, since they take on the weight of the door.
- The upper ones are distinguished by two wheels with bearings and a rubberized outer surface. On profiles with a metal coating, you need to install rollers measuring 39 mm; if the coating is wooden, you can buy 37 mm ones.
For sliding doors up to 60 kg, 2 pairs of rollers are installed; if the weight of the doors is greater, then 4 pairs of roller mechanisms can be installed. For some manufacturers, they are initially mounted inside aluminum door frames. If the doors have steel sliding systems, rollers are placed inside the door leaf on both parts. There must be a minimum distance from the edges of the door. For installation, bolts are inserted and tightened by 2 mm; this will help adjust the position of the door leaf.
Door installation
First, you will need to install a canvas located further than the façade. It fits into the end of the cabinet lid and into the far groove. The door must be lifted and the spring-loaded roller located at the bottom pressed. The blade is inserted into the far groove. Do the same with the second one.
Adjust the position of the door leaves and tighten the roller screws with a hex key. To lower the angle, the screw of the wheel is twisted counterclockwise, to raise it - in the opposite direction. It is necessary to ensure that the canvases fit tightly to the side wall, and that there are no sounds of squeaking or rubbing when moving.
Tips for choosing
Before you go to the store, you should study the recommendations for choosing furniture guides:
- The width of the profile must correspond to the dimensions of the facade and the diameter of the wheels.
- When installing the part, an open rail is installed at the bottom, which regularly becomes clogged with dust and hair. To prevent the mechanism from malfunctioning, it should be cleaned in a timely manner.
- When choosing an upper profile to protect laminate, parquet or linoleum, special wheels must be installed below; their size depends on the dimensions of the remaining parts of the door system.
- The combined design, when the guides are mounted at the top and bottom, is the most durable, since the facades are held on both sides.
- Based on the shape of the canvas, the guides can be linear or radial. The latter allow you to introduce more interesting design solutions, for example, creating curved facades. Such parts are made mainly of aluminum, their cost is higher.
Types of fittings for sliding wardrobes, functionality of elements
To make using the wardrobe comfortable and for the door opening mechanism to last for a long time, you should choose high-quality guides. It is better if they are made of aluminum alloy. In addition, when purchasing, you must check the quality certificate and clarify the warranty periods of the product.
The width of the profile must correspond to the size of the rollers and the facade
The combined system is considered the most reliable
Radius guides allow the installation of semicircular facades
Closers
If mechanisms for automatic closing of doors will be installed on the door, then they must be secured in advance to the upper frame of the door leaf with position latches towards the spring. When fastening, the shutter points must be in an inactive position; they must be activated immediately before installing the door. During installation, you need to adjust the latch so that it does not cling to the door wheels, otherwise it may break during automatic closing. Before final fastening, the closer must be tested.
After the doors are adjusted, the buffer tape can be attached. To do this, you need to remove the protective film from the back and apply tape to the end of the door.
Thanks to these recommendations, installing sliding wardrobe doors with your own hands can be done quickly and without much effort. Afterwards, all that remains is to remove the protective film and you can put the cabinet into operation.
Installation of Rollers for Sliding Wardrobe Doors
Installing sliding wardrobe doors is not particularly difficult
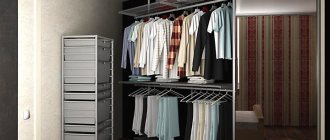
Sliding wardrobes have long ceased to be exotic, having thoroughly taken up residence in our homes. And it's not mind-blowing. They fit amazingly into a modern interior and are irreplaceable in small hallways, bedrooms and family rooms. Sliding door system for sliding wardrobes and its components. Characteristics of the guide for sliding wardrobe doors, installation of guides and care for them. Their main advantage is the saving of surrounding space, because the cabinet doors do not swing outward, but move in their own plane. As a rule, the design of sliding wardrobe doors has lower supports in the form of rollers and guides located below and above. It is easy to install the inside of this type of cabinet furniture, but installing sliding wardrobe doors can cause some obstacles and difficulties, although almost any home craftsman can install them.