There is nothing to compare the birth of your first child with. Of my own emotions, I remember only a certain euphoria, combined with a fair amount of inhibition of thought processes. “Standing there, grinning - a fool is a fool!” - a very accurate description, I think. And therefore it is good that all the “technical” preparations were made in advance. I remember that there was renovation, buying furniture... Now I would do everything differently. And first of all, I would build a changing chest with my own hands.
This design is so obviously convenient that its absence in furniture stores is a huge miscalculation of our furniture industry. There are many variations on the theme, but since we adhere to the optimal combination of “price-quality”, we chose this model.
Sketch of a changing chest
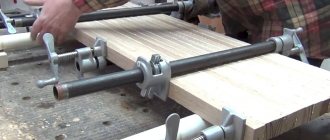
Preparing for assembly
It is quite obvious that the parts need to be drilled for confirmations. First about planes:
The figure that you have already seen above shows the markings of the sidewall plane. The drawing shows the right side of the chest of drawers. Remember that the left one is marked as a mirror image in relation to it. A hole near the radius is drilled through with a diameter of 5 mm - there will be an intersectional tie, the axis of the rotating structure. If the size is not clear: The center of the specified radius means that the hole will be an equal (76 mm) distance from the top and leading edge of the side panel.
We drill exactly the same through hole on the sides of the folding board.
Other marked holes are for confirmations. They also need to be drilled through into the plane, with a diameter of 8 mm. I only marked the centers of the shelf lines, because I have been using a jig for marks from the edges of parts for a long time. My conductor provides the most convenient distances for different cases: 20, 40, 60 and 80 millimeters. It doesn’t matter which one you choose.
The main thing is that they coincide with the holes in the ends of the shelves, base and rear side. We drill into the end of the parts with a diameter of 5 mm to a depth of approximately 60 millimeters.
If you noticed, our guides are 450 mm long. They must be screwed in at a distance of 20 millimeters from the front edge of the sidewall, since our drawers have internal facades. The centers of the fastener line are marked on the sidewall, that is, you must hit this line with a self-tapping screw.
On the partition, this line is marked at a distance of 94 mm from the top.
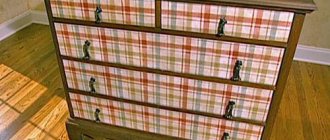
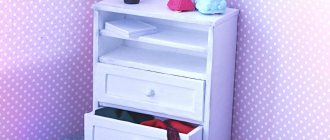
Dresser Organization
Well, I decided to show our chest of drawers for now. I am absolutely sure that a lot will change with the arrival of the baby, with her growth, with my needs, with more or less used products and things. But that's it for now.
The post, as always, is more for myself as a keepsake. But if there are any special comments, I’ll be glad to listen.
I moved the changing mat from left to right and back several times. I haven’t decided which is more convenient. It seems that it is more convenient for all sorts of jars to be on the right and to be taken with the right hand, but on the other hand it is better for the baby to be against the wall. For now I left the mattress on the right.
On top of the dresser
- a container with cotton swabs with a limiter
- a container with regular cotton swabs
- container with cotton pads of different sizes
— a long container (I don’t know what it’s for yet), so for now there are all sorts of miniature oils, as well as antibacterial hand gel (I’ll apply it before hygiene procedures). I don’t plan to use oils, etc., but for now there’s nowhere else to put them
— 3 in 1 thermometer (ear, forehead, and room temperature)
— hydrometer + thermometer 2 in 1 (I’m checking how it works for now, then it will move to the wall)
- container with wet wipes
- a container with regular paper napkins
- A 3-story thing from Ikea - I also don’t know what to put in there yet, but I think over time there will be all sorts of small things
1 Box
| Far left separator: | Middle distance separator: | Far right separator: |
| Nipples and anything related to them (donated) - clothespins for nipples, a mini sterilizer, wet wipes for nipples, nipple boxes, etc. | wet wipes | disposable diapers (they are on the bottom) and a diaper on top for the mattress |
| stock of bags for dirty diapers | cotton pads of different sizes | |
| Left front divider: | Middle front divider: | Right front divider: |
| Type 1 diapers | Type 2 diapers | First aid kit |
| box with bags for dirty diapers | box with bags for dirty diapers |
2 Box
— In the separator with 30 cells, bodysuits (with short and long sleeves), rolled up with rollers. 1 row of cells - 1 size. I got: newborn, 0-3 months, 3-6 months. My slips hang on hangers in my closet so they don’t get wrinkled, so don’t be surprised that they aren’t here. Maybe over time they will move to a box - we'll see.
- thin hats
- socks
- cloths for everything (IKEA Forever) + several large muslin napkins.
By the way, I found super cool colored rags in Ikea - in quality and size - exactly the same as the famous white ones with colored pendants here, and they even cost a couple of kopecks cheaper, but the colored ones are so pleasing to the eye!!! They come in a set of 4 and I found them in the bathroom department. Don’t ask for a link - I live in London - at most I can give a link to the English Ikea, and it’s not a fact that the collections are the same.
3 Box
Hahahahaha - half empty - I seriously don’t know what to store there... First of all, I need to buy more dividers. In the meantime, I have here bibs, warm hats and mittens, tights and teethers.
4 drawer - mom's
For now, all sorts of nonsense lives here - pads, an ergo backpack that my husband bought for himself, all sorts of little things. Again, over time I will definitely change and reorganize it for better convenience, but for now I don’t know where to put it and how it will be more convenient. I’ll get my bearings in practice.
Thanks to those who watched it.
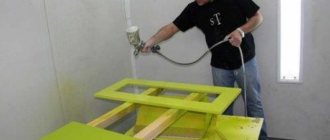
Assembling the changing chest
The design is completely visible in the very first sketch; I drew the markings - so you won’t have any problems with assembling the cabinet. The only caveat: First, screw the partition to the top shelf at the corners with 4x16 self-tapping screws, and only then fasten the bottom shelf and pull it to it with confirmations.
You can also nail the back wall onto the cabinet - be sure to check the right angle of the box. At this stage of assembly, place the “hooves” on the sides.
Folding board
In the second picture you can see that one of the corners of the part is not rounded. Measure 153 mm from it - this will be the rear edge of the folding shelf (in the open state). The general picture shows exactly how it should stand up, but I’ll add on my own behalf: three confirmations to each side, if you don’t want to catch the child in the fall.
I have already mentioned that there should be a washer between the sides of the flap and the sides of the cabinet - now I’ll clarify: about a millimeter thick. So as not to break your heads and fingers: You will not be able to hold it against the hole with a ruler or a piece of cardboard while you begin to install the axial tie.
Just glue the washers to the sides in advance.
Hammer the tie sleeve from the inside and secure it with a screw from the outside. There is no need to tighten it too much - just drop some superglue under the screw head and it won't come off.
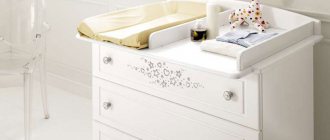
What is a chest of drawers with a changing table?
Main features of changing chests:
- Convenient height for all manipulations with the baby. Depending on the mother’s height, it can be about 800-900 mm. The average value of 850 mm corresponds to the height of the kitchen set not by chance - it is at this height that it is comfortable to stand and “work with your hands” without much strain on the back.
- A flat, wide surface according to the baby’s height, from 600 mm in depth. Chests of drawers with such wide lids are rarely made - they look too bulky. And it would be inconvenient to approach the front part. Therefore, folding and retractable structures are used.
- The presence of rear and side sides. When changing a child's clothes or giving a massage, a lot of small improvised objects are often laid out on the table. The sides also minimize the risk of a hyperactive baby falling if he suddenly wants to roll over and the mother accidentally gets distracted.
I am for simplicity in implementation. Therefore, a children's chest of drawers with a changing table in the form of a movable shelf attached to the sides seems to me the most practical option. And easy to implement. The difference between a changing chest and a regular one is the presence of a flange and an embedded table top. A board-shelf with edges is attached to the furniture screed using the sides. You can make a chest of drawers with a changing table based on the basic model, making minor design changes.
Standard changing chest
But what to do if you already have a regular chest of drawers for children’s things? There are two options for adding a changing table to it
How to make a changing table with your own hands?
In this part we will tell you how to make a changing table/dresser with your own hands. Such a chest of drawers will last for many years, in the first year it will serve as a changing station and chest of drawers, in subsequent years it will be a chest of drawers. This model can be made from wood, laminated chipboard or MDF.
First, we present a sketch of the future chest of drawers
Sketch of the future chest of drawers
The next step is to make a drawing. If our dimensions do not suit you, you can proportionally increase or decrease any parameters of the changing chest. Be sure to pay attention to your height and the height of the chest of drawers.
You should stand straight, without bending or stretching over the tabletop. If spouses differ in height, focus on the expectant mother, since she will spend most of the time near this chest of drawers.
Changing table diagram
Drawing for a changing table with dimensions
Chetrezh
Side drawing
Number of parts
For furniture, exact dimensions and right angles are very important, otherwise it will look crooked, will not be stable, and its service life will be significantly reduced due to inconsistency of parts. If possible, order cutting of the material; most often, this service is also offered at places of sale.
In addition to this, you will also need the following materials:
- Full roll-out guides (2 pieces per drawer)
- Furniture handles (in our case 8 pieces)
- Plastic legs 4 pcs (so that there is a gap of several mm under the chest of drawers, for air movement, and also as protection from moisture)
- Intersectional couplers 2 pcs with a diameter of 5 mm (for a folding system)
- Self-tapping screws 16 and 30 mm
- Confirmats 70 mm 5 pcs
- Furniture corners, they are necessary for fastening from below to the upper partition. Size: 20*20 mm
If you are making from chipboard - edge tape (the length is calculated along the perimeter of each part.
All that remains is to collect everything piece by piece. If you have questions about assembly, watch the video below.