Corner joining of tabletops
The corner tabletop can be made in two different versions, which fundamentally affect the joining of the tabletops.
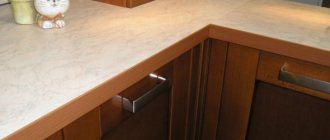
First option . This is a corner tabletop without a segment. That is, two sheets of countertops are taken and placed on the kitchen cabinets at right angles.
Easy docking
The second option for rotating the tabletop is rotating through a segment. It is more bulky and is done if the kitchen furniture includes a corner kitchen cabinet.
Tabletop segment
Kitchen worktops based on chipboard, coated with wear-resistant plastic, have long been very popular due to their low price and decent quality of the resulting working surface. Today, the lion's share of all kitchen sets are made on their basis. Such countertops are supplied from the manufacturer in the form of sheets about three meters long and several standard (fixed) widths. For this reason, in the manufacture of corner kitchen sets, there is a need to connect several tabletops (parts of canvases) at a certain angle, dictated by the characteristics of the room. In the vast majority of cases, we are talking about an internal right angle (90°).
The technology of connecting tabletops using decorative and functional connecting strips allows for high-quality (durable) joining quickly and without specialized equipment. A constantly high density of connection between the parts of the corner tabletop is ensured by special furniture fittings - a coupler (clamp) - hiddenly mounted at the bottom of the tabletop.
To perform an angular joining of two parts of the tabletop, the following fittings and consumables are required:
- Corner connecting (joining) strip for table top. The height of the plank and the corner radii are selected depending on the thickness and manufacturer of the countertop.
- Two ties (clamps) for the tabletop.
- Silicone sealant (preferably colorless).
Required tools and equipment:
- Electric drill.
- Faustner drill with a diameter of 35 mm (used for adding loops).
- Metal drills with diameters of 5 mm and 8 mm.
- Router with an end mill with a diameter of 8 mm or a Faustner drill with a diameter of 8-10 mm.
- Hacksaw for metal.
- Phillips screwdriver or screwdriver.
- 10mm wrench.
- Pliers.
- A simple pencil.
- A cloth to remove excess sealant.
Kit for connecting tabletops: two ties and a connecting strip.
Profile of the connecting strip.
The parts of the tabletop that need to be joined.
Preparatory stage.
Before marking the insertion points of the ties (clamps), you need to make sure that the holes for future fastenings will not interfere with the installation of any equipment built into the countertop. For example, it is often necessary to accurately calculate the relative locations of a kitchen sink and clamps, since in a corner kitchen the sink is very often located in the corner (that is, close to the joining seam of the countertop). There are also frequent cases when the joining seam is located close to the built-in hob, and you need to try not to create additional difficulties with fastening it using standard L-shaped brackets from the bottom of the countertop. It is important to know that even a corner tabletop connected by several ties is much inferior in rigidity to a monolithic (solid) tabletop. In this regard, when designing the lower kitchen modules (on which the tabletop will be placed), it is necessary to ensure reliable support for the tabletop near the joining point, both on one and the other side of the joining seam (in other words, the joining place should not hang in the air and “ play" when pressing on the table top from above). Clamps work well for breaking, but not for bending the tabletop! However, it is permissible to transport the countertop in a form prepared for installation on a kitchen unit (connected with clamps), if high rigidity of the joining point is ensured, for example, by temporarily fastening a tire with chipboard from the bottom of the countertop, which will reduce the likelihood of breaking the seal of the joining seam to a minimum. With small dimensions of the corner tabletop, it can be transported as carefully as possible without the use of tires.
Marking.
The indentations for marking the installation locations of ties (clamps) depend on the specific model of the ties used for countertops. Below we will consider the option of using 100 mm ties, which are the most common and convenient to use in most cases.
Table top screed. Dimensions.
On the bottom plane of the tabletop, it is necessary to make markings for drilling 35 mm blind holes (for C-shaped washers) and milling grooves for threaded rods. The marking is done coaxially on the two parts of the tabletop that need to be connected. The distance from the joining end of the tabletop to the center of the blind hole is chosen to be 55 mm. This distance takes into account the presence of a connecting strip with a thickness of about 1.5 mm. Depending on the presence of certain kitchen fittings or appliances (built into the countertop) near the joint, it is recommended to select a distance from the edges of a standard width countertop (600 mm) from 70 to 150 mm. In exceptional cases, you can deviate from these recommendations, or use not two, but only one clamp, moving it as close as possible to the center of the tabletop.
It is not recommended to connect countertops without using clamps, securing the countertops only to the kitchen modules!
Marking for screeds.
Marking for screeds using a square.
Checking the alignment of the markings.
Preparing the connecting strip.
It often happens that the location of the standard slots for the ties in the connecting strip is not satisfactory, and additional ones have to be made. After marking the ties, you need to lean the connecting strip against the end of the tabletop, align it and mark the locations of the new slots on the strip with a pencil. Using a hacksaw, we make cuts along the lines and break out the inside with pliers. Secondly, you need to cut the strip to length with the same metal hacksaw with a small margin of 1-2 mm (this operation can be done as a last resort). The last thing that must be done is to ensure that the heads of the screws are reliably recessed flush into the connecting strip (if necessary, perform additional countersinking).
You can mark the positions of additional slots in the connecting strip after making the seats for the clamps.
Drilling and milling of seats for clamps.
An electric drill, with a 35 mm diameter Faustner drill clamped in a chuck, drills blind holes to a predetermined depth. The depth of the holes is determined from the condition of the position of the tightening pin of the clamp exactly in the center of the thickness of the tabletop. After all the blind holes are ready (for 2 ties - 4 holes), it is necessary to drill 8 mm holes for studs in the tabletop connected at the end with a rounded overhang. For reasons of accuracy, it is recommended to perform drilling with two drills, starting with a small diameter (for example, 5 mm). In the countertop, which is connected by a straight overhang (that is, not rounded and not covered with plastic), open longitudinal cavities (grooves) are made into which the studs will be placed. It is most convenient to make cavities using a hand router with a groove cutter with a diameter of 8 mm. If you don’t have a router, you can use an electric drill with a Faustner drill of small diameter 8-10 mm; it can be used to drill a row (straight line) of blind holes in maximum proximity to each other until a groove is formed.
Drilling blind holes with a Fostner drill with a diameter of 35 mm.
Preliminary passage with a drill is 5 mm, after - 8 mm.
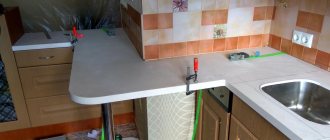
Screeding parts of the tabletop with clamps.
After the seats for the clamps have been prepared and the correctness of their manufacture has been checked, we proceed to the final stage - fastening the parts of the tabletop to each other. First, it is necessary to secure the connecting strip to the tabletop with self-tapping screws (with countersunk heads), having first covered the chipboard end with an even, continuous layer of sealant. Secondly, it is necessary to coat the surface of the connecting strip, which will be adjacent to the rounded (front) overhang of the tabletop, with sealant. It would not be superfluous to apply sealant to the surface of the mounting areas for clamps (on blind holes and cavities). The final stage: put the pin in the groove, insert the pin into the hole in the counter part of the countertop, and evenly (one at a time) tightly tighten the parts of the countertop to each other with a wrench. You should not pull too hard; an indirect sign of the end of tightening is the squeezing of the sealant onto the front of the countertop. It is recommended to immediately remove any squeezed out sealant with a cloth.
Applying sealant to the connecting strip before joining.
Squeezed out sealant (photo on the left). Connecting strip in a corner tabletop (photo on the right).
An example of the use of ties (clamps) in a countertop of complex shape.
With the proper approach to the manufacturing process of a corner countertop and compliance with all the rules to prevent water penetration, the joint area will have the same, or even increased, performance properties in terms of wear resistance and moisture resistance as a solid section of the countertop. The connecting strip protruding 1.5 mm above the top plane of the tabletop slightly reduces the aesthetic qualities. There is a technology for joining chipboard tabletops without the use of planks, while the joining ends are profile milled using special templates with high precision for perfect closure. However, this technology has become less widespread due to the relatively high complexity of implementation and the need for specialized equipment.
Similar articles:
- DIY kitchen table
- Installing an end strip on a kitchen countertop
- Installation of a built-in kitchen sink
Joining countertops at an angle without a segment
The joint of the tabletops should be tight, with a minimum gap between the ends of the tabletops. This is difficult to achieve if the end of the tabletop has an oval and rounded front edge.
A simple option is to use a special corner connecting element. It costs about 170-190 rubles and quickly solves such a connection.
A more aesthetic option, with the claim to create a single surface of the tabletop, is an option called “euro saw”. It is suitable for chipboard countertops with any front edge.
Care and restoration
Caring for a postforming countertop involves promptly removing moisture and liquid droplets from it, as well as protecting it from contamination and avoiding physical impact (including cleaning with metal brushes and brushes). For artificial stone, these requirements also apply.
Restoration methods for both types of countertops are also different: if such damage occurs during post-forming, it will be impossible to sand it down; moreover, the situation in some cases can be aggravated. For example, using an electric sander on a matte countertop will result in a glossy stain. But this method is suitable for artificial stone.
Removing stains from such a surface is also done using conventional detergents, but some types of stains (for example, old grease stains) are very difficult to remove. In this case, you can use detergents containing ammonia: artificial stone does not react in any way to this substance. We also recommend that you read the information about the standard height of a kitchen table in this material.
Docking with a segment
A tabletop segment is essentially the top table for a segmented base cabinet. The standard dimensions of the segment are 900 by 900 mm, with a width of 600 m. Along the front, the edge of the segment can be straight or semicircular.
Related article: Height of lower kitchen cabinets: standard and real, how to choose and calculate correctly
Since the ends of the joining of the table tops are sawn off smoothly, wood glue is used for joining. If such fastening seems insufficient, use special metal connectors for countertops (see photo).
By the way, similar parts are used for household trimming of countertops.
Materials
The choice of countertops must be approached with all responsibility, because a lot depends on this element of the kitchen set.
It is he who is exposed to maximum load in the kitchen. Among the most popular materials that are used in the production process of countertops, the following options can be distinguished. Chipboard is the most profitable option from a financial point of view. In addition, it is lightweight, so there is no extra load on the headset. The main feature of this material is that a special composition is used in its manufacture. It makes it possible to increase temperature resistance and ability to withstand moisture. In addition, chipboard can be given almost any texture.
MDF is much more expensive than chipboard, but this material can boast of its environmental friendliness. It should be noted that panels made of laminated boards require strong connection of the corners, otherwise moisture will get there, which will lead to swelling of the tabletop, as a result of which it will become unusable.
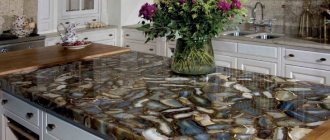
Fake diamond. This tabletop looks solid and includes a large amount of natural chips. Such elements can also consist of acrylic resins. This option will be an ideal solution for people who rarely renovate their kitchen, because a stone countertop can last for many years, coping well with moisture, high temperatures and other negative factors.
Natural stone. These options are created for people who love everything natural and luxurious. This material is considered one of the most expensive and effective. In most cases, granite or quartz is used in the production process of this element.
Wood is a natural and environmentally friendly material. The main advantage of a wooden coating is that it looks impressive even without additional processing. The only drawback is that sometimes you will have to treat the coating with a special composition to protect it from moisture.
Plastic options
If you need not just a budget, but a super-budget option, then pay attention to plastic countertops. Among the advantages are low cost and enormous possibilities in the field of decoration.
However, such a material cannot boast of resistance to mechanical damage: it is extremely easy to scratch the coating.
Glass is considered the most optimal option in terms of price-quality ratio. At an affordable price, this material is wear-resistant and even after many years retains its original appearance.