Good afternoon everyone. In this review, I will continue the story about the project for making a double bed, which I started in the previous review. In this part, I will show in detail the process of finishing the components of the bed, covering the side drawers and the headboard (carriage screed), tell you about the materials used, and also present the process of assembling the bed and the finished result. For me personally, this part of the project turned out to be much more difficult than the process of making the frame, since I had to work with furniture finishing materials for the first time, and you don’t know many of the secrets and techniques of work. I’ll say right away that this review will not include fittings, but I hope you will still be interested in how this project ended. When thinking about the bed project, it was immediately determined that light artificial leather would be used as the finishing material for the bed. I didn’t decide to make a carriage tie for the head of the bed right away, but only after repeatedly watching detailed videos from the CHEST’ER master. There are a lot of videos on his channel on making furniture elements yourself. At the same time, after familiarizing myself with the set of tools he used, I realized that I could try it too. It might not have worked out perfectly the first time, but I was determined to get a satisfactory result. I watched many of his videos on making headboards many times, paying attention to the little details. I highly recommend that those interested take a look.
MATERIALS AND TOOLS:
To finish the bed elements, we selected materials from the VINYLKO online store.
In this store we already had to buy artificial leather to make a cover for an electronic piano (not my job, I have difficulty sewing), and even then we were amazed at the variety of options, and quite affordable ones at that. We then spent a lot of time in their hall, since choosing from five fabrics of the same shade is quick, but choosing from dozens of options is a real problem. The following materials were selected and ordered on the website vinylko.ru:
- 1. Eco-leather TASKANA Milk (7 linear meters)
- 2. Foam rubber ST2536-40mm (sheets 1x2m) – 3 pcs.
- 3. Foam rubber ST2236-10mm (sheet 1.6*2m) – 1 pc. (in fact, they shipped 15mm, since there was no 10mm in stock)
- 4. Adhesive for ViKo Bond foam rubber (1 liter) – 1 pc.
- 5. In addition to these materials, a mold for making buttons was purchased: 1PC/ One #16-60 Fabric Covered Button Mold Tool Mold Press Die Assembly Tool For Round Bread Shape Top Button Diy Free Shipping
- 6. And also a set of buttons with steel eye (100 pcs.): 100pcs Sets/lot #16-60 DIY handmade fabric buttons Bread Shape Round Fabric Covered Cloth Button Cover Metal 4 Back Buttons 13s The size of the mold and buttons was chosen "32 " (19.2 mm)
- 7. Also, a polypropylene cord and a long sailing needle were purchased from a local store:
Despite all the variety, our choice was limited by a specific color (milk) and price. Based on parameters, availability and low price, this option was selected. The leather is really pleasant to the touch, very soft, stretchy, which was very useful when covering the bed frames, but caused a lot of problems for the carriage screed, given the fact that the leather is a bit thin.
Delivery to my city was made by a transport company.
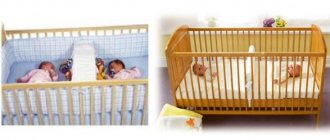
Determining the correct dimensions of the bed
The size of a bed and a sleeping place are two different concepts . The first parameter is important to consider when planning the placement of furniture in a room. And your comfort during rest largely depends on the second. There are the following standards for sleeping space dimensions:
- length 195 or 200 cm;
- width for single bed 80 and 90 cm;
- width for single bed 100, 120, 140, 150 cm;
- width for double bed 160, 180, 200 cm.
Of course, you can order a bed in custom sizes. But before that, you should make sure that there is a suitable mattress on sale.
The choice of certain dimensions of the bed depends on the height and build of the owner of the bed. So, the length of the bed should be at least 15 cm greater than a person’s height. To determine the optimal width, you need to clasp your hands behind your head, spreading your elbows to the sides, and lie down on the bed you like. It is considered normal when the elbows do not hang over its edge. Otherwise, you need to look for another model. The ideal height of the bed is at the level of the knees of the person standing opposite.
If the area of the room allows, then choose the widest possible bed. Comfortable rest is guaranteed on such a bed.
GLUING FOAM RUBBER TO ELEMENTS:
First, let's start gluing the foam rubber onto the bed frames.
The glue was applied with a brush, it is very fast, everything sticks quickly. The top layer of glue dries almost instantly, you can’t just smear the entire drawer with glue and glue the foam rubber until you get to the end - at first the glue has already dried, you have to glue it gradually. First we glue 40mm foam rubber and cut off the edges with a construction knife.
Then, from above, going to the ends of the drawers, we glue 15 mm foam rubber:
Let's move on to the headboard.
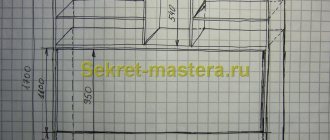
First, we need to draw a drawing of our carriage screed. We draw lines, mark points, draw diagonal lines, and we get our diamonds. I immediately mark the locations of future holes at the vertices of the rhombuses with circles, so that later I don’t have to think about it when drilling.
Drill holes with a 10 mm drill:
A layer of 80 mm foam rubber was laid on the headboard, consisting of two layers of 40 mm each. Glue the first layer:
In the upper part of the headboard, mark with a marker the longitudinal lines from the top and front sides of the foam rubber (25-30 mm from the edges), and cut off the upper edge of the foam rubber:
We glue the second layer of foam rubber, place it on the upper part of the headboard and shoot it with a stapler from the back side:
After the foam is completely glued to the top of the headboard, cut off the excess foam exactly along the edge:
And cut off the top edge, as with the first layer on the front side:
We glue 15 mm foam rubber onto the sides of the headboard and cut it according to the shape:
In the lower part, I cut the foam rubber at an angle with a construction knife, it turned out very scary:
Subsequently, before covering the lower part, I made a long knife from canvas, an aluminum plate and rivets, and then cut it straight:
Before covering it with artificial leather, it was necessary to refine the open plywood surfaces of the drawers and lintels, so it was decided to cover them with acrylic varnish, which was left over from making cabinets in the workshop:
All connecting and supporting elements of the bed were also varnished:
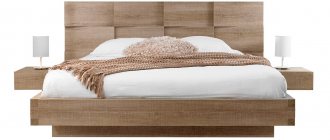
Bed appearance
The design of the bed should be in harmony with the overall decoration of the room. The color, style, and shape of the model are selected to match the existing finishing materials and furniture. But if the bedroom is decorated from scratch, then the choice depends entirely on the ideas of the owners of the room.
To make the interior seem lighter and more relaxed, choose models in neutral shades and with a laconic design. If you want to create an exclusive boudoir area, then take a closer look at round beds or other unusual designs.
For a classic style, products made from natural solid wood with milling elements, forged or leather models are suitable. A podium bed with bright decorative elements, such as mirror inserts and lighting, will fit into a modern space. Models with a headboard that is upholstered in leather or fabric and decorated with a carriage screed look stylish.
COVER OF THE DIGITAL GROUP:
Let's move on to covering the drawers. Cutting strips of artificial leather:
We stretch the leather and nail it to the drawer with a hand stapler. Here my wife and I worked with four hands, one stretches and holds the skin, the second nails it with a stapler:
When covering the semicircular edges, the stretching properties of this leather helped a lot; it stretches in all directions, and we managed to do everything without folds on the front side. True, on the headboard these properties of the leather only interfered:
Let's start assembling
The backrests should be installed vertically and then supported with stools. After this, we apply the drawers and check the frame for squareness using a level. We wrap the assembly with rope, and then check the diagonals and align the frame if necessary.
We mark the places for the dowels that will connect the side and back boards. We draw lines from the inside. After this, you can remove the drawers and drill holes in the end parts of the boards. We treat the ends with paint, move the backs apart, put the drawers in place, and firmly compress the backs.
We drill holes in the backs and assemble the base, gluing the timber. After installing the frame, it needs to be dried. We connect the lounger to the frame with glue and nails. We install the mattress at the very end - in a day or two. You can make a bed yourself without much difficulty if you know the technology and have the necessary tools and materials.
Loans without guarantors in Moscow, online loan on a card online without certificates.
HEADBOARD COVER:
Let's move on to the headboard.
First you need to make holes in the foam rubber at the tops of our diamonds for the carriage screed. On the back side, through the previously drilled holes, we pierce the foam rubber with a screwdriver: On the front side, we mark the holes with a marker to make it easier to make holes in the foam rubber:
I made the device for drilling foam rubber in the same way as in the video from CHEST'ER about the tool he uses. I bought a furniture leg with a diameter of the central tubular part of 50 mm:
I disassembled it, took the tubular part, tied it with electrical tape to the bimetallic crown and inserted it into the screwdriver:
Drilling holes:
The resulting foam rubber rounds were quickly used by children as building material:
In order to make the correct marking of leather for the carriage tie, it was necessary to make a test measurement of the required amount of leather per test diamond. We cut out a test element with dimensions of 200 mm x 175 mm, apply glue:
We glue the foam in two layers and cut off the excess:
We take a piece of leather, stretch it, staple it at the extreme points, and form our rhombus:
We remove the skin, mark the attachment points with a stapler and mark the resulting dimensions. I got 280 mm x 260 mm:
We make the markings in Sketchup and transfer them with a pencil to the back side of the leather:
In order to make it convenient to work, it is necessary to place the headboard horizontally - we stretch the skin on top and place buttons, and from below we fasten the tails of the buttons with a stapler. I didn’t have a large base to place the headboard on, but I did have furniture legs from old tables, 2 pieces. which I screwed to the back of the headboard, and the opposite side of the operas to the back of the chair:
As always, an employee of the regulatory authorities is nearby):
Before you start covering the headboard, you need to prepare the buttons. I cut pieces of leather 30 mm x 30 mm:
We place the button components in two parts of the mold:
We assemble the mold and press from above. I used my drill stand, it worked like a press, the required pressing force was not very high:
We begin the process of covering the headboard. We pull a needle with a cord and a button through the skin at our marked vertices of the rhombuses, and lower it through the holes in the back wall of the headboard:
We pull the cord on the back side and nail it to the back wall with a stapler:
Gradually we tighten the entire headboard, straighten the diamonds, tighten the leather over the edges of the headboard, and nail it on the back side. I recommend watching the whole process in the video on the CHEST'ER channel. I tried to do everything as this handy master does:
I’ll say right away that fitting it was problematic. The skin is a little thin and very stretchy. When covering it, the sharp edges of the foam rubber were visible through the skin. I had to cover the foam rubber with additional padding polyester (200 g/m2), it really helped. But there’s nothing you can do about stretchy skin; it stretches unevenly, you stretch the diagonals of the diamond, but there is loose material in the center of the diamond.
I cut holes in the lower part of the headboard for fastening the drawer frames and supporting elements with a scalpel and punched them along the contour with a stapler so that the material does not unravel:
I screwed metal plates from below to act as support legs for the headboard:
I cut and glued a sheet of felt with an adhesive backing onto the legs.
Bed frame: design and materials
The bed is purchased for a long time, so an important criterion for choosing it is the durability of the structure. The service life depends on the characteristics of the frame, which comes in two types:
- a pair of supporting backs is connected by two longitudinal sides;
- four drawers form a perimeter, which is installed on the legs. Can be supplemented with two or one hanging backrests.
But the main thing in a frame is not the design features, but the material from which it is made. Manufacturers use:
- natural wood;
- metal;
- MDF, laminated chipboard, fiberboard or chipboard.
Products made from solid wood and metal are the most durable. A bed with such a frame is durable, although not cheap, furniture. When the budget is limited, it is worth taking a closer look at models made from chipboard, MDF or other particle boards. You should choose beds from trusted manufacturers who use high-grade raw materials. Models made from low-quality materials will begin to produce an unpleasant squeak over time and become less stable. This is due to the fact that chips and cracks may appear in the places where elements are connected with special fittings. Particular attention is paid to this parameter if a double bed is selected for people with above average weight.
ASSEMBLY OF THE BED:
Place the headboard in a vertical position:
We collect kings:
We place the central jumper and supporting elements in the center:
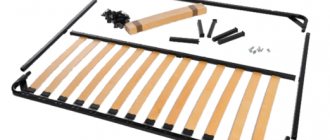
We attach the orthopedic base with a lifting mechanism:
Now you need to make a bottom to form storage compartments under the base. To do this, I cut thin slats from 18 mm plywood:
We drilled the slats and screwed them with self-tapping screws inside to the drawers, lintel and headboard:
I cut out panels from 6 mm plywood that are placed on screwed slats:
Then, when everything was done, we remove everything and cover it with acrylic varnish:
After the parts have dried, put everything back:
Wherever the orthopedic base comes into contact with the elements of the bed frame, I glued strips of sheet felt:
To prevent the mattress from rolling down when lifting the base, I made a small support from 6 mm plywood and attached it to the base with rivets:
The back of the bed had to be covered with spunbond, but it was not on sale in the city, and ordering it separately from Moscow for delivery would have been more expensive than the material itself. A local large “garden” complex found geo-textiles of very decent quality, dense, and light gray in color. 2 meters were purchased and nailed to the back of the bed around the perimeter:
Finished bed:
The drawer drawer is an important element of any furniture
Furniture production is a labor-intensive and responsible process in which the role of each structural element is important. One of them is the drawer, which is little known to most - this is the main element of furniture that contributes to the reliability of the table, chair, sofa and even stool. What is this element?
According to its design features, the drawer is a connecting part on which the reliability and strength of bolts and ties depends. In addition, it is a support for any furniture attribute. Let's look at a simple example: a chair consists of a table top and legs. But they are not attached to each other, but to a connecting board, which ensures that the legs do not wobble and stand stably, holding the tabletop. That is, the drawer is the simplest connecting element that holds the entire structure together.
Which pieces of furniture have drawers?
Any rectangular structure (be it a table, chair, stool) requires fastening the legs to the tabletop. For example, in a table and chair, the drawer is an important element, and there are four of them: one along the entire perimeter of the structure. The bed has three drawers, which are fastened together and with the head of the bed. Their main purpose is also that a mattress is placed on this frame. In some models of beds, the drawers may be upholstered with fabric or other material.
In sofas, the drawer is mounted under the seat, and it also fastens the armrests. As a rule, it is covered with the same fabric as the entire sofa. On average, the height of a sofa drawer reaches 30 cm with a maximum length of 190 cm (these indicators depend on the design features of each specific sofa). As for the material, chipboard, plywood or solid wood species can be used. In the chair, the drawer is also located under the seat and attached to the armrests, while its height has a maximum of 30 cm and a width of no more than 80 cm.
Interior doors: drawers are an important element
In this case, the drawer is a transverse crossbar with which the door leaf is connected. This element contributes to the strength and reliability of the door frame structure. At the same time, the drawer itself is made of laminated solid coniferous wood and MDF. The peculiarity of the door leaf is that it has a facing coating without joints and cracks, and the combination of coniferous timber and MDF ensures that the door will last much longer and more reliably.
We build it ourselves
Probably, many craftsmen are capable of making furniture with their own hands, for example, simple stools or tables for the garden. There is nothing complicated in the process, the main thing is to take care of every detail. For example, making a drawer with your own hands is very simple.
To create a stool you will need four of them. It is best to make these frames from hardwood - this way they will last much longer. The dimensions of the workpiece depend on the length and width of the stool. The frames need to be planed and milled if the bars need to be given a certain shape. The ends of the drawer can be cut at a certain angle - this depends on the design features of the stool. The products will be attached to the legs at a certain angle, which must be taken into account during assembly. After preparing all the components, you can begin gluing the structure.
Source: fb.ru
Project budget:
| № | Name | Price, rub.) |
| 1 | Orthopedic base with delivery | 7'000 rub. |
| 2 | Plywood | 3'500 rub. |
| 3 | Eco leather | RUR 2,310 |
| 4 | Foam rubber | 2'450 rub. |
| 5 | Glue | 280 rub. |
| 6 | Sintepon | 400 rub. |
| 7 | Cord and needles | 270 rub. |
| 8 | Fasteners | 500 rub. |
| 9 | Delivery | 1'200 rub. |
| 10 | Press form | RUR 1,050 |
| 11 | Geo-textile on the back | 200 rub. |
| 12 | Staples | 100 rub. |
| 13 | Acrylic lacquer | 400 rub. |
| 14 | PVA glue | 400 rub. |
| — | TOTAL: | 20'260 rub. |
Set of main tools used: