0
29208
A chest of drawers is an element of furniture in many apartments and houses. In its spacious drawers it is convenient to store bedding and underwear, clothes and home textiles. During use, the appearance of furniture loses its attractiveness even with careful handling. The design of the product may lose relevance in a modern interior. Do-it-yourself restoration of a chest of drawers allows you to restore furniture to its former attractiveness and revitalize its appearance.
Tools and materials for work
You can restore a chest of drawers in different ways. Staining, decoupage or aging will do. You can restore furniture made of plywood, chipboard, or restore the appearance of an antique chest of drawers. Before performing any restoration option, old furniture needs to be prepared and stocked with materials for the work. To do this you will need the following tools:
- sanding machine to remove old coating;
- wood putty and spatula for filling cracks;
- screwdriver for removing old rusty screws;
- metal corners that can be used to strengthen the structure;
- fine-grained sandpaper for sanding the coating;
- brushes and wood primer for processing furniture for painting;
- drill for making holes for fittings and fasteners;
- paint, brushes, roller and tray for restoration at home.
Tools
Depending on the finishing option, the list of tools and materials may vary. If the chest of drawers is painted, varnish is used to secure the coating. When using the decoupage technique, you need PVA glue and beautiful stickers that will decorate the surface.
All materials and tools need to be prepared in advance, as soon as it is decided how to update the chest of drawers. In order for the furniture to serve for a long time, it is recommended to replace fastening and decorative fittings with new elements.
Restoration of a children's chest of drawers
A children's chest of drawers is a reliable and practical thing where many children's things are stored.
Furniture made in a themed style is placed in the child’s room, then it will fit perfectly into the interior.
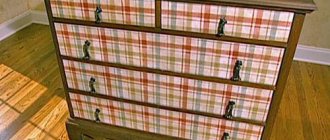
- Children love bright colors. For boys, furniture should be painted in blue, light blue, brown or green. While for girls they use other shades: pink, white, red, yellow, beige.
- As decoration, you can put pictures with cartoon and fairy tale characters on the chest of drawers to create interesting collages. And the top is coated with varnish. Girls also love butterflies, flowers, animals, boys love cars, robots, and soldiers.
Furniture preparation
Restoring an old chest of drawers will be successful if the furniture is properly prepared for work. The chest of drawers is emptied of the things and objects stored in it, and the drawers are taken out. Old handles are unscrewed - if they are antique, the products can be repainted in gold, bronze or silver. Parts that cannot be restored must be replaced with new fittings. Surface preparation is carried out as follows:
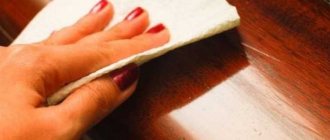
- To decorate an old chest of drawers with your own hands, wipe the furniture from dust and dirt. You can use warm soapy water for cleaning;
- Do not use aggressive chemical components - ordinary laundry soap will do;
- carved elements are cleaned with an old toothbrush, and small decorative holes with an awl or other sharp object;
- use a grinding machine to remove the old paintwork, hard-to-reach areas are treated with sandpaper;
- repair of furniture fastenings - loose legs are disassembled and reassembled, adding PVA glue to the joints;
- the wooden slats on which the boxes “ride” can be replaced with modern guide runners;
- If the product has cracks or chips, they are covered with wood putty. The mixture dries for at least a day;
- the restored areas are carefully rubbed with fine-grained sandpaper so that the surface is even and smooth;
- to increase adhesive properties, furniture is coated with a primer in two layers, allowing each coating to dry;
- the primer dries from 12 to 24 hours - this depends on the type of primer composition chosen.
An antique chest of drawers with a long history may contain a unique mark or mark of the master on the surface - these fragments should be preserved in order to accurately convey the charm of the restored antique item. Restoring a chest of drawers with your own hands requires patience and skill. You cannot ignore the process of preparing furniture, otherwise all your work will be in vain.
Dust removal
The old coating must be carefully removed from all decorative elements
Sanding furniture surfaces
Another repair option
This method will help you turn an old and boring bulky chest of drawers into a light and elegant piece of furniture. For the transformation, we will take a classic model without any special decorative decorations: three wide drawers and two small ones.
Classic chest of drawers with three large and two small drawers
You will need the following tools and materials:
- means for removing old layers of varnish or paint;
- sandpaper;
- chisel;
- matte putty;
- PVA glue;
- self-tapping screws;
- polyurethane foam decorative moldings;
- wallpaper;
- paraffin;
- water-based acrylic paint;
- transparent water-based varnish;
- 8 decorative handles.
Preparation
Unscrew the handles on the chest of drawers. Examine it carefully from all sides. Pay special attention to the lid and legs: these are the places where the wood is usually subject to the most damage. If the shortcomings are minor, it is not necessary to eliminate them. But if more serious damage is detected, sometimes it is necessary to replace some parts completely.
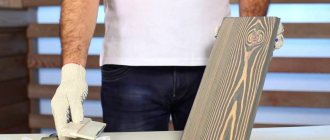
Free the chest of drawers from old varnish or paint. The top layers can be removed with a chisel; they usually come off easily. Rub the residue thoroughly with sandpaper until clean wood is visible.
Thoroughly clean the product from old paint and remove the fittings
In places where noticeable irregularities and dents are found, apply mastic with a spatula and level the layer. Once dry, sand these areas with fine-grit sandpaper. Do this carefully, do not press too hard, otherwise you will damage the fresh layer of mastic. As a result, the surface should become perfectly flat.
The new dresser handles you buy may be smaller or larger than the old ones. In this case, you need to fill the holes left from the old handles that you removed with mastic and make new ones in the right places using a drill.
Note! There are handles that are attached to special screws. There is no need to drill holes for them. If you have the opportunity, purchase such accessories to make your work easier.
Dilute PVA glue with water. Using a brush, treat the entire surface of the chest of drawers. You can replace the glue with any primer. When the surface is completely dry, you can begin decorating.
Decorative elements
First of all, prepare the main decorative elements - frames for the sides and drawers. They can be made from ordinary polyurethane moldings. The main thing in this work is correct measurements. The frame for the drawer should be located strictly along the edge. It is better to make a small indent on the sides.
Correctly calculate the dimensions of the decorative frames on the drawers
It is also very important to trim the corner portions of the molding correctly.
Once you have all the parts for the frames ready, start attaching them. For greater reliability, screw the frames with screws, and then seal the places where they fit into the moldings with mastic so that the caps do not stand out.
Apply mastic to the areas where the screws enter the moldings.
Now paint the installed frames with acrylic paint. Choose any color that you like or matches the interior of the room. For example, for a French-style chest of drawers, light coffee or beige would work well. Apply the paint in several layers, each time waiting until it dries completely.
Paste wallpaper inside the frames. It's good if they have a thick texture and a fancy pattern. The ornament should be darker than the general background. After you finish pasting the wallpaper, carefully screw the handles into place.
For original decor, use wallpaper
The final touch is to coat the chest of drawers with clear varnish. It should be applied in several layers.
Chest of drawers after restoration in the bedroom interior
To make the drawers slide out of their grooves easily, lubricate the wooden parts of the drawer system with paraffin. Sliding will be significantly easier.
How to restore an old chest of drawers with your own hands
Over time, any furniture ceases to be attractive: the varnish may peel off, the colors often become dull, etc. But everyone can do restoration work at home: restoration and renewal.
Over time, the chest of drawers may lose its attractive appearance.
How can you restore an old chest of drawers with your own hands? The main thing that needs to be done is to prepare everything that is required for work of this kind - finishing materials and tools - and familiarize yourself in detail with the process methodology. Having decorated the chest of drawers, the craftsman will give the antique piece of furniture another life.
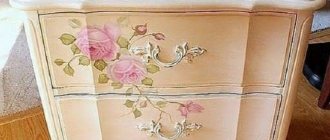
With the help of decor you can update old furniture.
Turning a chest of drawers into an open storage system
Necessary materials
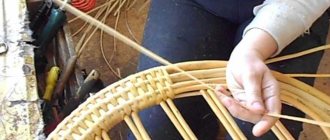
replacement for boxes (wicker baskets, suitcases, wooden boxes).
Another way for those who don’t want to bother. To turn a chest of drawers into an open storage system, simply remove the drawers and replace them with something more original. For example, wicker baskets or old suitcases. Just. And how impressive!
You don't have to have an art education to give furniture a second life. It is enough to arm yourself with the necessary materials, discard ideas about right/wrong and simply allow your inner child to express itself.
If the number of options makes your eyes wide open, go through our style preferences section. At the same time, you will learn something new about your inner designer.
Many of us have furniture in our homes that is still functional, but outwardly outdated. There is no need to throw away old things, because they can be transformed. One of the optimal solutions for such furniture is cosmetic repairs. Let's look at simple and interesting ways to update an old chest of drawers with your own hands.
Stages of complete restoration
If you decide to completely renovate a piece of furniture, then there is a lot of work to do. It takes place in several stages:
- Disassembly. Fittings and upholstery are removed if they require replacement. Keep in mind that antique items have good fastening materials, which can be damaged. If you are remodeling a chair, but the upholstery is intact, then there is a reason to keep it.
- Removing paintwork. The varnish is removed with a grinding machine or sandpaper. Cracked coating can be easily removed with solvents. You can also remove the paint with sandpaper or preheat it with a hair dryer, and then clean off the softened material with a spatula.
- Removing damage. We wrote above about ways to eliminate scratches, stains and cracks; use them to restore the integrity of the surface.
- Preparation for surface painting. Before applying paint, prepare the area. Remove dirt, dust, debris. Then degrease the surfaces to be treated. For better adhesion, apply a primer.
- Applying paint. The paint is applied with a brush or spray gun. To obtain a bright shade, apply 2-3 layers of paint.
- Applying varnish. To get a shiny surface, apply varnish to the dry paint.
- Upholstery. The fabric is attached to the frame with a construction stapler or small nails.
- Assembly. The final stage is the assembly of the structure and installation of fittings.
Restoring furniture completely with your own hands is interesting, but quite troublesome. If you are not ready to spend several days remodeling home furnishings, turn to the professionals.
Solving problems with the design of dresser drawers
Often there is a repair of drawers, which consists of correcting the fastenings of the bottom or facade. With the overhead type of installation, the drawers are pulled out, old nails or staples are removed from the bottom, and then the panel is nailed into place with new fasteners. With a mortise type of bottom (a sheet of plywood or laminated fiberboard fits into the grooves of the side walls), the boxes are disassembled, the grooves are carefully cleaned, the bottom is replaced with a new one from a suitable material and glued into the grooves. The façade that is loose or in need of replacement is unscrewed, coated with PVA in the places where it contacts the front and side walls of the box, and then screwed or nailed with pins (chops), using new fasteners.
The most enjoyable stage: painting sketches
You should start with large forms - a blue frame and painting the ends.
When working with the contour, you need to take into account that after application it takes about an hour to dry so that it cannot be smeared.
Master class on chest of drawers restoration
On thematic resources, connoisseurs of old things and those who like to create something with their own hands will find wonderful master classes. The videos show how to restore and restore an old chest of drawers, provide detailed step-by-step instructions, talk about the necessary tools and materials, and reveal the features of decoupage.
Master classes will help you do everything correctly, in the required sequence.
Decorating a chest of drawers yourself is a great opportunity to show your artistic taste and create an updated and completely unique interior object. A simple thing can be turned into an example of almost any stylistic direction.
Thanks to the art of decoupage, you can turn a simple boring thing into a unique art object.