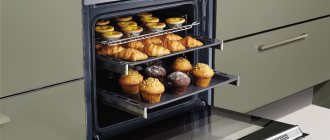
How beautiful it is to display and adjust our furniture!
On this page we will talk to you about various little things that seem insignificant to us, but on which the picture depends - the overall, final look
our furniture. That which pleases the eye. Let's start with the simplest. How to beautifully display and adjust our furniture! Level adjustment.
Don’t be lazy to use a level; furniture that stands level has never irritated anyone. You can check both the verticality of the rack and the horizon, for example the bottom
shelves or bases of the product. If we have adjustable supports, it won’t be difficult to level our furniture. To adjust large and heavy furniture, we
move it a little away from the wall and pile it on top of you, then turn the back legs (supports) out to the desired height, then roll it away from you and do the same
most with the front supports. If the supports are not adjustable, put something under the bearings of the rack. To avoid scratching the floor with all these movements
Glue felt pads to the supports. You can make them at home: double-sided tape and thin felt. We glue the tape to the felt, then cut it out
pads of the required size. Remove the protective film from the tape and glue it to the support. If you do not have clearly vertical walls, then it makes sense to level, for example, a closet
along the wall because visually it will look better than if the wall and the stand fall in different directions.
Adjustment of doors (facades).
Conventional furniture hinges, whether overhead, inset or intersectional, are usually regulated in the same way. This is a door adjustment up and down, away from you
and from the center to the right or left.
Up and down adjustment is carried out using oval lugs on the heel of the loop, which is attached to the stand with self-tapping screws. Raise or lower the door using these
ears is possible only by 4-5mm. no more, if there is a need to raise it to a greater distance, then you will need to rearrange all the heels of the loops on the stand.
In order to pull the door towards you, you will need to loosen the farthest screw; it usually has a large head. This screw connects both halves of the door hinge and
it should be tightened firmly after adjustment. To adjust the gap between the facades (doors), you need to screw in or turn out the threaded bushing,
usually it is made for a + screwdriver. If you cannot adjust the doors in any way, then the product itself is skewed, i.e. its diagonal is not aligned.
Adjustment of drawer fronts.
First of all, check whether your section or cabinet, chest of drawers or bedside table is level. If everything is straight, but the facades are crooked, then they need to be adjusted. If the facade
screwed on the screws from the inside, then only re-installation will help. You will need to unscrew it, seal the old holes with something (ordinary ones will do).
screw the screws back in.
The chest of drawers is rightfully popular among people, offering compact placement of things, making them easier to access and allowing you to keep the house in order. But, as with other furniture, certain malfunctions occur with it. Moreover, armed with some specific knowledge, the necessary tools and patience, everyone can do the repair of a chest of drawers on their own without overpaying.
Chest restoration operations are divided into three classes:
- adjustment;
- redecorating;
- complete renovation.
Products need adjustment after purchase and after complete restoration of the old one. And here we mean adjusting mechanisms, hinges, setting levels, securing loose handles. It happens that you want to repair a chest of drawers, simply updating a boring design or one that has lost its freshness. Then they resort to cosmetic restoration, based on the current condition and the desired result. A complete renovation implies the return of functionality to furniture parts and the replacement of elements that cannot be restored.
Frame repair
Since the chest of drawers itself is a load-bearing structure, it is subject to increased requirements for strength and stability. Ideally, it is advised to remove the drawers from the chest of drawers on runners, disassemble the parts, and replace panels that have dried out or cracked. Before screwing furniture bolts, it is important to thoroughly lubricate the joints with PVA glue so that they do not come apart later. After the glue has dried, restoration begins. And to do this, remove the old coating by using a solvent with methylene chloride (allowing it to act for a maximum of half an hour), or by peeling it off with a spatula, knife, or sandpaper. Then the defects are puttied, the surface of the chest of drawers is sanded, thoroughly cleaned and degreased, after which a new selected coating is applied (stain with varnish, tint varnish, paint with varnish, decorative film).
Solving problems with the design of dresser drawers
Often there is a repair of drawers, which consists of correcting the fastenings of the bottom or facade. With the overhead type of installation, the drawers are pulled out, old nails or staples are removed from the bottom, and then the panel is nailed into place with new fasteners. With a mortise type of bottom (a sheet of plywood or laminated fiberboard fits into the grooves of the side walls), the boxes are disassembled, the grooves are carefully cleaned, the bottom is replaced with a new one from a suitable material and glued into the grooves. The façade that is loose or in need of replacement is unscrewed, coated with PVA in the places where it contacts the front and side walls of the box, and then screwed or nailed with pins (chops), using new fasteners.
Legrabox boxes
The most modern and expensive systems of guides for drawers, occupying a high position in the list of all furniture components. The reinforced design stably withstands loads of up to 60 kg. The matte stainless steel surface emphasizes the rigor and sophistication of the stylish design of the legrabox.
Installation of this type of system requires pinpoint precision in drilling facades and side walls, and absolutely verified calculations in the manufacture of chipboard parts. It is also necessary to correctly and accurately mill the bottom.
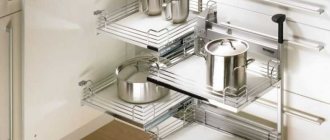
Manufacturers of furniture fittings offer other ways to use guides. For example, fastening retractable baskets, nets, containers for various purposes.
Repair of ball or roller drawer hardware
The type of retractable fittings dictates how to resolve problems. If the roller version (metabox) has become difficult to guide, then the fasteners may have sagged and then unscrew the runners and then attach them in the correct place, making sure the surfaces are horizontal. If the metal parts are deformed under the weight of the contents of the box, the guides will need to be replaced with new ones. After which it is important to adjust the chest of drawers on the roller guides. Ball options (telescopic) are more reliable than roller ones, and often only require proper adjustment, and not repair. If a loss of functionality is noticed (the frame flies off the wheels), the slide is dismantled, disassembled and cleaned, and the wheels are lubricated if necessary.
Video of repairing drop-down drawers
Strengthening the structure of drawers and chest of drawers
Very often, a chest of drawers in the basic design does not provide the required level of strength, which is why the panels become deformed, fasteners loosen faster, drawers move out worse or fall out, guides fly off, and a shelf falls. This means that the frame needs to be strengthened. For example, replace a thin bottom made of plastic or fiberboard with a similar thickness made of varnished plywood or laminated chipboard. Strengthen the back wall in the same way. If you plan to heavily load the furniture, it is recommended to additionally tighten the joints (facade - side wall, back wall - frame) with corners.
Repair of service fittings and additional mechanisms
Loose dresser handles, sagging or torn hinges, broken locks, latches and closers cause a lot of inconvenience. Fittings that have not lost their attractiveness can be easily repaired with your own hands. For repairs, parts are removed and then screwed back in, making sure that the holes do not coincide with the old ones.
If it is impossible to repair due to size or geometry, you will have to fill in the old holes and carry out a complete restoration of the selected area or facade.
Cracked handles need complete replacement, and worn ones need new painting and varnishing. Closers and clamps are checked for functionality, dismantled, cleaned and lubricated, after which they are installed in place and adjusted. It’s easier not to fix broken locks, but to immediately replace them with new ones.
- For lightly loaded dresser drawers, eight-millimeter brackets are used when installing the bottom. But, it’s safer to take a hot 10.
- The worse the quality of MDF or chipboard, the thinner the fastening screws are chosen (maximum 3.0 mm).
- If the pins become loose, simply drill out the old holes to a larger diameter and take a larger diameter of the fastener.
- Pins, grooves, and even connections nailed with staples or screws are pre-coated with PVA for reliability.
- To ensure that the chest of drawers does not lose functionality, drawers do not become difficult to pull out, and the shelf doors do not stop closing, in no case should you apply too many layers of paint or varnish. If the appearance still requires a multi-layer coating, first remove the extra 1-2 millimeters of the base with a grinding wheel.
- Extend the life of retractable rollers by regularly applying silicone lubricant. This is, by the way, how to care for furniture from IKEA.
Improper installation of the guides on the side walls of the drawer can lead to unpleasant consequences that cause the entire structure to bend. This will further lead to incorrect operation of the product, which will lead to its rapid breakdown.
To avoid such mistakes, you must immediately become familiar with the method of installing the drawer.
Video: installing guides on drawers
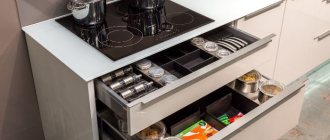
Modern furniture is often made with drawers, since such systems save space, which is especially important in small rooms (kitchen, bathroom, etc.), and increase comfort during use and maintenance. With a large selection of drawer systems, telescopic guides for drawers are popular.
Fittings for mounting a drawer
What is this type of fittings? What are its advantages and disadvantages? Read on to learn how to choose and install telescopic guides correctly.
Roller guides
Currently, the most widely used types of guides are roller and ball designs. Roller-type guides have a low cost; thanks to this quality, they are very widely used in furniture structures, most often on the walls of drawers.
Roller guides have a very simple design, which consists of 2 parts. The first part should be mounted on the side wall of the drawer, and the second part should be mounted on the inside wall of the cabinet, cabinet, etc. These guides can be made of steel or aluminum. The guides that are installed on the drawers have rollers that ensure their movement. To eliminate noise when the rollers move, their structure can be covered with a rubber sheath.
Since roller guides are not a structure intended for closed installation, their surface is coated with enamel, which is necessary to give a beautiful appearance to the entire structure. The most commonly used paint is white, black or brown.
The design of these guides is similar to rails, which allow you to open and close various moving furniture elements without putting much effort into it. This is due to the created inertial moment, which occurs after a small push on the box.
Return to contents
Installation instructions for roller guides for drawers
Now let's talk about installing the roller guides. When installing roller guides for drawers, the kit must be divided into right and left sides, and then into inner and outer parts. The left outer part has a U-shaped profile, the right outer part has a G-shaped profile, and the inner part has an L-shaped profile.
All parts of the guides have holes for their fixation and adjustment on the parts using self-tapping screws. Along the marking lines, the corresponding parts of the guides are screwed onto the racks of the product body. It is necessary to make sure that the rollers on them are closer to the front end of the part. L-shaped parts of the guides are attached to the already assembled box. In this case, the rollers should be located at the rear end of the box.
The product is assembled, drawers are inserted, fronts and handles are hung. The installation is completed.
Installation of mechanisms
Recently, the use of roller mechanisms has become widespread. This is due to the presence of computers in apartments and houses, which are installed on special computer tables. Such tables have a sliding shelf to allow installation of a keyboard on it. Also, similar mechanisms can be on various drawers, shelves and shelves. You can assemble such furniture elements yourself. The main thing is to approach this matter responsibly.
For installation you will need the following tools:
- drill;
- ruler;
- pencil;
- self-tapping screws
The installation diagram itself has a fairly simple sequence and is very easy to perform. To begin installation, you need to make markings on the walls of the box. This must be done accurately to prevent further distortions that may occur in moving parts.
Next, you need to drill holes using a drill, and they should not be through. Their depth should be 12-14 mm - this is caused by the length of the screws and the thickness of the chipboard sheet. Similar holes must be made on the body of the box (they must exactly match the previous ones).
To pull out drawers in wardrobes, kitchen cabinets, chests of drawers and other types of furniture, so-called drawer guides
.
Installation of guides
If we are not talking about replacing broken devices, the choice of a guide system is made at the design stage, since its parameters must be taken into account. When installing the mechanism, it is necessary to correctly calculate the attachment points. Do not tighten the screws completely. It is recommended to bait them all first, and then tighten them all the way. Otherwise, the entire system may become distorted, causing it to become incapacitated.
Replacing a worn roller mechanism with a similar one
Situations where rollers wear out and drawers become difficult to pull out and close are common. It is with roller fittings that problems are most often possible.
Photo of a worn-out roller
The easiest way to fix the problem is to replace the device with a new one. If you want to save money, you can take the same roller guides, fortunately they cost no more than 100 rubles.
Roller guides
Roller guides
The guides are the simplest in terms of design and installation; by the way, you can also find the following names for these guides, such as runners for drawers or runners. Their price is small, on average 50-100 rubles. for a couple. The roller guides look like the photo below, you've probably seen them more than once.
The roller guides are covered with durable epoxy enamel; guides are available in different colors, the most common guides being cream. You can find roller guides for drawers with a depth of 250 to 800 mm, that is, for almost all cases.
Roller guides can withstand dynamic loads of up to 25 kg; you are unlikely to store anything heavier in a chest of drawers or in a drawer in a closet. The disadvantages of roller guides are the noise with which they extend and close; the extension is partial. But the low price eliminates these shortcomings.
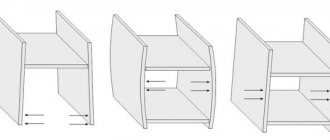
According to the installation diagram, the gap between the outer part of the side wall of the box and the side wall of the product body should be 12.5 mm or 25 mm on both sides, usually 26 mm is taken in calculations. This means that the width of the box should be 25-26 mm less than the internal space of the cabinet.
The role of ball guides in furniture production
Despite the fact that the principle of operation of telescopic devices is used to create many products in various fields of scientific and practical human activity, they most often continue to be used in the production of cabinet furniture of various types.
Ball guides are needed to equip furniture with them, which then becomes much more functional, and in addition:
- allows drawers to slide out silently;
- increases the permissible load, which has a direct impact on the box, extending its service life.
Scheme for installing ball guides in a drawer and the box underneath it
So, as an example, we can cite wardrobes, inside of which multiple drawers are installed, saving free space and generally increasing the usability of this piece of furniture. Usually such drawers are filled with clothes and accessories, as they say, to capacity. And yet, thanks to ball guides, they work silently and accurately.
By installing ball-type guides into your piece of furniture, you will increase the service life of the furnishings equipped with them, as well as increase the convenience and efficiency of using the furniture.
Specific installation calculations will depend on the parameters of the box and fasteners selected for it
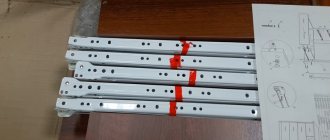
Ball guides
Ball guides
, or as they are called telescopic guides, are able to withstand heavy loads and have a smooth ride. The cost of guides is from 300-400 rubles. for a couple. There are options with and without closers.
Ball guides, like roller guides, consist of two parts. One of them is attached to the box, the other to the side wall.
In order to separate them, you need to press the latch, as shown in the photo. This is such a little black lever.
It is possible, of course, to install without disconnecting, but this is another torment, I had a chance to try it from my own experience. As a result, a negative idea may be formed about ball guides and the complexity of their installation. It's actually simple.
Installation of ball guides by elements is carried out on the side walls of the cabinet and the sidewalls of the drawer.
The most commonly used are ball guides with a height of 45 mm, the size range of guides is from 250 to 700 mm, and can withstand loads of up to 36 kg, which is more than.
The calculation of a box on ball guides is similar to the calculation of roller guides; the width dimensions of the box are determined as the size of the internal space minus 26 mm (12.7 mm + 12.7 mm).
But this scheme does not work for all cases, it all depends on the type of ball guides, you can read about this in a separate article.
for drawers
Manufactured from stamped steel with an anodized finish. Their design is fundamentally different from roller guides. To slide the box along the runners, a cage with metal balls filled with a viscous lubricant is used. This results in relatively quiet operation and increases service life. There are models equipped with built-in closers that prevent the drawer from noisily hitting the body stand when it slams sharply. The system has two metal elements: one is attached to the inner wall of the product, and the other is attached to the box. To separate these two parts, you need to use a clamp.
Ball guides are available in full or partial roll-out types. Full extension (or telescopic) guides allow the drawer to be pulled out beyond the boundaries of the furniture body, which maximizes visibility into the interior space. Partial extension guides leave a vast area of about 50 mm from the rear end of the drawer. The length of the guides ranges from 200 to 600 mm in increments of 50 mm. The maximum load of guides with a height of 35 mm is 30 kg. There are also reinforced guides, their height is 45 mm, and the maximum load is up to 45 kg.
Tandems
Tandem hidden guide technology ensures smooth movement even for heavily loaded drawers. The drawer can be easily removed from the guides without tools.
Tandem
- this is a smooth move and full or partial extension. Drawers can be either with or without a built-in closer. The tandem can be equipped with Tip-on (opening system by pressing the facade). The cost of guides is 1000 -1500 rubles. for a couple.
On the Tandem drawer guides you can make a drawer under the sink. Since the sink has a convex part, which is located inside the body, the standard, that is, straight drawer design is not suitable here. The convex part or bottom of the sink will prevent the drawer from closing. In this case, the bottom of the box is made with a cutout, and the walls of the box made of chipboard are attached along the cutout. This entire structure is installed on Tandem guides.
Application of Tandem guides
assumes the use of 16 mm thick chipboard, although solutions using 18 mm thick chipboard are possible.
The most expensive segment of the drawer slide market. The sides of the box (drawer side) are made of thin-walled steel, unlike tandems, where the box body is made of chipboard.
The kit includes fastenings to the front and fastenings to the back wall of the drawer. Detailing includes a chipboard bottom and back wall, similar to a metabox. The guides are similar to tandems, have a smooth closing, with closers.
Tandemboxes can be equipped with an opening system that does not require installing a handle on the facade; it is enough to simply press the facade with your hand.
Tandemboxes of various heights and variety of assortment significantly exceed metaboxes. Let's look at the example of Blum tandem boxes
.
Height N, drawer drawer height 68 mm, lowest drawer
Height M, drawer drawer height 83 mm
Height C, drawer drawer height 115 mm
Used for high facades, the back wall is enlarged, and a railing is also added. The minimum height of the internal space for a drawer is 191 mm.
Height also D, drawer drawer height 83 mm
Used for high fronts, the back wall is also enlarged, but instead of two railings, the Railing with Boxside is an overlay on the drawer side. The minimum height of the internal space for a drawer is 224 mm. The solution is mainly for kitchen drawers, not for wardrobes.
Two triple tubular holders and railing tubes allow you to make a special box on tandembox guides in a sink cabinet. Thanks to the cutout in the bottom, the drawer allows you to bypass the sink protruding into the body of the cabinet.
Another interesting solution from Blum is the use of tandembox guides for the corner cabinet, which is called Space Corner
.
The fittings set includes a number of specific elements that are not found in other guides and, frankly speaking, this fittings are not cheap. Space corner allows you to effectively use the corner space in the kitchen, and the use of ORGA line dividers further structures the storage space.
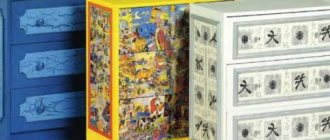
First Legrabox boxes
positioned as elite products that were inaccessible to mere mortal furniture makers. The point here was not at all in the price, and the price, by the way, is the highest in comparison with other extension systems, but in the complexity and accuracy of manufacturing the remaining parts from chipboard, the accuracy of milling the bottom of the drawer, the accuracy of drilling the side walls of the case and facades. Therefore, Legrabox boxes were offered to furniture companies that produce high-end furniture.
How to remove a drawer from a kitchen unit
To answer this question, it is important to have a general understanding of the types of furniture guides and their design features. The most common types of extension devices are:
- roller skids;
- telescopic with a sliding carriage or ball;
- telescopic multi-section;
- telescopic with closer and push-to-open system.
Roller guides are the cheapest and simplest. Such devices have 2 paired sets consisting of profile runners. The outer one has a flange that holds the roller when the box moves, and is attached to the furniture wall.
The internal one is equipped with a rolling roller at the far end of the profile and is attached directly to the box. When extended to its maximum stroke length, the roller is held by a projection on the outer profile to prevent the drawer from falling out.
To get it out, you need to grab it in the middle with both hands and slightly lift the front part first, then, pulling the back part towards you until it stops, removing the entire box from the niche.
Advice. Be sure to remove at least the heavy items before removing the drawer. This will make the process easier and prevent deformation of the guides. Relevant for all types of devices.
As for telescopic systems, the procedure is somewhat different. Some of them are officially listed as non-separable. However, if absolutely necessary, any model can be disassembled.
The design of the telescopic guide vaguely resembles a slide rule. An internal one with a sliding system is inserted into the outer profile, which sometimes consists of ordinary balls in the gap between the profiles. If another one is inserted into the inner one in the same way, this is already a multi-section guide.
Plastic clamps serve as travel limiters in such systems. To remove the drawer, both latches must be released simultaneously. They are located on the front end of the main profile. To turn it off, press the “flag” or “tongue” of the right and left latches, after which the box is smoothly removed.
Multi-section guides are distinguished by a greater permissible load and the ability to extend the drawer to its entire length. The procedure for separating the retractable element is similar to that described above.
Multi-section guides are most often not disassembled. The reason is simple: when dismantling the end clamps, the sliding balls will fall out, making them difficult to assemble and return to their place.
There is no point in disassembling the guides to remove the drawer. Given the possibility of full extension, it will not be difficult to separate it from the supporting section, since the fastening screws are freely accessible.
How to remove a drawer from a kitchen unit with a closer
The push-to-open system, when you lightly press the front panel of the drawer, automatically pulls it out to a distance of up to 15 cm. The finishing mechanism, on the contrary, pushes it all the way. To do this, it is enough to set the initial movement to the middle.
The presence of such options in the process of removing the box obliges one to take into account the design features. Regardless of the operating principle of the fittings (mechanical, compression), first of all it is necessary to disconnect their fastenings.
When reassembling the system, the closers will have to be adjusted again taking into account the free play to activate the push-to-open latch. This is done using a screw on the pusher rod or by moving the mating part of the latch within the longitudinal groove.
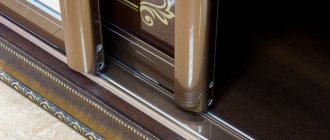
For owners of the Grass guide system, such problems will not arise in principle. The design is so perfect that the box with the supporting part simply fits into the guide groove and slides in until it clicks. The location of the clamps at the bottom causes some difficulties when removing the box, but nothing needs to be adjusted.
Advice. In all cases, it is important to consider that boxes with decorative elements are heavy. If disconnection from the right and left guides occurs alternately, it is recommended to provide temporary support to avoid deformation and breakage of the profile parts.
Installation, calculation and installation of guides for drawers
It’s not enough to know what types of drawer guides there are, but the question arises of how to calculate and install the guides
.
There are a large number of methods and approaches to calculating and installing guides on the Internet. I use a simple program from Blum called DYNALOG with a clear interface; for design we use the DYNAPLAN module.
Special furniture programs are expensive, there is no point in mastering them, much less buying them, if you want to make products for your home yourself.
As an example of a basic product, I will give a cabinet 616 mm high, 600 mm wide, 500 mm deep with overhead facades 200 mm high, chipboard drawers 150 mm high, gaps between the facades 4 mm.
If we want to calculate the installation of drawers in a sliding wardrobe, then keep in mind that with a cabinet depth of 600 mm and an internal partition of 500 mm, we carry out the calculation for inset facades, the facades will be inside between the side wall and the partition, as well as between the horizontal walls. It is better to make side gaps of 4 mm in the version of inset facades.
When assembling new furniture, it can be very difficult to adjust several drawers stacked on top of each other so that they do not interfere with each other. It is important to install the guides correctly here. It will only take a few minutes.
Process:
1. We take out all the drawers to expose the guides (the same “slides” along which the drawers move back and forth). 2. We place a level on all the guides one by one to find the culprit of the problem - the crooked “sled”. 3. Unscrew the screws that hold the guide we are interested in. We leave the rear screw in place (if you decide to move the guide to another place, then the rear screw needs to be screwed to a new height). 4. Holding the guide, place a level on it again and straighten the “sled” until it is strictly perpendicular to the floor. 5. Mark with an awl in the wall the place for the outermost screw. 6. Screw the screw into a new place - first the outermost one, and then all the others. 7. Put the box in place and check the result. These steps may need to be repeated with other guides until they are all straightened as they should be. 8. Enjoy the results of your work!