Types of shelves in the house
Depending on the installation location, shelves can be wall-mounted, floor-mounted or hanging. If the floor shelf has a large height - from a meter and above, it is often called a rack. A few words about hanging ones: usually these are decorative structures that hang on a pipe or a specially driven bracket. This option is popular in rooms where heating pipes run under the ceiling: they just beg to have something hung on them. Shelves are hung on the pipe in the kitchen and bathroom: it’s convenient there.
These hanging kitchen shelves are convenient and functional. You can use the same pipe to make a story made by yourself.
They are made of wood, plywood, laminated chipboard, fiberboard, and there are glass shelves. The same materials are used as stands, but they are also made from metal, plastic and other absolutely incredible things - for example, pipes or bottles.
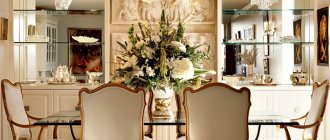
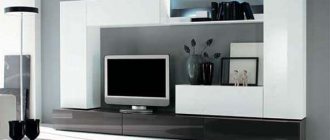
In living rooms, it is not so important what material the shelf is made of. It is important that its design is in the same style as the interior. Even functionality is not always important: some play a purely decorative role. If they have anything on them, it’s only one or two items. Their role is to give the interior of the home a special style and flavor.
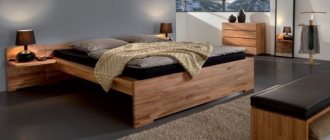
The intimate atmosphere of this room is emphasized by cozy pillows and dark wood shelves.
A laconic style of apartment design and the same laconic shelves in a contrasting color. In this interior they are the main element
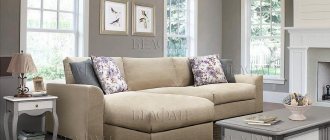
The free space above the sofa is organically filled with shelves to match the walls
The shelf can serve as a divider for zones in the room
Light interior in light colors and the same shelves
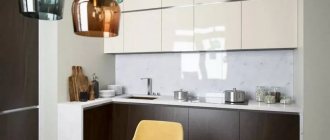
The shape and color of the shelves matches the shape and color of the table drawers
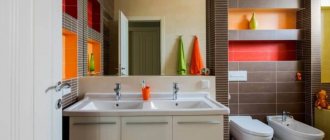
If we talk about shelves in technical rooms - the kitchen and bathroom, in particular, then in addition to aesthetic considerations, practicality requirements are almost universally added. Even decorative shelves in the kitchen should be washed well. For bathroom shelves, the requirements are generally high: periodically there is very high humidity and materials are required that can withstand it without any harm. There aren't many of them. These are plastic and stainless steel. They also make bathroom shelves from MDF, but they can be used normally if there is good ventilation in the bathroom.
Hanging shelves
Such shelves are placed on pipes or special brackets. These are lightweight decorative structures that are not designed for heavy loads. They can be hung, for example, on a heating pipe running under the ceiling in the bathroom or kitchen.
Typically, the materials for making a hanging shelf are laminated chipboard and fiberboard sheets, wood, stainless steel, plastic or glass. For homemade options, plastic bottles or pipes can be used, as well as wicker baskets and parts of an old suitcase.
Shelves on the wall
In any room there are places on the wall where you just need to hang something. After all, most modern furniture occupies only the lower part - sofas, tables, couches. The upper part remains empty and dissonance arises: the lower part of the room is overloaded and the upper part is half empty or completely empty. These voids on the walls are organically filled with shelves.
The whole system, and the most “dead” space is used - the corner
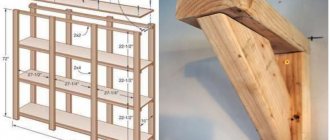
Structurally, most shelves consist of the actual shelves and lintels. But these components are combined into so many options that it is impossible to count. A simple design is good: you can make any shelves with your own hands. Moreover, these products may be the first self-made things. It's really simple.
How and what to attach it to
It’s not for nothing that we start with fasteners. The design of a wall shelf largely depends on the type of mounting. Or maybe it’s the other way around. It depends on what to dance from...
Traditional hinges
Traditional hinges for hanging shelves
There is a traditional way - on loops. It is suitable for wood and fiberboard, any other material that is thick enough to attach. Screwed onto the sides with self-tapping screws. Then the distance between the centers of the loop holes is measured and marked on the wall (make sure it is horizontal). At the marked points, holes are drilled for the dowel, the dowel is inserted and a dowel-nail with a small head is screwed into it, which fits into a loop or bracket (a pin slightly bent upward). Then a shelf is hung on them.
Not all materials can be drilled. For example, glass shelves. You definitely can't screw anything into them. Fastenings for glass shelves are special: they consist of two parts, between which glass is inserted. Often elastic pads are installed between the holders. The bottom mount usually has a small clamping screw to secure it in place.
Fasteners for glass shelves
The most popular mount for glass shelves is called “pelican” - for its unique shape. It looks good on its own and is available in different colors. The thickness of glass that it can hold is from 8 to 34 mm. You can insert not only glass into it, but also any other material of such thickness. It just looks stylish with glass.
It’s easy to make glass shelves on the wall with it: you buy a mount, order pieces of glass with processed edges of the required size and shape from a glass workshop (or cut them yourself, if you know how). All that remains is the assembly itself:
- Attach the pelicans to the wall. Two dowels each. The case is collapsible - the decorative trim is removed, and there are two holes in the mounting plate. One is higher in the body, the second is lower. We secured it and put the decorative trim in place.
- Glass was installed.
- Tightened the screw. All.
Glass shelf holder for wall
There are other forms of similar fasteners. The photo below shows a few of them.
Some mounting options for glass (and not only) shelves
Decorative brackets
Another type of fastening is brackets. They are reliable, some are decorative, so much so that they themselves are decorations.
Wall shelf brackets
Concealed installation - shelves without support
And the most amazing device for hidden installation. It makes it possible to hide the fasteners. A seat for the pin and the holder body is cut out at the end, and the shelf is simply put on it.
Hidden fasteners for shelves
As you can see, even a simple board or piece of glass on such mounts is not bad. But there is still a sea of all sorts of ideas.
Read about how you can update old furniture here.
Bookshelves
There are strength requirements for bookshelves: they can hold significant weight. Therefore, the fastening, materials and design must be reliable. Traditionally, bookshelves are made of wood, laminated or veneered fiberboard. And then fiberboard with a long span (more than 90 cm) sag over the years.
When planning shelves for books on the walls according to your own dimensions, keep in mind that the distance between the supports should not be more than 90 cm. Then even when fully loaded it will not bend. There are two types and varieties of shelves: wall-mounted and floor-mounted. Both of them can be angular.
In the simplest case, it is a board secured in one of the following ways. Some options, especially when presented correctly, look very good.
The simplest design of a shelf at the bottom of a wall for books (a secret fastening is used)
And with imagination, several planks turn into a very interesting thing, which can even be the main element of decor. Ideas for DIY are collected in the photo gallery.
And this is a serious way to expand the space due to the corners between two windows
Very interesting idea of using corners for small shelves
Corner wall shelf for books. Attaches to pelicans))
The contrasting color makes this shelf the center of attention.
Nothing complicated: it’s easy to assemble such a bookshelf with your own hands, and the look is non-standard
Nonlinearity - they are always interesting, and on such a shelf you can put books of different heights
Small system with pipe jumpers
Floor bookshelves can be loaded more seriously. Here the forms are different: there are racks to which shelves are attached. The highlight can be a broken or unusual line of shelves, as well as interesting racks.
Simple design benefits from color and lintels
Unusual racks adorn this floor-standing bookshelf
This is more like a bookcase or even a cabinet, but the essence does not change - the original color and interesting small shelves in the central part and the structure looks interesting
Easy to make and original
A very interesting idea - non-linear shelves and lintels made of thick glass
It's more of a shelving system
Read about the manufacture of fountains (both small indoor ones and more substantial ones for a country house, personal garden or garden plot) here.
Floor structures
This is rather a transitional variety, since large floor-standing models can rather be called tables, shelving or even cabinets. Depending on the design, they can be attached to the floor or walls to give the shelf greater stability and safe operation.
For small and lightweight shelves, you can use wheels instead of legs, so in addition to the useful functions of the shelf, mobility is added, an important quality in a situation where you need to quickly move the structure to another place.
Hanging
Not very numerous, but an original type. The most important thing is that it can be done easily: a few planks, four ropes or two belts and you can get to work.
Old leather straps can also become the basis for a suspension system
This is a complex system of blocks...and the shelves can be located at any level
Two planks, four ropes and half an hour of time are all that is needed to make this shelf
How to make a hanging shelf - graphic step-by-step instructions
To the nursery
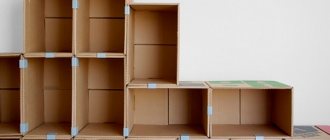
While the child is very small, I want functional shelves, but with children's drawings. But where can you get these? Do it yourself. Any shelf of the configuration you like can be covered with non-woven wallpaper or thick wrapping paper (glued with PVA). After drying, coat twice with water-based varnish. Such shelves can be washed, but what’s most interesting is that the shelf can change with the child. You tear off the old decor, glue on the new one. The idea is simple, it works perfectly.
Here's what can happen
For children, the shelves are not very different in design. If we talk about floor or shelving, then they must be strong, taking into account the fact that older children will definitely want to climb on them. Therefore, often even those shelves that stand on the floor are additionally attached to the wall: so that they do not collapse and crush young climbers. Based on these considerations, they are not made tall: even if they fall, it’s not scary.
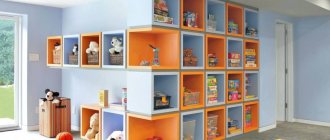
The shelves in the children's room also differ in color - they are brighter, can be made in the form of letters, and boxes for toys can be installed in them: this makes it easier to keep them in order. In general, functionality and security must be combined.
System with drawers - cleaning will be quick
Children grow, designs and colors change
A combination of open and closed shelves - convenient for preschoolers
The fairytale town will appeal to both boys and girls
Read about developing a children's room design here.
Shelves and shelves for the kitchen
Say what you like, but in the kitchen the main thing is functionality. There is not much free space even on the walls: the cabinets take up a large area. Therefore, one of the tasks is to make the most of free space. There are interesting ideas for small or even very small gaps between the wall and the refrigerator or other household appliances. Strictly in size, you can make a pokka on wheels, which can be pulled out and completely hidden there. It is wide and narrow (see photo).
It’s easy to make such a retractable shelf-rack on wheels for different jars. Everything you need is at hand and out of the way
There are also interesting ideas for saving space. If the sink or station is located near the window, you can take the sides. There is an interesting hanging option - a grid on chains to which all sorts of utensils are attached. But such a shelf is possible if the desktop is not against the wall. Another option for saving space is if the kitchen-dining room is zoned with a counter, you can also make a shelf above it, which will be partially hanging. One part of it rests on the wall, the second on the counter or “hangs” on the ceiling.
We take up all the free space
Shelves near the window in a different style
Hanging shelf for small items
There is also unused space above the counter.
Read about ways to arrange kitchen furniture here.
Covering the entire wall above your desk with cabinets is not the best solution. They look heavy. The problem can be solved by using glass doors, but not everyone likes this. The solution is to make open shelves between the cabinets. They will add more lightness to the interior and the work area will not put so much pressure on the rest of the space.
Glass and open shelves will “lighten” the interior
Stylish accessories don't hurt
There is also room for glasses
Different style - same idea
Closed and open shelves in one system - convenient and non-standard
DIY pull-out shelf for working tools
Let's make pull-out shelves from under the tabletop for various small items and tools that are needed during the work process.
I usually have a bunch of different auxiliary tools, bobbins, extra presser feet, threads, needles, and the like accumulated on both sides of my sewing machine. All these little things cling to the fabric and constantly fall to the floor, sometimes right into the trash can standing near the table. I was tired of all this and finally got around to making two shelves on the right and left under the table in order to move everything there and free up the work surface once and for all. I had this idea for a long time because I didn’t know how to secure these shelves under the table. But one fine day, I saw on the Internet guides for a shelf for a computer keyboard, and not simple ones, but fixed to the tabletop with special corners.
These guides turned out to be available at the nearest construction hypermarket, where I bought them, as well as boards and slats for the shelves. To make a shelf we will need:
- Ball guides for computer keyboards;
- board 20x40 cm, thickness 1.8 cm (the size of the shelf can be any, it all depends on your needs, but practice has shown that the depth of the future shelf should not exceed 25 cm);
- slats 40x5mm;
- a handsaw, but not necessary, I was able to cut with a utility knife;
- sandpaper;
- PVA construction adhesive (I used regular stationery adhesive, it worked too);
- crosshead screwdriver;
- screwdriver;
- ruler;
- pencil.
And here are the same guides that we will use. They come in two pieces per package, right and left, plus corners and screws in a bag for them:
The first thing I did was to cut off slats 40 cm long with a stationery knife - 2 pieces. Or rather, I first tried to saw them off with a handsaw, but it turned out very rough. Then I took a hacksaw for metal, it turned out better, but there was also a lot of hassle. In the end, I decided to try cutting off the slats with a utility knife, which turned out to be faster and easier.
Pine slats are quite soft, and considering that the thickness of the slats is only 5 mm, the knife can cut through it 1-2 mm in depth.
Then I broke the rail in half, cut off all the irregularities with a knife and sanded the edges with sandpaper:
We glue the cut pieces of the slats to the board on both sides:
After 10-15 minutes the glue will set and you can proceed further. Place the strip on the shelf and mark with a pencil where to cut.
We also glue these side panels with PVA glue and wait for them to set.
Here's what happened:
Now, so that everything does not fall apart during operation, we fasten the narrow sides of the shelf with screws. You also need to slightly widen the holes for the screw heads so that they don’t stick out too much. I don’t have such a device and I used a cross nozzle:
Next, we attach the guides to the shelf. We make marks with a pencil so that the screw hits the base of the shelf so that everything holds tightly:
Tip: before drilling, to prevent the drill from jumping off, you must first make small indentations using a nail and a hammer.
We fasten the corners. You can adjust the height of the shelf from the tabletop level closer or further by selecting the desired hole in the corner.
And here I was very mistaken, and I realized this only when I started writing the master class and looked at the photographs with fresh eyes. For some reason, I attached the corners to the guides inside the shelf, although it should have been the other way around. Please do not do this, it greatly complicates the fastening. But what's done is done, but I've become smarter :)
We turn the table over and attach the shelf to the tabletop.
We remember that the corners should stick out, and not, like mine, inward. We make marks, drill and fasten. As you can see, I did everything in a different order. First, I somehow made marks with a pencil, unscrewed the corners from the shelf, screwed the corners to the tabletop, and screwed the shelf back to the corners again. I'm still in shock why I did that. Apparently some kind of eclipse has come over me!
When I attached everything to the tabletop, my discovery was that the shelf cannot be pulled out completely, since the guides do not allow this. Therefore, a shelf length of 40 cm is too much for such a guide; ideally, the depth should be no more than 25 cm. Because of this, I decided to expand the second shelf and attach it to the guides on the narrow side so that it extends completely and becomes more functional. Maybe the same guides exist in nature, but with full extension, then it’s better to use them.
But, despite all the mistakes, no matter what, I got the shelves, which I’m very happy about. It’s really convenient when everything is at hand and nothing interferes with you while working.
I hope my unsightly experience in this direction will be useful to someone. You will take into account all my mistakes and make everything much better and more beautiful.
Thank you for taking the time to read my master class and reading it to the end. I wish you creative success!
Decorative and original
Often, shelves on the wall play a purely decorative role. They are designed to attract attention and this goal is achieved by an unusual shape, contrasting with the walls and color. You can’t bet much on it: one or two things, but how interesting they are.
There are only three rectangles, but due to the color and binding they look very stylish
Another option made from different rectangles and squares, and even painted in bright contrasting colors. You won’t pass by. Very interesting idea of using corners for small shelves.
The theme is the same, the mood is different. And only due to the fact that the contrast between the color of the wall and the color of the shelf is not so bright
Another option for “square” shelves. Two identical sets arranged differently
If traditional square shelves are decorated around the edges with curly frames, the style turns out to be completely different.
Another interesting topic is glass shelves. Just one glass is not very interesting. Its combination with wood and steel is more attractive. The effects are sometimes unexpected. Glass is assembled on guides: the material is fragile and heavy, and it needs to be held. Steel can do this.
An interesting glass option. You can arbitrarily change the height between tiers
In fact, these systems are intended for creating store interiors, but they also look stylish in an apartment in a modern or loft style.
Also suitable for vintage style
What are shelves made of? Even from pipes. Metal and plastic. Do you have any samples left from the renovation? Put it to work and get a designer item, interestingly, assembled from trash.
This is a floor-standing option
Plastic pipes do not need to be painted
Water pipes, corners, everything is painted with bronze paint
Large diameter plastic pipes installed in a frame. Here's an unusual shelf for you
This is an interesting variation of a bookshelf made of pipes
There are examples that simply amaze you. Well, how could you come up with this?
A combination of open and closed shelves. Non-standard shape - rounded corners and a completely new look
The forged base looks noble
Custom corner shelf
Can be an interesting partition between zones
Something similar can be made from polycarbonate. They come in different colors and bend well
The author's wild flight of fancy
Idea for those who have a lot of books
Interesting design
For lovers of cut flowers
Cardiogram shelf...
What types of fastenings are there?
If you make shelves with your own hands, then you need to choose the right fastenings for them. There are different types of such products. Let's look at the most popular of them.
What products can you attach homemade shelves to:
- There are special hidden fasteners. They hold up the shelf by being inside it.
- Brackets are the most common mounting method. You just need to calculate the load they can withstand.
- You can place the shelf on hinges and corners. There are decorative options for such products.
- There are special mounts for glass options. They are called shelf holders.
- There are also mounts with special perforations and guides for shelves.
Such fastenings can have a very decorative appearance. You need to be able to choose them correctly.