Reupholstering furniture with your own hands is a labor-intensive, long process that requires a wealth of experience and skills. For this reason, many people simply throw away old furniture, not realizing that they can restore it with their own hands. If you are good at working with your hands and have a rich imagination, reupholstering a chair with your own hands will not be difficult, especially if you follow the instructions.
Furniture restoration means restoring not only its functionality, but also its appearance.
Advantages of upholstering a chair with your own hands
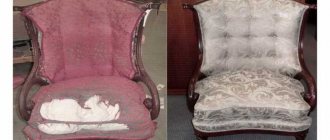
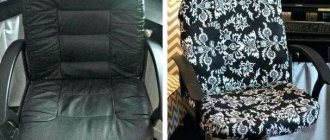
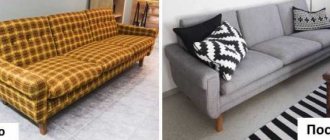
New life for an old but beloved chair with your own hands
Making something with your own hands is a fascinating process that allows you to unleash your creative potential. It is not for nothing that in the age of factory production, handmade products are valued higher than their factory counterparts. Such a thing will definitely attract the attention of guests and will decorate your interior.
An old chair with torn upholstery can be turned into a chic, exclusive piece of furniture.
Having decided to reupholster an old chair yourself, you are free to choose finishing materials, and you can also save on buying a new chair. Any design, texture, the only limitation is your fantasy and imagination. And things made with your own hands are much nicer and closer than those bought in a store.
Choice of upholstery fabric
Self-upholstery will help restore the product's attractiveness and save money. A standard chair becomes unique and designer. If you organize the process correctly, the entire work will take no more than one day. Restoration is necessary in certain situations:
- the filler has already changed shape;
- depressions appeared in the seat and back;
- there are stains or damage on the upholstery;
- The product does not match the style of the room.
First of all, reupholstering old chairs is needed to change the type of piece of furniture. The leading role is played by upholstery fabric. It must be durable, wear-resistant, and retain consumer qualities for a long time. The fabric must also keep its shape well, be cleaned of dirt, be dense and tear-resistant.
To re-tighten a product you do not need to have any special skills or experience, just follow the instructions carefully.
You can restore an old chair using any textile, leather, denim, flock, velor and other materials. If there are cats in the house, select raw materials that do not form snags on the surface (flock). For the children's room, where the risk of potential contamination is high, soft fabrics that are resistant to cleaning and abrasion (chenille, matting) are selected.
In the living room, more attractive options made of nubuck, tapestry, leather, and jacquard are appropriate. If there is a lot of smoking in the room, you should give preference to fabrics that do not absorb odor. The latter include chenille. An additional advantage of the upholstery will be moisture-repellent properties, Teflon or acrylic impregnation. The denser the product, the longer it will retain its original appearance.
Types and models of Ikea children's chairs, the best designs and colors
Flock
Chenille
Velours
Microfiber
Tapestry
Jacquard
Leather
Required set of tools
Necessary tools and materials for sewing a cover
Let's look at the set of tools needed to reupholster a chair. Prepare them in advance so as not to waste extra time.
A furniture stapler is the main working tool with which upholstery is attached to the frame. You can purchase it at any construction or hardware store at a low price. You need to buy special staples of the appropriate size for the stapler. It is better to take them with a reserve so that you do not have to interrupt the work process.
Foam rubber or batting - if the old filler has lost its former elasticity, it is necessary to replace it with a new one. Sold at a hardware or construction store.
Furniture filling – foam rubber
Batting for filling upholstered furniture
A flathead screwdriver or pry bar for removing old staples.
Minimum set of tools for furniture repair at home
A hammer, pliers, tailor's scissors, an adjustable wrench - all this will be needed to completely assemble and disassemble the chair.
Sewing machine, tailor's chalk or bar of soap, for sewing new upholstery.
You will need a sewing machine to sew a new chair cover.
A wire brush, coarse and fine sandpaper - for updating external wooden elements, as well as varnish or paint of the required shade.
Required materials and tools
Usually, not only the upholstery itself wears out, the filling also becomes unusable over time, so to restore the soft part you will need furniture fabric, padding polyester or batting and dense furniture foam rubber 3-5 cm thick, as well as strong reinforced threads, for example, lavsan. If the chair has exposed wooden parts from which the varnish has peeled off, they will also have to be restored using sandpaper and varnish or stain.
Tools needed:
- screwdriver (screwdriver), hammer, nail puller, pliers for disassembling and assembling the frame;
- an anti-stapler for dismantling old upholstery and a furniture stapler with staples for fixing new ones;
- sewing machine for sewing furniture covers;
- scissors and sewing accessories;
- tape measure for measurements.
You may also need new fasteners - nails, screws - the threads of old ones are often broken.
Disassembling the chair before restoration
Internal structure of an upholstered chair
Having prepared the entire set of tools, you can begin to disassemble the old chair. First of all, you need to lay it on its back to get to its bottom. Using a screwdriver, unscrew the legs and wooden armrests, if any.
We disassemble the bottom, for which we remove the old brackets. It is convenient to pick them up with a flat-head screwdriver and finally remove them using a pry bar. We remove the bottom upholstery, we need to get to the back of the seat. After this, we begin to remove the old upholstery using pliers. It is important to do everything with extreme caution, since the upholstery will be needed to cut new fabric.
Chair diagram for sewing new parts
To simplify the process, you need to mark the sequence of steps, this will be useful during reassembly. You can also mark which part was located where, so as not to get confused. Since the upholstery is secured with staples, we remove them using a flat-head screwdriver and a pry bar.
After dismantling the old fabric, you can evaluate the quality of the padding. If the foam rubber turns yellow and begins to crumble, it is better to replace it with a new one. If it has simply lost its shape, you can add a new layer of foam or batting on top. In places where fasteners remain, they should be removed for a better fit of the sheathing or filler.
Wooden chair frame
The process of sewing a new chair
We take measurements, make patterns, leaving seam allowances
The next step is to take measurements from the old upholstery using a tape measure and record them separately. Then we go to the store and buy a canvas of the appropriate size. At this stage, you can choose the material, texture, and pattern to suit your taste. It is advisable to take the canvas 10% longer than the required length. In any case, the excess can be cut off, but if the length is not enough, it will no longer be possible to sew it on. For fabric with a pattern, specifically take more fabric to match the pattern on all elements of the chair.
We cut out and cut out parts from the main fabric
We place the old upholstery parts on the fabric, outline them with tailor's chalk, leaving a small margin.
Stages of sewing the side part of a chair cover
If the fabric is woven or piled, pay attention to the correct direction of the pile: from top to bottom and from back to front.
Replace soft padding - synthetic padding or foam rubber
To create decorative folds, mark the folds of the fabric and use a sewing machine. Before sewing, secure each element to the chair frame with pins and check how it will look when finished. After a series of trials and experiments, you can begin the final sewing. Having cut out all the parts and brought them to their proper form, you can begin reupholstering.
We make cuts on the allowances in those places where one part is sewn to another
Stages of work
Upholstering the product at home is not difficult. The whole process comes down to disassembly, fabric cutting, trimming and assembly. Even novice masters can do it in a day. Recommendations will simplify the process.
If the design of the chair is too complex, it is useful to watch the rules for disassembling the product in the video instructions.
Step-by-step instructions are a complete guide to action. Before starting work, you should read it to the end, then organize your tools. After completion of the work, the product can be decorated to your liking.
What are the criteria for choosing computer chairs for adults and children?
Disassembling the product
Before upholstering an old chair, you need to disassemble it into separate parts. If you have no experience in assembling such models, it is recommended to record the process on paper or in the form of a photo report. Then there will be no problems with assembly at the final stage. Disassembly comes down to the following algorithm:
- dismantle all decorative elements;
- turn the product over, remove the legs;
- remove the fasteners, unscrew the screws and take out the nails;
- pull out old staples;
- remove the bottom.
Unscrew all parts of the structure gradually. The fabric is carefully removed so that it serves as a pattern for new upholstery. Self-upholstery can become part of restoration work. At this stage, you can replace rotten, damaged parts, and repair damaged areas.
A good filler can be left untouched, but a deformed one will have to be dismantled. Use a flat-head screwdriver to remove the staples and remove the foam. If it is glued, carefully cut it off in layers. All garbage and unusable material are sorted into bags so as not to litter the workspace.
Before continuing work, the product is cleaned of dust and damaged fittings are replaced. If necessary, cover the structure with protective compounds.
If you have to reupholster an office chair, the procedure does not change. Initially, all parts and decor are removed, the back and bottom are dismantled. Remove the upholstery and take out the filling. The only difference is in the design.
Cutting fabric
Replacing an old canvas with a new one involves preliminary cutting. You can transform the product with flock, jacquard, tapestry, leather, nubuck, chenille. The cutting method does not change depending on the type of material. A pattern can be created in two ways: tracing the old version, creating it from scratch by taking measurements. The first method eliminates the possibility of error. The process boils down to the following steps:
- Preparation. The old upholstery is ironed and laid out on a flat surface. For convenience, you can mark which part belongs to what.
- Open it up. Place the pieces on the new fabric, trace, and mark the hem allowance. It is advisable to overlock or hem the edges. This will extend the life of the upholstery. Cut out the details with tailor's scissors.
- Fitting. Place the parts on the chair, fold the edges for a hem, and check for correctness.
- Making adjustments. Cut off excess if necessary, add darts if the shape of the product is complex.
Stages of making a feeder chair with your own hands, finishing
You can also cut the foam rubber yourself to the shape of the old filler. Otherwise, the structural parts are cut to shape, leaving a few centimeters for fastening. An important condition is observed - upholstery fitting is carried out only on a structure with a filler.
Reupholstery and assembly
When all the decorative elements are updated, the parts are cut out, you can start reupholstering. Dust is removed from the structure and parts are prepared for assembly. Step-by-step instructions will tell you how to reupholster a chair with your own hands:
- foam rubber is applied and secured to the inside of the backrest;
- cut off the corners of the filler to make the corners smooth;
- apply batting and fix it with a stapler;
- stretch the materials so that there are no folds or distortions;
- apply the fabric and fasten it with a stapler;
- repeat the sequence of actions with the armrests and seat;
- attach the lower part and secure it.
Once the seats, armrests and backrest are reupholstered and the bottom panel is screwed down, you can put the updated decorative elements back in place. It is more difficult to work with the upholstery of leather chairs, since the leather has to be constantly stretched, preventing the formation of voids, folds, and distortion.
Reupholstering a chair is a simple step-by-step process that even a beginner can do. The main thing is to stock up on tools, choose the right fabric for upholstery and follow the instructions. It is useful to record all stages of disassembly so that there are no problems during assembly.
Re-upholstery: step-by-step instructions
Before reassembling and reupholstering, the external wooden elements should be renewed. To do this, remove the old paintwork using a wire brush or coarse sandpaper. Then clean these parts with fine-grained sandpaper and coat with varnish or paint of your choice.
Secure the new case with staples
Once again, try all the parts on the furniture using pins: if everything fits, you can start covering it. We begin the process from the place where we finished disassembling the chair. We fasten one end of the part to the frame using staples, starting from the center, leaving a distance of 10 centimeters at the edges. Having secured it, we stretch the fabric from the front side and check for the absence of folds. If everything is in order, we tighten it and fasten the remaining sides. Let's check the appearance again. If everything is in order, we attach the edges of the upholstery to the frame.
Secure the inner part of the seat with staples
Using the same principle, we fasten all the elements of the chair, observing the reverse order of disassembly. As a result, the fabric will completely wrap around the entire chair, and all the edges will be folded.
We make holes in the case for attaching the legs and screw the legs
Completely reupholstering furniture can take a lot of time, but the most important thing in this process is not to rush anywhere. It is important to note that different chairs have their own characteristics, so you will have to figure out many of the details yourself. The final result will definitely pay for all the reupholstery efforts and will delight you for a long time.
The finished chair after reupholstery with your own hands
Advantages and disadvantages of chair reupholstery
Before you update an old chair with your own hands, it is worth understanding all the pros and cons that the owner of such a piece of furniture receives.
If you are good at working with your hands and have a rich imagination, reupholstering a chair with your own hands will not be difficult, especially if you follow the instructions.
The positives include:
- For little money you can get a completely new, attractive looking product.
- When there is no financial opportunity, you can update the furniture, sparing the family budget.
- You can practice working with your hands, perhaps after this you will have a desire to make things and repair them yourself.
Disadvantages:
- You won't be able to buy completely new furniture this way. Therefore, it is impossible to talk about updating the interior style in this case.
- If you act ineptly, you can damage the product. And then you will have to make even greater efforts to restore it.
Furniture restoration means restoring not only its functionality, but also its appearance.
Perhaps restoration, based on its pros and cons, looks like a really winning move. Therefore, why not try to do it yourself. To do this, you first need to prepare the tools and buy fabric that you will like in appearance and will suit the interior. At the same time, do not forget to take into account the class that will allow it to serve for a long time in terms of its mechanical characteristics, and not break after a short period of use.
Such a thing will definitely attract the attention of guests and will decorate your interior.
Chair back restoration
We will separately consider repairing the backrest if it was broken for any reason. After completely dismantling the upholstery, you need to determine the cause of the breakdown. These could be loose fastening bolts that need to be tightened.
- If there is a crack in the frame, you can try to find a similar part and replace the broken one. Or carve a new one out of wood yourself.
- If the cause of the breakdown is a loose tie strap, you need to tighten it. To do this, remove one of the edges of the tape and stretch it evenly, after which we fasten it with staples.
- If the tapes have lost their previous properties, they must be replaced with new ones. The remaining excess is cut off with scissors so as not to spoil the appearance after reupholstering. You will get a beautiful chair without extra costs.