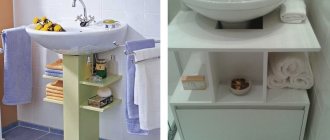
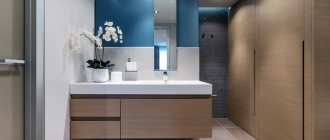
The design of a bathroom cannot be complete without elements such as bathroom shelves. They provide proper placement of space, compact storage of personal hygiene products, household chemicals and textiles. In addition, with their help you can conveniently hide utilities, plumbing and water pipes. Wall-mounted structures can even be placed next to a water source.
Shelves play a huge functional and aesthetic role in the bathroom interior
What types of bathroom shelves are there?
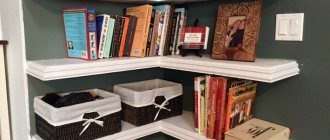
The shelf must be selected to match the interior, since not all structures can be mounted in the bathroom. The most popular options are floor-mounted stationary ones, on which household small items and other things are conveniently stored. In addition, we allow the installation of plumbing elements. The second most popular are multi-level corner ones: you can place creams, shower gels and other personal hygiene products on them. You can also compactly place hanging items above the washing machine. They are also used to place towels, bathrobes and other home textiles.
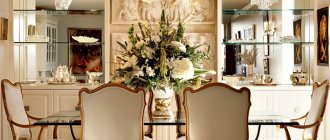
With proper selection and placement, shelves decorate the interior, become its accents and can even influence the visual perception of space
Photo of DIY bathroom shelves
Read here - DIY wardrobe bed - 120 photos and video instructions on how to make it and what materials will be needed to build the wardrobe
Did you like the article?
0
Main functions of a shelf in a bathroom
It doesn’t matter whether you have a Khrushchev-era apartment or a huge apartment designed by a designer, without shelves for compact storage of things in the bathroom, the room will be uncomfortable, and the overall picture of the interior will be incomplete. The main task of such an organizer is to ensure proper storage of household chemicals, small items, home textiles and decorative cosmetics, without cluttering surfaces and making a mess.
Shelves help keep the bathroom tidy and make the room more comfortable to use - thanks to them, everything you need is at hand
If you choose a shelf with lighting, you get decorative decoration and functionality in one: this design looks expensive, beautiful and performs several tasks at once. The room looks refined, and this small detail can set the tone for the entire interior.
Stylish shelf with a drying rack for storing towels
Glass bathroom shelf
Homemade glass shelf for the bathroom
A DIY glass bathroom shelf is one of the easiest options to create. In addition, it is a beautiful interior element that is very suitable for the bathroom.
- To implement them, first of all you need to decide on the size of the shelves and the place where they will be located.
- Having decided on the size, all that remains is to order pieces of glass from a glazier, or cut it yourself. You can also buy ready-made glass shelves in the store, thus the safety issue is immediately resolved, since they are made of special shockproof glass.
Tip: If you decide to do everything from start to finish with your own hands, you can get by with ordinary glass. For safety, it is enough to cover it with a special film.
- All that remains is to securely fasten the glass shelves. For this purpose, special holders with a glass clamp are usually used. Such fastening of shelves in the bathroom can be ordinary or with decorative finishing. They are mounted on the same horizontal level, along the width of the shelf, using dowels.
Where is the best place to place a bathroom shelf?
A shelf for a bathroom should be purchased according to the design and parameters of the room; its compact placement depends on this. It must be installed so that everything you need is at hand: near the bathtub or shower, above or under the sink.
Thanks to the use of shelves, even a small bathroom becomes comfortable and functional
If you don’t want to drill into the tiles, you can carefully attach the shelf using suction cups. The height should be optimal so that it is comfortable to reach with your hand. If the structure has hinged doors, it must be secured so that opening the doors does not interfere with standing nearby.
A bathtub screen with shelves or drawers is an excellent solution to save space and organize things wisely
Corner shelves in the bathroom
Corner shelves are most often placed near the mirror, on the side of the sink, or inside the shower stall.
As a rule, these are multi-tiered structures with several rows of fastenings. Shelves for the shower stall have a number of holes on each tier for water drainage.
Choosing shelves for different interior styles
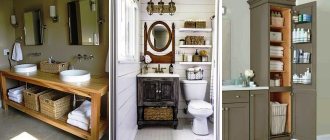
The style in which the room is decorated plays a leading role in the choice of interior items. The bathroom is most often decorated in high-tech, country, and minimalist styles. If this is a classic direction, wooden products treated with a special impregnation to repel moisture would be ideal.
Shelves must be chosen in the general stylistic direction of the bathroom interior
If your bathroom is decorated in a light Provence style, choose a plastic design. Open shelves in the bathroom in pastel shades look simple and aesthetically pleasing; photos selected to match the design can be viewed on the Internet.
Simple shelves placed in a niche in a Provence style bathroom
Colors for bathroom shelves
To choose the right color for your bathroom cabinets, you can use one of the methods for combining shades. To do this you will need the Itten color wheel. So, possible combinations:
- complementary. It is based on a combination of contrasting colors, that is, located on opposite sides of the circle. For example, in a room with pale blue walls you can hang a light pink shelf, in a room with orange walls you can hang a blue-violet one, etc.;
- triad. Three shades are combined, located at equal distances from each other. The effect of contrast is obtained, but harmony is preserved. One of the possible combinations according to the circle is light purple, orange and blue-green;
- analogy. In one room, colors (from 2 to 5) are combined, located nearby on sectors of the circle. Such bathrooms look calm and measured. Example: blue-green, green, yellow-green, yellow, yellow-orange;
- tetrad. Four colors are combined, the first of which is the main one, two are additional, and the fourth is accent. For example, a combination of blue-green, red-orange, blue-violet and yellow-orange will look good;
- square. A combination of four shades that are equidistant from each other (they can be connected by a square). In this case, the colors will be complementary, although different in tone. The bathroom will be bright, lively and dynamic. Example combination: yellow, purple, blue-green, red-orange.
Based on these rules, you can choose shelves for the bathroom. It must be borne in mind that only products made of plastic and MDF differ in color variety.
Open and closed
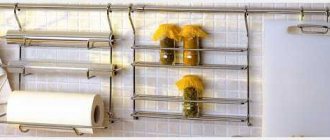
If we talk about open models, such shelves are distinguished by the absence of doors and walls on the sides. This is the most convenient device for placing the main necessary parts: shower gel, shampoo, soap, etc. Most often, open shelves can be wall-mounted, forged, or glass. They are supplemented with special hangers and hooks for washcloths, and grilles.
Open shelves are primarily intended for storing items used daily
Closed structures are complemented by cabinets with sides, top lids and doors (sliding, compartment-type or simple hinged). If desired, you can install lighting.
If the bathroom is small, the ideal solution is a closed cabinet - a compartment, with a built-in grille or hooks, which is compact in size and does not take up additional space with hinged doors.
Very convenient and practical designs with pull-out shelves that can be placed in any nook and cranny of the bathroom
Corner floating shelves on the wall
Decorative corner shelves, which are intended for the bathroom, can be of several variations: cabinets, racks or shelves. They are similar in appearance to floor structures, but differ in shape - they look like a triangle, and the facade is located at an acute angle towards the two walls of the room. The most common option is a simple corner shelf, which is compactly placed in any corner of the room, perhaps even above the bathtub or toilet.
These shelves are quite durable and designed to hold fairly heavy objects. The material for their manufacture can be plastic, metal, wood, glass or all sorts of combinations
There are convenient options for placement inside the shower stall, but you need to carefully select the material of manufacture: wood, MDF, chrome surfaces will not work - they do not tolerate large amounts of moisture.
How to make a shelf with your own hands?
You can make shelves with your own hands in the following ways:
- purchase materials and then cut out design parts from them;
- buy ready-made shelf elements and then assemble them.
You can buy ready-made panels for assembling a shelf
We will look at the most optimal ways to create shelves with your own hands from various materials.
Glass shelf
A distinctive feature of glass shelves is their easy installation. Typically, such structures are mounted on special holders.
To make a shelf you will need the following:
- glass with a thickness of at least 4-5 millimeters;
- dowels;
- fasteners;
- installation tools.
Only durable glass may be used
Prices for glass for shelves
Glass for shelf
Video - A simple way to make a glass shelf
Step-by-step instruction
Step 1. It is necessary to cut out the base of the structure according to the template. To do this, you will have to first measure the distance on the wall so that the shelf fits there without any problems.
It is necessary to cut out the base of the structure according to the template
Step 2. After which you will need to cut out the glass and carefully process its sharp edges. If you do not have the skills to work with this material, it is better to order parts from a specialist.
Sharp glass edges need to be processed
Step 3. It is necessary to mark the place where the shelf is attached to the wall. It is important to correctly determine the height of the structure. Usually the shelf is hung at a distance inaccessible to small children. In addition, it should be remembered that the structure is installed only in a horizontal position.
Determining the height of the structure
Step 4. The next step will be installing the fasteners. Typically, part of the holder is mounted into the wall, and the other is fixed to the shelf. All this work is carried out using dowels and a building level. For a small shelf you only need a couple of holders. While a large product will have to be secured to several such elements for greater reliability.
Installing fasteners using dowels
Step 5. The final step is to install the glass shelf on the holders. These are the simplest actions that do not require professionalism.
Installing a glass shelf
Plasterboard shelf
An equally simple but popular method is to make shelves from plasterboard. This material allows you to create products of various configurations.
Advantages of plasterboard shelves
To make the structure you will need the following materials and tools:
- profiles: carrier (PN) and guide (PP);
- dowels;
- slats;
- self-tapping screws;
- plasterboard panels;
- primer;
- set of tools for installation;
- emery cloth;
- brushes and spatulas.
Materials and tools for work
Prices for the range of drills
Drill
Step-by-step instruction.
Step 1. Based on preliminary markings, holes should be made in the wall where the dowels will be fixed. Their diameter should be 10-15 millimeters larger than the dowels. In this case, it is necessary to leave a distance of about 100-150 millimeters between them.
Holes for dowels
Step 2. Next, place dowels in the prepared holes and hammer them into the wall. Then you need to adjust the PP profile to size by attaching it to the wall according to the markings of the fasteners. Then the self-tapping screw with a washer should be inserted into the profile hole and secured tightly to the dowel itself. The same actions must be done with other fastening points. You can check the correctness of the profile fastening using a building level.
It is necessary to adjust the profile to size by attaching it to the wall
Step 3. The PP profile acts as a fastener and guides the entire structure. It is fixed to two walls at once, where an angle is formed, which is fixed with self-tapping screws. The PN profile will need to be pre-cut to obtain two longitudinal parts and four cross members (the length of the shelf will be 12 centimeters, and they are fixed every 4 centimeters).
The profile must be fixed on two walls
Step between profiles
Step 4. Longitudinal slats are placed in the PP profile. In this case, one of them is laid with the viewing side outward, and the other inward. Then they should be fixed in this position with self-tapping screws. It should be borne in mind that this design is not durable, so it is further reinforced.
Longitudinal slats in the profile
Step 5. Following from the edge, additional strips must be installed along the entire wall every 400 millimeters (they are held in place by fastening with self-tapping screws and dowels). Their dimensions will differ depending on the size of the shelf itself (the size must match). Then you will need to secure the lower points of the planks with the outer parts of the longitudinal ones. This can be done using a PN profile, the size of which is determined by calculations.
Attaching additional strips
Step 6. The ends of the PN profile must be connected to reinforcing slats and inserted under the front part of the longitudinal strip. Thus, the profile should be fixed at four points on all sides. Thanks to this fastening, the shelves will withstand even heavy loads.
Due to fastening, the profile can withstand large loads
Step 7. Then you will need to cut sheets of moisture-resistant drywall to the dimensions of the resulting frame. To cover the structure you will need to prepare 5 parts. First, fix the bottom one, and then form a common box. In addition, it is necessary to make shaped grooves under the fixing slats, and only then secure the drywall using self-tapping screws.
Formation of a common box
Step 8. Make the overlays on the sides in the same way. In order to secure them you will need to use 4 self-tapping screws. Finally, the top sheet of drywall is installed, after which the product takes on a normal appearance. Some craftsmen also cover the retaining strips with plasterboard or paint over them.
Fixing the side panels with self-tapping screws
Step 9. The finished structure requires further finishing. First of all, you will need to cover all the joints of the drywall.
Finishing the finished structure
Finishing a plasterboard shelf.
Step-by-step instructions for finishing a plasterboard shelf:
Step 1. The finished structure should be coated with several layers of primer.
Primer coating
Step 2. Carefully mask all joints. This must be done especially carefully, otherwise cracks may appear.
Masking joints
Step 3. You need to install perforated corners in the corners and then secure them with plaster. For various shaped structures, you can purchase special flexible arched corners (they bend along sections without any problems).
Perforated corner
Step 4. Then you need to putty the entire structure and leave it until completely dry. A day later, carefully seal the shelves on all sides again.
Putty construction
Step 5. After the last layer has dried, you need to go over the entire structure with sandpaper.
It is necessary to walk with sandpaper on the dry surface.
Step 6: Apply a coat of primer to the sanded shelves.
Shelves need to be primed
Step 7. Cover the shelves with decorative plaster, and then paint them in any color of your choice.
Decorative plaster
Prices for various types of decorative plaster
Decorative plaster
Corner shelf made of MDF
To make a corner shelf you will need to prepare the following:
- MDF sheets;
- electric jigsaw;
- screwdriver;
- set of tools;
- sandpaper;
- building level;
- screws;
- dowels;
- pencil;
- construction compass;
- putty knife;
- primer;
- paint.
Important! If wood is used instead of MDF to make the structure, then it must be pre-treated (dried and planed).
Table No. 3. Sequence of making a corner shelf.
| Illustration | Description |
| It is necessary to calculate and mark the structure on an MDF sheet. To do this, use a construction compass or a pencil with a rope. You will need to draw a circle according to the selected parameters, which will be divided into 4 parts. | |
| We cut MDF sheets using an electric jigsaw. This must be done very carefully, following exactly the markings, otherwise the shelf will be crooked. The edges of future shelves at this stage have irregularities that should be sanded with sandpaper. | |
| Next we have to assemble the entire corner structure. For such purposes, horizontal and vertical elements are used, and their end part must be rectangular. | |
| You should once again make sure that the geometry of the structure is correct using a level, and only then make holes for the fasteners. | |
| You will need to tighten the screws on the sides of the workpieces. Then connect all these parts, securing the bottom and side elements. The correctness of their location can be checked again using a building level. | |
| Finished shelves can be coated with moisture-resistant paint or covered with a special polymer film. | |
| Then all that remains is to make holes in the wall, secure the dowels and the shelf itself. |
Detailed diagram for making a corner shelf
Prices for popular models of screwdrivers
Screwdrivers
Video - How to hang a corner shelf in the bathroom
Bathroom shelf made of wooden pallet
When choosing a wooden shelf option for your bathroom, you shouldn’t settle for typical box-shaped designs. Currently, there are a huge number of different design solutions. An unusual shelf, which has a decorative appearance, can even be made from a pallet.
To do this you will need the following:
- wooden pallet;
- fasteners;
- circular or hand saw;
- dye;
- brushes
Step-by-step instruction.
Step 1. It is necessary to disassemble the pallet into parts.
Wooden pallet
Step 2. Next, use a saw to cut the stand with dense blocks of wood. As a result, there will be a plank at each end.
Cutting off a piece with a saw
Step 3. Next, you will need to cut out any of the remaining blocks to use for installing the shelves.
Need to cut a block of wood
Step 4. You can use a single board from a pallet to make shelving, dividing it in half. The remaining part is used for the middle shelf.
Fastening shelves to boards
Step 5. Next, you need to attach the shelf to the wall without fastenings to see how it will look in the end.
Shelf on the wall
Step 6. Then you should paint the structure with moisture-resistant paint in several layers.
Moisture-resistant paint treatment
Step 7. After which the shelf should be screwed onto the support block.
Securing the shelf with screws
Step 8: Place various accessories on the shelf to test its strength.
It is necessary to check the strength of the shelf
Important! Any wooden shelf can be covered with stain and then several layers of varnish. This treatment will reliably protect the structure from moisture.
Pipe rack
This is a fairly simple design; to make it you will need to prepare:
- grinder;
- locksmith tools;
- pipes: 30, 26, 46.70 centimeters;
- cross pipes (20 centimeters);
- tees;
- knee;
- flanges;
- plywood sheet;
- paint.
Step-by-step instruction.
Step 1. First, you need to prepare the parts for future shelves, which are cut from plywood to size.
It is necessary to cut parts from plywood
Step 2. You need to make holes in the shelves for the pipes, and then carefully sand them and paint them.
Need to make holes for pipes
Step 3. Flanges should be installed at the ends of the pipes, then tees, and then a transverse pipe with an elbow.
Pipe fastenings
Step 4. Attach another part of the pipe on top, and then install the shelf. The remaining parts of the rack should be assembled in the same way, fixing the flanges to the upper ends.
Shelf installation
Step 5. The correct location of all structural elements can be checked using a level.
Level
Example of a finished design
Wall-mounted or mounted
Suspended wall-mounted structures are ideally combined with small-sized rooms - this is a good design solution when there is a shortage of free space. There are many options for such designs:
- dryers;
- wall-mounted closed cabinets;
- towel dryers;
- small shelves;
- steel hangers.
You can store light items on hanging shelves, but for heavy ones it is better to use built-in or floor-mounted structures
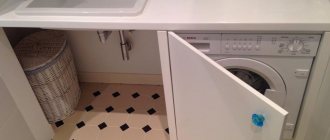
Cabinets are located above the plumbing, washing machine or sink. You can choose any interior solution. They provide order and help avoid clutter, giving the room comfort. Materials that are used most often: chipboard, in rare cases plastic or mirror.
Floor structures
There are a lot of options here:
- racks;
- bookcases;
- dryers;
- cabinets;
- shelves above the bath;
- shelves for the bathroom.
Each of the options has its own subtleties and nuances, directly dependent on the purpose of the product. If we talk about a bookcase, then with their help you can competently fill the free space and compactly place all the items inside. If free areas have formed under the washbasin or bathtub, a small floor structure will look harmonious in the set.
Floor shelves will come in handy in a spacious bathroom
Corner models of floor shelves will fit well into a small bathroom
There may also be options for open shelves that are connected to each other by a stainless steel frame. Used for storing home textiles, bed linen or towels. On the lower tiers of the shelves there is space for storing household chemicals and cosmetics.
Specially designed floor shelves designed for installation above a toilet or above a washing machine
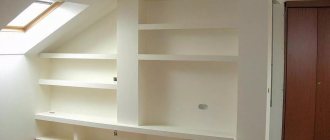
Built-in shelves
Built-in products are the best option for a small bathroom. This way you can save space, arrange things and create a cozy atmosphere. Focus on the thickness of the walls - the depth of the structure depends on this. It is possible to make a combined type model: slightly extend some of the shelves. Installation is carried out anywhere in the room. It looks aesthetically pleasing, neat and original. For decoration, you can use decorative stone or lay out a mosaic.
Built-in shelves are placed in niches and can be made of the same material as the niche, as well as glass, wood or stainless steel
Built-in shelves in the bathroom
One attractive option for DIYers is built-ins. This is the ideal solution for a small room. Creating a shelf in the bathroom wall provides an opportunity to completely save space and provide proper comfort. The thickness of the walls limits the depth of the structure. If it is not enough for convenience, you can make a combined model, pull out some of the shelves, providing the required dimensions.
Built-in shelves save bathroom space
You can choose any convenient location to equip the built-in shelf. It can be located above the sink or bathtub and used to place hygiene products. This will ensure ease of use.
A shelf in the wall performs not only practical, but also decorative functions. Beautiful interior decoration of a niche and the creation of lighting turns it into a spectacular interior accent, an original decoration. Tiled bathroom shelves look attractive. In this design the following can be used:
- mosaic,
- porcelain stoneware,
- artificial stone, etc.
Tile bathroom shelves
A mirror is often used for the back wall. It will provide maximum attractiveness and visually expand the room.
Creating a built-in structure requires a responsible approach. Wall and floor models can be altered if necessary. Adjusting a niche in the wall will be more difficult. Before you start creating it, you need to develop a sketch of the future shelves. The configuration of the niche, its size, and location are carefully selected. At this stage, materials for finishing and making shelves are selected.
Those wishing to create built-in shelves in the bathroom should take into account that such work requires skill and experience. Without special equipment and skills, it is impossible to perform it efficiently. It is advisable to contact a company specializing in repairs and entrust the design of the structure to qualified specialists.
How to choose the material for bathroom shelves
You must select the material solely to suit your taste. It is important to consider moisture resistance, strength and the number of items that will be located on the shelves.
The closer the shelf is located to the water source, the more moisture resistant the material for its manufacture should be.
Glass shelves
Glass has excellent performance characteristics and visually makes the room wider. This is a very thin and fragile material that must be used wisely: it may not withstand heavy loads on the base. Glass models require additional care, careful and careful handling. There are a lot of designs of such structures, so everyone can choose something for themselves. The combination of glass with chrome surfaces and a wooden frame looks great.
Illuminated glass shelves look especially attractive and can become the highlight of a bathroom interior.
Bathroom shelf made of PVC pipes
Plastic products are easy to use and easy to maintain. They can be painted as you wish and given any shape. But it is worth remembering that plastic loses its original shape over time. Despite this disadvantage, such products are very popular among buyers. When choosing, you need to take into account several details: the manufacturing company and quality, since plastic does not always have a good cost-quality ratio. A good option is shelves with small holes that allow excess liquid to drain.
You can make such a shelf from PVC pipes with your own hands
Metal shelves
Embedding a metal shelf is an ideal solution, as it has an excellent aesthetic appearance, is characterized by wear resistance and good technical characteristics. The only drawback: metal products corrode over time and a limescale deposit forms on them. In addition, the shelves are much more expensive than plastic or other similar models. They are a little more difficult to care for, which is also important.
Chrome bathroom shelf in modern style
Experts recommend buying metal shelves with a chrome coating - a special composition will help avoid the appearance of plaque, rye, and maintain the appearance in perfect condition.
Choose chrome shelves for a high-tech style bathroom. If the shelf is forged, it will look great in the Provence or Country style.
Hanging shelf on a metal frame with wooden drawers for a retro-style bathroom
Wooden shelves
Wood is an environmentally friendly material that fits perfectly into different styles. It is pre-treated, making it resistant to moisture, and varnished. This shelf will look harmonious in any bathroom.
Wooden shelves will be appreciated by lovers of comfort and adherents of natural materials.
Velcro shelves
There is a good and budget alternative to expensive designs - shelves with suction cups. They are suitable for any room and can be of different shapes. They are easy to install and dismantle, remove for maintenance (washing) and move to another corner of the room.
Shelves with suction cups are designed for small things - sponges, brushes, small bottles and vials
There are metal corner or non-corner shelves with Velcro, plastic is used. Depending on your needs, you can choose multi-tiered or single-tiered; the total number varies from 1 to 6 levels. Focus on the size of the bathroom - perhaps 1 or 2 tiers are enough.
Glass and ceramics
The ceramic product looks neat and expensive, is easy to care for and easy to install.
Ceramic toothbrush rack with towel rack
Finding your ideal shelf is not difficult: the modern market offers a lot of variations for any interior solution. Focus on its purpose: compact and convenient arrangement of all the necessary little things, household chemicals and cosmetics.
Types of shelves in the bathroom
Wall shelves and shelves for the bathroom differ in a number of indicators. These include:
- installation method;
- material of manufacture;
- form;
- style;
- size.
The choice of design will depend on the size and interior of the room, as well as who lives in the apartment. For example, if a man lives alone, he is unlikely to need a large hanging wardrobe. But if the house is inhabited by a large family, in which the gender is also predominant, it makes sense to think about purchasing spacious shelves. According to the shape of the product there are:
- oval and round. Smooth shapes will add softness to the interior and will organically fit into rooms made in delicate pastel colors;
- triangular. Installed in corners, designed to save space and store washing supplies;
- rectangular and square. Universal, placed both on walls and on the floor. They are used for storing accessories and textiles.
If the room is small, it is advisable to place small round shelves in it. If the room is of impressive size, it can accommodate large cabinets of almost any shape.
Depending on the type of installation, there are wall-mounted, built-in, corner and floor-mounted structures. Plastic, glass, metal and wood are used as manufacturing materials.
Mounted
Such shelves in the bathroom allow you not only to store a lot of things, but also do an excellent job of zoning the room. These include all kinds of organizers for pastes and toothbrushes, and full-fledged multi-tiered structures for shampoos, gels or even textiles. If the size of the room allows, you can hang the rack anywhere, and if the bathroom is small, then it is better to place the shelves on walls that are partially occupied. For example, above the toilet, sink or washing machine.
Built-in
An excellent option for small apartments. Usually shelves are built into niches, which allows you to store a large number of items in the recess. To create such a cabinet, you can choose any convenient place in the room. For example, between the mirror and the bathroom. It performs not only a practical, but also an aesthetic function: the niche can be interestingly decorated from the inside, combining the design with the style of the room. So the recess can become a bright accent, emphasizing the originality of the bathroom. The shelves are finished with artificial stone, tiles, mosaics, porcelain tiles, etc. Sometimes a mirror is placed on the back wall - this technique helps to visually expand the space.
Corner
Another option that can significantly save space. Corner shelves in a plastic bathroom can be located directly above the bathtub so that it is convenient to take shampoos, gels and other items from them while washing. There are one-, two-, three-tier and more. These are practical and functional designs that help expand the working space of the room.