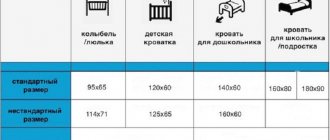
Advantages and disadvantages of toy storage furniture
Shelves and chests of drawers for children's rooms are multifunctional and suitable for a child of any age. They fit a lot of supplies: for school, creativity, toys or bedding. The furniture is ergonomic: convenient placement of things and minimal waste of free space.
An option for storing toys, in addition to regular boxes, is a rack.
The following advantages can be highlighted:
- Safety, environmental friendliness. Modern materials meet all criteria, do not cause allergic reactions, and do not emit harmful toxins.
- Exclusive execution (if made independently), wide selection of models (if selected in stores).
- Unique appearance - ships, animals, trees.
- Ease of use.
For the baby, the most important thing is the atmosphere of the room, where he feels comfortable, first of all, with his favorite things.
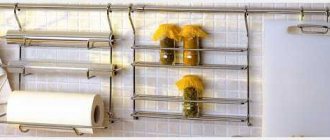
It is convenient to place wooden and collectible toys and books on open shelves. You can hide construction sets or cubes in the drawers.
Making a rack with your own hands means being able to provide all the child’s preferences.
Depending on the type of furniture, there are the following disadvantages:
- plastic chests of drawers should not be overloaded;
- furniture made from natural wood is too heavy and uncomfortable for children to use independently;
- drawers without stops can cause injury;
- When made independently, textile finishing collects a lot of dust.
You need to purchase shelves and shelves taking into account the individual characteristics of the child, his age and independence.
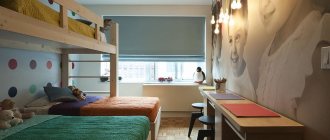
It's hard to imagine a children's room without a shelving unit.
Decoration in different styles
Products in a classic style are the most presentable and elegant.
Manufactured shelves can be designed in various styles, each of which has certain characteristics. Among the most popular styles are the following:
- Classical. This is a common furniture design style that has been popular for many years. Most often, designs made in a classic style are made of natural wood. This material gives the shelves elegance and presentability. To decorate such shelves, many manufacturers use forged metal elements or moldings.
- Nautical. This style is less popular, but is still often used in shelving. Marine style models are made of light wood. Such products are painted in light colors with a bluish tint.
- Provence. All shelves in Provence style differ from other models in their unique vintage design. Sometimes they have quite unusual decor using paintings.
Shelves made in Provence style are more suitable for teenagers' rooms.
What material can it be made from?
Making furniture for compact storage of things and toys in a nursery with your own hands is not so difficult. Consider the age and gender of the child, the number of toys, and health status (some coatings may cause allergies).
The design and construction of a toy storage rack must be chosen based on personal needs.
First: decide on the material of manufacture. It could be:
- natural wood;
- laminated chipboard;
- plastic;
- metal;
- cardboard;
- MDF.
Important! If you have to work on wood, you will need certain processing skills.
The absence of sharp corners and protruding parts will reduce the risk of injury to a minimum.
Depending on the type of building material used, the following tools may be useful:
- jigsaw;
- drill;
- Sander;
- hammer;
- roulette;
- wood glue;
- hacksaw;
- fasteners;
- drills of different diameters;
- metal corners;
- picture baguettes;
- miter box and others.
It is recommended to give preference to wood: it is easy to work with, it is characterized by durability and environmental friendliness, and can withstand mechanical damage. Before you start work, you need to create a drawing of the future piece of furniture. Indicate on the diagram the dimensions and all mounting options for parts.
Depending on the type of rack, the materials and tools used in production will vary.
DIY narrow shelf for books made from planks
Books can not only enrich a person’s inner world, but also decorate a room. Bright covers placed on the shelf will become an original decorative element that will attract all the attention.
To store small children's books, you can make a narrow shelf from planks
The ideal solution for placing books is to install narrow slats. A distinctive feature of such shelves is their width, which allows you to place a book only with the cover first. Such a library will definitely attract the child’s attention, helping to instill a love of reading.
Narrow planks are constructed of three parts: a supporting element, a shelf surface and a small side. Attached to the wall using regular self-tapping screws. This bookshelf can also be used to display a collection of cars or store souvenirs.
How to make toy storage shelves
You can make a creative hanging shelf in the shape of a cartoon character, a child’s favorite item, or fruit. Draw the base on paper in advance so that you can then transfer it to the wood. You will need:
- large sheet of plywood;
- fasteners: nails, screws, dowels;
- structure holders;
- building level and ruler;
- drill;
- emery;
- everything for decoration.
Depending on the gender of the children, the design of the children's toy rack will vary.
After applying the design, you need to carefully cut it out, and mark areas for further cutting on the second sheet of material. The blanks are fastened together, the design is cut out with a jigsaw.
Important! Before assembly begins, each element must be sanded.
Use nails and self-tapping screws to mount all the parts, having previously marked the areas where the holders will be located. Upon completion of assembly, the furniture is painted, varnished, and after complete drying it is attached to the wall with dowels.
Furniture for girls should be more romantic, in bright colors, with a variety of decorations.
Manufacturing of shelving
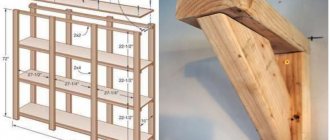
Let's look at how to quickly make a beautiful rack for storing toys with your own hands. The structure must be stable, with strong support. There should be no sharp protruding parts or corners on the surface - it is important to minimize the possibility of a child getting injured.
Having decided on the type, design and construction of the toy storage rack, you need to make a sketch of it.
The creation process looks like this:
- draw a drawing with dimensions;
- prepare all parts separately;
- assemble the frame: upper, lower and side shelves;
- drill grooves on the shelves with dividers;
- generously lubricate the joint areas with adhesive and dry;
- connect the shelves using nails;
- Assemble the rack and sand it down.
The back wall can be cut out of plywood and attached with small nails for furniture assembly. Decorate the finished product to your taste: painting, carving, drawings using stencils.
You can initially make a shelving unit for a children's room with your own hands in such a way that, as the child grows up, it will grow with him.
Important! A wooden piece of furniture must be additionally secured to the wall with metal corners to ensure stability.
Creating a Storage Cabinet
The best option for a nursery cabinet is made of plywood. The material is environmentally friendly and practical, does not dry out, and does not lose its original appearance. Depending on the need, the thickness of the sheet can be selected individually.
The toy storage item should fit organically into the overall interior of the room.
Advice! To make such furniture, it is important to think through the shape and design in advance and prepare the tools.
To get an original cabinet, you need to make blanks in advance: cut out the shelves and two sides. Holes are made in the walls for attaching shelves, according to the width of the plywood itself. If the thickness is less than 2 cm, you can attach the shelves to the structure with small metal corners. The assembly algorithm looks like this:
- two bases are connected: lower and upper (using furniture bolts);
- shelves are inserted.
Such cabinets will serve as a good alternative to a regular box.
As you can see, everything is simple. You can mount two planks on top, connected at right angles, and give the finished product the shape of a house.
Making a chest of drawers for toys
The design of the chest of drawers can be different, depending on preferences. The material used is only environmentally friendly: chipboard, plywood, wood. You need to make a drawing with dimensions, purchase consumables and get to work. The tools you will need are a drill, a building level, fasteners and a jigsaw. Design the drawers: decide on the width and depth, and the height of the sides of the chest of drawers. A good solution: a chest of drawers with a door on top - for large toys.
Depending on the gender of the children, the design of the children's toy rack will vary.
Important! The fittings must be of high quality: durable, smooth and comfortable for a child’s hand.
First of all, the frame is assembled, then the side guides are fixed. Third stage: cutting out the boxes and installing them together. The bottom is secured with furniture nails. The last thing to do is install the facades. You can view detailed step-by-step assembly instructions on the Internet.
To equip a structure with drawers, it is important to accurately determine their dimensions.
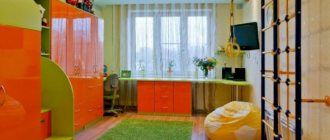
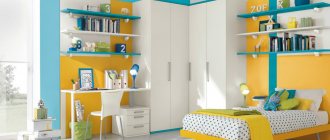
Colors
The most common option is white shelves, which harmoniously complement any stylistic decision of the nursery and are advantageously combined with various shades. These products can blend in with the wall decoration or, on the contrary, create unusual contrasts. No less popular is the use of designs in blue tones, which have a positive calming and calming effect.
The interior of a child's room can be diluted with colored shelves in bright yellow, orange, red, green or other more saturated colors. Thus, it turns out to significantly enliven the nursery environment and create a truly rosy atmosphere in it.
Design ideas
The choice of furniture design depends on the age and gender of the baby. From 1 to 3 years, one section with shelves is enough, from 3 to 6 - you will need drawers and boxes. For older children, from 6 and above, shelving on half the wall would be a good solution. Boys will be delighted with a rack in the shape of a ship or a fortress, a car garage or an airplane. For girls, bright castles, towers, and houses are suitable, in which you can not only store toys, but also convert them into a mansion for Barbie.
Depending on who the children's toy storage rack is intended for, as well as the interior of the room, its decor is also made.
Advice! Students are advised to choose a neutral color scheme for furniture that can be added with new shelves.
Choice of colors
Yellow shelves - go well with red, blue and green designs.
It is very important to choose the right color scheme for a shelf on the wall in the nursery. Most often, the following colors are used in the manufacture of shelving:
- Red. This shade is suitable for a schoolchild's room. It promotes the child’s activity and encourages him to engage in various activities, including lessons. Children who like red are often more active and purposeful.
- Orange. This color symbolizes comfort, friendliness and health. In rooms where orange colors predominate, a pleasant and warm atmosphere reigns. Many psychologists believe that this shade stimulates brain activity and promotes learning. Therefore, shelves that are painted orange are recommended to be installed above the desk.
- Yellow. This shade symbolizes cheerfulness and joy. Yellow color can awaken in a child a desire to do something interesting and useful. This color goes well with red, green and blue. This color scheme creates a feeling of safety and security.
- Green. The greenish tint symbolizes cheerfulness and fun. Using a green color scheme will allow you to redo the decor of the shelf in the future and make it, for example, in the form of tree bark.
- Blue. This color scheme promotes relaxation and rest. Shelves painted blue should be hung above the child's desk, where he does his homework. You can also hang it above your crib, as the bluish tint helps you fall asleep faster.
- Blue. The color symbolizes harmony. Many child psychologists claim that blue helps children become more productive.
If a child chooses furniture painted blue, it means he has a desire to learn something new.
50 design options for shelves and racks in the nursery
Girl's shelf-house: master class on making
A multifunctional dollhouse will be a great gift for a little princess. This design can be used both for playing and for storing various things.
An unusual shelf house will be a great gift for a little princess
To make a shelf house you will need:
- Wood panels;
- Plywood (thickness 10 mm);
- Euroscrews;
- Tools;
- Dye;
- Decoration materials.
The first step is to decide on the design of the future house. There are various options for drawings on the Internet: you should choose any one and use it to make parts from wood panels, which are then fastened with Euroscrews.
Don't skimp on interesting decorative elements. Railings and openings in the house can be made from wooden rulers; ready-made twisted parts can be used for fencing. Window frames must be decorated with corners. Thanks to this, the product will take on a finished look.
The roof can be made of plywood with cardboard “tiles” laid on top. Finish the parts with special acrylic paint. For realism, you can add a flashlight to the veranda or attic of your house by making it from a small light bulb and a lampshade. Hide the batteries in a niche under the ceiling or roof.