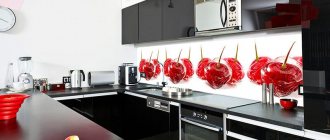
Built-in household appliances have appeared in kitchens relatively recently. But she took her place firmly and for a long time. This fully applies to such a household appliance as a kitchen hood. After all, in the interior of a room, it is important to follow certain rules for creating a design so that not a single part of it contradicts the general concept. And in this regard, there is no better option. Therefore, the relevant question is how to install a built-in hood and what points you should focus on.
The first thing you need to know: the household appliance is not installed completely closed in the kitchen cabinet. The lower part of the hood and the control panel should always be visible. This is done so that the first one functions correctly, the second one for ease of use, control and setting of modes. Therefore, a special cabinet is needed for a built-in hood - without a bottom plane.
The second thing you need to pay attention to is the height of the suspension:
- If an electric hob is used in an apartment or house, the hood is installed at a height of 60-70 centimeters above the surface of the panel.
- If a gas stove is used, then the height must be increased to 85 centimeters. This is a requirement of fire safety regulations. An open fire can negatively affect the device, and if the flame is high, it can catch fire.
Third is the interior design of the room. Most often, built-in models are flow-through. The design is designed in such a way that air contaminated with particles of food, oil and fat, as well as steam, is immediately removed outside the kitchen into the ventilation system. This means that the hood is equipped with air ducts through which polluted air is removed from the device. Today, aluminum corrugations and plastic pipes of round or rectangular cross-section are used as air ducts. Metal air ducts are gradually disappearing from the market due to their high price compared to plastic ones.
Read also: How to choose a kitchen hood with a ventilation outlet?
These are the three main criteria that will influence the design features of such a piece of furniture as a hood cabinet. We'll talk about it further.
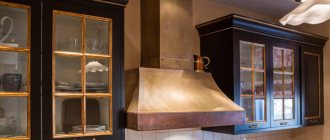
Features of the built-in hood
A built-in hood saves space in the kitchen and fits harmoniously into the interior.
In order to increase free space, people buy built-in appliances. A kitchen hood can also be installed in furniture and not make changes to the interior of the room.
The design of a suspended hood contains the following elements:
- The fan is responsible for displacing purified air.
- Carbon filter – cleans air masses and eliminates unpleasant odors.
- Metal filter – collects grease, soot and small debris.
- Control display.
- Backlight.
The operating principle is based on air flow circulation. The air is sucked by the fan into the hood, where it passes through a metal filter, getting rid of grease and soot. Next, it goes into a carbon filter to remove unpleasant odors.
The positive qualities of the hood include:
- The device does not stand out from the general background thanks to its installation in a hanging cabinet.
- Wide range - models have different sizes that fit any kitchen parameters.
- High work efficiency.
- The high power of the device allows you to clean any kitchen area.
- You can find a silent model.
- Modern devices have additional functionality that makes them easier to use.
Built-in ceiling models are difficult to install.
The disadvantages include the following factors:
- The performance of the hood is lower than that of the dome modification. For small rooms, this minus is not taken into account, since the volume of purified air is low.
- If a recirculating model is used, periodic filter replacement is required. This slightly increases the cost of operation and makes maintaining the device more difficult.
- Some models are difficult to install, especially those installed in the ceiling.
- The price of built-in products is higher. It increases with the number of functions.
When choosing a suitable device, you need to check whether the dimensions match the size of the box in which the hood will be mounted. Measurements should be taken before purchasing. Also, the hood should not be much smaller than the stove, otherwise its efficiency will be reduced. Before installing the hood in the kitchen cabinet, you should read the instructions.
Telescopic kitchen hoods built into the cabinet
Telescopic models are available with one motor and two. These air purifiers have a turbine. The maximum productivity of telescopic hoods can reach 1000 m3/hour.
Regardless of the performance, any installation of this type is compact, and thanks to the retractable panel, you can expand the working area. If necessary, the doors can be easily moved into place. The front panel is the part that can be seen; everything else is hidden in the cabinet. The backlight is also built-in.
In addition to two operating modes, air purifiers are equipped with two filters - carbon and grease. They retain grease and clean the “exhaust air” from soot and odor.
An important parameter of the installations is the noise level during operation. The width of such air purifiers can be 500 mm, 60 0 mm, 900 mm.
There are no restrictions on the color scheme. Models with a body made of stainless steel are more often successful. Due to the ability to replace filters, such hoods will last a long time.
Telescopic hood involves adjusting the usable area of the device
Filters are changed quite often - 4 times a year. This is the main disadvantage, as well as the high price. Modern telescopic hoods are controlled by touch or using a remote control.
For some buyers, additional features that are found in more expensive models are also important:
- voice control;
- The brightness of the light in the built-in backlight can be adjusted;
- in automatic mode, operating modes can be changed;
- the function of turning the hood on and off is performed according to a timer;
- special sensors that respond to filter contamination.
When purchasing a hood, you must look at the warranty period. For high-quality models it is at least 3 years. We also recommend checking how loud it is right in the store.
Types of devices
If there is no ventilation duct, you can install a circulation hood.
All models on sale can be divided into two groups according to the type of design.
- Circulation (channelless). A device in which the volume of air processed does not change. When installing such a hood, no outlet to the street is required.
- Flow-through (with blower). In such models, polluted air is removed outside and clean, filtered air enters the room.
By location:
- Horizontal devices. These are the most common hoods that are installed in apartments. Installation is carried out in a box that is hung above the stove.
- Vertical. These include hoods, for which you do not need to buy additional furniture for installation. The device is mounted into the wall, which increases the labor costs of the work.
The Domino hood is a new development that takes up minimal space.
Classification by type of installation:
- Into the cupboard. The models are especially relevant for small rooms. Such devices are the most budget-friendly. An important advantage is the reduction of noise levels due to the cabinet walls. Installation of hoods built into cabinets is simple; even a novice master can handle it.
- Wall mounting. It is characterized by increased labor costs due to the need to create a hole in the wall. Not suitable for standard apartments.
- Built into a countertop. This is a relatively new development in which the device body is mounted in a kitchen cabinet. Has a touch panel and LED backlight. They are quite expensive.
- Ceiling installation. The main advantage of such models is that they do not reduce the ceiling height due to the installation of a cabinet above the stove. Installing a built-in hood in a plasterboard ceiling should be done at the renovation stage. If installation is carried out after finishing work, some of the panels will need to be removed. They have a remote control.
Classification by type of control:
- Electronic. These are the most expensive high quality devices. They have advanced functionality, so before purchasing you should decide in advance which options will be used. Most of the device’s capabilities may not be used, which is why it makes sense to choose a more budget model.
- Traditional. They are manually controlled and have a limited set of functions.
Circulating hoods are equipped with filters that need to be changed periodically.
Additional options that the hood can be equipped with:
- Removable front strip. It allows you to hide the device in a closet.
- Various filters that are selected depending on the type of recirculation.
- Automation. Expensive models are equipped with it. They make life easier in small ways - for example, automatically determining the operating mode, turning on the backlight when a person approaches, turning on after signs of boiling liquid appear.
Each hood has a filter. It cleans the air of grease and other pollutants. The grease filter is the most important part of the hood. It can be based on padding polyester (organic), non-woven, acrylic, aluminum or steel. Paper filters are practically not installed, since they are disposable. The most reliable are metal products. They need to be changed periodically.
Types of built-in hoods according to air purification method
Built-in hoods, and others too, may differ in the method of purifying air from combustion products and steam. In particular, there are two types.
Flow hood
Flow hood - it is connected by ventilation pipes to a chimney or channel leading through the walls to the street. There are blower fans installed inside them, which draw in air, moving it through the system forcibly. Contaminated air is discharged outside the premises along a specified path. It is replaced with a fresh one, which means that in order for the device to operate effectively, a high-quality supply ventilation system must be provided.
Duct hood
Grease traps are installed in front of the fans at the entrance to the device - metal mesh, which become clogged over time and require cleaning or replacement with new parts.
Why are grease traps needed?
Such devices are very effective if all installation conditions are met. They ventilate the room, constantly drawing fresh air into it.
Circulation type hood
Recirculating hoods - outwardly, these devices will not differ from their flow-through counterpart, but they work on a different principle. Such devices do not need to be connected to the ventilation system. Their task is to drive polluted air through a system of filters located inside their housing. The first to be installed at the entrance is a grease trap. Next come fans with electric motors, and then everything else. The air returns to the room and circulates in it again. That is why this type received the appropriate name.
Circulation type hood
There is only one convenience in using such a hood - it is compact and there is no need to stretch pipes through the entire kitchen. There are more disadvantages. Firstly, filters filled with absorbent substances (mainly activated carbon) wear out their service life over time and need to be replaced, so those who wanted to purchase such equipment, prepare for additional expenses. Secondly, a one-time pass through filters cannot clean the air completely. Thirdly, the system does not create a pressure difference, which means that fresh air will flow into the room worse.
Interesting to know! Very often, such hoods have an island design. They are placed in the center of the kitchen, where they are more important in aesthetic terms than in sanitary ones. If it is possible to carry pipes to the installation site, give preference to flow-through models.
Designer island hood
Selecting a hood
When choosing an air purification device for the kitchen, you need to pay attention to three criteria:
- Device width. The hood should be approximately equal to the surface of the stove. It should also fit easily into the box in which it will be installed.
- Power. Selected according to the recommendations of sanitary standards. The device must extract at least 10 cubic meters/hour.
- Noise level. It is recommended to take devices up to 55 dB.
The design of the device is not an important indicator, since the hood will be hidden in the furniture. For ease of use, you need to pay attention to the number of built-in lamps. Usually two lamps on the front of the hood are sufficient.
Built-in hood dimensions
Scheme of a hood with a retractable unit with detailed dimensions
In order to correctly install a built-in hood, measurements are taken of the slab and the existing cabinet into which the equipment will be built. If you do not pay attention to this, it may turn out that the size of the device will exceed the dimensions of the cabinet.
Sanitary standards for air exchange
Air exchange standards for residential premises, household premises, toilets and kitchens
All ventilation and air purification systems must comply with accepted sanitary standards. It is necessary to take into account the number of people in the room, size, presence of wet and hot surfaces, and the volume of polluted air removed. The combination of these conditions will help in choosing a hood and providing the room with fresh, clean air.
Each kitchen room has its own air exchange mode. This depends on the number of hot surfaces, the presence of multicookers, ovens and other appliances in the room. They significantly change the composition of the air and further pollute it.
SanPin adopted the optimal way to take into account the air exchange regime - by multiplicity. It is necessary to determine how many times during the day the old air should be replaced with new one. The values will vary for kitchens with different types of stoves. The ventilation mode is calculated based on the exhaust volume.
Performance calculation
Hood power depending on ceiling height and area.
The performance indicator is the main one when choosing a hood. Calculations are made in the standard way.
Example calculation for a kitchen with an area of 10 sq.m. and with a ceiling height of 2.7 m. Kitchen volume - 10 × 2.7 = 27 cubic meters. For 1 cubic meter a productivity of 10 cubic meters/hour is required. Then the productivity for the entire room will be 27 × 10 = 270 cubic meters/hour.
It is better to take hoods with a small power reserve. Low performance will not effectively remove all contaminated air from the kitchen.
Working with the bottom surface of the cabinet
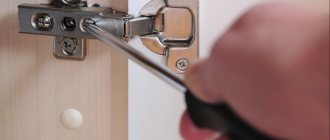
To remove the part, just unscrew the side confirmations. You will first need to embroider the back wall, which is attached to the chipboard part. This is usually done with staples, but craft projects may use nails or screws. After opening the back wall, the side fasteners are removed and the bottom part of the cabinet is removed, which is not held back by anything.
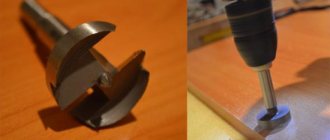
If you need to cut a hole of the required size, which does not occupy the entire area of the bottom of the cabinet, you should follow several requirements:
- The hole should be cut so that the body of the built-in hood fits close to the front wall of the cabinet, and not the back. This will avoid disassembling the structure;
- The dimensions of the cut part are marked using a marker and a carpenter's corner;
- holes with a diameter of 10 mm are drilled so that their centers are clearly in the corners.
After this, the hole is cut. In practice, it is enough not to disassemble the cabinet, just remove it from the wall, dismantle the doors (for further convenience of working with the shelf), turn it over and do all the work on the floor. The following video clearly shows the work process.
A little trick. A jigsaw with a coarse wood saw and laminated chipboard is a thankless combination. When a saw with a straight tooth direction is used (bevel upward, undermining the material from below, cutting when the saw moves upward), chips are formed on the upper side of the slab to the side of the cutting line. This is an excellent place for moisture to enter and destroy the chipboard. You can do it in three ways. In the first case, the end surface and chipped areas are coated with waterproof glue. Surface defects will be hidden if the built-in hood design has a side. In the second case, you can take a saw with a reverse tooth (the cut is made when the cutting tool moves downwards). In this option, the chips will be inside the cabinet. However, the best way is to go deeper into the material along the cut line with a strong knife to a depth of 2-3 mm. After that, by carefully moving the saw with a straight tooth close to the formed line, you can avoid the appearance of chips. The cutting tool should be located on the side of the part that will be removed.
Installation of a built-in hood
The easiest way to install the hood is in a cabinet located next to the ventilation duct.
After purchasing the hood, you can begin installing it. Manufacturers usually provide a mounting diagram that is easier to work with. First of all, you should choose the installation location. Recommendations for selection are given in the SP and the instructions for the device.
The basic algorithm for any type of built-in hoods:
- Creating a placement plan. You also need to choose a location for the air duct.
- Carrying out the necessary measurements if the hood is built into a cabinet.
- Based on the data obtained, recesses and holes are created, including for fasteners. If the device needs to be embedded into a wall, a corresponding niche is made.
- Securing the hood into the box. It should also first be secured to the wall above the stove.
- Air duct installation.
- System testing. An initial check of the functionality of the headset is carried out before installation. At the end, the correct operation of the entire assembled structure and the ease of its operation are checked.
You also need to take into account that the cord is usually not long enough for the device. An additional outlet may be required.
The air exhaust system must have as straight a path as possible. The channel is made in the form of a corrugated or smooth-walled sleeve. Its diameter depends on the size of the outlet.
Installation Rules
Distance from the hood to the stove - gas or electric
When installing the hood, you need to take into account many nuances. There are a number of additional rules in addition to the manufacturer's instructions that should be followed during installation:
- The retractable part of the device must always be accessible.
- The outlet must connect to a ventilation shaft or opening in the wall. The option of processing air masses is undesirable.
- The optimal gap between the stove and the hood is 65-75 cm for electric and 70-80 for gas.
- An anti-return valve must be installed. It will not let polluted air into the room.
You can create a hood cabinet yourself. You need to take measurements in advance and focus on them when assembling.
How to make a hole for a large diameter hood yourself
There are situations when there is a need to make a hole for a relatively large diameter hood in a brick or concrete wall in an apartment.
Such openings may also be in demand for air inflow or outlet in outbuildings or for exhausting boiler equipment with a closed combustion chamber.
When you have diamond bits of suitable diameter and a high-power hammer drill, that’s great, but you ask, what to do if you don’t have all this? You definitely can’t do this without using a hammer drill, but you can do it without an expensive diamond crown (since it will be expensive to purchase just for once). So, in order to make a hole of a suitable diameter, you will need, as indicated before, a hammer drill, a drill (drill) of the required size with a Pobedit tip and a chisel to knock out the middle of the hole.
First, we decide on the size of the diameter we need and draw a circle in the required area on the wall. To use a pipe whose diameter is 12 cm, the hole should be marked a couple of cm larger, in our case 14 cm, since the drill may move slightly to the side during the work, for this reason it is advisable to immediately make a small reserve.
Next, you should mark points on the circle at a distance of 2-3 cm, in those places where you need to drill a hole with our drill. The more holes you drill, the easier it will be to remove the brick from the wall. On the circle we need with a diameter of 14 cm, it is advisable to drill up to 20 holes.
First, you need to determine the thickness of the wall and choose the right drill length so that it drills right through the wall.
Let's start drilling the holes. We set the hammer drill to the “drill-impact” mode and drill according to the hole marks. It is important not to forget about your own safety: if you have to work high from the floor, therefore, the base or support where you stand must be securely fixed.
Considering there are a lot of holes to be drilled, expect a lot of dust. All furniture and other items placed in the room must first be covered with a protective film or some material so that they do not deteriorate from contamination and subsequently simplify the cleaning process. Many people mistakenly apply excessive force to the hammer when drilling; this should not be done; this is why the “drilling-impact” mode is provided. We drill through the wall until the drill comes out on the other side. At the end of drilling we get a circle with holes.
Having finished the drilling process, remove the drill from the hammer drill; it will not be needed in the future. We install a chisel in the hammer drill and switch it to the “jackhammer” mode without the drilling function and one by one knock out the jumpers between the holes. You can also knock out a brick from the center of the circle, beating it with a chisel from the center to the circumference. If the chisel is short and does not penetrate through the wall, it is possible to work with a hammer drill on the other side of the wall. This option can only be done low from the floor; at a height you will need to buy a chisel according to the thickness of the wall. As a result, our wall will have a hole of the planned diameter.
Unfortunately, it is difficult to achieve a perfect and neat hole using this method.
If the wall consists of concrete or monolith, or for a number of other reasons it is not possible to do such work yourself, you should contact professionals engaged in diamond drilling of holes.
You'll get:
- a perfectly smooth hole of the required diameter;
- avoid dust and dirt;
- save your own time and energy;
- save money (this service will cost less than buying a special crown or two or three high-quality drills)
We provide the services of professional craftsmen to create holes with a diamond drill
Expert advice
The telescopic hood should not be interfered with by kitchen furniture.
There are two ways to install the hood in a cabinet: first, place it in a cabinet and hang the fully assembled structure together, or install it in a box already hung on the wall. The choice of the appropriate method is made only according to the convenience of the master. General recommendations:
- It is necessary to provide in advance a place for the hole for the blower.
- Powerful hoods must be connected through a separate outlet.
- Wall mounting is best done using dowels. If installation is carried out on a shelf or cabinet wall, you need to take self-tapping screws.
- If you purchased a telescopic model, you need to make sure that the cabinet doors do not interfere with the extension of the working panel. Otherwise, they can be filed down.
- It is better to make a blower from a metal pipe. Plastic and corrugated elements are easier to install, but they fail faster. Also, when air masses pass through a metal surface, there is virtually no noise.
It is important to connect the housing and the duct in such a way that users can disassemble and clean the structure if necessary.
General tips on designing a hood cabinet
Installation of a built-in hood should always begin with the assembly of the box. To make a box you can use wood or MDF. For telescopic air purifiers, it is assembled according to the same principle as for conventional hoods. The top of the cabinet and the sides are fastened together immediately. After tightening, it is necessary to compare with the size of the telescopic hood.
The hole for the air duct is made in advance
Then the lower part of the cabinet with the hole for the air duct is mounted. After installing the cabinet, cutting out this hole will be difficult. To ensure that ventilation works silently, it is better to use plastic air ducts rather than corrugated pipes.