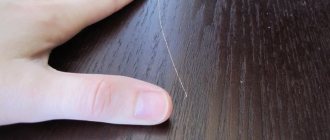
Sheet material based on chipboard and MDF, from which cabinet furniture is made, is covered only on two sides. The ends, after cutting the parts to size, remain unprocessed. The edge on chipboard is used not only to give the furniture a more aesthetic appearance. But also to protect chipboard and MDF from the influence of the external environment, as a result of swelling or drying out. In the case of chipboard, the process of edging (lining, processing, gluing the ends) helps to make the furniture safer - to create a reliable barrier to the emission of formaldehyde resins and other harmful fumes.
Melamine edge on chipboard: cheap and cheerful
The easiest way, which does not require special skills or specialized tools, is gluing a melamine edge from chipboard made on a paper base. There is no trick to the question of how to glue an edge on chipboard with an iron: the edge material itself already has a layer of glue applied evenly on the reverse side. All that is required is:
- Press the melamine edge evenly to the end of the chipboard.
- Use a heated iron until the glue is completely melted and, accordingly, the edge material is glued.
- Cut off excess melamine and glue with a sharp, wide, short knife (shaped like a shoe knife) or an ordinary stationery knife.
- Gently sand the edges with fine sandpaper.
Melamine chipboard edges are glued at home. The process itself does not take much time and is not too “junk”, unlike sawing and sanding. The only waste will be the cut residues, which can easily be swept away with a broom when finished.
How to prepare for gluing edges
In order for the final result of your work to look impeccable and look quite aesthetically pleasing when gluing the edges , you should use a good iron, preferably using Teflon as the basis for the surface. Make sure that the ironing surface of the iron is clean - if there is dirt, it must be removed. If you have selected this tool, you can start gluing the shelves of a wardrobe, for example.
To make the work more convenient, you should not use ordinary knives; a cutter is ideal. If you do not have such a knife, then you need to find an old knife blade and construct a cutter from it yourself.
You can make the block yourself - you even need to take an ordinary piece of chipboard and cover it with sandpaper on one side.
Melamine edges are sold with a layer of glue already prepared on it, but if you are “lucky enough” to purchase an edge without an adhesive coating, you need to apply glue to it yourself.
The holder can also be easily constructed independently from the remnants of chipboard; to do this, you need to take two small pieces of material and stuff them at a short distance from each other perpendicular to the base.
We recommend: Kitchen furniture – what is it?
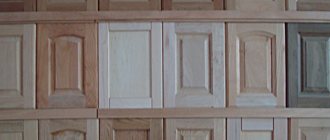
Plastic edge on chipboard: PVC and ABS
The main disadvantage of conventional melamine edging is its fragility. It performs well in use on the inner ends of furniture that are not subject to constant wear. On the visible ends (countertops, facades, open shelves) it wears out, chips, and takes on an unpresentable appearance. Another thing is the plastic edge for chipboard.
The most common two types: PVC edging (PVC) and ABS (ABS). Outwardly, they are practically indistinguishable, they are analogues, the differences are only in properties and composition. Both types are available in different widths and thicknesses of 0.4 mm, 1 mm and 2 mm, with and without adhesive base. An edge of 0.4 mm thickness or “one” is used on the internal boxes of furniture, and “two” on the table tops and facades.
PVC furniture edging is made on the basis of polyvinyl chloride, and ABS is made on the basis of acrylonitrile butadiene styrene. ABS edge is considered environmentally friendly because it does not contain chlorine or heavy metals and does not emit their harmful compounds when burned. Also, ABS as a material does not electrify, does not attract small debris and dust, exhibits less heat shrinkage when gluing and looks neater, smoother (without pressing) at the ends (if we are talking about a thickness of 0.4-1 mm). But it also costs more than PVC.
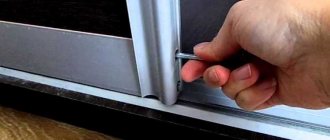
If you are interested in the process of gluing an edge to a chipboard, then it is much more complicated and requires additional skills and specialized equipment. In furniture production, plastic is edged on special edgebanding machines using high-temperature hot melt adhesives. There are manual edgebanding machines for small-scale production.
At home, gluing a PVC edge onto chipboard is possible, but it will take more time. Step by step:
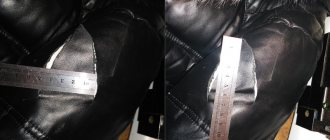
- It is important to very carefully prepare the end of the furniture piece for the sticker, especially if a thick edge, 1-2mm thick, is used. When a PVC or ABS edge adheres to the base, the glue can “pull out” the chips and the end will take on an untidy, lumpy appearance.
- If the PVC edge has an adhesive base, then it is heated with a construction hairdryer until the glue melts. If not, coat the end of the part with Moment glue and wait for it to dry a little for better adhesion.
- Then press the PVC (ABS) edging to the end (manually or roll it several times) and wait for the adhesive base to harden.
- Next, you need to carefully cut off the excess edges of the edging and sand it, giving it a uniformly rounded shape along the entire length of the part. Usually a milling cutter is used for these purposes. With some skill, you can get by with hand tools - a knife, a file and sanding paper.
Types of edges - why are they needed?
- The most common type is melamine edge with paper-based glue . Used for finishing interior areas of furniture. Available, inexpensive, but not the highest quality option. Does not tolerate moisture and wears out quickly. Easily glued at home with a simple iron.
- T-shaped flexible profile - is a T-shaped strip, it is inserted into a slot in the side of chipboard or MDF. It is convenient to replace the damaged element in the future without disassembling the furniture. Installation requires a milling machine.
- PVC edging - reliably protects the ends of furniture from damage, is wear-resistant and resistant to moisture. To glue PVC edging, you will need an edge processing machine, so using this type of edges at home is difficult.
- ABS plastic is an eco-friendly option without chlorine. Valued for its resistance to high temperatures and physical damage.
All options can be divided into two subtypes - edges without glue and with glue.
Average cost of a profile per linear meter:
- PVC 0.4 mm thick - about 25 rubles,
- PVC 2 mm thick - about 40 rubles,
- Melamine material for chipboard – about 25 rubles.
In our country, products from the Rehau company are actively used, which offers a large selection of colors, as well as different tape widths from 15 to 45 mm.
To simplify the work, you can use various specialized furniture programs that will calculate how much material is required for gluing the edges.
Decorative plastic edges: super glossy, metallic and 3D effect
Both PVC and ABS edgings are available in attractive glossy and metallic finishes to not only make furniture more practical and durable, but also significantly improve its aesthetics.
If you decide to choose exactly this type of edging for table tops and furniture facades with your own hands, then it is better to entrust the solution to the question of how to glue PVC edges to chipboard to a workshop that has the appropriate equipment. When gluing a glossy or metallic edge, there is too great a risk of accidentally scratching the surface of the end and thereby ruining the entire effect. On the other hand, decorative edging has a protective layer in the form of a film, which can only be removed after the entire process of sticking, rolling and processing is completed.
The acrylic 3D edge (PMMA), made on the basis of polymethyl methacrylate, deserves special attention. The decorative base is covered with a thick layer of transparent polymer, which protects the base from damage and abrasion. It also gives the edging an attractive 3D effect of a certain solidity, in which the edging does not look like a simple frame for the tabletop.
How to glue an edge to a tabletop with an iron
Different edge thickness
As can be seen from the description of edges existing on the market for building materials, only melamine edges to the adhesive base and PVC edges are suitable for self-gluing at home.
Melamine edge is the cheapest and easiest to use, but it also has a number of disadvantages:
- due to poor-quality connection with the tabletop, it can come off if the work was done by the hands of an inexperienced craftsman;
- often exposed to water, after which it can peel off;
- less aesthetically pleasing compared to more expensive types of edges.
If you still decide to use melamine edges, you can use the simple and most popular method, for which we will need the following materials and equipment:
- iron or hair dryer;
- edge;
- paper.
Step-by-step steps for gluing the edge with an iron:
- We heat the edge with a hairdryer or iron; in order for the glue to soften a little, there is no need to set the iron to maximum power, so as not to damage the edge material and leave marks on the sole of the device. It is enough to use the “Silk” mode;
- We apply the strip with the adhesive side to the surface of the table top on which we will glue it. The width of the strip and the edges of the tabletop must match completely. Try to do everything as carefully as possible, it must work the first time, otherwise, if you try again, the adhesive layer may be damaged, and such an edge will be considered damaged. You can determine that the edge has stuck when the gap between the surface of the table top and the tape completely disappears;
- We press the edge forcefully to the surface, iron it with an iron and apply it with force with a roller or a simple dry rag along the entire length, fixing and pressing the tape. If the glue sticks out a little on the edges, you can use fine sandpaper and a file to sand off the unnecessary glue residue.
- The end of the tabletop is ready.
Overlay and mortise edges
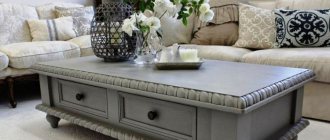
This type of edging is more decorative. It does not protect furniture parts from swelling and drying out, but only gives an attractive three-dimensional shape to the ends. It is used only for the design of visible ends - facades, cornices, countertops, open shelves, etc.
As is clear from the name, the overlay (U-shaped) and mortise edge does not require a sticker (in rare cases, only additional fixation, support), it is attached using protruding parts, wrapping around the end of the part or cutting into a specially prepared recess in the center of the end. They make flexible overlay and mortise edges from PVC and use them to decorate tabletops in office and student furniture.
The aluminum end, which frames the facades and countertops of kitchens, premium-segment office furniture, reception desks, etc., deserves special attention. Since the aluminum end is not able to go around corners, additional accessories are required for its installation - internal and external corners. Sometimes craftsmen do without them, sawing and joining the end at the desired angle.