Selection of materials and tools
If you decide to restore a chair with your own hands, do not rush. First you need to decide what paint to paint. It is also important what tools and related materials will be used for the work.
When choosing paint, you should pay attention to what materials the piece of furniture is made of. The legs of the chair can be made of metal, and the working (upper) part can be made of wood. It is now easy to purchase paints for different coatings. Aerosol paint and varnish products are best suited for metal surfaces, acrylic paint - for wood, alkyd - a universal option.
Important! You should not choose water-based paint, since in any case the chair will be subject to wet cleaning from time to time. The peculiarity of aqueous compositions is that they create a coating that wears off quickly.
If you want to preserve the texture of the old material, then there is a solution - choose transparent paint or varnish your favorite chair. The varnish will protect the surface from external negative factors and save the decorative coating from abrasion for some time.
The choice of working tool depends on the painting method. You can stock up on round or fluted brushes, sponges, rollers of different textures, and a paint sprayer. The choice is yours.
What else you might need:
- putty and spatula (for sealing cracks, chips, deep damage);
- wood primer (it will ensure adhesion of the surface to the paint);
- fine or medium-grit sandpaper, depending on how much of the old paint layer will have to be removed;
- unnecessary newspapers or paper;
- soap and a regular rag;
- tape or construction tape;
- a screwdriver, a nail puller and a hammer will also help.
We must not forget basic safety requirements. You need to work in old or protective clothing, gloves, glasses and a hat. This will reduce the risk of skin contamination and foreign bodies getting into the eyes.
How to carry out work
So, how to paint wooden chairs so that the coating is not only beautiful, but also durable? In fact, the process is quite simple and consists of two main steps.
Product preparation
At this stage the following activities are carried out:
- The reliability of all connections is checked; if necessary, they need to be tightened or the fastenings strengthened using self-tapping screws (it is important that they are not visible on the surface).
- The soft elements on the backs and seats must be removed, and then the old upholstery must be removed. How to putty a car with your own hands before painting? The new material with foam rubber is carefully attached with a stapler, so you can repair the seat very quickly and easily.
- Before painting an old chair, remove any remaining coating from it. It is not recommended to use various solutions, as they can damage and even deform wood that is decades old. The work is carried out with sandpaper, the process is quite long and painstaking, but it cannot be done without it.
Surface treatment should be continued until it is completely clean.
- To achieve a perfectly smooth surface, after removing the layer of old paint, it is processed with fine sandpaper. This allows you to make the planes very smooth.
- The last operation is to thoroughly clean the entire product from dust; this must be done carefully, since the entry of such impurities into the paint will make the surface rough.
Applying paint
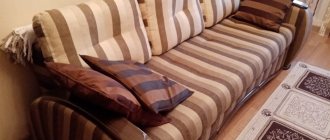
Using the right combination of paint and upholstery can transform the look of your furniture.
After preparation, you can proceed to the main stage - applying the composition to the surface. If there are elements on the furniture that do not need to be painted, they must be covered with masking tape.
Advice! If you paint from a can, do all the work outside so that fine dust from the paint does not get into your eyes or onto the walls indoors.
The work is carried out in several stages. First, the first layer is applied, which, due to the characteristics of the wood, raises the pile on the surface. After the composition has completely dried, the pile is removed with fine sandpaper, and the surface becomes perfectly smooth.
Next, apply one or two more layers, depending on the hiding power of the paint. Each subsequent layer is applied after the previous layer has completely dried.
If you decide to apply a design to the surface, it is done on top of the last layer, and it is best to use paints on the same base as the main coating.
The final stage is treatment with transparent furniture varnish, which makes the surface wear-resistant and durable.
Sometimes the question arises of how to paint an old metal chair.
To do this, you can use a wide variety of compositions:
- If you need a steel-colored surface, Zinga electrically conductive paint is perfect, as it protects the metal well.
- You can also use fire-retardant metal paints Polistil; they not only protect the chair, but also make the surface impervious even to open fire.
Surface preparation
Painting chairs is accompanied by preliminary preparation of the surface so that the paint does not peel off quickly. To do this you need to perform the following steps:
1. Using a soap solution and an old rag, rinse the product, degrease with white spirit and dry. Check for gaps, cracks and loose fasteners. It is best to mark each defective place with chalk so as not to miss any defects.
2. Cracks, potholes and chips must be repaired with a special wood putty. If there is a large crack, then it is better not to use this method, as the material will sooner or later fall out.
3. Remove the old upholstery (if any), unscrew the legs if they are screwed on. Carry out the work with a screwdriver and a nail puller.
4. Painting a chair yourself requires first removing the old coating layer, especially if it is already peeling off. Cleaning can be done using sandpaper. You can also use a sander.
5. For uniform distribution of paint and its better adhesion, the surface of the chair must be primed.
6. Wipe the surface with a damp cloth to prevent dust from mixing with the paint.
Important! To paint a chair with high quality, you must first disassemble it and process every detail.
In the video: painting and restoring a chair - 5 steps.
DIY designer furniture: beautiful and inexpensive
Do you have furniture at home that is already out of fashion or has lost its attractive appearance? Don't rush to throw it away. It is quite possible that it will become a designer accessory that will decorate the room. Use our tips, and painting chairs at home in your own house or apartment will not be difficult at all.
Pay attention to: Transforming an old cabinet into a new one with your own hands
Read further:
Protection of wooden windows: choice of paint and varnish material and painting technology
How to paint MDF furniture at home
How to remove old paint from a wooden door
Bath paint
Painting ceiling tiles: choosing paint and tools, surface preparation and painting technology
Painting process
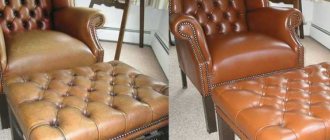
To make the old chair shine again and look like new, it should then be painted in the chosen color. To do this, do the following:
- To protect the floor surface, you can lay down old newspapers or paper.
- If the chairs have some decorations, it is recommended to seal them with construction tape or tape.
- It is best to mix the paint first so that the drying oil is not on top.
- Turn the wooden chair upside down if it cannot be disassembled.
- Prepare all the tools.
- Wear protective clothing, household gloves and goggles.
Painting technology:
- First we paint all hard-to-reach places.
- Next, we cover with a thin layer all possible elements or what can be approached at the moment.
- Now you need to wait for it to dry completely.
- You should use fine sandpaper to remove any hard particles after painting.
- The treated chair should be wiped with a damp cloth and allowed to dry.
- Next, paint the entire product evenly with a second layer of paint.
- At the final stage, varnish should be applied.
Advice! It is more convenient and faster to paint with aerosol paint. This way you can carefully paint over all the protrusions and small decor (if any).
We restore wooden chairs
We have been thinking for a long time about what master class to publish at the Masters Fair, which one will be useful to many of you. And so! We decided to show how to restore old chairs in simple conditions.
Our customer brought us 6 chairs in fairly good condition, despite their age, and asked us to update, repaint, and change the upholstery. In general, to make new beautiful chairs for his current interior from those dear to his heart, made by his father in his youth.
The chairs were covered with varnish; they didn’t even bother to understand its properties and name, but it didn’t want to be washed off chemically. This is actually why this master class has appeared now. After all, not every home has the opportunity to remove old paint with chemicals.
So there you go! This is the condition in which these chairs arrived to us.
And the work began.
First of all, naturally, we removed all the soft parts - the seats and backs, and then we started cleaning - sanding the surface of the varnish.
For straight surfaces, which were minimal on the chairs, we used a sander to speed up the process. But everything else was cleaned off manually:
It took more than a week, or rather 9 days, to remove the old coating from all 6 chairs and prepare them for painting.
For this we used:
- coarse sandpaper to remove the top dense layer of varnish;
- softer sandpaper to clean the surface from varnish residues and smooth out scratches left by coarse sandpaper. You can use several types, each time thinner and thinner. In this case, the work will be more accurate and fewer defects will appear during painting.
- fine sandpaper for final leveling of the surface;
- “zero” sandpaper to prepare the wood surface for painting.
After all the sanding procedures, it will be better if the furniture stands for 1 day, so to speak, to rest.
While the chairs were “resting,” we used wood putty to smooth out all the deep chips, scratches, and gouges. It is better to use putty to match the tone of the wood. You can easily find it in stores that sell building materials. Everything is simple here, if you have birch, then take putty for birch. If you are in doubt about what kind of wood you have, then take part of the product with you - the putty should be a similar shade to your wood.
For our customer, we painted 2 chairs in different shades of white: warm and cold, since it was more convenient for him to see the color on the product itself, and not on small paints:
Don’t be afraid to paint and see if a given shade suits you, since for proper and durable painting, you will need to put at least 4 - 5 layers of paint, each of which must be sanded - to remove gloss and various smudges, which are necessary in figured products will be, especially if you paint with a brush (we painted with a “gun”).
So, the customer chose a warm shade, and a new stage of work began.
I won’t insert a photo after each layer of paint, I’ll just say that we applied 6 layers of paint, each of which was sanded with a “zero” polish, removing gloss and small drips.
You may ask, why remove the gloss after each coat of paint? This is necessary so that subsequent layers penetrate each other and the final “general” layer of paint is durable and “for centuries”.
So, it took us a full 14 days to paint all 6 chairs. We spent most of this time waiting for each of the layers to dry, which we then sanded and painted again.
We spent the day changing the upholstery and installing seats and backs on the chairs. And here is the result:
So, the materials you can use:
— quick-drying white paint for interior work;
- colors to achieve the desired shade;
- sandpaper - the more types of density, the better the result will be;
- if you paint with a brush, it is better to use several types of brushes (see this, based on the presence of small parts on your product);
— foam rubber and fabric, if upholstery is needed;
— gun with staples for upholstery;
You will also need a lot of patience and willpower! The work, in general, is not difficult, but it is long and requires perseverance.
As a summary, I will give a short list of all the work carried out. Since we do not have more detailed photographs, since when the chairs were being restored, we did not plan to do a master class.
1. It is necessary to inspect the entire product for the presence of dirt, fats, and oils. It would be better to wipe them, then the sandpaper will not become greasy and will serve you longer.
2. To remove old paint or varnish, use different sandpapers in stages, starting with the coarsest you can find. It is better to do this according to the structure of the wood in order to avoid transverse stripes, which will then be very difficult to get rid of.
3. After completely cleaning the surface from the old coating, you need to prepare the wood for painting. To do this, you need to take a very thin “skin”—“zero”, as it is also called—and level all surfaces.
4. If the product has deep scratches, chips, or cracks that you would like to get rid of, then cover them with wood putty of a suitable shade. It is better to take a soft rubber spatula.
5. After the putty has dried, it also needs to be sanded with fine sandpaper and leveled with the rest of the surface.
6. Let's start painting. I’ll say right away that you need to paint in a well-ventilated area, wearing a protective mask and clothes that you don’t mind getting dirty with paint. Prepare brushes of different sizes and shapes. It is better to use small flat ones and small round ones for painting small details. Brushes need to be washed if they have already been used. If you bought new brushes, it is better to “pinch” them slightly in order to remove loose hairs before painting, and not from the surface of the product being painted.
7. You need to paint in the same way, in the direction of the wood grain.
8. First paint all the small parts, grooves, depressions, and only then proceed to large areas.
9. The first layer must dry completely. Do not rush to lay the next one until you are sure that the first layer is completely dry.
10. Each dried layer of paint must be sanded to remove gloss and drips. Scuff marks can be applied straight away if the final appearance is to be distressed.
11. Sand the last layer of paint or varnish in the same way, but carefully.
12. You can also polish the product - for this there are various furniture polishes - matte, glossy, semi-gloss - the choice is yours.
By the way, you can buy all materials from brushes to polish in one place - in a store that sells materials for construction and repair.
13. After your product is completely painted and ready for use, you need to install its soft parts - the seat and back. We will try to make a separate master class with our photos on proper fitting.
Thank you all for your attention! This was our first master class, don’t judge strictly!
How to paint it white?
Painting a chair white is a great solution. White furniture always looks stylish and brings coziness to your home interior. To do this, the product should initially be bleached and sanded using fine-grained sandpaper. The preparatory steps are performed in the same way as described above.
It is worth paying attention to whitening. For these purposes, a special whitening paste is purchased, which contains pigment and wax.
To carry out the work you need to prepare:
- a brush with metal teeth;
- a clean rag;
- fine grain skin;
- furniture varnish.
Let's get started with the task:
- Before painting the chair, it should be disassembled and wiped with a damp cloth and detergent. Let it dry a little.
- Remove the old paint layer from the surface with sandpaper. You can also use a grinder to speed up the process.
- Now you can bleach. To do this, you need to fill all the uneven areas with paste and wait a little for it to dry.
- Then wipe the product with a cloth and varnish. After complete drying, the chair can be used again.
Using white paint will also help achieve whiteness. The work is not difficult, for this it is recommended to do the following:
- Sand the surface.
- Using a brush, carefully apply a layer of white paint.
- After it dries a little, remove the excess with a napkin.
- Then apply varnish.
Such furniture will delight both owners and guests for a long time with its amazing whiteness and sophistication of style. It will perfectly complement the interior and give the room a visual increase in area. At the same time, it will be perfectly combined with other colors, because white is a universal color.
How to repaint furniture (1 video)
Interesting ideas (28 photos)
Reupholster an old chair
A quick way to update a chair is, of course, to reupholster the stool and give one of the sweaters a new use . The only cost will be the purchase of paint.
Necessary materials:
- Chair
- Paint (wood enamel or regular acrylic)
- Brush
- Construction stapler
- Sweater
- Construction adhesive
Step-by-step instruction:
Step 1: Making a new skin
- You need to unfasten the seat from the wooden structure of the chair, and then cover it with a knitted sweater and secure it around the perimeter with a construction stapler.
- Of course, you can also use fabric for covering, but here we are considering the simplest and cheapest option from scrap materials.
TIP: Of course, you don’t need to take the whole sweater; cut off such a part for covering so that it is enough to wrap the seat and secure it.
Step 2: Paint the wooden part of the chair
In this case, we paint it white with special paint for wood. Before this, the wood can be sanded with sandpaper to remove the old paint and ensure better adherence of the new one. Leave until completely dry.
All that remains is to connect the two parts of the chair. This can be done using construction adhesive or thin nails driven in from the back.
Chair seat reupholstery ideas
When restoring a chair seat, it is not necessary to use fabric; other cheap materials at hand can be used: old belts or cloth tape.
Master class as in the PHOTO: How to make a fur cover for a standard IKEA stool - follow the link!
How to Reupholster and Paint Chairs
I really wanted to do something summery, something that would delight and become a bright accent. Chairs from the late 60s. Apparently the previous owners actively used them and they served them for many years. (It’s easy to calculate, the chairs are already more than 50 years old) The restoration took the longest amount of time, they arrived to us in very poor condition. Their chairs are solid beech, very strong, but battered by time.
1) Disassemble.
First you need to remove all the upholstery, for this you can use a flat-head screwdriver and pliers, they are convenient for tearing out old staples. The springs are not broken or bent, so there is no need to replace them. 2) Remove varnish.
Here you can use a wash, we use Bosny (don't forget about the protective agent, it is toxic). Or you can take ShM.
3) Painting.
We chose canary colored acrylic paint. The paint can be diluted with water and painted with a flat synthetic brush. Then there will be no streaks and the paint will lie evenly. I applied two coats with 30 minutes drying in between (see instructions on your paint packaging), sanding each coat with 320 grit sandpaper. After painting, we apply wax; it will eliminate cracks from the surface, make the color brighter and give a beautiful shine. After drying, polish with a soft dry cloth.
4) Upholstery.
First you need to take a thick, non-stretchy fabric, such as linen, and cover all the springs without stretching - cut and secure with staples.
Next, we lay several layers of padding polyester and sew them in rows using thick silk or nylon threads (in 2 threads), without pulling too much, as close as possible to the edge of the chair frame. Carefully trim off the excess.
Laying padding polyester
Sew stitches
Cut along the edge
Next, we lay another half of the padding polyester layers on top and secure them with staples: 5) Upholstery with fabric.
We select the fabric, center it and stretch it over the back of the chair. First, by hammering in the 4 central staples, then the corners, and then all the others, the tension can be checked by hand. We put padding polyester inside and nail it with staples to make the back soft.
We cover it again with the fabric, now with the front side and nail it with staples. We do the same with the seat, center the fabric, stretch and hammer in the 4 center staples first, then the sides and finally all the rest. Check the tension with your hand, as if stroking the seat; if you see a wave, pull out the bracket again in that place, tighten it better and secure it again.
When everything is ready, all that remains is to trim it, right next to the staples, so that the fabric is not visible later. Choose the decorative cord you like and use hot glue to frame and close all the staples along the edge of the fabric. If you are interested in how to make a cord yourself, then write, I will make a detailed master class. If you liked the master class, write in the comments, like, subscribe! Creative success and don’t be afraid to experiment!
Step by step process. Video
A chest of drawers that you got from your grandmother, an old mirror in a wooden frame, a chair whose color has become boring - these things are connected with the past and sometimes we feel sorry for sending them to a landfill. And there is no need to get rid of them. Often an old chest of drawers is very dear to us, and these memories cannot be replaced by any new model from the store.
Restoration of chairs
Restoration of old chairs: repainting white and dark colors. How to quickly and effectively paint an old one.
Therefore, we are faced with the task of updating it. How to change paint color at home? How to paint furniture at home?
You will find the answer to this and some other questions in this article.