What kind of glue can I use?
Not all types of glue will work. Do not use superglue or PVA. The first option will create a too rigid connection, which is not suitable for elastic skin. PVA will last until the first rain. This glue dissolves with water.
In order to seal a cut on dermantine, it is better to use adhesives that are not afraid of water and retain elasticity after drying. Among the most popular options:
- classic "Moment". I most often use this glue to repair leatherette at home. It is reliable, not afraid of temperature changes and moisture;
- glue for shoe repair. It can be used to repair artificial and natural leather. You can consider SAR 30E glue. It is moisture resistant, elastic and provides high strength joints. It can be used to glue leatherette to metal, rubber and other materials;
- adhesive based on polyurethane resin. For example, you can purchase Desmokol. Various dermantine items are repaired with this glue. It is highly moisture resistant and creates strong elastic joints;
- spray glue. One of the best options for repairing their leather products. It is easy to apply, guarantees a strong bond and dries very quickly. You can seal an item with an aerosol in a couple of minutes. Consider 888 Ultra glue as one option. The domestic aerosol “Multi-Spray” is also suitable.
Using these compounds you can easily seal artificial leather. But there are more complex cases, for example, when a hole appears on the surface. In this case, ordinary adhesive is not enough.
Materials for work
In our age, gluing any two surfaces together is not a problem. Therefore, it is also possible to repair a leather jacket at home, just like a suede or leather jacket, using glue. Moment, waterproof PVA or nairite are often used as adhesives. All of them have properties without which repairs would be impossible:
- quick drying of the layer;
- plastic;
- resistance to high and low temperatures;
- viscosity;
- resistance to fat and water.
In order to connect leather surfaces, glue from Henkel is most often used. The famous “Moment” can be found in almost any store, but you need to choose the one that says “universal” or “for shoes” on the tube.
The second most popular is waterproof PVA glue. In addition, viscous nairite glue grips surfaces perfectly, and liquid leather allows you to work with the layer for as long as twenty minutes.
How to glue a patch?
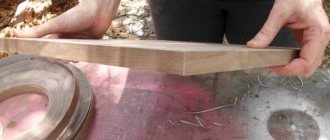
To carry out the repair you will need a ruler, scissors, glue, a match and a weight. It's better to prepare everything you need in advance. You will also need to cut out a small piece of leather. It will act as a patch. Then follow the instructions:
- place the rupture site on a flat surface;
- apply glue to the walls of the hole using a match;
- lay the patch end-to-end;
- press down with a weight and knock;
- leave the skin under pressure for 24 hours;
- remove the weight and apply glue to the seam;
- leave again for a day under the load.
Take the leatherette, glue the patch, carefully adjust the dimensions. This all sounds quite complicated. Therefore, you can use a simpler method - liquid skin. With its help, small cuts, holes and punctures can be easily filled. It perfectly imitates the surface of real dermantine.
Method 1
The first method of sealing a jacket with your own hands is more suitable if you need to repair a tear at an angle, however, in it you will need to add a small piece of tape to the tools.
- In order to repair a jacket at home, we need access to the tear not only from the front, but also from the back, which means that we will have to break the integrity of the lining. You can rip it along the seam in any convenient place, but it is best to do this along the sleeve in the place where the factory outer seam is located.
- So, first, let’s fix the tear on the front side with tape so that the torn piece fits back very neatly.
Advice
Very sticky tape can leave marks after removal, so stick it to your hand until the adhesive breaks to slightly weaken its stickiness.
- Now we glue a patch made of fabric, leather or suede from the inside according to the instructions for the glue.
It is important to lay it out very evenly so that no folds form at the time of gluing. Despite the fact that when gluing with “Moment” it is principally the force and not the pressing time, place a weight on the already glued area to avoid deformation and very smooth the area. By the way, the patch must extend at least 1 cm beyond the edges of the tear in order to completely cover the hole. - When the patch is one hundred percent dry, remove the tape and use a toothpick to apply glue along the seam of the torn area.
You will need very little glue: all excess must be removed with a cloth before it dries. - The last step of repairing a jacket with your own hands will be to tint the patch with watery leather, special paint, or at least ordinary leather cream to match the product.
Basic Tips
When repairing leatherette, you need to follow a few simple rules. This way you will definitely be able to avoid negative consequences. After all, mistakes during repairs can only worsen the situation.
- Before gluing the patch, degrease the surface. Regular alcohol will do. This will provide a more reliable grip.
- Apply liquid artificial leather in two stages. Let the first layer dry. Then apply the second one.
- Recreate the surface relief. You can use a regular napkin for this. Otherwise, you will not be able to glue the product together unnoticed.
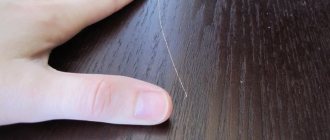
After wearing for a long time, scratches and abrasions appear on a leather jacket. Thin leather breaks if caught on a sleeve in transport. You can repair your favorite biker jacket at home if the damage is minor. The main difficulty is to choose a patch that matches the color. To make a beautiful repair on a leather jacket, you need to figure out how to use glue, tape, and liquid leather. You can also use applique, fabric or decorate the item with a decorative stitch.
Materials and tools
If a small dirty spot appears on the skin, then a napkin and alcohol are enough to restore the aesthetic appearance. In case of serious mechanical defects, the list of required materials and tools expands. It is determined by the choice of repair method. To eliminate minor damage in the form of small scratches and cracks, you need to prepare an express furniture repair kit: paint, liquid leather, glue, patches made of similar material, threads, needles, scissors, tweezers, spatula. When carrying out large-scale restoration work, a complete repair kit is required. It is needed for assembling and disassembling furniture and sewing seams. The list includes:
- screwdrivers;
- spanners;
- screwdriver;
- pliers;
- stapler;
- anti-stapler;
- sewing machine.
Tips for repairing furniture depending on the type of damage
When the repair plan includes replacing upholstery, the required amount of new material is prepared for the work. If the filling has become compacted or damaged during use of upholstered furniture, foam rubber must be prepared for restoration. Its quantity is determined by the scale of the defect. To restore the protective layer, you will need a restoration mask, a sanding sponge, and soft cloth wipes.
Common Mistakes
How can you ruin the appearance of a jacket:
- seal the gap with PVA glue - the patch, held on by a water-soluble compound, will fall off after rain;
- sew on a machine with a thin needle - to work with leather in the studio they use a special machine and needles;
- overuse glue - marks will remain on the front side;
- To paint a patch without testing - you need to try on a small whole area of skin to see how the paint or cream will look.
Leather stitched on a regular sewing machine stretches and wrinkles. Dried excess glue can be wiped off with a dry cloth. You cannot wash off traces with water, as the moisture will cause the patch to come off.
How to seal a leather jacket with your own hands?
If someone managed to tear a leather jacket, you can follow these instructions. To do this you will need a set of tools:
- Small sharp scissors;
- A hard brush and several toothpicks;
- Cream paint for leather;
- A small piece of leather with the same coloring as the jacket that needs to be repaired. The pad must be wide enough to cover the damaged area on each side by several centimeters.
- Glue used for working with fabric or leather goods;
- The area being treated will need to be pressed with something;
- The work area must be well lit.
Having collected all the necessary list of tools, you can get to work.
The higher the quality of a leather product, the thinner and softer the leather from which it is made. For example, you still have to try to tear apart a biker biker jacket, which is made of thick, rough leather. But a hole on an ordinary one may seem extremely simple. I got caught on a nail, awkwardly stuck my hand into my pocket, in transport they tore out a button with some meat - and that’s it, I tore my original clothes. If it's torn, fix it. It is not difficult.
How to seal a leather jacket and can you do it yourself? Can! Anyone with diligence and a small set of tools can carry out the repair.
To repair a thing, you need to have:
- Adhesive suitable for working with leather and fabric.
It could be “Moment”, or any of the shoe glues, but in no case PVA or “Superglue” for instant gluing. - Sharp small scissors.
- A piece of narrow leather or suede of the same color as the product you want to repair.
The size of the future patch should be such that it covers the torn area or cut by a couple of cm on each side. You can take narrow, dense fabric, but leather and suede stick better. If you need to repair a hole or a small cut, you can use an old leather or suede glove to patch it. - Solvent for degreasing bonding surfaces.
- A hard brush and a pair of toothpicks.
- Paint or cream paint for leather.
A hammer and something heavy that can be used to press down on the area to be glued may also come in handy. All work is best done on a well-lit table.
Additional tips and tricks
The following rules will help you repair your favorite jacket:
- use non-marking tape;
- To check the quality of the tape, you need to glue a piece to a sample of leather. If a sticky trace remains, you can loosen the adhesiveness of the tape - stick it on and off several times;
- instead of Moment, you can use any moisture-resistant elastic adhesive - polyurethane Desmokol, chloroprene SAR30E Kenda Farben;
- work quickly, before repairing, remember the instructions or check point by point with the note on a piece of paper;
- cut the patch 1 centimeter larger than the size of the tear;
- do not keep the patch coated with glue suspended for a long time, otherwise it will dry out and it will be impossible to correct its position after gluing;
- the surface to be treated must be dry;
- Instead of a leather patch, you can use a fabric patch, but the fabric does not adhere to the skin well;
- the leather insert can be painted with leather cream, but it is less durable than paint;
- apply the patch evenly, otherwise folds will form;
- To make the patch fit better, after gluing it you need to lightly tap it with a hammer;
- It is not necessary to rip off the lining; you can cut the fabric under the tear and then sew it up.
If you couldn’t match the patch by color, you can glue a contrasting piece, and a few more of the same ones for decoration.
Damage to leather products is not a reason to throw away an expensive item. It is possible to repair a leather jacket at home using inexpensive materials.
how to repair a leather product
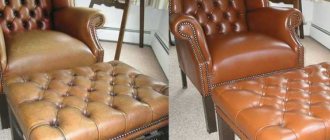
The shoes are truly like new! Leather products can last you more than one year, and for some even decades, it’s all a matter of proper care. No one is safe from sudden scratches on shoes, bags, wallets, or furniture. But if, due to carelessness, scratches appear, use some tips that will help return the product to its previous appearance. There are many ways to make your shoes look like they do in a store window.
Removing scratches from shoes and leather
Place a drop of varnish or glue on the head of a match or on a toothpick. The problem area needs to be slightly bent and lubricated. Then press the glued part with a towel and hold for 3-4 minutes, you will notice that everything is tightly glued. If the scratch is still visible, then pour superglue into it. Choose a paint that matches the color of your shoes and apply it several times to the damaged area. It is better to use acrylic paints; they will last on shoes for a long time.
Removing scratches with wax
Wax or paraffin will help get rid of deep scratches. You need to heat the wax or paraffin and then apply it to the scratch. Wait a few minutes for the wax to harden. Then gently wipe with a soft cloth (flannel is fine), and then you can apply shoe polish.
Removing scratches from patent leather
It is necessary to prepare a soap solution and wipe the damaged surface of patent leather shoes. Then take a cloth and use it to dry the surface of the soapy solution. Then choose a suitable nail polish and apply one coat to the scratch.
All leather products wear out sooner or later, including leather furniture
Removing scratches from leather furniture - 1 way
Take olive oil, wet a cloth with the oil and gently massage the problem area in a circular motion. Wait a little, the oil should not only be absorbed, but also dry.
When the furniture was dry, there was no trace left of the scratch. If this method does not help, then use the next method.
Removing scratches from leather furniture - method 2
First, apply oil to the scratch. Take a cotton cloth and dampen it with water, then apply it to the leather surface of the furniture. Prepare the iron by plugging it in until it warms up a bit, then place it on the fabric. Heat helps the oil penetrate deep into the skin, thanks to this effect, the scratch will quickly disappear. Then take shoe polish in the color you want and apply it to your leather furniture. Use a cotton pad or sponge to remove excess cream.
How and what to glue the skin with
You can repair an item if it is torn using universal glue (for example, “Moment”) or liquid leather. Before starting work, it is necessary to tear off the section of the lining opposite which the damage is located. It is advisable to flog along the seam. The skin around the break is degreased with a solvent. Traces of the solvent itself are washed off with water and wait until the surface dries.
To repair a leather jacket at home, in most cases a patch is used. Jackets are often sold complete with a piece of leather, which is intended for installing patches. If the product was sold without a patch, use dublerin or artificial leather. After installing the patch, the lining must be sewn up.
In addition to adhesives, a brush, spatula and gloves are used. A brush is needed for applying glue to large areas, a spatula for small ones (it can be made from any hard material: cardboard, a piece of plastic, etc.). Gardening or rubber gloves will help protect your hands from adhesives and dyes.
How to seal a hole in a leather jacket
To seal a torn leather jacket, prepare a flap whose diameter is 1.5-2 times greater than the diameter of the hole. Glue is applied to the edges of the front side of the flap and a patch is applied from the back of the product so that its front part is visible from the outside.
When is “Moment” useful?
You can repair a leather jacket if it is torn. Restoring a lost piece of leather can be effectively done using “Moment” for shoes - rubber glue. It has excellent ductility, and when the product is used, the adhesive layer will naturally stretch and contract along with the base. It is also useful to stock up on:
- Solvent. Needed for degreasing surfaces to be treated.
- Leather or suede patch.
- Small sticks (matches), toothpicks.
- With a brush.
- Leather paint.
- Scissors.
- With a small weight or hammer.
The restoration process itself is not at all complicated. However, it requires some order. What to do if your leather jacket is torn:
- Prepare a patch. To do this, take any old leather or suede product and cut out two pieces. One flap should strictly correspond to the size of the hole, and the other should be cut a little larger. It is advisable to choose the color of the patches to match the jacket. However, you can take a larger piece of a different color, since it will not be visible from the wrong side.
- Attach the patch to the inside of the jacket. After ripping the lining, the largest of the flaps is glued onto the inner surface of the leather layer, having previously treated the leather with a solvent. The flap is firmly pressed against the jacket with a weight and left in this state until the glue dries completely.
- Secure the patch to the front of the jacket. The second flap is glued over the first so that its edges exactly match the edges of the hole. In this case, you can help yourself with a stick so that the edges of the hole are completely straightened.
- Touch up the results of your work. The top patch needs to be painted so that the color matches the color of the jacket. It is most convenient to paint with a brush. When working, it is recommended to use special paint for leather. It needs to dry completely before you can move on to the next step.
- Restore the lining. It is carefully sewn up, the jacket is turned inside out.
Repair using liquid leather
You can seal a leather jacket at home with liquid leather. It is a polymer compound based on water and alcohol. Rubber resin in the leather makes the treated surface elastic, which prevents the material from detaching. The skin can withstand temperatures up to 55ºC. For work, choose the product of the desired shade. If the required color is not commercially available, products of other shades are mixed to obtain it.
If for some reason the patch needs to be removed (for example, it turns out to be the wrong shade), a solution containing alcohol is used, which must be used in the first 10-15 minutes after installing the patch.
Despite the fact that liquid leather dries out in half an hour, you can use the jacket no earlier than 8-10 hours after it has been repaired. It is advisable not to wear the item for 1-2 days.
Elimination of through cuts
To seal a hole in a leather jacket, you need to prepare a patch in advance. A small amount of leather is applied to it and glued from the inside out. A little more material is applied to the cut on the leather jacket from the front side. The treated area is blotted with a dry cloth and placed under a press. The skin hardens within 20-30 minutes.
Eliminating cuts with jagged edges
Uneven holes are treated with a blade or sharp scissors. If the jacket is burned, it is necessary to cut off the burnt edges. Liquid leather is applied to the patch and placed on the inside. A small amount of material also needs to be applied on the front side.
Repairing shallow cuts
Non-penetrating cuts do not require patches. To seal a damage in a jacket, you need to apply leather without going beyond the edges of the cut. Remaining material must be removed with a napkin.
LiveInternetLiveInternet
Leather jackets are an integral part of the wardrobe. They are chosen for practicality and durability.
But such a thing is subject to wear and tear and may require repairs over time. Most often, the jacket suffers from tearing of the fabric if you accidentally get caught on something sharp
When repairing holes in the skin, the amount of tension or strain placed on the damaged area plays an important role. For example, the floors of a raincoat do not experience heavy loads - repairing such damage is quite easy. If a hole or crack appears on a leather product, you can contact specialized workshops, where they will help you and repair the product. In most workshops you can easily get services such as removing holes and scratches, applying patches, and eliminating shiny areas. In addition, you will be happy to provide cleaning and painting services for your favorite item, thereby giving it its original appearance. Of course, you shouldn’t delude yourself, because damage to the jacket can be of such a nature that eliminating it seems impossible. However, as practice shows, such cases are extremely rare, and the skillful hands of a craftsman can make your product practically new. In addition, you can do the repairs yourself. However, you need to be completely confident that you can carry out this labor-intensive process, since inept actions are likely to lead to even greater damage to the product.
In order to avoid such troubles, we will analyze the easiest way to repair the product. This method is suitable for repairing small holes in leather jackets.
So, if you decide to repair it yourself, prepare everything you need in advance. For this you will need some supplies.
- Buy “Moment” glue in the store, preferably “Crystal” - transparent, since ordinary glue with a yellow-brown tint on a black leather jacket can be slightly noticeable. Superglue "Second" is not suitable for gluing leather products, because after drying it hardens, making the treated area brittle, which will subsequently lead to a new rupture.
- Turn the jacket inside out. Gently peel back the lining to expose the tear in the fabric. Straighten the area so you can see it clearly and level it.
- Prepare a patch that is placed in the pocket of the product by the manufacturer along with spare buttons/snaps. If you don’t have the original patch, you can use any thick fabric of a similar color. In any case, it will not be visible to others, since the sizing is done from the inside. Cut the patch so that the piece is a couple of centimeters larger than the area to be repaired. The excess can be cut off upon completion of work.
- Use a brush to apply the glue more evenly and carefully coat the tear area on the reverse side and the patch. After 20 minutes, repeat the procedure. Try to avoid applying glue to the edge itself, where the tear occurs.
- Carefully apply the patch to the area of the jacket with the hole and align the cut, gently ironing and pressing the material with your hand.
- Now process the cut from the outside. To do this, place the jacket in front of you, face up. Bend the edges slightly and apply a little glue, then press with your fingers. Excess glue can be easily removed by “rolling” it off the surface. On top you can apply a little Salamander leather paint in the appropriate color.
All that remains is to sew up the hole in the lining and enjoy the result and the savings in the family budget.
Now let's consider a case where it is not so easy to get to the underside of a leather product.
For repairs you will need:
- Glue for gluing leather and other surfaces.
- Scissors.
- A piece of durable, but thin and elastic material - you can use leather, rubber, latex, textiles.
- Abrasive, such as sandpaper.
- Surface cleaning and degreasing products
- Rubber gloves to protect your hands.
Let's get started! First, check the quality of the edges. If necessary, trim off excess pieces of leather and sand the surface with abrasive. Cut a piece from the prepared material that is several centimeters longer and wider than the cut. Treat it with abrasive. Next, thoroughly degrease the surface of the product from the inside and the prepared patch. Apply glue to the patch and let it sit for some time in accordance with the instructions for using the glue. Then carefully place the patch inside the cut.
Coat the inside surface of the hole with glue, helping yourself with tweezers (as in the photo).
Wait 5-10 minutes until the glue dries a little. Straighten the patch, bring the edges of the cut together and press them firmly against the patch. At this stage, we can still correct or move the tear site by gently pressing it with our fingers.
Let the glue dry. It takes several hours for the glue to completely dry.
If everything is done correctly, only a barely noticeable scratch should remain on the product. To disguise it, use the method suggested in the post How to remove scratches on leather shoes
In the same way, you can repair a hole - when a piece of the surface is missing. However, this is only possible if you have a spare piece of leather. Sometimes manufacturers supply such pieces for repair along with the product.
If the damage to the canvas is quite serious, large in size, and located in the most visible place, then in this case your imagination and a decorative patch will help. Use your imagination and turn renovation into a decorating process. If necessary, you can apply several patches located symmetrically. They can always be passed off as a decorative element of clothing. This is where pieces of leather to match the main fabric come in handy.
Consider this example: a leather jacket that has had its pockets torn out on the underside.
You will need:
- threads of a suitable color;
- needle for leather goods;
- leather patches of matching color
The hole is quite big.
First you need to sew up with frequent but not tight stitches,
so that when sewing on the patch, the skin does not come apart and the correct shape of the jacket is not distorted.
A very important step is to cut out the patch. Its shape, size and edges are all very important, because... A successful patch adds a special style and flair to your favorite item. Most often people make diamonds, squares, hearts and circles. I made the wrong trapezoid - better suited for pockets. And try to ensure that the patch covers at least 1 cm around the perimeter of the sewn part of the hole - otherwise the hole will come apart during wear.
Next, sew the patch onto the hole using basting, using contrasting threads.
On the side of the lining, lift it slightly and pin it with tailor's pins, since when the item fits according to the figure, the lining rises, and if this is not done, the lining will come apart at the seam or simply tear.
The next step is to sew on the patch using a sewing machine or by hand, whichever you prefer.
Remove the basting and trim all the threads. Front view
View from the reverse side.
And for symmetry, we put the same patch on the opposite pocket.
This is what the repaired leather jacket will look like in the end.
A long longitudinal tear can be repaired in the following way:
First, stitch the tear with a needle over the edge.
Cut out a patch of a certain shape - as your imagination tells you and the configuration of the hole dictates (in our case, a strip). Their size must exceed the size of the damage. You should still have a few millimeters left per stitch. The patch should completely cover the hole made.
Sew the patch with a decorative stitch,
For example, for a long narrow patch, a “Goat” seam is suitable.
You can decorate other parts of the jacket with the same decor - it will look more organic.
Based on materials from rezinkin.rf, kakimenno.ru
Tip: The Goat stitch is made from left to right and consists of a series of intersecting slanted stitches. The length of the stitches and the distance between them should be the same.
So, the thread is brought to the front side along the bottom seam line, then a small stitch is made along the top seam line from point 2 to point 3 - you get the first inclined stitch. Now make a small stitch along the bottom seam line from point 4 to point 5 - you get a second inclined stitch. Then stitch again along the top seam line from point 6 to point 7, then along the bottom seam line from point 8 to point 9, etc.
As a result, the stitches form an even, straight strip. Looks beautiful :o)
I hope that now if we have a situation in which we need to decide how to repair a leather jacket, you can easily handle it!
Note to the owner:
How to preserve the appearance of a natural fur coat for a long time
How to easily clean your oven
Snow-white bath - easy and simple!
Work order
Jacket repair work at home is carried out in the following sequence:
- To perform the work you need to gain access to the back of the leather.
To do this, rip out the lining in the area of one of the sleeves. The work must be done extremely carefully so that everything can be restored perfectly later. - Lay out the inside out jacket on a large surface. Degrease the back side of the skin in the area of the cut and the front side of the patch with a solvent.
- The glue is applied in a thin layer to the treated surface. Read the instructions first, check the holding time before joining the skin and the time required for complete polymerization of the glue.
- The next step of work requires scrupulousness and accuracy.
You need to glue the patch on the back of the jacket. First, one part of the cut is glued, the second part is adjusted to fit it. It is better to join the parts very close to each other. - Next, turn the jacket inside out. Using a toothpick, spread the edges of the cut and apply glue. The edges are painstakingly joined. Remains of glue are gently removed by rolling.
- The repair area is left under the press for the time required for drying according to the instructions.
- After completing repair work at home, you need to sew a jacket according to the style.
Sometimes it is advised to connect the part of the skin at the tear site with tape on the front side before starting work to best fix it.
You can try this option as well. But first you should think about how to remove the adhesive coating left by the tape.
Everyone loves leather things. They are practical and durable. But, like any things, they require repairs from time to time. Leather jackets most often suffer from cuts or corner-shaped tears if they are “lucky” to get caught on something sharp.