Loading…
Loading…
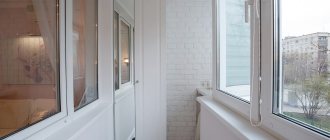
You can save space in your apartment and neatly arrange your balcony by preparing spacious drawers for this room. Everyone can make their own furniture if they first figure out what to make a cabinet on the balcony from and how to proceed. Spacious shelves are suitable for storing canned food, clothing, bulky items, and building materials. Making racks for a balcony will not take much time and special skills will not be needed for this work. All the necessary materials can be easily found in a hardware store, and the tools can be found in every home.
Types of structures
Before moving on to making furniture, it is important to decide what type of product will fit well into the size of the balcony.
If the space is small, then you should pay attention to the built-in model. During the carpentry process, the balcony walls will serve as load-bearing structural elements. Shelves and racks are attached to the walls of the balcony without taking up much space. Making a built-in wardrobe for a balcony with your own hands is not difficult, but before starting work it is important to think through all the details, since moving the product if necessary will no longer be possible. When there is a lot of space in the room, you can complement it with a cabinet. Carpentry work will require large financial costs, since it will be necessary to manufacture all structural elements and the inner wall, among other things. The product takes up more space on the balcony, but if necessary, it is convenient to move or transport when moving.
Making a corner cabinet for a balcony with your own hands will be a little more difficult than the two previous design options, but such a product is very roomy. This type of furniture can be built-in or cabinet type. A similar model is made in the form of shelves attached to the corner of the room. The corner type product is installed on an insulated loggia or balcony.
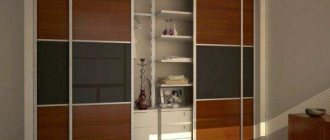
It will be much more convenient to be in the room if, before making a built-in wardrobe or cabinet on the loggia, you decide what kind of doors there should be. You can make a design using the following elements:
- Swing doors. Suitable for a loggia with a lot of free space. You can install doors to the full height of the structure or divide the structure into certain zones, where each will have its own door;
- Accordion doors, compartments and roller shutters. This type of door is suitable for a room where space is limited. They will help you save space and use your closet more conveniently.
Built-in furniture is the best solution
For small areas, precise size matching is important. A few extra centimeters - and the wardrobe will no longer fit on the balcony. And smaller furniture will waste space. Therefore, it would be more correct to order a built-in wardrobe for the balcony.
Ikea offers a convenient design designed for DIY assembly. Here you can not only choose a ready-made wardrobe for a standard loggia, but also order custom-made furniture for a corner balcony. Ikea store specialists will be able to demonstrate a three-dimensional model of future furniture, which can be adjusted if necessary.
A properly chosen cabinet will do an excellent job of ergonomically organizing space. If you approach this matter wisely, a balcony can miraculously turn from a place of chaotic storage of things into a full-fledged cozy room.
Comments
0 Igor 17.11.2016 21:43 The balcony slab cannot be heavily loaded, therefore, to make a cabinet for the balcony you need to use lightweight materials.
For the frame, take a metal profile for plasterboard, and for the installation of doors and cabinet lining, use laminated fiberboard or plastic lining. Quote Update list of comments
What materials will be needed?
You can make a cabinet using plywood, wood, chipboard, plasterboard or plastic. If desired, you can combine several materials with each other. In the process of finishing work, it is important to use PVC or lining. Using natural wood when making a balcony cabinet with your own hands is important when the room is not glazed. If you pre-coat the wood with waterproof paint or varnish, you will be able to prevent damage to the material under adverse weather conditions.
Before deciding on the building material from which the cabinet will be made, you need to take into account the design of the balcony, whether the room is insulated or not, and what the load will be on the shelves. A universal option for any type of balcony is natural wood. Materials such as plastic and MDF are also resistant to moisture.
Material of manufacture
When choosing structural materials, the following features of a balcony or loggia are taken into account:
- illumination (direction of sunlight);
- is there glazing, insulation (their quality, created temperature conditions);
- purpose of space (purpose of design).
Important: glazing does not protect against ultraviolet radiation and humidity; even when insulating a balcony or loggia, condensation forms when the doors are opened due to the temperature difference.
Pros and cons of the material used:
- practical plastic is not subject to swelling, but does not withstand prolonged exposure to light: it changes color and becomes brittle;
- plywood is well assembled and processed, but it swells from excess moisture, loses strength over time, and cannot withstand long-term static loads;
- MDF is a board material that is convenient to use, but emits harmful components when heated; it is undesirable to use it if the balcony or loggia is on the south side;
- Chipboard with laminated coating (LDSP) is a convenient, economical construction material, but over time it crumbles at fastening points, loses strength with frequent temperature contrast, and burns out;
- wood is an environmentally friendly, easily processed material, but requires mandatory antifungal protection;
- white plasterboard, impregnated with moisture-proof compounds, is well processed and fastened, but is not designed for large static loads;
- Tempered glass is used for shelves and doors; it can withstand heavy loads and is not afraid of humidity or temperature contrasts.
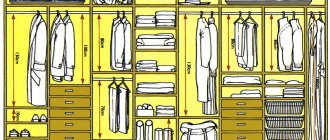
Once you have decided on the materials, it is important to think about the interior arrangement.
Product frame
Having decided to make a wooden cabinet for the balcony, you should think about what material to use for each individual structural element. When manufacturing the product, the main attention is paid to the frame and doors. Some cabinets come with a side stand and trim.
It is possible to make a cabinet frame using timber with a section of 50x50 mm or 40x40 mm. This option is suitable for a heated balcony. If the room is not heated, then it is better to exclude a wooden frame and pay attention to other materials, since under the influence of moisture the wood will change its size and begin to deform.
A universal way to make a frame is to use galvanized drywall profiles, since they do not change their appearance under the influence of adverse weather conditions. It is very easy to attach plasterboard, chipboard, plywood and other materials to a galvanized profile.
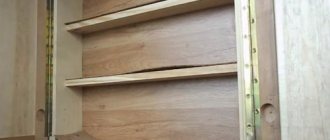
Cabinet shelves
You can make a high-quality and reliable cabinet for your balcony if you choose the right building material for the shelves. The main load will be directed precisely to this element of the product, so the shelves will have to pay special attention. Chipboard, OSB or thick plywood are best suited for making this part.
If the load on the shelf is more than 5 kg, then it is better to give preference to a wooden board. This material will cope perfectly with cargo in the form of canned goods, dishes or books.
The shelves are attached to pre-mounted bars or screws. It will not be difficult to make a frame for a cabinet from bars if you prepare all the tools and materials in advance. You can make a cabinet using metal corners, where you can also attach shelves. If the cabinet is of a built-in type, and the walls of the balcony can be drilled, then it is important to use corners and self-tapping screws.
A home-made cabinet on the balcony will look no worse if you build shelves using metal guides and brackets. In this case, changing the height of the shelves is very simple; just move the brackets to another hole.
You can build shelves from the remaining scraps of wooden boards. Before attaching the part to the frame, it is important to first prepare the boards. To do this, they are coated with a paint and varnish material (preferably water-based). Such shelves will not deform under the influence of moisture and ultraviolet radiation.
Types of cabinets
A wardrobe on a balcony should not only perform a practical function, but also please with its appearance. When choosing, you need to focus not only on personal preferences, but on the size of the room.
Built-in wardrobes on the balcony are considered the most ideal option, as they allow you to use all the usable space and not take up unnecessary space. When installing this model, precise calculations are required and it is made to order.
The balcony cabinet comes with louvered doors that do not impede air movement and preserve food, and metal-plastic doors that can protect items exposed to moisture and cold.
Corner cabinets for balconies come in open and closed types and are designed for storing flower plants and pickles. Most often, such models are large, occupying space from floor to ceiling and allowing you to accommodate many shelves.
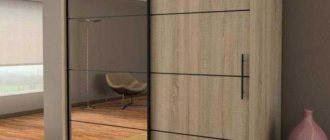
Wardrobes of this type use sliding doors, which indicates an even more economical use of the balcony space.
Hinged wardrobes on the balcony are considered a classic, but not entirely convenient option. Open doors take up a lot of space that could be used more efficiently.
According to storage functionality, cabinets are:
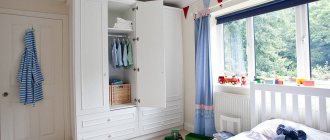
- For an insulated loggia. The closet on the loggia will become a full-fledged wardrobe for storing seasonal clothes;
- For storing tools and canned food. This option has many shelves, doors and sections of different sizes;
- For storing frozen foods. It is placed under the windowsill.
Also read on our website: How to arrange a balcony or loggia
Preparatory work
Before you start carpentry work, you should stock up on the necessary tools. Prepare electrical appliances in the form of: screwdriver, electric drill, jigsaw. You will also need to take a hammer, a chisel, a building level and a square. When making a product, you cannot do without nails, self-tapping screws, a plumb line, a tape measure and dowels. It will be easier to draw a drawing of a cabinet for a loggia if you prepare a ruler and pencil in advance.
Before you start assembling the cabinet, pay attention to the following points:
- Pre-repair the floor surface on the balcony. If it is not possible to repair the entire floor on the loggia, then pay attention to the area where the closet will be located.
- In the process of installing a cabinet on a balcony with your own hands, drawings will help you avoid troubles and get the desired design.
- If you install the structure on a glazed loggia, the cabinet will last much longer;
- Insulate the balcony (walls and floor) in advance and eliminate cracks using mineral wool, polystyrene foam or PVC. This measure will extend the shelf life of the cabinet.
DIY wardrobe for the balcony
A frequently asked question is how to make a cabinet on the balcony with your own hands, and how effective this solution will be. Making furniture yourself will not only save your wallet from unnecessary expenses, but will also help you create the item that you need and is right for you.
Moreover, for this you do not need to have special skills and abilities; it is enough to arm yourself with a set of tools, suitable materials and listen to the following advice:
- To extend its service life, coat it with a protective varnish. You can also use stain;
- Stick to calm, natural shades when choosing a facade, as bright colors fade in the sun;
- Do not purchase ready-made louvered wooden doors - their service life is short due to poor resistance to moisture and sudden temperature changes;
- Choose moisture-resistant drywall;
- To store things, you can build not only wardrobes for balconies, but also vintage chests. You may have one of these in your attic, gathering dust and waiting in the wings;
- From the point of view of saving space, a wardrobe on the balcony would be the most suitable option;
- Corner options are best placed on balconies and loggias of non-standard sizes.
Also read on our website: Curtains for the balcony: making and installing them yourself
To make a wardrobe for a loggia you will need the following tools and materials:
- Jigsaw;
- Drill;
- Sander;
- Screwdriver;
- Hammer;
- Construction level and additional devices: ruler, pencil, plumb line, tape measure;
- Wooden frame;
- Metal corners to assemble the frame;
- Corners for furniture to collect wood blanks;
- Self-tapping screws, nails, dowels.
How to make a product for a beginner?
Having understood what the cabinet on the balcony is made of and how to properly prepare the room, you should move on to the next stage. Think in advance about where the structure will stand, and also take into account the fact whether the balcony is glazed or not. This factor will help you figure out which material is best to use for carpentry.
For beginners, you can make an open cabinet in the form of a bookcase. The process of creating a loggia cabinet includes the following steps:
- Using a tape measure, measure the exact dimensions of the future cabinet.
- Prepare a drawing. Consider the width, thickness and height of each piece.
- Buy the necessary materials at a hardware store and prepare the tools.
- Based on the dimensions indicated in the drawing, make markings on the boards with a pencil.
- Using the prepared materials, cut out the parts, assemble the frame and attach the shelves.
It will be much easier to make a wardrobe on the loggia with your own hands using a photo or drawing. Make a frame following the basic rules. Start assembling the frame starting from the bottom. To begin, set the base level and then attach the vertical parts to it. After this, fix the horizontal parts on the structure, not forgetting to fix the rigidity of the product. Then attach the tabs where the shelves will go.
When you start assembling the cabinet, make sure that the product stands level and its parts are arranged symmetrically. If the product will be placed on an unglazed loggia, then pre-treat the boards with varnish so that the cabinet will last as long as possible.
Tips for experienced craftsmen
The process of making a cabinet with a more complex design includes the presence of doors. Having figured out what to make a balcony cabinet from and what tools to use, proceed to the next steps:
- Think over the drawing. Decide on the dimensions of each piece, the height and depth of the cabinet, and the distance between shelves. Think about the order in which you will assemble the design parts.
- In order to make swing or sliding doors for a cabinet on the balcony, buy hinges, handles and fasteners.
- Using the drawing, prepare the materials, cut out all the main parts with a saw.
- Assemble the cabinet one at a time using a building level and a plumb line.
- At the final stages, cover the cabinet with clapboard or plastic (the covering should be combined with the rest of the repairs on the loggia).
Assemble the wardrobe for the loggia with your own hands according to the drawing, starting from the bottom of the frame. First install the support, and then secure the longitudinal and transverse parts. After this, attach the shelves and doors. Try to straighten and carefully secure the hinges on which the doors will be located. Finally, attach the handles to the doors. You can prepare holes for hinges and handle fastenings using a drill and chisel.
Unusual design ideas
It is important to install on the loggia not only an ordinary hinged wardrobe with doors, but also other wardrobe options with a beautiful design. It will be much easier to design a cabinet for a balcony using photos and ready-made drawings. Frosted glass inserts will help make the product as cozy and homely as possible. A cabinet in the shape of a kitchen buffet looks unusual on the balcony.
A wardrobe with mirrored doors will help to visually increase the size of the room. The product can also be arranged as a workplace. This option is suitable for an insulated balcony. A computer monitor and system unit can be hidden behind the cabinet doors.
You can add fresh flowers or books to your closet if you think about neat shelves on the side in advance. If the loggia is large and it is insulated, then the room can be equipped as a separate room. The lower part of the cabinet can be designed in the form of a soft bench or sofa. It is important to equip the window sill on the loggia in the form of a table and complement it with a folding chair.