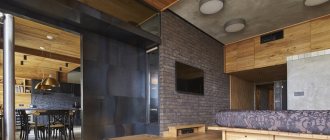
You can delimit the space of an apartment or private house not only with partitions and walls. One of the well-known ways to divide your home into zones is to install a podium. And if you create a pull-out bed underneath it with your own hands, then the area of the podium will also become functional and useful, because the bed will be suitable not only for sleeping, but also for storing a certain number of things and other items.
It is generally accepted that a podium is usually installed in a fairly small room, but this is not always the case. Such a bed can significantly enliven the interior of the room, and it can also easily accommodate guests who are staying too long with the owners. During the daytime, the bed can be easily pushed into the podium under the lid, and almost no one will know that it is there at all. Moreover, to make a pull-out bed, there is no need to open the floor or make a hole in the walls - therefore, such a bed can be used even in an apartment that is rented for a while.
How to make a podium bed
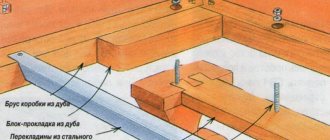
Structurally, the product is located at an angle, and it includes the following elements:
- Support frame attached to the wall.
- The frame of the podium, which is installed on the sides, which have good strength - they are located vertically.
- Actually, the bed itself, which can be pulled out, with a mattress. Behind the semicircular facade there are several compartments in which you can store magazines, clothes, bed linen and much more.
- There are two central triangular niches located in the corners (closed with separate lids).
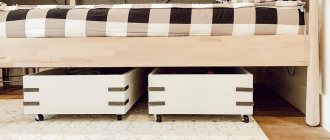
- Two side drawers for large items.
- A small ladder attached to the podium simultaneously hides a niche.
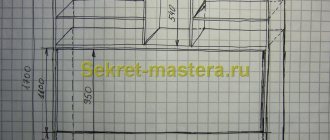
First of all, it will be necessary to calculate the parameters of the space that will be needed to install a pull-out bed. The most important thing is the size of the mattress - we will start from them. It is worth remembering that in the place where the bed will be pulled out, you cannot place any furniture that is stationary, because if you move a chest of drawers or a chair every day, this will lead to irritation and will also spoil the floor covering - linoleum or laminate. This area should always remain empty and easily accessible so that the bed can be approached from any place.
The height that the flooring will have, taking into account the thickness of the mattress about 20 cm, can be taken equal to 45 cm. Now about the ceiling. Standard ceiling heights range from 2.2 to 2.85 m. This means that a person of average height will be comfortable on such a podium. On such an elevation you can place a computer desk and a chair with a laptop or desktop computer.
The sequence of creating a retractable bed
Having purchased and prepared tools and materials, you can begin to build a podium and create a retractable bed.
Drawing of a pull-out bed on wheels.
- Installation of a supporting wall structure made of wooden beams.
- Installation of vertical posts and beams. The pitch of the racks depends on what future load will be placed on the podium. The higher the load, the smaller the step. The height of the racks should be lower than the platform by the thickness of the timber.
- Installation of horizontal beams on vertical supports. Fastening the posts and cross beams to the wall using dowels and screws.
- To make the bed itself, you should take an MDF board. As for the podium cover and its side part, they should be much stronger, so they should be made from furniture board. Markings are applied to the boards and MDF in accordance with the drawing, after which the parts are carefully cut out using an electric jigsaw. Having prepared all the parts, you can begin assembling and gluing them.
- The glued structure must be thoroughly dried, then varnished and placed on the sides. Assemble a lattice from slats to install the mattress, and screw furniture casters to the lower base of the structure.
Materials for making a bed
Having considered exactly how the pull-out bed will be made and calculated all the required dimensions, you can purchase the following lumber:
- Panels used in furniture. Their thickness is usually 22 mm, and the size of one slab is 60x30 cm. You will need 2 of these shields.
- A couple of 19 mm MDF boards, measuring 2.07 x 2.62 m (or plywood).
- Planed timber 40×60 – up to 30 m.
You will also need the following consumables:
- dowel screws;
- 2 furniture casters;
- wood glue.
It is advisable to have tools on hand such as a power saw and jigsaw, a milling machine, a regular drill, a screwdriver with screw attachments or regular screwdrivers, as well as clamps to fasten the glued parts of the pull-out bed together until they stick. In addition, you will need:
- Ruler and pencil;
- roulette;
- paint roller.
When all the materials and tools have been collected, you can begin to cut out the blanks, having previously created the necessary drawing.
Preparatory stage
If you decide to make a bed with your own hands, you need to carefully study some of the nuances and features. First of all, it is worth calculating the space for building a bed. In this matter, you need to proceed from the size of the bed mattress. It should also be taken into account that the space that will be occupied by the bed at night should not be cluttered with furniture. It won’t be possible to place a closet or chest of drawers close to the podium, since dragging them around every day to make room for the bed will be inconvenient.
Related article: How to insulate a log house with your own hands
Having decided on the size and design of the future bed, you can begin purchasing building materials.
The tools you should have on hand are:
Tools for making a bed: electric saw, jigsaw, milling machine, drill, screwdriver or screwdriver, sandpaper, brushes.
- electric saw;
- jigsaw;
- milling machine;
- drill;
- screwdriver or screwdriver;
- sandpaper or grinder;
- brushes
You may need:
- furniture panels;
- MDF boards;
- wooden beam;
- screws and dowels;
- paint or furniture varnish;
- glue.
Assembly and installation of wall frame
The assembly of the supporting structure begins, for which timber is used. The entire system will be installed along several walls. To do this, measure and draw the markings of the pull-out bed, doing this directly on the floor. In this case, the baseboards here will have to be dismantled - if this is not done, then the support rails will not go where they need to be.
Along the edge of the markings, vertical posts made of planed timber are placed. The distance between them will directly depend on the load that will be applied to the site subsequently. So, if there are several children in your house who will really like the podium, then supports should be located every 40–45 cm to strengthen the structure. If a heavy load is not expected, then the step can be increased. The height of the racks is calculated taking into account the fact that the platform will be higher by the thickness of the block.
Now about this block - it is installed horizontally, on top of the supports. All posts and cross beams adjacent to the wall must be attached to it with dowels.
When buying dowels, it is worth considering the width of the bar and the material from which the wall is made. So, if a pull-out bed will be made in a private house, the walls of which are built from shell rock, then the dowels need to be chosen longer. If the racks will be attached to concrete or brick, then their permissible length should be twice the thickness of the block.
You shouldn’t take risks and install supports as rarely as possible, trying to save on the beam. A structure built on such a foundation will soon begin to creak due to the lack of the required rigidity and constant dynamic load.
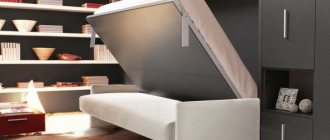
Features and advantages of the model
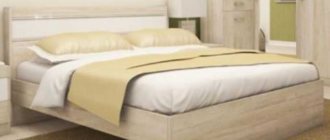
A children's pull-out bed for two children is a stable and compact design that can be easily transformed. It is installed:
- in small sleeping quarters with two or more children living together;
- when implementing original design ideas - placement in a niche or on a podium;
- in teenagers' rooms - to get an extra bed for friends;
- in preschool institutions - to increase the play area after naps.
A design feature of such furniture is the presence of a retractable mechanism with an additional sleeping place. The upper bed rises to a slight height. To get to the second level, there are convenient wide steps that can hide additional drawers or shelves. Compared to tiered models, the design benefits in safety and stability.
Depending on the principle of operation, the retractable mechanism can be of several types: on guides, with wheel (roller) devices, on rails or without them. The first option is not very suitable for children, since the guides rigidly fixed to the body and the absence of wheels limit the functionality of the furniture. As a result, the lower tier only moves forward and requires effort. With roller mechanisms such problems do not arise: the berth is installed in the desired position in a matter of seconds.
The clear advantages of such children's furniture include:
- Ergonomics and practicality. A pull-out bed takes up a minimum of space, transforming into 2 or 3 full-fledged beds with convenient and safe access.
- Functionality. Modern models are equipped with spacious drawers, niches, pull-out, folding or attached tables.
- Cost-effective - a double children's roll-out bed is cheaper than two single beds.
- Easy to use - even small children can operate the retractable mechanism.
- Variety of model range.
Children's beds with a pull-out table are optimal in size for small rooms.
Disadvantages taken into account include the risk of conflicts between children over the right to sleep in the upper place. It is difficult to do anything with such a negative psychological aspect. The only way out is to periodically change the children's places. Another disadvantage is that the child sleeping on top is forced to step over the one below.
It is also worth considering that roller marks may appear on carpets and coverings. But this can be easily avoided if you purchase a bed with wide wheels. As an option, choose models with a mobile and autonomous bottom drawer: their retractable design can be detached and installed next to it or in any other place.
Characteristic features of a classic children's bed, decor options
Ergonomics and practicality
Economical
Functionality
Ease of use
Variety of model range
Making a bed
The frame from which the bed and its front parts, which have curves, will subsequently be made, must be cut out of 19 mm chipboard. Since the cover and sides of the podium, located below, must withstand average weight, they are made from furniture board having a thickness of 22 mm.
All actions must be carried out only after an accurate comparison with the drawing of the bed, otherwise the material may be damaged and unsuitable for use, which will lead to unjustified costs.
All work is carried out in stages:
Stage 1. The bed begins to be made by marking the parts on MDF and chipboard panels. One of the slabs is used to cut out the lower base of the bed, which is rounded at the front. This process can best be accomplished using a jigsaw. A cover is then cut out of the furniture board, which will be attached on top of the podium, but before installation it is necessary to clean the cuts on the boards after cutting them.
Stage 2. The sides on which the flooring will be attached are cut out of the shield. You should turn over the floor of the podium and mark the places where these sides will be located. Stiffening ribs are glued to the edges of the flooring, which can be made from a 40x60 mm block.
Stage 3. The structure should be given some time after gluing. Before it is installed on the sides, all surfaces that will be visible are varnished.
Stage 4. Grooves are cut under the supporting beam. This block will be the support for the lids of the corner niches of a triangular shape.
Stage 5. Assemble the mattress grid, assembled from slats. Strips cut from chipboard are attached to this base. The facade that will be in front is assembled from two parts of slabs. First one part is screwed to the lower base, and then the other. Between this facade and the frame, special stops are installed, which are cut out from the remaining pieces of MDF.
Stage 6. Rollers are screwed to the base of the bed from below, with the help of which the bed will be pulled out.
After these steps, the additional step necessary to climb onto the podium is assembled. The finished step should be secured. When the entire structure is assembled, they check how well the parts fit, and then the bed is rolled out.
The next thing they do is screw the manufactured side ends to the frame beam located horizontally. A support rail is glued there (into the grooves), which is necessary to place triangular covers there. It is better to strengthen such a connection with screws. In cases where various furniture will be placed in a corner on the podium, it makes more sense to store things for the season in niches.
An extension ladder is installed, thereby covering a fairly large volume where household property can be stored. On the second side of the podium there is exactly the same niche. As a result, all occupied space will become useful.
Step-by-step process for making a bunk bed with your own hands
Frame making
First, you should measure the mattress, the shape of which corresponds to the size of the bed. If the design includes a sofa, then the lower part of the seat is measured.
The process for creating a frame is as follows:
- Creating side panels - tsarg. To do this, two boards of different widths are fastened together at right angles to resemble a shelf.
- Attaching bars to the panels, between which boards will later be placed to hold the mattress.
- Fastening all four bars using tenons or self-tapping screws.
- Attaching boards between beams.
First, the bed frame is made.
If using a sofa, it must be attached to the box. For this purpose, side supports are prepared, which are two vertically located bars, pulled together by other bars, smaller in size. There should be two such supports, for both sides.
The boards are fastened using either tenons or lugs, which are treated with wood glue. The elements must be connected very firmly to prevent the frame from weakening during operation. Afterwards the box is dried.
Back
It is best to make a slatted version of the back by adding slats to the frames of both tiers. They allow you not only to hold the bed, but also to protect it from contact with the walls. The back of the lower tier is often made soft, which allows it to serve as a sofa.
To make the backrest, you will need boards pressed tightly together or a furniture panel equal in width to the frame, as well as dowels for connection. The slats must be attached to the back of the box by drilling holes in both elements and connecting them using dowels.
The backrest is made of closely spaced slats.
Side boards and stairs
For the side walls, divided into a headboard and a backrest, you will need two sanded boards (one slightly narrower than the second) and four side slats. The headboard is attached as follows:
- Installing the boards for the headboard into the slats on the sides.
- Connection between back and headboard.
- Making lamellas, lattice or mesh to support the mattress.
- Attaching the slats to the inside of the box.
- Preparing the frame for the lamellas and positioning it on the inner plane of the tier.
- Overlay the slats on the frame in increments of 5-7 cm.
- Chamfering the outer ribs using a hand plow.
Finally, the side boards and stairs are made.
When attaching the backrest, you need to change the arrangement of the boards, installing a narrow board on top and a wide one on the bottom. Thus, the height of the narrow headboard board should coincide with the wide back board.
The staircase can have a different number of steps, be located straight or at an angle, and also be placed on different sides of the bed. Its assembly consists of the following steps:
- Installation of two parallel bars, which are the bases and guides of the stairs.
- Attaching steps. First, the lower one is fastened to the backrest, and then the rest are placed one above the other. The steps should be inserted into the bars.
The staircase is made in two stages.
There are such types of step connections as recess, external and metal corner. In any case, the fastening must be hidden, which will protect the child.
The staircase is also equipped with a handrail, which is a board attached to the frame. It is selected taking into account the easy grip of the child's hand.
Legs
The legs can have different sizes and shapes, calculated to ensure maximum structural reliability. Most often, round, square or carved legs are used, which can be secured from the outside, from the inside, or by inserting them into the frame.
The legs are made from bars and can be of any shape.
To make the legs, bars 50-100 mm thick are used, which are connected in pairs. The result should be a shelf-type end, with the length of the leg matching the height of the upper tier fence.
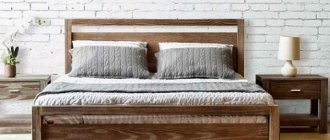
Bunk bed decor
It is necessary to think about decorating the bed before starting production, as it can significantly change the project. If you have certain skills, you can make furniture in the form of a car, a house or any other object. A simpler, but no less popular option is to equip the bed with a wall bars, rope and bars. It is also common to install a slide for a quick descent.
Ideas for decor can be very diverse.
Making a bunk bed yourself is a rather labor-intensive and painstaking process. However, with some skill and care, you can get a unique and high-quality product.
Flooring Finish Options
When the assembly of the podium and the pull-out bed is completed, they begin to paint the structure. Before painting, the surfaces are primed with a wood compound, for example, drying oil, and then dried. When the drying oil has dried, the paint is applied in two layers, after which the flooring is completely ready.
For those who don't really like paint, a suitable option is carpet. By the way, the coating can be made the same throughout the room. True, in this case, the delimitation of space will not stand out so much, and the podium will not be immediately noticeable, so a person who is not used to it may bump into the podium.
The result of all the work is that in just a few squares a small cozy corner was created, where a bedroom, a workplace and storage units for personal belongings can be located at the same time. This option is suitable for many apartments, especially one-room apartments, because the pull-out bed, which is available on the podium, will save space and give the home uniqueness and comfort.