0
19079
Today, many consumers are interested in making their own furniture. The number of home craftsmen is increasing all the time. Some of them purchase construction blanks from furniture factories, while others prefer to manufacture products according to their own designs. A do-it-yourself children's car bed can be made with all sorts of decorative elements or have a very simple look. It depends on the personal preferences of the child, parent, and financial capabilities.
What types of car beds are there?
Before you start making a bed, you need to choose a suitable model. In the assortment of furniture stores you can find several varieties of unusual children's and teenage beds that resemble vehicles. It’s curious, but there are options not only for boys, but also for girls.
Table 1. Types of models
| View, illustration | Description |
For boys | Basically, “machine” type beds are chosen specifically for boys. These can be racing or police cars, various jeeps (they will require more free space), as well as characters from the popular cartoon “Cars”. |
For girls | Usually, beds for girls are made in the form of convertibles with various patterns in the form of flowers and bright designs. You can choose the option of an unusual carriage-shaped bed - they are often painted in pastel, delicate colors that fit perfectly into the interior of a young lady’s bedroom. |
Two tiers | This bed model is best suited if two children live in the same room. You can make a structure in the form of a double-decker bus or a large truck. The main advantage of this model is that it allows you to save free space, because not every room allows you to install two separate beds for children. |
Table 2. Types of beds that differ in design features
| View | Description |
| Caracas on legs, which is reinforced by horizontal crossbars | In its manufacture, bars with a diameter of 5-7 centimeters are used, and their joints are reinforced with corners. On such a frame it will be possible to place all structural elements, including the frame, headboard, etc. The main advantage is that a bed of this type can be made at home, because its assembly diagram is very simple. In addition, instead of legs, some craftsmen use wheels, and then the structure can be moved around the room. |
| Frame and frame as a whole structure | In this model, the main load will be placed on the sides, back and legs. To further strengthen the product, you can install various cabinets and drawers. In general, this type of car bed duplicates classic furniture, and there is nothing complicated in assembling it either. |
Prices for car beds
Car bed
Step-by-step instruction
How to make a car bed with your own hands? You can stay with the basic version of the product. Or you can use your own project and supplement it with exclusive decorative elements.
Drawing and dimensions
To make a crib for a boy, you need to develop a project that will consist of diagrams and drawings. They indicate the dimensions of the future children's car bed. As an example, let’s consider the manufacturing process of a model with a standard polyurethane foam mattress with dimensions of 1600x700x100 mm.
To make a “racing car”, you need to prepare drawings of structural elements:
- Under the “hood” there will be a box for children's toys;
- The “spoiler” is a shelf;
- Side roll-out box ─ 639x552x169 mm;
Box size:
- Bottom ─ 639x552 mm;
- Side walls ─ 639x169 mm;
- Inset ribs ─ 520x169 mm.
- Niche for a roll-out box with upper cutouts for beams 50x50 mm;
- For a niche you will need two parts measuring 700x262 mm;
- The headboard measures 700x348 mm. The upper part of the element can be drawn in a radius or rectangular shape.
Then all dimensions of the parts are transferred in full size to templates, the projection of which will be transferred to the base material.
Material cutting
Lay out the prepared templates on the selected material (MDF or plywood) and cut out the parts of the car bed for the boy.
The side pads can be shaped like a racing car.
To cut parts at home, craftsmen use an electric jigsaw.
Cutting should be done slowly to avoid chipping on the outside cuts.
The nuances of making a frame
The main advantages of the frame include strength and reliability. If cribs are made at home, then it is better to purchase ready-sawn material for the frame. To make a frame, you can use two modifications:
- The frame can be made of a frame on supports or a box reinforced with wooden beams 50x30 mm. Metal corners are used to connect parts. The size of the frame or box must match the size of the mattress +1-2 cm. The plywood bottom can be replaced with a slatted one, which can be purchased at a hardware store along with a lath holder;
- When the structure of the frame and the frame are one whole. The load-bearing load is distributed on the sides, headboard and footboard. Using templates, parts are cut, which are then assembled using confirmat. For the mattress, a frame is made of timber, which is attached to the inner sides of the sides and the back. To strengthen the frame in the car, you can use bedside tables or chests of drawers. In this case, the sides of the car are attached to furniture products. You will get ready-made niches for bedding, stationery, toys, and seasonal clothing.
Assembly
A homemade car is assembled from prepared parts, which are cut from MDF boards using a jigsaw. Each part must be numbered. This facilitates quick and error-free connection of structural parts.
All holes for fastenings must be drilled in the parts, the end parts must be sanded and treated with appropriate edge material. Only after this is the preliminary assembly of the machine bed and all detailed matches are checked. Then the structure is disassembled and the master moves on to the next stage. He paints the parts according to the design project. After the paint has dried, the parts are coated with water-based varnish, which does not harm the child’s health. And only after this the product is assembled.
Make a frame for the mattress from selected 50x50 mm timber. Connect the beams with self-tapping screws 80 mm long. The dimensions of the mattress frame are 1600x700 mm.
Attach support legs ─ 5 pieces to the assembled frame (3 in front, and 2 in the back of the structure). The height of the supports is 225 mm. Make a front drawer, which consists of two side walls, a front, a back and a lid. It will have to be attached with a piano loop.
Connect the back wall and the bottom with a confirmat, then attach the side parts and the lid with a piano loop.
Place templates for the side sides of the car on plywood or MDF sheets. They will be different, since on one side you need to prepare a cutout for a roll-out box. Strengthen the side structures on the mattress frame using confirmat. The sides are attached at a distance of 13 mm from the floor.
Determine the location of the box, and then screw the side with the slats and fix the box with self-tapping screws to the side of the car.
Make a niche for the box from racks measuring 700x260 mm. In the upper part of the niche there are 50x50 mm cutouts that correspond to the cross-section of the timber. Secure the racks.
Make a headboard according to the template. Attach the headboard to the frame.
Attach linear rollers to the box or use them as guides, which can be attached to the side posts of the niche.
The dimensions of the box are influenced by the linear rollers between which the box should be placed. Strengthen the box in the structure so that the side coincides with the front of the box, and the bottom edge of the side of the bed is flush with the bottom edge of the front.
Place the box in the niche. Make a limiter from a piece of timber on the opposite side so that it does not go further than necessary.
Attach the parts with self-tapping screws to the structure. Make an overlay, which is in the project with dimensions, and attach it to the facade so that the distance to the floor is 41 mm. Make wheels and tires. The radius of the outer tire is 164 mm, and the inner one is 125 mm. Make disks around the inner circle.
The supports on which the structure is installed will be hidden under the wheels. Fix them on the car bed. Strengthen the spoiler shelf made of 16 mm thick MDF, with 12 mm racks. Place a sheet of plywood 10 mm thick on the bed.
Base and mattress
To make the base, durable material is used so that it can withstand the weight of the child and not break if the child suddenly decides to jump on it.
Manufacturing procedure:
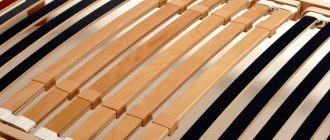
- To fill the base, cut 20x20 mm slats;
- The distance between the slats should not exceed one and a half times the width of the lamella;
- Secure the slats to the frame slats with slat holders.
Cutting slats
We attach them to the frame
Parents should take the choice of mattress very seriously, taking into account the age and physiological characteristics of the child. Doctors have identified several main types of mattresses for a certain age:
- Up to 3 years ─ coconut, 5-12 cm high;
- From 3 to 7 years ─ medium hardness, latex;
- From 4 years ─ with independent springs;
- From 7 to 12 years old ─ soft type allowed;
- Over 12 years old ─ polyurethane foam, 14 cm high.
Today, the industry offers mattresses with antibacterial impregnation or ventilation covers. The mattress is placed on the base.
Up to 3 years
Over 12
From 7 to 12
From 3 to 7
What materials are used to make the bed?
Since we are talking about a children's bed, with which the child is in direct contact for a long time, you should pay special attention to the choice of materials for its manufacture. It is important that they are as durable as possible and safe for the baby’s health. In order to make sure that a particular material is safe, you will need to ask store sellers for the appropriate product certificates.
Table 3. Types of popular materials for making a bed
| View, illustration | Description |
Natural wood | This is the safest and most durable material, which is best suited for making children's furniture. At the same time, it is important to choose a high-quality array that has been treated against fungus, otherwise the product will quickly become unusable. One of the disadvantages is that natural wood is less easy to process and it will not be easy to cut out shaped parts from it. Of course, you can buy softer types of wood, but they are no longer very durable. |
Laminated chipboard | This is a more suitable material, which is often used for the manufacture of any shaped structures. The only downside is that some cheap copies are toxic, because they are made from synthetic resin and sawdust. Therefore, when choosing a material, you need to make sure that it is environmentally safe - pay attention to the relevant certificates that the seller must provide you with. |
MDF | A more expensive option compared to chipboard, but absolutely safe. It is easy to process, which is why in recent years MDF has gained particular popularity among furniture makers. In terms of its qualities, it is not inferior even to natural solid wood, and in some areas even surpasses it. Thus, MDF has good resistance to humidity and high temperatures. |
Prices for different types of MDF panels
MDF panels
In addition, parents should take into account that a large load will be placed on the children's bed, because kids often like to arrange various games in their sleeping place. Therefore, the thickness of all elements of the crib must be sufficient to support the weight of not only a lying, but also a jumping child.
Video - What to look for when choosing lumber
Selection of material and tools
The basis for a children's bed should be harmless and non-toxic materials. It is recommended to carefully select wood and check for all relevant health certificates.
Its safety and durability depend on the correct choice of crib materials.
The most common option is to make a car yourself from photo-laminated chipboard or laminated chipboard. These durable materials are distinguished by their bright appearance and high moisture resistance, allowing you to create beautiful models.
A set of tools for working with wood.
Another option is an MDF base. It is environmentally friendly, since natural polymers are used in the formation of the array. This material is very close in its properties to natural wood, but at the same time is more durable and resistant to external influences. Children will have to try very hard to scratch such a coating, and its susceptibility to moisture is minimal. Such a children's car bed will be durable and practical to use.
To process materials and cut out parts you will need a set of special tools. However, most of them are already stored at home by any man: a hammer, a screwdriver or screwdriver, a drill, sandpaper for grinding and deburring.
Tools for making a crib with your own hands.
It is recommended to purchase an electric jigsaw - it will greatly simplify the process of cutting wood. You will also need self-tapping screws, a measuring tape, a marking pencil and, if necessary, non-toxic paints.
Optimal bed size
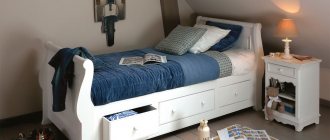
It is important to make the most comfortable bed for a child, which means it must be spacious. So, the optimal width of the product should be about 100 centimeters, and the length should be at least 160 centimeters. It is worth considering that some mothers sometimes like to lie down next to their child to read to him at night or just to be together. Therefore, it is better to make the length of the structure about 200 centimeters, so that it is comfortable not only for the baby, but also for the adult.
It is important to correctly calculate the size of the sleeping place, in accordance with the age of the baby
If you are going to make a bed in two tiers, then you should take into account the height of the ceilings of the room, because the distance from the bed on the top floor to the ceiling should not be too small. For a child who will get the second floor, it is important not only to lie comfortably, but also to sit without touching the ceiling. At the same time, it is important to make the highest possible sides on the second tier so that the baby does not fall out of there.
The child will definitely be able to appreciate the spacious bed-car
Types of children's beds
A children's bed must satisfy three basic requirements: durability, safety and attractiveness. If everything is clear with the first two, then the latter leads to ambiguity, especially when it comes to going to the store. On the one hand, there is no point in overpaying for unnecessary decor and design, and on the other hand, it is worth taking into account the fact that children should find it interesting. Always!
A children's bed should not only be comfortable, but also interesting for the child.
Taking this into account, we can consider the main types of children's beds:
- Regular. The most common option is the most practical and equally uninteresting.
- Two-tier. It is attractive because it is possible to sleep on the upper tier.
- Combined. A compromise option between, in fact, a bed and a table, wardrobe, nightstand. Good too.
- Homemade, stylized. For girls, these are butterflies, clouds or fairy-tale animals. For boys, of course, cars: sports cars, trucks, as well as buses and planes. The most interesting solution!
Note! If we talk about making it by hand, then it is the option with a machine that is most often found in modern homes.
Schemes and design drawings
Before starting to manufacture the structure, it is necessary to draw up a detailed drawing or take a ready-made version. So, the design of the product may have additional drawers and other elements - it depends on the overall design of the room and your desire.
Having chosen one or another model, you should take the drawing as a basis, and then use it to prepare patterns on thick cardboard. They will be needed to prepare wood parts.
Cutting diagram
In our case, we will use the following cutting scheme. You must first prepare cardboard patterns according to these dimensions (this is not a mandatory step), or contact a professional workshop. If you choose the second option, you are more likely to get perfectly smooth parts.
If it is not possible to contact the craftsmen, then it is recommended to cut the material with an electric jigsaw. Using a handsaw can damage the edges of MDF, resulting in unsightly chips that will be difficult to disguise with anything. In addition, there will be a lot of dust in the apartment from such a process.
It is better to entrust the cutting of parts to professionals
Body panel
Step 1
Now place the template on the remaining part of the MDF sheet (see Appendix). Move the bottom edge of the template so that it overhangs the MDF panel by 5 cm (photo 8). Trace the template to create the outline of the body (B) that needs to be cut out.
Step 2
Draw window openings (drawing 2 of the Appendix). Use 5cm diameter round ventilation grilles to create curves at the corners of the windows (Photo 9).
Step 3
To cut out the windows, drill a 10mm diameter starting hole, insert a jigsaw blade into it and cut out the shape (photo 10).
Step 4
Use a file to trim the edges of window openings. Place panel (B) on side panel (A) with a 5 cm bottom offset (Appendix Figure 1). Fasten the parts with clamps and grind off the edges of the body panel with a router (as when making copies of parts).
Step 5
To duplicate panel (B) for the opposite side of the car, place the finished piece on a sheet of MDF, align the edges and trace the outline. Cut out the workpiece with a jigsaw (with a margin).
Step 6
Connect the template (B) and its copy with clamps. Use a router to complete the second body panel.
Making a car bed with your own hands
As with the manufacture of any furniture, you will first need to prepare all the materials and tools. So, in the process we will use the following:
- jigsaw;
- circular saw;
- screwdriver;
- drill with a set of drills of different diameters;
- sander;
- milling equipment;
- file;
- clamps;
- brush;
- MDF and plywood sheets;
- adhesive tape;
- furniture fastenings;
- glue;
- paint.
Most assembly tools can be found by any owner.
Step-by-step instruction
Making the sides
Step one: on an MDF panel (1.9 centimeters) you need to schematically display the car exactly according to the drawing. So, you should draw all the details, including bumpers, glass, hood, trunk. If you already have ready-made cardboard patterns, then it will be enough to just attach them and outline them.
It is necessary to prepare an MDF sheet
Step two: it’s better to start drawing from the rear bumper. So, you need to move carefully so that all the lines are neat. If you need to display rounded details, you can use all kinds of objects for such purposes. For example, these could be cans of paint of various sizes.
Drawing the lines of the structure
Step three: now we need to draw the hood. Since it has a curved shape, you will need to use a round object to draw it. The best solution would be to draw a flexible wooden stick.
You need to fix the stick with a clamp and then draw the hood
Step four: using a jigsaw, we will need to cut these blanks exactly along the contour (the blade should be slightly higher than the markings). Next we will need to sand the edges. If you have minor deviations from the intended lines, do not worry. The main thing is that all the details turn out to be as smooth and identical as possible.
We cut out the parts exactly along the lines - this should be done carefully so as not to spoil the design
Prices for popular models of jigsaws
Jigsaw
Step five: all fresh cuts will need to be sanded. Curly protrusions are processed using a grinder with an emery attachment.
Finish the edges with a sander
Go along the edges of the internal holes with a file and then with fine-grained sandpaper
Making symmetrical parts
We have only prepared parts for one side of the car bed. Now you should make symmetrical parts for the other side. Let's take a closer look at this process.
Step one: finished, we could cut out exactly the same parts for the other side using a jigsaw. To do this, it is enough to leave a few millimeters on each side (taking into account subsequent sanding). However, professional craftsmen consider such actions inappropriate. You can make perfectly symmetrical parts using hand-held milling equipment using an edge finishing attachment. To begin with, we will prepare the sidewall parts in this way, and only then we will move on to others.
The use of milling equipment will allow you to quickly obtain the required number of workpieces
Step two: you need to place the previously prepared side frame of our bed with the second (draft) side frame on a flat table. Now they should be connected on the other side using clamps.
Now you need to install the facing attachment into the milling machine and thus cut out the perfect edges of the rough part. The advantage is that this is all done very quickly.
Prices for a linear series of milling cutters
Fraser
Making the body
Step one: you need to attach the prepared template to the remaining MDF sheet. It should be moved so that it hangs 50 millimeters above the sheet. Now it should be outlined along the contour with a simple pencil, thanks to which we will get the body part.
We trace exactly along the outline of the template
Step two: we need to map the openings for the car windows. In order to make them, you need to use any round object with a diameter of 50 millimeters. This could be a jar lid or similar items.
Making round corners
Step Three: Next we have to carefully cut out the window openings. To do this, you will need to drill a hole in the MDF sheet and place a jigsaw blade into it.
Cutting out holes for windows
Now, as in the previous case, we will use a file to make these holes perfectly smooth. Then you need to align the two panels (window and side panel), secure them with clamps and trim the edges with a router. Next, for the other side of the bed we need to prepare another window panel. This also needs to be done using a milling machine.
Making wings and wheels
Step one: we have to transfer the outline of the car wing onto the MDF sheet. In this case, you will also need to cut out the part with a jigsaw and then sand the edges. This template will then be used to make the remaining wings. Now it is necessary to connect the parts of the wings using self-tapping screws so that they cannot move during processing with a milling machine. In the future we will cover these holes with putty.
Tighten the screws
Trimming the edges
Step two: using a compass, draw a circle - this will be the tire of our car. One more circle should be made inside, after which it will need to be cut out with a jigsaw. Next, the internal hole should be carefully sanded. For these purposes, you can use various devices, including a file and sandpaper. The main thing is that the part turns out smooth. Using this blank it will be easy to make the remaining tires.
Cutting out the tire
Step three: we begin to make wheels for the car. We will make 6 holes in them for fastening bolts. It should be borne in mind that these holes must form an even hexagon, so it is important to correctly calculate the location of these points using a compass. This is quite simple to do - we need to draw a circle in the middle of the wheel, its radius will be 6.35 centimeters. Now you need to stick a compass into one of the intersection points and mark the point with the back of the compass. The remaining values should be obtained using the same principle.
We designate the points
Now you can connect these two parts with self-tapping screws through the prepared holes
As in previous cases, we need to achieve smooth edges, so we process them with a milling machine. Then the wheels and tires should be disconnected. All these parts must be numbered. In addition, using a router, you need to make the edges smooth.
Treating the surface
Prices for popular models of eccentric sanders
Random orbital sander
Assembling the sidewalls
Step one: first you need to assemble some parts of the structure, and then unscrew the fastenings just before painting the bed. This way we can connect the painted parts without damaging the coating.
We need to cut a beam with a cross-section of 50×100 millimeters for the parts of the support, partitions, frame, seat and pipe of the machine. Next, all the bars (except for the exhaust pipe part) should be laid out inside the sidewall of the structure and secured with adhesive tape. In this case, there should be space between the support and the partition for attaching a sheet of plywood. Now you need to unfold the sidewall and cut out holes of the required diameter for the screws.
Leave space for plywood
Now the body needs to be installed in place and secured with screws and glue. All screws should be secured from the sidewall.
Next, you need to make holes for fastenings in the pipe blank. After which it will also need to be carefully sanded.
Step two: next you need to unfold the sidewall so that the body part is in front of your eyes. This will allow us to mark the place where the wings are fixed.
Determining the location of the wings
Then you will need to glue the pipe block and the wing blank to the side with adhesive tape, and then secure it with screws. The same actions will need to be duplicated with another part of our machine.
The basis
Step one: you need to prepare a plywood base and support bars.
Preparing the details
Step two: these bars must be connected to the plywood using the same principle, using fasteners and adhesive tape.
A piece of wood should be used to determine the correct location of the holes.
Spoiler (headboard)
Step one: you need to cut out the spoiler blanks according to the parameters specified in the diagram.
Cutting out the details
Step two: Now we will need to make rounded edges, then sand the parts, after which we can assemble the base of the headboard using fasteners and wood glue. Next you need to make plywood partitions. We will fix one of them on the base of the headboard.
As a result, our spoiler should be symmetrical to the sides of the structure
Seat
We have to make elements for the base of the seat from bars, as well as parts for the back from a plywood sheet.
It is necessary to secure these parts together
Prices for clamps
Clamps
Making a box and a bumper
Step one: you need to cut out the parts of the box from MDF (according to the diagram), and then sand them. All edges of the drawers are also processed with a special attachment for the router.
All parts of the structure should be assembled and secured with screws
Step two: at the end we will need to make a car bumper. This bumper will then be installed on the box
Handle mounting diagram
Painting and installing the bed
As we said earlier, in order to paint our car, we will have to disassemble the mounts. Choose a paint based on its non-toxicity parameters; the shade of the future crib can be discussed with your child or matched to the interior. After painting, the bed is covered with several layers of varnish. When all the parts are dry, you need to assemble them in accordance with the diagrams.
Assembly diagram No. 1
Assembly diagram No. 2
What parts does the bed consist of?
The headboards and sides of the children's “car bed” are made of chipboard. These parts were cut out on a CNC machine. Of course, you can cut them yourself with an electric jigsaw, but to get a perfect cut, you need to sweat quite a lot.
The archive, which you can download at the end of the article, contains the layout of the bed parts for the CNC machine in dwg format. This file can be opened using Compass or AutoCAD. But, by and large, you don’t need to do anything with it. Just pass it on to the company where you will order the parts, and they themselves, according to this drawing, will make you the necessary parts for the bed - sidewalls, front and rear bumpers of the car bed.
The design on the sidewalls was obtained using glued oracal film, which was previously printed on a large-format plotter.
The ends of the chipboard are covered with a U-shaped mortise profile. The process of its installation is described in the article U-shaped PVC mortise profile.
The slats that will hold the mattress were attached to the sides of the bed using wooden beams and lath holders (see photo).
Also, in order to hide the fastening points on the visible parts of the bed, eccentrics, rather than confirmats, were used as fasteners.
Let's sum it up
Making a car bed is not only an opportunity to give an unusual gift to your child, but a great way to enliven and decorate the interior of a room. In addition, any parent can cope with such processes - they just have to stock up on all the necessary equipment and lumber.
The range of children's furniture is now huge, each manufacturer offers many models to suit every taste. But if you have carpentry skills, even basic ones, you can make everything yourself, and such products will cost several times less. For example, you can find out how to make a bunk bed with your own hands on our website.
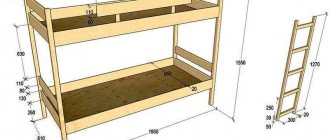
Children's bed machine ROMACK RENNER 2 with drawer - assembly instructions
Packing and equipment of the bed of the Romak Renner 2 machine with a box:
* Click on the photo to enlarge the image
1. To the sides of the bed of the Romak machine we attach the front armlet bar along the marked lines (the bottom of the armbands to the line), using self-tapping screws through through holes, with blind holes inside the machine (to the mattress).
2. Attach the back plate-plate (also known as the box lid) to a bolt with washers on both sides into a threaded hole on the side with blind holes inside the crib (see picture). It is necessary to add a drop of glue (included in the kit) into the threaded barrel to avoid unscrewing the bolt during operation.
3. Install the limiter on the lid of the laundry drawer. We align the back strap-plate along the line, apply a limiter to the bottom of the strap and secure it with self-tapping screws.
4. Attach the corners to the back straps. The corners are attached at the very edge of the plank, along the bottom side.
5. Screw the corners to the front of the crib and the back using self-tapping screws into the marked holes.
6. Screw the front part and the back to the side panels with braces.
7. Turn the rear slats to the “upper position”, screw on the rib-stiffener.
8. We put the batten holders on the armor. We screw the armor to the armor plates into the marked holes.
9. We prepare the bottom of the bed of the 3D Romack renner 2 machine - we attach the corners along the marked holes (5 corners for the main parts of the bottom and 2 corners for the vertical partition).
10. Assembling the drawer bottom begins with attaching the back. We join the edge with the central corner with the back, and align the opposite edge of the bottom part with the bottom of the side of the crib.
11. Extending the drawer, we fasten the second part of the bottom at the joint to the first and align it with the bottom of the sidewall.
12. We attach the vertical wall of the linen drawer at the end along the bottom with the last part, securing it to the sides and in the center to the last part of the bottom.
13. All that remains is to turn the car over, put on the mattress, lay down the bed linen and make the young racer happy.
How to choose a car bed for children over 3 years old
Car beds are quite popular today and manufacturers are constantly coming up with new solutions for children’s furnishings using such products.
Classifications of sleep machines by design
Single bunk beds
These are classic products designed in the appropriate style. Their design may include retractable and lifting mechanisms for storing linen, toys and other child accessories inside the bed.
Bunk
In this case, the bed can have two types of designs:
- Two combined beds located one above the other. A staircase leads to the second floor and is designed for two children.
- Loft bed. The bed bed is located at the top; a ladder is provided for climbing. The area under the bed can become a play or work area where the child will do homework, play on the computer, and so on. A convenient solution for saving space in the nursery.
Thematic classification
- Car beds for small children. Made in the form of your favorite cartoon characters.
- In the form of racing cars, the look is close to real cars. Beds for older children, they can spin wheels and turn on lights.
How to properly cut sheets and prepare holes?
There are two ways to make templates for future bed parts. Use a computer program or draw. There is also a third method, but it is more labor-intensive and involves a lot of paper consumption and the presence of a photocopier. After the templates are ready, you need to place them on sheets of the selected material and outline them with a marker. Now, using an electric jigsaw, you need to cut out all the parts of the bed.
After you have cut all the necessary parts, you need to process them using sandpaper. This method will make their ends even and smooth.
Next, we move on to the process of preparing holes for confirmations. They are made at the junction of the frame and other parts of the bed. If you took our advice and purchased special drills, then you can make such a hole quickly without much effort.
Related article: Floor tiles for the hallway: kitchen and hallway floors, types and how to choose, what photo, correct floor sizes
Return to contents
Design Features
Children's beds are subject to much more stress than adults, despite the obvious difference in weight. The child is constantly and actively moving, and the bed, both regular and play, is constantly used not only for sleeping, but also for jumping, tumbling, climbing, playing hide and seek, and so on.
- Therefore, one of the main requirements for the model is the strength of both the material and the fasteners.
- Safety of design - material, paints, stickers, lighting, if expected, must comply with the required safety class.
The second is the correspondence of the size of the machine bed. A sliding bed cannot be designed in this way, so the parameters are selected for “growth”. On average, the period of use will be 2–3 years.
Bed in the shape of a car (photo)
Frame
It is performed in two main modifications. The choice depends on desire, experience working with wood and the upcoming load - the weight of the main user.
- The frame itself - a frame on legs or a box, reinforced with transverse crossbars, is made of wooden beams 50 * 70 mm. The joints are reinforced with metal corners. If it is planned to install drawers, then instead of cross beams, plywood jumpers, or better yet boards, are fixed. The frame of the bed is assembled onto the frame, that is, the sides, back and headboard. This design is easy to manufacture and very reliable. The dimensions of the frame coincide with the parameters of the mattress plus 1–2 cm. The bottom can be installed solid from plywood 10 mm thick, but a slatted one will be much more useful. A set of slats along with lath holders can be purchased at any relevant store. Height is determined by the child's height. The frame can be installed directly on the floor, on legs or on casters.
- The second option is that the frame and frame of the bed are a single whole. In this case, the sidewalls, headboard and footboard perform the load-bearing role. The parts are cut out according to the developed template and then assembled. The mattress will be held by a frame made of beams, fixed to the inside of the sides and back. You can strengthen the model by using the simplest bedside tables as frame elements. The sides are fixed directly on them, the fronts of the bedside tables are designed as a footboard and headboard. And as a result, they get a machine bed with ready-made niches for blankets and linen. Chests of drawers with one drawer can be assigned to the same role; this option is even more convenient.
Do-it-yourself car bed (photo)
Side panels
They serve as the main design detail, giving the bed the contours of a car.
Sidewalls are cut from plywood, chipboard, MDF or wood, depending on the features of the model and financial capabilities. At the first stage, a project is developed. A specific model or an abstract image of a car is used as a sample, but even with the most basic calculations, there should be a drawing in front of your eyes with parameters, rounding angles and color. A template is made from the sketch and then cut out of the material.
The same is done for the headboard and footboard. The options are different: it is possible to install simple flat panels, where the resemblance to a car is achieved by the image of headlights, but you can develop a design that more accurately imitates a bumper.
There are two ways to make a machine bed with your own hands.
- If the elements are mounted on a frame, then special strength is not required from them. In this case, the sides and backs are cut from plywood 10 mm thick, or chipboard as desired.
- If the bed frame is the frame, then you will need chipboard, MDF or wood up to 18 mm thick.
In both cases, the workpieces are cut out with a jigsaw, cleaned, and the edge is processed with a milling cutter. The edge must be sealed with thermal tape or plastic edge.
Details and additions
The most obvious car accessories are the steering wheel and wheels. In the vast majority of cases, both in models of manufacturers and in-house production, they are absent. In principle, a steering wheel is not provided: it would have to be installed at the foot and the backrest should be made too high. They prefer to paint or stick on wheels.
- In vain, since making wheels is very simple. A disc is cut out of plywood, the contour is reinforced with plywood overlays - they imitate the bulge of a tire, and the end is covered with a plastic edge. You can simply paint the wheel or attach a simple plastic cap purchased from a car store to it. The wheels are installed stationary or allowed to rotate freely.
- Most often, the sides and backs are painted with suitable bright colors, achieving maximum resemblance to the selected model or focusing on beautiful airbrushes on real cars.
- If you have experience in drawing up electrical circuits, you can equip the bed with “headlights” from spotlights. Or do it even simpler: attach the LED strip along the rims of the wheels and the lower contour of the sidewalls. No knowledge is needed here, you just need to assemble a tape of sufficient length and attach the adapter. Painting and gluing of the sides and backs is done before the bed is assembled. If the child is already old enough, and even more so if he is interested in automotive topics, it is worth involving him in the design. He probably has more ideas.
Wings and wheels
Step 1
Draw the outline of the car fender (C) (Appendix Figure 3). Cut out the workpiece with a jigsaw, smooth the edges using a sander and file. Use this piece as a template to make the remaining three wings.
Step 2
Fasten the narrow parts of the wings placed on top of each other with a pair of self-tapping screws so that they do not move when processed with a router (photo 11 and 12). The holes left by the screws will be filled with putty later.
Step 3
Draw the tire (D) (Appendix Figure 4). Cut out the inner part with a jigsaw, first drilling a starting hole (photo 13), and then the tire itself (outer contour). Finish the shape of the tire using a file for the inner circle and a sander for the outer.
Step 4
Use the tire you made as a template for making the rest.
Step 5
Cut four wheels (E) from MDF (Appendix Figure 5). Plan the location and drill 6mm holes for the bolts.
A quick geometry lesson: Each wheel has six bolt holes plus a center hole. The six holes form a regular hexagon. To locate the vertices of this hexagon, draw a circle with a radius of 63.5 mm in the center of the wheel. Then place the compass needle at any point on the drawn circle and draw an arc of the same radius intersecting this circle (Photo 14). Move the compass needle to the intersection point and repeat the operation. When six points are marked on the circle, you will get a regular hexagon.
Step 6
Place the wheel on the tire and fasten them with self-tapping screws (photo 15).
Step 7
Finish the edges of the pieces to achieve a perfect fit. Repeat the operation for each wheel-tire pair.
Step 8
Number the parts and separate the wheels from the tires. Using a router bit, lightly round the edges of all pieces (bed sides, body panels, fenders, wheels and tires).