Installation of ceiling cornice - 5 options for carrying out work
Today I will talk about how to install a ceiling cornice, since this type of product is one of the most popular today. We will figure out how to properly attach to various bases, and what nuances you should pay close attention to during work. After reading this review, you will be able to carry out the work yourself and achieve excellent results.
In the photo: the ceiling cornice is easy to attach and looks great
Ceiling cornice design
Before you begin work, you need to purchase a cornice; it can be sold either as a set or as individual elements, so first of all you need to figure out what parts it consists of:
This diagram shows in detail all the structural elements
| Materials | Description |
| Cornice profile | This is the main element on which the curtains are held; it can be single-row, double-row or three-row. As for color, most often it is white, but beige and brown options can be found. The manufacturing material is often plastic, but there are also aluminum products, but they are much more expensive and are not much stronger than the first option. |
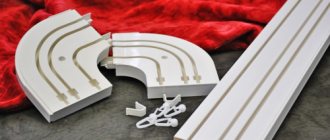
| Roundings | They can be placed on the sides to give the structure greater accuracy and create a kind of frame around the window opening. They are inserted into the ends of the main profile, which is very convenient and simple |
| Straight plugs | It is used in cases where the cornice occupies the entire width of the wall. You can also use plugs if you prefer a straight cornice or there is no room for attaching curves, because they take up a certain space and increase the distance of the structure from the wall, which is not always necessary. Again, they cover the ends in curves to make them look neat |
| Connectors | They are necessary so that, if necessary, you can connect two or more main profiles. Thanks to these elements, you will not only fasten the individual parts together, but also perfectly combine them so that the curtains open and close without any obstacles |
| Stoppers | They are installed along the edges and are necessary in order to limit the movement of the hooks and prevent the curtains from crawling out of the structure. They are located on the grooves in the place you need |
| Hooks | Necessary for attaching curtains and inserted during assembly, their quantity depends on the weight of the materials that will be hung and the width of the structure, most often the elements are located in increments of 10-15 cm |
| Fasteners | Most often, the kit includes dowels, screws and plugs. From my own experience I can say that standard elements are not always suitable for use; sometimes other elements are needed |
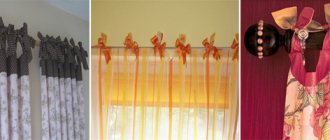
| Decorative tape | It is needed to cover the ceiling cornice and give the structure a more attractive appearance. This element is most often purchased separately and selected depending on the interior design. If you will place the structure in a niche or a ceiling plinth will be attached in front of the cornice, then decorative tape is not needed |
Decorative ribbons can have a variety of colors and textures
When purchasing, always pay attention to the quality of the plastic; I have come across options that are made of soft material and bend very easily. So just try to bend the profile slightly, it shouldn't give way very easily.
Now let's look at such an important aspect as price, I will tell you using the example of a cornice 200 cm long, the kit usually includes the following elements:
- Double-row plastic tire;
- 4 stoppers, they are also called clamps;
- 40 curtain hooks (20 for each row);
- 2 end caps;
- Decorative baguette 50 mm wide.
The cost of such a kit starts from about 600 rubles and depends on the manufacturer and quality of the product. If you need a version with curves, then the price will be at least 200 rubles higher. The sizes available for sale most often range from 160 to 350 mm, which is quite sufficient for most window designs.
How to hang curtains on a ceiling cornice
The ceiling cornice has hooks or runners for hanging curtains. Each type of profile has its own, but they come in different heights.
It is necessary to select hooks/runners according to the type of profile
Now about the difference between hooks and runners. The runners have small wheels. They are more expensive, but the curtains move much easier. To save money, you can take hooks for tulle (we move it very rarely) and runners for drapes (curtains).
Types of hooks for ceiling cornices
To hang curtains on a ceiling cornice, a special ribbon is sewn to the top of the curtain. It helps to form folds of the required size. This ribbon has a strip that can be used as loops. This is where the hooks are attached.
Curtain tape and hooks on it
There is another option - to make the loops by hand, but then the folds will have to be laid and sewn up by hand. This option will have to be used if you need to lay not standard folds, but with some special pattern.
There are two ways to hang curtains on a ceiling cornice:
- Secure the hooks to the tape, and then tuck them one by one into the desired groove on the profile. Then install the stopper, then the plug.
- The second method is to first insert the required number of hooks/runners into the groove, install a stopper and a plug. Then put loops on the hooks.
Installing the locking screw. Then you need to put a plug
The first option is physically simpler, but the second option is more often done. When you remove the hooks for washing, they may get lost, or you may make a mistake in the order in which they are installed. In general, it is not so important how exactly you hang the curtains on the ceiling cornice. The choice is yours. And finally, a small life hack on how to make it easier to put loops on hooks. This is a tedious and difficult task that irritates many.
Characteristics and Features
Suspensions of this type are made of plastic and can be presented in the form of a hollow part with slots for the movement of runners with hooks, or in the form of a part of the same shape, but filled with different materials. Filling increases the strength of the product and gives it slightly different characteristics.
Conventional curtain fasteners made of plastic are 100% resistant to water and are not inferior in wear resistance to their metal counterparts. At the same time, the cost of such products is much lower. Externally, such curtains look like a flat box with slits on the bottom side. It is in these slots that the design feature runners move, to which the curtain hooks are attached.
The ends of the hollow part are closed with special plugs, and to prevent the hooks from falling out, the grooves through which they are inserted into the structure are closed with stoppers. The entire curtain weighs very little and is attached to the wall using brackets. At the same time, it is possible to fix the structure on the ceiling if desired.
Advantages
There are two types of plastic curtain hangers - round and tire-shaped. Ordinary round parts do not stand out in anything special and look like a simple tube with tips on the ends, attached to the wall. They do not have any particular advantages or disadvantages compared to standard metal or wood hangers, except for the difference in price - plastic parts are cheaper. Another thing is plastic wall curtain rods in the form of a tire. They have a certain set of advantages:
- The design is very light.
- The cost of the cornice is low.
- If necessary, installation can be carried out both on the wall and on the ceiling.
- There are one, two and three row models.
- The length of the structure is practically unlimited, since several tires can be connected into one large composition.
- There are corner curved modules that will allow you to assemble a structure with curves.
- The color of the plastic is white and does not stand out against the background of a standard ceiling design.
- If necessary, you can decorate the outside of the product using a special decorative tape.
- Installing the suspension is no more difficult than installing standard rods.
- Caring for the product is very easy, thanks to its water resistance.
The only disadvantage of such tires is the restriction on the weight of the fabric used to make curtains. However, a plastic tire can easily withstand most modern curtains.
Ceiling mount
Installing a cornice on the ceiling is another installation method. There may be several reasons for choosing this particular location. First of all, this solution is well suited for windows with non-standard openings, for example, arched ones. Cornices are also placed on the ceiling in cases where the concrete of the walls next to the windows is too worn (this happens in old houses where cornices already stood). There may also be a purely aesthetic justification for this installation option.
For mounting on the ceiling, you can choose several design options for the cornice:
- Curtain rods with a rod on round holders, which are placed on the wall, can also be attached to the ceiling. Such a cornice will have an unusual and interesting appearance. But you need to remember that plastic structures of this type are not particularly reliable anyway, and when mounted on a ceiling they are only suitable for light curtains.
- String cornices. Although the greatest popularity of this type of fastening has passed, there are many modern designs that have a fairly attractive appearance. Their main drawback is their tendency to sag in the middle, so it is better not to hang very thick and heavy curtains on such a curtain rod.
- Bus or rail structures. These are strips made of a plastic profile. The slats have tracks into which runners with fastenings for curtains are inserted. Today, the range of curtain rods is varied: there are one-, two- and three-row models, some designs can even allow curtains to overlap.
Before installing the ceiling structure, pay special attention to the fasteners. It often happens that the manufacturer includes fasteners in the kit that provide minimal reliability. It is worth thinking about replacing them with more reliable options, and in the case of a tire model, also about increasing the number of screws for greater installation reliability.
How does installation work?
To figure out how to attach a plastic cornice to a wall, just read the installation instructions that came with it. If it is not there, it does not matter, since the installation process is very simple.
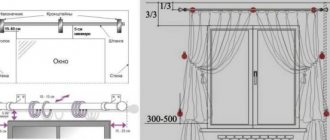
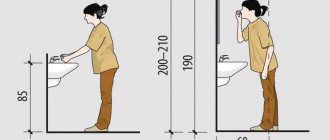
- First you need to mark the mounting points for the brackets. They should be located symmetrically, relative to the window opening. From its edge to the end of the curtain there should be about 15 - 30 centimeters, unless installation of a wall-to-wall suspension is provided. There should be at least five centimeters above the window opening.
Important: pay attention to the location of the plane of the curtains relative to the radiator and the window sill. There should be some free space left from all protruding elements to the curtain.
- Next, holes are drilled at the designated points.
- The brackets are mounted using dowels and screws.
- The guide itself with grooves is fixed to the brackets using self-tapping screws or special fasteners.
All that remains is to attach the curtains to the hooks and admire the result of the work done. To make the installation process more understandable, and also so that you don’t have to remember all the dimensions that should be taken into account, below is the simplest installation diagram for wall curtain rods, suitable for almost all modifications of curtains.
Source: wikipotolok.com
How to install curtain rods on drywall with your own hands - we offer a step-by-step guide
For many people, installing curtain structures is considered an overwhelming and very difficult task. For the sake of reliability, apartment owners are convinced that it is necessary to reach the solid base of the wall during installation.
In practice, everything is much simpler; the structure can also be fixed to drywall. How to attach a curtain to drywall? Below are the most proven and simplest solutions.
Strengthening the Foundation
Suitable for property owners who are still in the process of renovation and have not equipped the constructed frame with plasterboard. The meaning of the method is that the place for attaching the curtain is strengthened from the inside using any suitable fragment.
The thickness of the installed timber must be equal to the depth of the drywall frame
This can be a wooden element with a thickness of 30-35 mm or higher, which is attached along the structure. It is screwed to the wall or ceiling and provides a solid base along the entire length of the window opening. Now you can easily fix the bar. Drywall is screwed with a nail or self-tapping screw onto a wooden base, the fasteners firmly adhere to the reliable element.
Important! This option is simple and does not require complex skills. Simply screw in the screws and secure the curtain. But if curtain rods have already been installed, it will be impossible to secure the surface.
Applications of the butterfly dowel
Here the fastening is carried out to an existing structure. The element firmly fixes the drywall on the reverse side, ensuring the reliability of the attached product. Withstands weight up to 16 kg. For installation you will need a drill, a screwdriver and a butterfly dowel.
The butterfly dowel consists of a spacer and a static part
You must first assemble the cornice; this is necessary for installation, in order to calculate the distance and location of the fastening area.
The plank is fixed to the wall, markings are set. Next, holes are drilled. Before attaching the structure, dowels are installed. The butterfly is inserted into the hole.
Remember! The dowels must be inserted before the curtains are secured to the drywall.
Next, use a screwdriver to turn the self-tapping screw until it stops. After installation, it is important to install plugs on the holes. They are necessary to cover the place of fixation.
When the screw is tightened, the “wings” are straightened and pressed tightly against the back surface of the drywall
For heavy structures, it is advisable to use metal fasteners. Although they are more expensive, they are much more reliable.
Metal butterfly dowels are much more expensive than plastic products, but can withstand a load of several tens of kilograms
Application of the Driv dowel
At the first stage, the cornice is assembled and applied exactly to the ceiling surface. Mark the holes. Using a screwdriver, screw the dowel into the specified fixing point. Now you can screw in the screws. The curtain fits tightly and is secured with a 4/30 mm self-tapping screw.
The Driva dowel (aka “snail”) is made from nylon or metal. Plastic products are used for light curtain rods; heavy structures are best installed on metal dowels
Scheme of fastening the Driva dowel with a tip in the form of a drill
For dowels with a blunt tip, first drill a hole with a diameter of 6 mm
The work does not require special skills, everything is done quickly and the result will justify itself. The bar will be securely fixed and hold any curtains.
Install the cornice yourself
To install the structure yourself, you need to collect the necessary tools:
- Ladder.
- Drill or hammer drill. Depends on the wall material.
- Drills of the required diameter for dowels.
- Roulette.
- Pencil.
- Self-tapping screws and dowels.
A minimum set of tools that you simply cannot do without
To ensure maximum reliability of fixing the strip when planning to place heavy curtains, you can add liquid nails to the installation. They are inserted into the prepared hole before inserting the dowel. A strong mass is formed inside that can withstand any load.
It is advisable to use a level when marking
Before installation, markings are made. The size of the brackets should preferably be longer than the protruding part of the window sill. This is important for convenience and comfort in the future.
If necessary, the cornice is cut to the required size
If the curtains are fixed to the ceiling, then the cornice must be moved to the required distance. When using a plumb line, you can check how the curtains will be positioned in the future.
After installing the marking fixation with a pencil and tape measure, you must first see how the window will open and the curtain will hang.
Mark the place where the cornice bracket is attached
Next you need to drill the surface of the future mounting of the strip. It is carried out using a drill with a drill attached to it.
We select the type of drill based on the wall material
Liquid nail is poured into the drilled hole and dowels are driven in.
The dowels must fit completely into the wall, protruding parts must be cut off
After the mass has hardened, the bracket strips are secured to the screws.
Tighten the screws with a Phillips screwdriver
Screw the bracket and fix it with a hexagon
To complete the installation, you need to insert the bar into the fastening ring elements of the bracket. This must be done after hanging all the curtain rings.
We install the rod with rings in place and secure it with fixing screws
Interior elements are installed on the threaded strip at the ends. Now you can start hanging the curtains.
Fastening a plastic ceiling cornice
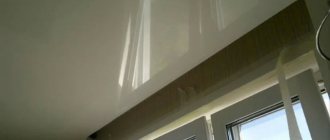
Plastic curtain rods look great in rooms with a modern modern interior. Such cornices are attached to the ceiling so that they become almost invisible, hidden behind the fabric. This places emphasis on the curtains themselves, emphasizing their beauty and airiness. Hanging a cornice is not particularly difficult, and the fastening strength is high, so you can forget about it until the next repair.
Installation of plastic cornice
Today, cornices are used for fastening curtains, curtains, tulle, drapes, curtains. Plastic curtain rods are made from high-quality polyvinyl chloride. The product is structurally a hollow tire with several working lines.
Cornices are divided into:
- single row
- double row
- three-row
- four-row
Double row plastic ceiling cornice
- 1 Complete set of cornice, tools necessary for work 1.1 Necessary tools
- 2.1 How to attach a ceiling cornice to a wall?
Complete set of cornice, tools necessary for work
The complete set of ceiling cornice includes:
- Profiled plastic cornice. On the bottom side it has 1-3 grooves where hooks are inserted to secure the curtain. The plastic element is flat on top.
The main profile, depending on the manufacturer, has a length of 1.2-6 m, which allows you to create combined curtain rods of various lengths. Excess elements can be sawed off or left, at your discretion.
Required Tools
- Screws with dowels
- Hacksaw for metal
- Electric drill
- Screwdriver or screwdriver
- Marker/pencil
We saw off the excess edge. To do the job smoothly, use an additional corner
How to hang a cornice on a suspended ceiling
Attaching the structure to the suspended ceiling is a separate and difficult task. The difficulty is that a suspended or suspended ceiling by itself is not capable of supporting at least some mass, and access to the main ceiling is blocked. There are two options to solve this problem:
The first option is to take care of installing embedded structures in advance when installing the ceiling. This is a wooden beam that will go immediately under the stretch ceiling, attached to the main ceiling. In this case, the cornice is installed on self-tapping screws screwed into the wood. The length of the fastening element must be less than the thickness of the beam.
Using a solid beam as a foundation element is often too wasteful. You can place small blocks only in pre-calculated places where the cornice is attached to the ceiling. Of course, this option requires greater installation precision, but the economic benefits justify the effort.
The second method of fastening is to place its edges 10 cm from the window when installing the ceiling. Then there will be a niche near the window in which you can reach the main ceiling and attach the cornice directly to the concrete. The disadvantage of this solution is that the cornice is hidden from view, so it will not be possible to install a beautiful decorative border. But you can use the cheapest version of the cornice, since no one will see it anyway.
The sequence of installing a plastic cornice with your own hands
Hanging a ceiling cornice is not difficult, but it is important to do everything correctly, in a certain sequence.
Sometimes the profile already has mounting holes for fastening. After complete installation of the product, these holes will become invisible, so do not make them too infrequently. The average distance between them is 0.5 m. Accessories for ceiling plastic cornices
Plastic cornice with bends and turns
How to attach a ceiling cornice to a wall?
Mounting on brackets to the wall
It is impossible to attach such a cornice to suspended plasterboard or suspended ceilings, so it is attached to the wall.
Manufacturers foresaw this problem and equipped the cornice with special brackets, which are also attached with screws and dowels, but to the wall.
The upper strips of the brackets can be of different lengths (10-30 cm), which allows you to adjust the distance of the cornice from the wall.
The cornice is attached to the top bar of the bracket with special plastic plates. The brackets are mounted at a distance of 1-1.5 m, and 0.5 m from each other if the cornice is two- or three-row with large massive curtains.
Plastic cornices are even easier to install on a wooden ceiling. Here you need to mark everything correctly and secure the structure with self-tapping screws. In wide cornices, the holes must be made in two rows.
If you plan to attach light curtains or curtains to a plasterboard ceiling, there will be no problems. But if you are hanging multi-layer, massive curtains, for reliability they are fastened to the wall using brackets, or you need to construct wooden anchors. Fix the timber embeds to the base ceiling at the location where the future cornice will be attached.
So, it is not difficult to hang the cornice correctly, following the necessary installation steps. A decorated plastic cornice along with matching curtains will decorate the entire room.
Useful tips
- Before purchasing a cornice, take measurements of the window opening or other place where it will be mounted.
The main advantage of plastic curtain rods is their versatility
Source: smartremstroy.ru
Features of the installation process
There are many ways to attach a ceiling cornice, but what they all have in common is that the structure must be attached to a solid base. Such a basis is the ceiling, timber, frame, wall.
Installation on a concrete ceiling or wall
The installation principles are similar in both cases. Here's how to attach a cornice to a concrete ceiling step by step:
- Assemble the product, prepare fastening accessories. Calculate the segments between the points for installation, guided by which curtains need to be hung. If they are heavy, then it is recommended to reduce the distance (step) between the fasteners to 20-30 cm; if the curtains are light, 60-70 cm is enough.
- Holes are drilled in the product for future fastening.
- The structure is joined to the ceiling and markings are made on the ceiling through the holes.
- Using a hammer drill, recesses are drilled at the marked points, into which dowels are hammered and self-tapping screws are screwed in, attaching the holder. Then plugs, decor, hooks or rings are put on the product.
There are circumstances when it is impossible to install a model on the ceiling. Then they act differently, choosing to mount the cornice to the wall. For this you will need:
- metal corners with bend stiffening ribs, brackets;
- bolts, nuts.
Instructions for fixing the ceiling cornice to the wall:
- Prepare the fasteners, following the same rule as when installing on a concrete ceiling (points 1, 2).
- Calculate the optimal distance of the structure from the wall and select the corners according to size.
- Holes are drilled in the corners. There are configurations that include special strips for attaching to the corners.
- The structure with corners is fastened with nuts.
- Compare it to the wall and ceiling end-to-end, mark and prepare mounting holes.
- The holder is mounted on the wall on the installed brackets using anchor elements.
- Upon completion of installation, plugs, rings, hooks, and decor are put on.
Recommendations for installing a cornice to a plasterboard ceiling
It is possible to attach a ceiling cornice to a plasterboard ceiling, but the load-bearing capacity of plasterboard is limited. In this regard, the curtains and the bar itself should be light. In order not to take these limitations into account, you need to strengthen the ceiling by installing a block of wood in the area where the holder will be fixed. To secure heavy curtains, select a block measuring 50x100 mm. The installation is done like this:
- A cornice is attached to a plasterboard ceiling with a block using self-tapping screws.
- The structure is installed on an unreinforced ceiling using anchor fasteners.
Methods for installing cornices with suspended ceilings
A stretch ceiling does not involve securing any elements to the stretched fabric, so the installation of the curtain holder is carried out in a special way:
- Before installing the tension fabric on the ceiling, install the embedded parts. Marks are placed at the bookmark location. Thermal rings are attached to the canvas (where the fasteners will be screwed in) so that the canvas does not tear.
- You can mount it in another way - in the form of a niche near the window. The beam is attached to the ceiling. The tension fabric is mounted to it, without reaching the wall. The structure is installed in the resulting niche.
Related article: Expand the wall under the door
Attaching the cornice with glue
A very simple way of fastening is with glue. It is used when it is necessary to attach a holder for light curtains to smooth surfaces, for example, to a suspended ceiling. It is necessary to choose the right glue; it should be suitable for:
- composition of the ceiling cornice tire;
- finishing of the ceiling surface.
Fastening is carried out as follows:
- The structure is assembled completely to size, after which it is applied to the ceiling, checking the quality of the joint in order to avoid the formation of cracks and gaps in the future.
- Places where glue is applied are pre-degreased.
- The curtain holder is leaned against the ceiling for marking.
- The glue is applied along the entire length of the structure, applied exactly along the markings to the ceiling and pressed for 3-5 minutes.
- After the glue has completely dried (according to the instructions, usually in a day or two), you can use the product for its intended purpose - hanging curtains.
- It happens that it is not possible to completely glue the fasteners. Then, first of all, the transition plate is glued, and after the glue has completely dried, the main parts are glued.
In order for the installed cornice to hold tightly and reliably, you need to choose the appropriate installation method and perform all installation steps step by step. Be sure to take into account the type of ceiling, since it is impossible to attach a cornice to some types of suspended ceilings without prior preparation.
Characteristics and Features
Suspensions of this type are made of plastic and can be presented in the form of a hollow part with slots for the movement of runners with hooks, or in the form of a part of the same shape, but filled with different materials. Filling increases the strength of the product and gives it slightly different characteristics.
Conventional curtain fasteners made of plastic are 100% resistant to water and are not inferior in wear resistance to their metal counterparts. At the same time, the cost of such products is much lower. Externally, such curtains look like a flat box with slits on the bottom side. It is in these slots that the design feature runners move, to which the curtain hooks are attached.
The ends of the hollow part are closed with special plugs, and to prevent the hooks from falling out, the grooves through which they are inserted into the structure are closed with stoppers. The entire curtain weighs very little and is attached to the wall using brackets. At the same time, it is possible to fix the structure on the ceiling if desired.
Advantages
There are two types of plastic curtain hangers - round and tire-shaped. Ordinary round parts do not stand out in anything special and look like a simple tube with tips on the ends, attached to the wall. They do not have any particular advantages or disadvantages compared to standard metal or wood hangers, except for the difference in price - plastic parts are cheaper. Another thing is plastic wall curtain rods in the form of a tire. They have a certain set of advantages:
- The design is very light.
- The cost of the cornice is low.
- If necessary, installation can be carried out both on the wall and on the ceiling.
- There are one, two and three row models.
- The length of the structure is practically unlimited, since several tires can be connected into one large composition.
- There are corner curved modules that will allow you to assemble a structure with curves.
- The color of the plastic is white and does not stand out against the background of a standard ceiling design.
- If necessary, you can decorate the outside of the product using a special decorative tape.
- Installing the suspension is no more difficult than installing standard rods.
- Caring for the product is very easy, thanks to its water resistance.
The only disadvantage of such tires is the restriction on the weight of the fabric used to make curtains. However, a plastic tire can easily withstand most modern curtains.
How does installation work?
To figure out how to attach a plastic cornice to a wall, just read the installation instructions that came with it. If it is not there, it does not matter, since the installation process is very simple.
- First you need to mark the mounting points for the brackets. They should be located symmetrically, relative to the window opening. From its edge to the end of the curtain there should be about 15 - 30 centimeters, unless installation of a wall-to-wall suspension is provided. There should be at least five centimeters above the window opening.
Important: pay attention to the location of the plane of the curtains relative to the radiator and the window sill. There should be some free space left from all protruding elements to the curtain.
- Next, holes are drilled at the designated points.
- The brackets are mounted using dowels and screws.
- The guide itself with grooves is fixed to the brackets using self-tapping screws or special fasteners.
All that remains is to attach the curtains to the hooks and admire the result of the work done. To make the installation process more understandable, and also so that you don’t have to remember all the dimensions that should be taken into account, below is the simplest installation diagram for wall curtain rods, suitable for almost all modifications of curtains.
Source: wikipotolok.com
How to securely attach a cornice to a wall?
Today you can find many types of cornices on sale, differing from each other in material, design and method of fastening. The most popular among consumers are simple, tire, round, telescopic and decorative cornices.
For light curtains, a single-rod curtain rod is suitable, but for heavy ones, you need to select a more reliable design.
Nuances of choosing a console
When deciding how to attach the cornice, you need to follow a certain algorithm of actions. First you need to correctly measure the width of the room and the window opening in it, otherwise you can buy a console that cannot be installed in the room due to inappropriate length or width. It should be taken into account that for different types of cornices the distance to the side walls and ceiling can differ quite noticeably.
For light curtains, whole or divided into two parts, a single-rod round wall console suspended above the window, protruding its edges 10-15 cm beyond the window opening, is best suited. Although, depending on the design decision, a console of this type can be mounted not only on the width of the window opening, but also the entire width of the wall, leaving only a small indentation from the side walls. To attach the cornice to the wall, the kit includes 2 or 3 holders (depending on the length of the cornice).
The string cornice is the most invisible design, creating the effect of curtains floating in the air.
Attaching curtains to such a cornice is done using eyelets or clips connected to rings strung on the cornice. Removable tips are installed at both ends of the console, which, in addition to their decorative function, also serve as a limiter, preventing the rings that are put on from sliding off the tube while the curtain is moving.
For light curtains, the long-used string type of console can be used. A distinctive feature of this type and its fastening is the need to make the console as invisible as possible, so that the curtains seem to float in the air.
There is also the option of attaching curtain rods directly to the window frame. This is how, for example, curtain rods for roller blinds are attached to the wall. There are types that have only side fastening, that is, this type of cornice can only be attached to opposite side walls.
But, no matter what length the chosen cornice is and no matter what method of fastening is used, there is one rule common to any fastening: the fixed cornice should not interfere with opening the window, so its fastening should not be lowered lower than 5 cm from the top plane of the window opening.
Also, curtains hung on a cornice should not cling to window handles, window sills or heating radiators underneath them. If you are attaching a multi-row cornice, measurements should be taken from the row closest to the window.
Why are double-row cornices needed?
A double-row cornice is a load-bearing base attached to a wall or ceiling that holds the curtain fixed to it. The difference between a double-row cornice and similar products is the presence of two longitudinal guides along which the window curtain moves.
Such cornices are used in conjunction with the classic combination of window opening design: tulle + curtains. On the first, closest to the wall, light tulle is fixed, on the second - the main panels of the curtain.
The classification of double-row products is carried out according to the method of fastening, according to which they distinguish:
- Ceiling structures fixed directly to the ceiling in front of the window opening. This is the most common solution due to its aesthetic qualities - guides matched to the color of the ceiling are visually invisible, they do not disrupt the overall picture of the window decor, which allows you to implement any design ideas;
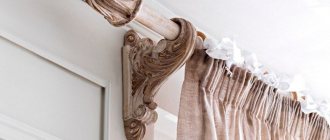
- Wall structures installed above the window opening on special brackets. A beautiful wall cornice, made of aluminum or forged metal, fits harmoniously into the design of the window and becomes an additional decoration for the curtain, but plastic products look extremely utilitarian.
Depending on the materials of manufacture, double-row structures are divided into metal and plastic cornices. In practice, the difference between them lies in the load-bearing capacity (polymer products are not used for heavy curtains), price, and aesthetic appeal - visually, a two-row metal cornice looks better, and steel products are often decorated with artistic forging, while plastic double-row curtain rods are made in simple form, in the form of a tire or a round pipe.
Related article: How to correctly calculate the amount of wallpaper per room
There are simple and sliding double-row cornices. In simple designs, curtains are opened by manually moving them, while sliding products are equipped with a cord and a ring hooking system, which allows you to adjust the position of the curtain by pulling the cord.
Installation of curtain rods
Tools for fastening the cornice.
Attaching any type of cornice to the wall must begin with marking and determining the attachment points. Both the appearance and the reliability of fastening the cornice to the wall largely depend on the accuracy of this marking, so you need to approach its implementation very responsibly.
To complete the work you will need the following tools:
- roulette;
- water level;
- electric drill or hammer drill;
- marker;
- screwdriver.
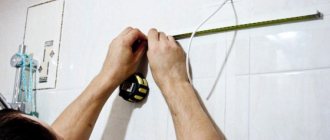
First, you need to measure the length of the console with a tape measure and mark it on the wall, checking its horizontalness using a water level. If you have an assistant, you can do it even simpler: attach the bar to the wall and put two neat marks along its edges, connecting them with a horizontal line.
Then, in accordance with the marked line, the mounting brackets sold as a set are applied to the wall and marks are placed for the holes. These marks must be symmetrical both in relation to each other and in relation to the adjacent walls. Then, using an electric drill or hammer drill, holes are made in the marked places in the wall.
Scheme of fastening the cornice to the wall.
There is a nuance here: dowels will subsequently be inserted into the hole, so for drilling you need to choose a drill with a diameter equal to the diameter of the dowel. The hole also needs to be drilled to the length of the dowel or 5-10 mm more.
If the length of the rod attached to the wall is no more than 2.4 m, then 2 brackets are usually used; if the rod is longer, it is advisable to install an additional bracket in the center of the rod. The most secure way to secure the brackets to the wall is with screws. And only after securely fixing the brackets can the cornice be attached to them.
Installation of a ceiling cornice to a concrete floor
The procedure for attaching a ceiling cornice is not too complicated, but if the length of the product is more than two meters, an assistant will be required. In addition to the fasteners, you only need a drill and a screwdriver with a suitable slot.
This is what an installed ceiling cornice with curtains should look like
Preparation
Before attaching the ceiling cornice, it is necessary to carry out some preparatory work. The first thing we do is adjust the length. If everything suits you, great. If you need to cut off excess, you will need a hacksaw. It is advisable to use a cloth for plastic, but it is also suitable for metal. If the cornice is assembled, remove the plugs and turns (if any), cut off the excess, then return everything to its place - the turn, the plug.
If the holes for the fasteners are not drilled at the factory, you will have to make them yourself. Let's start with the markings. Mark so that the distance between adjacent screws is no more than 50-60 cm. If there are joints, then retreat 5-10 cm from the joint on both sides. For better load distribution, it is better to stagger the mounting holes.
After the marks are set, we drill mounting holes in the plastic. Use a drill that is equal in diameter to the size of the fastener. More is undesirable, but less is also not good - when twisted, the plastic may crack.
Even for a single-row cornice, it is better to place the holes in a checkerboard pattern
After all the holes are ready, if the cornice is prefabricated, assemble all the parts. You don't have to install the decorative trim (if any). For now she will only get in the way.
How to attach
In most apartments and many private houses the ceiling is a concrete slab. Accordingly, we take a drill for concrete. The diameter of the drill should be taken according to the size of the dowel. Then we proceed according to plan:
- We apply the assembled cornice to the ceiling and level it.
- Use a simple pencil or marker to mark the attachment points.
- We drill holes, trying to hit exactly the marks. The depth is equal to the length of the plastic insert. To make control easier, you can stick a strip of electrical tape on the drill.
Already fixed, but without curtains
That's all, actually. You know how to attach a ceiling cornice to a concrete floor. If the floor is wooden, everything is even simpler: there is no need to pre-install dowels. After all, wood screws are usually used. In this case, the cornice is leveled and screws are immediately placed in the mounting holes. It’s more convenient to follow the same order: along the edges and in the center, and then - as it turns out.
Features of fastening the cornice to the ceiling
For ceiling mounting, plastic or metal bars are usually used. This design of curtains allows you to make the cornice almost invisible, which is why today many people choose this particular mounting option.
The console can be mounted to the ceiling either using brackets or directly through holes in the console itself. In the first case, the fastening technique completely repeats the technique of fastening the cornice to the wall. When mounting the console directly to the ceiling, there are some features that must be taken into account.
Ceiling cornices of this type are usually sold in standard sizes, so you need to make the length of the cornice you need yourself by sawing it off with a hacksaw from the workpiece. You need to put plugs for the holders on the ends of the sawn-off cornice.
Ceiling cornice mounting diagram.
The first hole is drilled exactly in the middle of the cornice. It is drilled with two drills: first, slightly larger than the diameter of the head of the fastener, and when the depth of the hole is sufficient for the head to sink into it, drilling continues, but with a drill of a smaller diameter.
In the same way, holes are drilled along the edges of the ceiling cornice, with a distance of 3-4 cm from the end, and then, maintaining a certain step, along its entire length. The heavier you plan to use the curtains, the smaller the hole spacing should be.
Then it's a matter of technique. Having attached the cornice to the ceiling at the required distance from the window, its axis must be adjusted so that it is symmetrical to the window. Then a mark is made on the ceiling through the drilled central hole.
Then, using a hammer drill with a drill of the required diameter, a hole is made in the ceiling along this mark, a dowel is inserted into it and the ceiling rail is fixed with a self-tapping screw. This fixation allows, if necessary, to correct the position of the tire, after which the remaining holes are marked and drilled. Afterwards, the cornice is fixed to the ceiling with dowel nails, and its installation is complete.
Types of fastening
Installation of fasteners is carried out taking into account the configuration of the ceiling, walls and the selected design with curtains.
The following types of fastenings are used:
- universal hangers;
- structures with holes and grooves, strips;
- brackets, screws, dowels, anchors;
- liquid nails, corners.
Dowel nails
The dowel-nail consists of:
- a rod in the form of a cylinder, made in the form of a spacer system that expands during fastening;
- a regular nail (sometimes a limiter cuff is included in addition).
Related article: Wall cladding with OSB boards inside
Dowel nails are reliable fasteners for cornices in the wall.
Self-tapping screws
Fastening the cornice with self-tapping screws is a simple process:
- special plugs are driven into the prepared hole (according to the size of the fastener);
- a self-tapping screw is driven into the cork.
The fastening is strong and reliable.
Liquid Nails
You can perform fastening without drilling holes, using liquid nails. They support loads up to 80 kg/cm2. The work is carried out as follows:
- Clean and degrease the contact areas between the ceiling and the curtain holder for better adhesion to the glue.
- Nails are applied in the form of a snake to the structure, pressed against the ceiling for several minutes, holding for better gluing.
- The glue dries completely after two days. After this you can hang the curtains.
Drywall dowels
Conventional designs for light curtains are attached to drywall with dowels in the form of “umbrellas” and “butterflies”. This fastener opens after screwing in, thereby increasing the support area. Plasterboard will not be able to withstand bulky structures with several rows even when the holder is attached with such hardware. Therefore, if heavy curtains are hung on the bar, it is necessary to resort to attaching the ceiling cornice to the wall.
Brackets
The cornice can be attached to the ceiling using brackets. In plastic products, holes for fastening are already prepared. The installation procedure is as follows:
- The product is assembled.
- Fasteners with brackets are applied to the selected location and marked along the holes.
- Drill holes in the ceiling and insert dowels.
- The structure is joined according to size and secured with self-tapping screws.
It is very convenient to use brackets for mounting curtain holders under the ceiling, and installation itself is quick.
Little fastening tricks
The reliability of fastening and the beautiful appearance of the installed console largely depend on the shape and material of the wall. If the wall decoration leaves much to be desired or there is a concrete lintel above the window where the bar needs to be installed, then wooden slats are used as an additional element of the fastening system. In this case, the slats are pre-attached to the wall, and the brackets are directly attached to them.
If it is not possible to attach the curtain rods to the wall, they are attached directly to the ceiling. If the console kit, in addition to brackets, also includes dowels and screws, then these should be used for fastening.
Typically, in one room, it is advisable to place curtains at the same distance from the walls, which is facilitated by both the aesthetic preferences of the owners and the identical brackets included in the console set. If there is a need to hang curtains at different distances (for example, to hide heating pipes), then you need to deviate from the rules and use brackets of different designs for fastening. In this case, a visual symmetry effect can be achieved by hanging decorative curtains behind the curtains.
Diagram of a ceiling cornice for curtains.
The holding brackets must be fastened in such a way that the ends of the rods fit into them by 3-4 cm. When attaching curtains to a rod, one ring at a time must be placed on the ends of the rods protruding beyond the mounting brackets, then the brackets, in addition to their main task - to securely hold the curtain rod, will hold the edges of the curtains when curtaining.
If you plan to install not only curtains, but also a lambrequin, then when installing the console you must leave space for it between the installed console and the ceiling. If, due to the low ceiling in the room, such space is not enough, then it is better to abandon the idea of fixing a lambrequin.
If you plan to use curtains made of heavy material, then it is better to further strengthen the metal and plastic curtain rods by installing the brackets holding them at a distance of 1-1.2 m from each other. If the purchased console kit does not have additional fasteners, then it can be mounted on homemade brackets or ordinary corners.
When using corners, the fastening is even more reliable, but loses in aesthetic terms.
Installing curtains is a creative and exciting process. Knowing well how to attach a cornice to a ceiling or wall, you will, having spent a little free time, easily cope with this work, receiving a lot of pleasure from the fact that, thanks to your efforts, the room has become much more beautiful and comfortable.
Source: dekormyhome.ru
Installation of cornice on the wall
Today there are many types of curtain rods for attaching curtains. There are options for mounting on the wall, ceiling, and suspended models. In each case, the choice of a specific model is made based on aesthetic preferences, interior design features and window opening design. One of the most popular options is to mount the cornice on the wall.
Several types of brackets can be attached to the wall:
- Metal structures with L-shaped fastenings. Installing this design is quite simple. This curtain hanger is very reliable, but not everyone likes the appearance of these models.
- Lightweight round plastic structures with dismountable holders. They are chosen for their aesthetic appearance. But if you plan to hang heavy blackout curtains, the strength of the plastic may not be enough.
- One-piece holders with through holes for fastening. They are usually made of wood and are intended for wooden structures.
Whatever type of brackets you choose, you must first decide where the cornice will be located after installation. To do this, you need to determine the distance from the ceiling and from the edges of the window opening.
To determine how far to lower the cornice from the ceiling, the distance from it to the upper edge of the window opening is divided into 3 parts. There should be 1 part of the distance from the cornice to the ceiling, and 2 parts from the top edge of the window to the cornice. So, if there is 18 cm from the edge of the opening to the ceiling, then you should take 6 cm from the ceiling, and 12 cm from the edge of the window opening.
To learn how to hang blinds on plastic windows, read this article.