Hanging cabinets and its main stages
How to hang kitchen cabinets? There are two ways to proceed here.
Method 1: ordinary
In the first case, loops and fasteners are used:
- after determining the upper limit, draw a horizontal line along the entire length of the cabinet or cabinets intended for hanging;
- use a water level to check the accuracy of its outline (after all, it can be distorted due to an uneven floor);
- mark the first point on the line for drilling a hole for the fastening element (usually dowels or screws are used, having both plastic and wooden seals, but sometimes also fastening hooks) using a drill or hammer drill;
- install fasteners;
- accordingly, the furniture itself is equipped with metal hinges or brackets that allow small horizontal shifts to ensure better adjustment;
- the cabinet is hung, leveled with a water level, the second attachment point is marked, and the cabinet is removed from the wall;
- further actions are carried out in the same way;
- at the last stage, the cabinet is suspended and the coincidence of its upper edge and the applied horizontal line is checked;
- do the same with other cabinets;
- then the cabinets are connected with furniture screws, after drilling holes. in this case, all adjacent cabinets must be located at the same height;
- Next comes the installation of a unifying decorative cornice, which is screwed to the upper base using screws;
- and then you need to hang the facades, hang the shelf(s), check the doors (how tightly they close, do they sag, do they interfere with each other when closing) and remove them using adjusting screws.
Of course, all this requires utmost attention and a skillful assistant, without whom it will be difficult to accurately calculate the distances between the holes for fasteners.
Method 2: Using a mounting rail
But you can always do it easier and hang kitchen cabinets using a simpler method - a “mounting rail”. It consists of a hook attached to the side of the cabinet so that it protrudes slightly from behind the cabinet. And, of course, from the strip itself, which is installed on the wall at a given height and serves as the basis for which this hook is hooked.
This method allows you to:
- do all the work yourself, since hanging cabinets on an already installed strip is easier than struggling with markings;
- using rotating screws, independently move the cabinets back and forth and up and down, thereby ensuring their alignment;
- make the structure more reliable by breaking the rail into several parts and securing it in the very location of the cabinets with three screws each. Increasing the number of screws will increase the strength of the structure (although if the wall is not strong enough, it is better to completely secure the rail);
- speed up the weighing procedure, which in this case takes at least two hours;
- carry out work after fastening the lower cabinets, which is impossible when fastening with simple hinges, since in this case it is necessary to install a border along the lower edge of the cabinets for alignment, which is dismantled after the process.
But it also has its disadvantages:
- high price of a complete set of parts compared to a conventional set of hinges,
- loose fit of the structure to the wall and the formation of a small gap between the wall and the cabinets.
In this case, you need to hang the closet like this:
- or nail the opgalite to the back wall of the cabinet. And since hanging with a mounting rail does not allow for a tight fit to the wall, the lower part will require additional indentation and installation of the same kind of rail. In this case, the bottom of the cabinet extends slightly onto the kitchen apron (the part of the wall between the work surface and the wall cabinets);
- or insert the hardboard into the holes in the cabinet walls and thus push it a little deeper inside. This design will allow the cabinet to be pressed much more tightly against the wall and, naturally, will not require an apron.
Fastening techniques
Let's start with the fact that fastening methods entirely depend on the parameters of the object being hung (dimensions, weight), and based on the data obtained, you can get an answer to the question - is it possible to hang kitchen cabinets on drywall.
Professional techniques
- The most popular and accessible method even for beginners is to attach kitchen cabinets to plasterboard using butterfly dowels and special plasterboard dowels.
When attaching cabinets to the so-called “butterflies”, you need to make holes in the wall and then install the fasteners. When screwing a self-tapping screw into a “butterfly”, the tendrils of this type of dowel spread in different directions and tightly press the installed fastener to the surface of the gypsum board.
Operating principle of the butterfly dowel
If the cabinet is mounted on special dowels, use a screwdriver to screw the dowel into the cavity of the material and only then screw in the fastening bolt (screw). This method allows you to fasten only lightweight structures whose weight with all contents does not exceed 5 kg.
dowel nail; 2. snail dowel; 3. butterfly dowel;
- The second method is to attach kitchen cabinets to drywall using mounting strips. The main feature of this fastening technology is that the mounting strips are attached to a sheet of drywall, and not to the suspended structure. The strips are fixed in several places (both to the gypsum board and to the metal profile located under the drywall). Fixation is done with self-tapping screws.
Mounting rails for wall cabinets
After completing the installation work, you can hang a cabinet on such slats, the weight of which when fully equipped will not exceed 15 kg. But this method has one significant drawback - the use of unaesthetic fasteners that are unlikely to decorate your kitchen.
If you need to hang bulkier and heavier cabinets on the wall, there are other secure mounting options that will help you do the job yourself:
Extended anchor bolts can be used as fasteners - such fasteners will allow you to attach bulky kitchen cabinets and even household appliances to the wall.
In order to secure them, you should drill deep holes with a hammer drill through the drywall at the very base. We insert anchor bolts into the resulting holes and clamp them there using ordinary wrenches.
This method of fastening is relevant only if there are base walls (this fastening option is not applicable for a plasterboard partition);
Anchor Bolt Installation
The price of mortgages is zero - they can easily be made from leftover building materials.
Unconventional fastening methods
- Thus, a heavy kitchen cabinet suspended on a plasterboard wall can be additionally secured to the ceiling using decorative cables;
Hole in the shelf for the cable
- As additional elements for fastening kitchen cabinets, experts often use decorative chrome-plated tubes - they are screwed to the floor and installed in the form of a frame, which bears the weight of the suspended structure;
In order for the hanging cabinets to be mounted as efficiently and productively as possible, several recommendations must be followed:
- Use only those fasteners that have a quality certificate and meet aesthetic standards;
- When marking fastening points, you must use a building level, and not do the work by eye - correct marking will allow you to evenly distribute the load on all fastening points.
If you follow all the instructions and recommendations described above, then you will probably end up with a reliable fastening system that will quietly serve until the next repair.
In addition to cabinets, the presented techniques allow you to attach any other hanging accessories and attributes to the walls (hoods, air conditioners, cornices, curtains and paintings). All of the above work can be carried out without problems by beginners, without the involvement of expensive specialists.
Shelf on plasterboard for various accessories
Mounting a shelf on a wall
- Mounting to drywall
- Concrete and brick wall
- Wood fastener
Hanging a shelf on the wall is not as easy as it seems at first glance. Each job has its own subtleties. A shelf hung incorrectly can cause enormous damage to property and human health.
An option for attaching a shelf to a weak wall.
If you need to fix the shelf to the wall yourself, then take the time to study the features of the work.
Mounting to drywall
Recently, plasterboard has been increasingly used in the design of premises and living rooms. Thanks to this simple material, the basis of which is gypsum and sheets of cardboard, the walls and ceilings of the house can be remade beyond recognition. Niches, arches, multi-level ceilings and partitions are built using this simple building material. But will it hold up on the shelves?
To be sure of the strength of the suspended structure, you should carefully inspect the mounting location and the product itself.
Assembling the shelf bracket.
What to pay attention to:
- Availability of communications. Check to see if there are any electrical wires or water pipes running through this area. If they are located in this particular place, then the structure will have to be moved or act very carefully so as not to damage the energy-carrying elements.
- The location of the frame for drywall. It can be either wooden or metal profile. It is better to attach heavy shelves to it, then the load-bearing capacity of the fastener will increase several times. If the distance between the shelf fastenings does not correspond to the gap between the frame guides, then it is necessary to screw an additional horizontal bar to the vertical profile on top of the drywall, and the shelf to it.
- Shelf weight. A light decorative structure can be hung directly on drywall, and a heavy one on a frame.
- Mounting height. Determine how to hang the shelf (height, distance to other items) based on the height of all family members. If the interior element has opening doors, then check whether they interfere with other parts of the room’s decor and people when opened.
After checking the mounting location, you can proceed to installation. In order to hang a shelf, you will need materials and tools:
- a drill with a drill bit with a diameter slightly smaller than that of a dowel;
- butterfly dowel or spacer dowel (the number corresponding to the number of fasteners on the shelf);
- screwdriver;
- building level;
- simple pencil.
Option for reinforced fastening with expansion dowels.
Progress:
- Place the shelf against the wall and mark where one fastener will be located.
- Using a building level, mark the remaining fasteners.
- Drill the holes.
- Drive in the dowels. If you are installing a shelf on drywall or a metal profile, then use a butterfly dowel. If on a wooden frame, then an expansion dowel.
- Place the shelf and hold it against the drilled holes (it is advisable to use someone's help).
- Tighten the screws.
A shelf installed in this way on drywall will hold up no worse than on a concrete wall.
Concrete and brick wall
Drawing of a chipboard shelf.
The concrete wall is very strong and can withstand enormous loads. But it is almost impossible to screw a self-tapping screw into it. To install the shelf you will need materials and tools:
- perforator;
- dowel for concrete or wooden dowel (amount corresponding to the number of fasteners on the shelf);
- hammer;
- screwdriver;
- pencil.
To install a shelf on a concrete base or masonry, follow the same steps as when installing on drywall. The difference lies in the tools and materials used. It is difficult to drill through a concrete or brick wall with a simple drill, but a hammer drill will cope with this task in a matter of seconds. And special dowels have spacers that can hold the fasteners in the wall.
You can use a wooden dowel instead of a dowel. Its diameter must be greater than the diameter of the hole. The dowel is driven into the wall using a hammer.
Wood fastener
If you have wooden walls, then hanging a shelf will not be difficult. The most difficult thing for you will be to measure the location of the holes. Next, the shelf is brought with fasteners to the marked points and screwed with wood screws. That's all.
If the shelf is responsible for holding a large amount of cargo, then you should use expansion screws for wood.
Hanging a shelf with the acquired knowledge will become much easier. And the time spent familiarizing yourself with the question of how to hang a shelf will be made up for by quickly installing a new decorative element.
Tools and materials
The list of tools required for hanging kitchen cabinets is standard:
- Drill and/or hammer drill;
- Screwdriver (it takes a long time to use a regular screwdriver);
- Jigsaw;
- Clamps;
- Level, plumb line, tape measure.
But the choice of hardware used to secure the cabinets will depend on the material of the internal partition in your kitchen:
- For wood, hardened screws with a countersunk head and a double-start thread with a large pitch are suitable.
- Concrete or brick - anchor bolts or hooks with plastic, metal dowels or wooden plugs (plugs).
- Cellular concrete - long bolts with the possibility of fixing on the back side of the wall or capsule himankeras.
If the kitchen is lined with plasterboard, you will have to find long enough studs that will fit securely into the main part of the wall, going right through the thin sheets. Otherwise, heavy cabinets will not be supported by any fasteners.
Do-it-yourself wall cabinet mounting
You can install the upper modules of the kitchen unit yourself, without resorting to the services of professional teams
To do this, it is important to have the necessary tool and have minimal skills to work with it. In addition, it is necessary to consider the fastening system
Fixing the cabinet on the wall can be done in two ways:
- on the mounting rail;
- using loops (or corners).
Kitchen Cabinet Fasteners
The first method, despite the more expensive parts, is considered the most reliable and convenient. All work can be done alone, and aligning the modules is easier. Dismantling of structures suspended on the bar is also easy.
Installation of kitchen cabinets on a strip
To install the upper modules, you need to prepare the following tools and accessories:
- perforator;
- screwdriver;
- level;
- tape measure, pencil.
Prices for popular hammer drill models
Hammers
Installation will be carried out on a mounting rail. Planks are available in various lengths: 0.5, 1 or 2 m. They have special holes intended for fastening.
To fix the cabinet, universal canopies are used (2 pieces per cabinet).
The great advantage of such devices is the ability to adjust the installation level of the cabinet in terms of reach and height. Canopies can be right or left, as well as universal.
In addition, you will need self-tapping screws: with dowels for mounting the tire (for greater reliability, you can replace them with anchor bolts) and for attaching canopies.
Step 1.
Tire installation markings are made using the level. The bar itself can be broken off using the notches on it. Many people use separate tires for each canopy for installation. However, for convenience, it is recommended to mount a solid rail across the entire width of the modules. This will immediately ensure the correct installation level.
Marking the tire installation using a laser level. Marking fastening points
Step 2. The plank is applied horizontally to the wall, points for fastening are marked. It is important to familiarize yourself with the location of the wiring in advance, otherwise if it is damaged by a drill, big problems may occur. Step3. To fix the tire, you need to drill holes
The wall can be made of different materials. The vast majority of load-bearing structures are made of reinforced concrete. The cabinet is installed on such bases using dowels with a diameter of 6 mm and self-tapping screws of 4 mm
Step3.
To fix the tire, you need to drill holes. The wall can be made of different materials. The vast majority of load-bearing structures are made of reinforced concrete. The cabinet is installed on such bases using dowels with a diameter of 6 mm and self-tapping screws of 4 mm.
Drilling holes
Step 4.
The resulting debris is removed from the recesses. Dowels are driven into the holes. A mounting rail is supplied. Use a screwdriver to tighten the screws.
Screwing in self-tapping screws
Prices for popular models of screwdrivers
Screwdrivers
Step 5.
Adjustable canopies are fixed to the side walls of the hinged module (from the inside). To make room for the hook, you need to make slits in the back wall. To do this, you can remove the hardboard or plywood from which it is usually made and make cuts. After this, the sheet is screwed back. It is possible to go the other way: use a pen attachment and use a drill to make holes in the back cover without removing it.
Slots in the back wall of the cabinet can be made with a jigsaw or hacksaw
Fastening the back wall of the cabinet
Step 6.
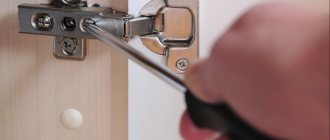
Canopies are being installed. To attach them, you need self-tapping screws 3 cm long (their diameter is usually 3.5 mm). Longer fasteners may pierce through the cabinet material. To fix each canopy you need 2 screws.
Fixing awnings
Step 7.
The cabinet is hung on a rail using hooks.
Hanging a cabinet
You can pull it closer to the wall by tightening the end bolt.
Adjustment by tightening the bolt
Now the cabinet will not be able to jump off the mount, even if it is accidentally lifted a little. Height adjustment is carried out using the second bolt.
Height adjustment
Prices for building levels
Construction levels
The wall cabinet is securely mounted on the kitchen wall.
In order for the dimensions of kitchen structures to best meet the requirements of household members, it is recommended to order designs according to your individual requirements. However, this option is more expensive. If you want to save money, you can purchase standard modules. In this case, you need to consider the proposed options and carefully calculate the installation method to choose the optimal one.
How to attach furniture correctly and evenly: step-by-step instructions
Since modern houses are built from different materials, hanging cabinets on walls has its own peculiarities.
After all, all materials differ in strength and ability to withstand heavy loads. For example, if the wall is made of brick or building block (foam block, gas block), then it will cope well with the loads and withstand the massive weight of the furniture. But if the walls in the kitchen are decorated with plasterboard, PVC panels and other less durable materials, you will have to work hard: select fasteners and the method of their installation.
First you will need:
- Accurately calculate the height of the furniture. It should be such that it is convenient for all residents to use it. Another 10 cm is added to the height of the shortest resident. For example, it will be comfortable for a person to get accessories from hanging drawers if, with his height of 160 cm, the drawers are located at a height of 170 cm (along the top edge).
- Think through everything so that hanging furniture does not interfere with the ventilation system.
- Place wall cabinets parallel to floor cabinets.
Tip
Before hanging kitchen cabinets, check that all electrical work has been completed.
You may need an additional outlet or switch for lighting. This needs to be thought through in advance. Otherwise, you will have to remove the boxes from the wall again to illuminate them.
Before hanging cabinets you must:
- Complete all finishing work in the kitchen. The walls must be smooth, clean, dry.
- Before drilling holes in the wall, you should carefully consider whether there are hidden electrical wiring there.
- To prevent the wall from starting to crumble under the influence of the drill, it is recommended to start drilling with the thinnest drill. And then the hole can be drilled with a drill of a thicker diameter.
The hanging process itself will look like this in detail:
- After determining the height of the kitchen unit on the wall, draw a line with a simple pencil under the ruler (if the cabinets are hung horizontally along the entire structure).
- The drawn line is checked for accuracy using the construction level. If it is smooth, then the first point for the hole is marked, and a drill is used.
- Fasteners (hinges or other fasteners) are mounted on the wall.
- The cabinet is suspended from securely and firmly installed fasteners and leveled in a straight line with a building level. Marks are made on the wall.
- Then the cabinet is removed, the remaining markings are made in the form of the following attachment points in the same way.
- When all the points are marked, the first cabinet is hung again and the accuracy of its top edge coincides with the marked line is checked.
- When hanging several cabinets at once, they need to be tightened together with self-tapping screws or self-tapping screws.
- The decorative cornice is attached with screws.
- The final stage is hanging the facades and checking the doors for functionality. Shelves are installed inside the furniture.
Tools and materials
Before you start work, you need to prepare all consumables and tools.
This will make the work easier and reduce the time it takes to complete it. Fasteners need high-quality, proven brands, since the reliability of the furniture and your personal safety will depend on them. There are several ways to evenly hang the upper cabinets from a kitchen unit. The following fasteners are suitable for this:
- Dowels with galvanized screws. They are sold in construction stores in pairs at once: there is no need to adjust them to fit the screws.
- Mounting rails with adjustable hangers. It is convenient to hang several pieces of furniture on them at once.
AttentionIt is good to connect the elements together with mounting rails so that there are no cracks or gaps between them.
And since they distribute the load onto supporting structures, this allows them to be used on thin and not entirely level walls.
- Hooks screwed into dowels. They are comfortable and can withstand heavy loads.
Tools:
- drill with different drill bits;
- screwdriver;
- perforator;
- hammer;
- building level;
- ruler, simple pencil.
Top wall cabinet on plasterboard
Since plasterboard quickly levels walls, it is widely used in the construction industry. The material is not strong enough, but you can still hang cabinets, shelves, and racks on it. Here it is important to choose the right mount and take it with a reserve for the load exerted.
If you choose the wrong fasteners, and too much pressure is applied to the wall, the sheets of drywall will simply not hold up and will break or cracks will appear on them - the fasteners will break out and the furniture will fall.
All hanging furniture items by weight are divided into:
- light (weigh up to 4 kg);
- heavy (their weight exceeds 4 kg).
Kitchen furniture is heavy. Fastening cabinets should be done carefully and very thoughtfully.
Advice
If, when leveling the walls with plasterboard, it was known that heavy furniture would be mounted on it, then most builders make a reinforced frame in advance, increasing the frequency of guides and their number.
Metal profiles are also needed of high quality: rigid, durable and reliable.
Heavy furniture is hung on drywall only with long screws or self-tapping screws. They must go through the drywall and sink deep enough into the wall or metal profile. To quickly find the location of the metal profile, you can use a magnet. If a piece of furniture together with kitchen utensils weighs up to 20 kg, then you should not fasten them with self-tapping screws. Use anchor bolts.
It’s even better to think about the location of the furniture at the initial stage of renovation, so that you can lay wooden blocks under the plasterboard in advance on which the kitchen set will be supported. The timber is fixed in those places where the cabinets will hang, only then the wall can be covered with plasterboard.
Furniture is fastened to mortgages using long self-tapping screws. Their length is calculated depending on the thickness of the drywall and the embedded beam. The length of the fastener must be greater than the thickness of both materials so that it is securely fixed in the main wall.
Below you can watch a video about hanging cabinets on drywall:
On a foam block
Advice
The foam block has good characteristics during its operation, but its porosity can sometimes play a cruel joke when hanging heavy furniture items on it.
How to hang bulky kitchen drawers on a foam block without them falling on the floor? Special fasteners are needed - elongated dowels with an increased cross-sectional diameter. These fasteners will ensure reliable fastening of hanging boxes.
In order for the furniture to firmly and firmly adhere to the porous foam block, it is recommended to first drive wooden bushings with a diameter of several centimeters into the walls, and then install a fastening element in them, which is additionally treated with glue or sealant.
Next, you can watch a video about the fasteners used for foam blocks:
On the mounting rail (bar)
Hanging furniture on mounting rails is easy. This fastening element is made of metal and has many holes located exactly in the middle of the rail. The process itself looks like this:
- The mounting strip is applied to the wall, where a horizontal line has been drawn in advance (the location of the fasteners).
- Self-tapping screws are screwed into the bar using a screwdriver. The more there are, the better.
- If the furniture is massive, it is better to additionally strengthen it with metal dowels. To do this, take a drill with a diameter of 1 cm (if the wall is brick or concrete). It is necessary to make an additional hole on the wall through the plank.
- The final step is to hang the kitchen cabinets on a well-attached strip.
Attention
It is necessary to screw the fasteners into the mounting plate through the wall into the two outer holes.
Features of hanging the corner model
Corner wall drawers in the kitchen are hung in different ways:
- Using attachments. In this case, turbo screws (if the furniture is too heavy) or dowels are driven into the base, into which screws or self-tapping screws are then screwed. And the back wall of the furniture piece is additionally attached to metal hinges.
- On the mounting rail (bar) . It is attached to both the wall and the cabinet. This method is the most common; it is often used when installing cabinets to plasterboard sheets.
When choosing fastening elements for wall cabinets, you should carefully study the manufacturer’s recommendations.
Installation of cabinets: stages of work
After completing the preparation of surfaces, it is necessary to proceed to the stages of installation of structures. First, we need to apply markings at the optimal height.
Choosing the height of the cabinets
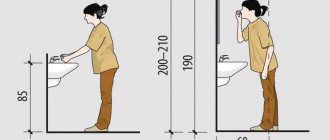
According to the standard, many manufacturers recommend leaving a distance from the table to the beginning of the top cabinet of about 45 centimeters. At the same time, many repairmen and designers consider this arrangement to be incorrect, and call another, the most optimal distance - 50-60 centimeters.
In fact, there is no single rule - cabinets must be installed in such a way that a person can easily reach the highest shelf. Since the height of all people is significantly different, during installation you need to do the following: raise your hands up and mark on the wall the point where your fingers end - the top cabinet will begin from this point and this calculation will allow you to have free access to all other shelves.
Calculations must be carried out based on your height and the growth of other family members
There are also general principles for installing upper cabinets depending on the height of the residents. If the average height of household members is up to 160-165 centimeters, then the cabinet is installed at a distance of approximately 175 centimeters. If you are taller than 170 centimeters, the top shelf should be located at a height of about 185 centimeters. In some cases, cabinets are installed even at a distance of two meters from the floor.
When determining the exact height, it is necessary to calculate the distance from the floor to the highest shelf
Marking
The exact marking height will vary depending on the type of fittings chosen. However, the principle of performing the work will be identical in all cases:
- After you calculate the exact location of the cabinet, you will need to draw a transverse line along the entire surface.
- If the headset is located at a corner, you will have to start from the corner. If the cabinets are located in one line in the middle, then marks should be left from the beginning of the outer cabinet.
- During the process, you must use a measuring tape and a water level. First you will need to place one point, and then determine the location of the second using a level.
A water level is a convenient but cheap tool that allows you to make markings on the wall in the best way.
After determining the location of the points, they will need to be connected to each other to get a line. For such purposes, you can use a ruler or any flat bar.
Tools
During the work you do not have to use a large number of tools. The main thing is to prepare an electric drill with an impact mechanism, or it is better to immediately purchase a hammer drill. In addition, we will need the following:
- measuring tape;
- water level;
- hammer;
- screwdriver;
- screwdriver;
- a simple pencil;
- square;
- knife;
- metal knife.
It is necessary to prepare all the tools in advance
Selection of screws and dowels
There are two types of screws suitable for hanging: standard - for wood or metal and more specific - for concrete.
- For wood or metal. An affordable and quick option to fix the cabinet to a beam, and the use of a dowel ensures reliable fixation of the self-tapping screw in brick, cinder block and similar materials.
- Self-tapping screws for concrete. Such fasteners are noticeably larger in diameter than conventional screws, which allows you to more securely fix kitchen cabinets. Fastening to a concrete wall is carried out as follows: a hole of the required diameter is pre-drilled, then the self-tapping screw is screwed in without a dowel.
The dowel consists of two parts - non-expanding and expansion. The first is designed to preserve the integrity of the upper soft layer of finishing materials. For example, if you are hanging on a stone wall covered with a centimeter layer of plaster, the length of the non-spacer part of the dowel should be about 15 mm.
The second selection criterion is the diameter of the fastener that will be screwed into the dowel. Most often, hooks or screws with a thread diameter of 4-5 mm are used to hang kitchen cabinets. To firmly fix such fasteners you will need a dowel with a diameter of 6-8 mm.
Naturally, you need to take into account the length of the screws. Hanging fittings screwed into a short dowel are not able to provide rigid fixation of the cabinets, and if you make the depth of the hole according to the dimensions of such dowels, then the long fasteners simply cannot be completely tightened.
Dimensions of dowels for the corresponding screws
You can attach the cabinet to the aerated concrete surface with an anchor, through a special dowel, or with a regular self-tapping screw. The latter option is often chosen because of its simplicity, but such fastening is not reliable under prolonged lateral loads.
Dowels and anchors for fastening in porous materials
How to hang a cabinet on the wall
Before starting installation work, please consider the following:
- Cabinets are installed at a height convenient for access to kitchen utensils;
- Hanging furniture should not spoil the interior;
- It is necessary to use fasteners that can withstand the expected loads for a long time.
Depending on the hanging fittings, there are several options for installing kitchen cabinets:
- Hinged on hinges. There are two common types of fittings of this type: P-shaped and “ear”. The hinges differ in shape; otherwise, it is a metal plate with holes for fixing on the cabinet and a hinged slot. There are P-shaped loops with small teeth at the top of the slot. This allows you to adjust the position of the cabinet in the horizontal plane, eliminating its arbitrary displacement later. This hanging option requires precise marking of the walls, since it is impossible to correct the vertical position of the cabinets. In addition, the hinges are visible from above, which is why they are not used for installing low-lying elements.
- Hidden loops. They are also called mirror ones, as they are often used for hanging mirrors. A cheap option for installing low-lying cabinets, the top and sides of which fall into the line of sight. There is no horizontal or vertical adjustment, which requires precise marking of the walls. The hidden location of the hinges significantly complicates installation.
- Corner. Old hanging fittings from Soviet times. The hard corner is attached to the top of the cabinet from the outside with a through bolt flush with the back panel. The actual mounting is done using a self-tapping screw screwed into the wall, and adjustment is only possible in height. The fasteners are reliable and easy to install, but are visible from above and do not allow cabinets to be installed under the ceiling.
- Mounting on a bar with a hinge. The set of accessories includes a metal profile up to 3 m long and an adjustable hanging mechanism with a hook. The plank is attached to the wall with dowels or self-tapping screws, and the hinge is attached inside the cabinet to the top of the side panel. A hole is made in the back panel for a hook, which during installation clings to the protrusion of the profile. The hinged mechanism adjusts the vertical position of the hook and its distance from the wall by turning the screws; The horizontal position of the cabinet is changed by displacement along the profile.
Tire mounting - Ikea. The fastening consists of a complex galvanized profile and plastic corners. The wall profile is pre-cut in accordance with the distance at which the plastic corners are fixed on the rear panel of the cabinet. When hanging, the side corners are placed on the profile and fixed to it with screws through holes in the rear wall.
Mounting on the IKEA profile
Let's look at an example of how to hang a cabinet in the kitchen using a mounting rail.
Tools you will need:
- Impact drill or hammer drill.
- Several dowels with a diameter of 10 mm and a length of at least 6 mm.
- Two canopies and a mounting plate.
- Metal scissors or jigsaw.
- Concrete drill with a diameter of 10 mm.
- Drills 4 and 2 mm.
Fastening awnings
Let's prepare a cabinet for attaching awnings. To do this, if it is not removed, dismantle the back wall. It is usually made of fiberboard. We insert the canopy inside the cabinet and make sure that its upper part fits snugly against the cabinet body.
The hook, when released, should extend beyond the cabinet body by 4mm.
Use a 4 mm drill to drill a through hole for attaching the canopy.
We do not drill the second hole for fastening the canopy through it, but go through it with a 2 mm drill to screw in the screw.
In practice, two fastenings use screws, but for greater reliability it was decided to use a through screw and nut. The disadvantage of this method is that the screw head will be visible on the side of the cabinet. But even with ordinary screws the cabinet will not fall off.
When the hole is ready, fasten the parts with a screw and washers.
You should not clamp them too tightly so as not to break the canopy body.
We screw the screw into the second hole.
We do the same on the opposite side.
There are “left” and “right” canopies, and they need to be inserted accordingly.
The body is marked with the letters “L” and “R”.
Having secured the canopies to the side walls of the cabinet, we cover the back wall of the fiberboard with a panel, cutting out the places where the hooks exit. This can be done either with metal scissors or with a regular jigsaw.
We nail the panel to the body with thin nails.
Installing the mounting plate
The cabinet is prepared, we determine the height of the mounting plate. It should be assumed that the distance from the sink or countertop to the bottom of the cabinet in the kitchen should be 500 - 600 mm. If this value is less than 450 mm, the cabinet may interfere with work on the work surface of the kitchen countertop. Consider the height of the owner and the depth of the closet. When we have decided on this value, we add it to the distance from the bottom edge of the cabinet to the hooks. This will be the height of the mounting plate.
We mark the calculated value with a marker on the wall, apply a bar at this level and mark the places for drilling holes.
The standard strip is 2000mm long and if you are planning to hang a row of cabinets there is no need to cut it. In the case where two cabinets will be suspended at a distance, cut pieces of the required length. To save the bar, it can be broken into several parts, securing it only in the place where the hook will be located.
It is better to make the first hole from one of the edges. Next, without clamping the screw, place a level on the bar and, having chosen the optimal value, make a mark on the other side and in the middle.
Lower the bar and drill holes according to the markings.
We insert the plastic dowels into the holes and screw the screws through the bar.
We check the level and reliability of fastening. We lift the cabinet and place its hooks on the mounting plate.
All that remains is to adjust the tilt with the corresponding canopy screws. This can be done with a Phillips screwdriver. When the work is finished, you can safely lay out the dishes; the awnings will reliably support their weight.
How to hang cabinets on a mounting rail?
1. Preparatory work. The wall must be perfectly flat. The installation of slats should be carried out only after making sure that the plasterboard profiles fit snugly to the base.
2. Fixing the tire for mounting. After measurements and markings, we place the tire at the required height and fix them with self-tapping screws. The length of the screws should be selected according to the thickness of the cladding plus 1.5 - 2 cm for fixing to the base wall. To achieve a perfectly even arrangement of the modules, installers advise using a second rail at the bottom edge of the headset items.
3. Installation of fastening fittings to the modules. Typically, the hanging system is connected according to the “rail to runner” principle. The slats are hung on the wall. We screw another tire to the back wall of the cabinet. Instructions for this type of slats can be found in the video on the Internet.
4. Attaching cabinets and shelves to the bar. The cabinet must be assembled without moving elements. Shelves and doors are attached to a suspended and securely fastened module.
If you are planning a large load (more than 15 kg), it is better to choose a bar across the entire width of the set. This way you will get a more even weight distribution and reliable fastening of the wall cabinets.
The price of fastening rails is higher than traditional fittings.
Mounting to drywall
If you plan to hang heavy-duty kitchen cabinets on a drywall wall, you will need to install reinforced wall cladding. Usually the number of vertical guides is increased. You shouldn’t skimp on the quality of metal profiles either; they must be strong, rigid and reliable. It's also worth shelling out for high-quality metal fittings.
1. Before hanging the cabinet, take measurements using a level. Zero deviations allow the load to be evenly distributed.
2. Do not tighten the bolts too much. Bolts screwed with excessive force can deform the cladding.
3. Lighter wall cabinets can be mounted with hinges and bolts screwed directly into the base. Hanging heavy products involves the use of long self-tapping screws, which are screwed through the thickness of the profile into the base wall.
4. A filled kitchen cabinet weighing more than 20 kg can only be supported by long anchor bolts. Before using the anchor, you should cut a small hole, drill the base wall, and secure the dowel. Then screw in the furniture anchor. When the installation of fasteners is completed, it is worth covering the mounting window with a piece of drywall and carefully strengthening it with mortar.
5. After installation is complete, do not rush to fill the cabinets right away. Double-check the accuracy of angles and slopes with a level. It is especially important that the shelves for dishes are not tilted.
Place the ball. If it does not roll, then the hitch is done correctly. Feel free to fill your cabinets with your favorite things. If an error is found, professional help will be required. Poorly installed wall furniture poses a threat to the safety of household members and property.
Design and drawing development
Before you take on cabinet drawings, you need to understand how to take measurements correctly. The niche in which you plan to install a wardrobe will not always have the correct geometric shape. That is why measurements in a niche must be carried out according to the following rules:
- first, measurements are taken along the back wall: at the top, at the middle level, at the bottom;
- then we also measure the “front part” with an indentation;
- height measurement also occurs in three positions from the “rear” and from the “front”.
Installing a built-in wardrobe without such measurements can lead to the fact that the body, made without taking into account errors and differences, either will not fit, or when trying to assemble the structure, serious gaps will be discovered. It will be a shame if the cut shelf turns out to be smaller than the required size and simply falls through. Before installing, carefully calculate all errors in order to leave allowance for installation. Sometimes it happens that the end drawing of the shelves resembles a trapezoid rather than the expected rectangle. It all depends on the quality of the walls, the density of the plaster on the inner corners of the niche.
Next we move on to the drawing. If you do not have drawing skills, it is better to contact a designer. Based on your data and wishes regarding the material, they will make a drawing of your future wardrobe in a niche. In such work, you need to remember to take into account the thickness of the material, the edges, if you want to thoroughly cover the cut points, and the margin for the mechanism of the compartment itself, which also needs to be about 10 cm.
Having detailed diagrams on hand, you can be sure that the manufacture of cabinet parts will be more accurate. Allowances left when taking into account wall errors will make the installation more accurate.
Now, as for the design of the future cabinet: without much experience in drawing up drawings and installation, give up complex radial facade designs. Here you need not just skills, but good professional experience in order to calculate and then competently assemble such a structure. Limit yourself to a simpler cabinet option that you are guaranteed to be able to control during assembly. Order all decorative elements strictly in accordance with the drawing.
Useful drilling tools
A jack of all trades always needs certain tools to work in a private house, on a summer cottage, in an apartment, or when building his own house. Many of them are not even worth purchasing if they do not require constant use. For example, for drilling, there are many different attachments that will greatly increase the functions of your drill and significantly expand them.
Let's look at some devices for auxiliary potential.
To obtain precise holes of significant diameter in different workpieces, a device such as a drilling and milling attachment will help to carry out individual milling work.
Make a milling machine out of a drill.
The next device worth mentioning is very expensive, but has the highest versatility. You will sharpen all the tools that you have on the farm, be it knives, shovels, axes, hoes, various drills, effortlessly with the universal sharpening device.
When purchasing drill attachments, be sure to check their compatibility.
Holder with clamp. With its help, you can fix the drill anywhere, use it with various kinds of devices, use it as a mini-lathe, sharpening, milling or grinding and polishing machine.
The drill holder allows you to quickly secure the drill.
All kinds of attachments are also designed for drills. These can be stops that limit the depth of drilling, platforms with which you can drill at a certain angle or perpendicularly. There are nozzles that are adapters and extensions of different designs: offset, angled, flexible.
The angle drill adapter is designed for hand and electric drills.
Metal cutting attachments turn your drill into a one-of-a-kind tool. Some resemble sheet metal shears, while others have a different feature, such as roller shears. The nozzle, called the “Cricket,” seems to cut through the metal.
The main advantage is that they do not damage the polymer coating of the metal.
There are also other attachments designed for monotype work.
- For installing aluminum rivets. There are types for both the same size and those with interchangeable bushings for different calibers.
- Tape-shaped attachment for self-tapping screws. With its help, you will significantly save time when working with plasterboard partitions or when you need to secure other materials with self-tapping screws.
- A belt sanding attachment will completely replace a sanding machine, and it will be much cheaper in cost.
- An attachment with which you can turn your drill into a hammer drill will not be superfluous.
- Using the corner pruner attachment, you can cut various cables, as well as tree branches.
- Using a variety of attachments, the drill will replace your jigsaw, circular saw, pump, and you can polish surfaces and sharpen drills.
- There are unusual attachments.
Whatever attachments we use, the main thing is that the work is enjoyable.
Is it possible to hang cabinets on drywall: basic mounting techniques
There are several ways to attach furniture to drywall.
The fastening methods are as follows:
- The use of drywall dowels and so-called “butterflies”. First, a hole is made in the wall, then a butterfly fastener is installed. The difference between the butterfly and other fasteners is that, when connected to a self-tapping screw, the antennae of the dowel very firmly press the structure to the drywall. The technique of inserting a dowel into the material and then using a screwdriver to tighten the screw is more suitable for lightweight structures. The weight of this cabinet should be about 5 kg including everything inside. This fastening system is invisible to the eye. It is quite possible to implement it at home even for one person.
- Use of mounting rails. The cabinet is suspended from slats attached to drywall. The slats must be firmly attached. It is recommended to fasten the slats in several places. Approximately 10 cm apart. This method is more reliable. The weight of the hanging cabinet can reach 15 kg. The downside is that such fasteners are more massive, solid and, therefore, too noticeable and can ruin the design of your kitchen.
- Use of extended anchor bolts. This technique will make it possible to fasten bulky furniture. But this technique is mainly suitable only for main walls (concrete, brick); it is possible to attach a cabinet to a plasterboard partition using this method if it is directly attached to one of the above types of surfaces.
- If there is a need for attachment to a plasterboard partition, then it is necessary to strengthen the partition in advance. Amplifiers made of timber or other material can be placed at the intended fastening points. It is necessary to make notes in order to determine in the future the location of the reinforcement material.
- If the fastening to the wall does not seem strong, you can use decorative fastenings to the ceiling or to the countertop. The chrome legs can be used as a frame, and the main weight of the cabinet will fall on them, let them rest on the countertop. The cables attached to the ceiling and additionally supporting the hanging cabinet will look no less original.
How to hang a shelf
Let's consider the procedure for attaching a shelf to walls made of various materials.
On a brick wall
The most convenient way to hang a shelf on a brick wall is with dowel nails. Here are the steps you will need to take to do this:
- screw the selected fasteners to the product;
- attach it to the wall and draw with a marker or pencil the location of the holes;
- drill holes in the wall at the marks with a drill;
- insert a dowel into them;
- attach a shelf to the wall;
- insert the tip of the nail into the dowel through the fastener holes;
- carefully drive the nail in with a hammer;
- when the nail enters the wall almost completely, tighten it with a screwdriver (this is necessary so as not to damage the piece of furniture being mounted with a hammer).
Instead of dowel-nails, you can use screws with dowels. They are somewhat more reliable. It should be remembered that they cannot be hammered in with a hammer. Screws can only be screwed into the dowel with a screwdriver.
On a concrete wall
In general, the procedure for attaching to a concrete wall is no different from that for a brick wall. However, you should remember some nuances.
- You only need to use a concrete drill. This material is stronger than brick, so making a hole in it is more difficult. In addition, concrete is often reinforced with reinforcement. If it collides with it, the brick drill will simply break.
- You need to drill carefully. Despite its strength, concrete is easy to crumble. In this case, to securely hold the shelf, the crumbled area will have to be restored with plaster.
- If the concrete wall is too dense and difficult to drill, you can use a concrete nail. It does not require the use of a drill. It is placed on the desired surface and struck several times with a hammer. In this case, you must be extremely careful not to damage the shelf and fasteners.
On drywall
If the walls are finished with plasterboard, it will not be possible to attach a decorative item to a dowel-nail. After all, he simply cannot resist in this material. Use:
- ordinary screws;
- butterfly type fasteners.
With ordinary screws everything is simple - they are simply screwed into the plasterboard surface. If they fit too tightly, you can drill holes in the screw-in areas with a drill before starting work. Their diameter should be 2-3 smaller than the diameter of the screws used.
A butterfly fastener is a bolt with a spring-loaded drop-down stopper instead of a head. It is used if it is planned to create a load of over 5 kilograms on the shelf. The screw simply cannot withstand such weight. To secure the product using a “butterfly”, you will need to perform the following steps:
- attach the selected fasteners to the shelf;
- attach it to the wall and draw the locations of the holes with a marker or pencil;
- drill holes in the wall at the marks with a drill;
- fold the butterfly stopper and insert it into the hole;
- when the stopper opens under the layer of drywall, adjust the length of the protruding threaded part by twisting or unscrewing;
- put the fastening holes on the protruding parts of the “butterfly”;
- Screw the supplied nuts onto the threads.
Installing a shelf with hidden fastening
In order to attach a shelf with an invisible fastening system, you will need to perform the following steps:
- measure the distance between the holes of the shelf where the fastening pins will go;
- place the fasteners near the wall at the same distance from each other;
- draw dots in the holes with a marker or pencil;
- drill holes in their place with a drill;
- insert dowels there;
- place fasteners on top of them;
- hammer the nail in with a hammer, when only a little bit remains to be tightened with a screwdriver;
- place the shelf on the pins of the fixed hinge.
As a result, we get a wall-mounted piece of furniture without visible fasteners.