DIY cornice is a great way to show Creative skills and get an exclusive item to decorate your room. You can find many different models of curtain fasteners on sale, but a homemade item is always beyond competition. In addition, such a cornice will be made specifically for a specific room, taking into account all its features
, which will allow it to fit perfectly into the interior. How to make such a useful thing? Let's figure it out.
There are many modifications of cornices. We will look at the simplest ones
in embodiment options.
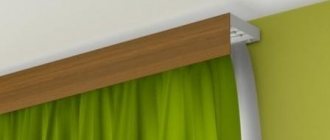
Design with decorative strip
Making such a cornice with your own hands is quite simple. You need to take the old string structure as a basis. In addition, we will need steel corners, self-adhesive film, laminated chipboard, paint, a circular saw, an angle grinder, a drill, a screwdriver, screws and self-tapping screws. Let's get started
:
- We start by making a decorative strip. To do this, use a circular saw to cut out a strip of the required length, about 15 cm wide, from a sheet of chipboard.
- We decorate the detail. You can paint it in a suitable color or cover it with self-adhesive film
. The coating must be applied in strict accordance with the instructions on its packaging. To ensure that there are no air bubbles left on the surface, smooth it with a rubber roller. We design the corners of the bar as follows: carefully cut the film from the front part of the crossbar along the line of continuation of the corner. Then we wrap the covering onto the back side of the plank and make a cut along the corner line from this side. Then we glue the narrow end of the film. We glue the remaining corners in the same way. - We are preparing to attach the cornice to the wall. It is assumed that the curtains will be attached to a regular string
suspended from the ceiling. Therefore, the decorative strip we prepared will also be attached to the ceiling. We make two corners from strips of sheet steel. These will be the fasteners. The width of the product should be 2 cm, length – 10 cm. Drill holes on the plates. We fix the corners to the bar with screws. - We install curtain rods. We mark a place on the ceiling for fasteners. We install the screws and put the corners on them, move the parts along the grooves, achieving the desired position. We fix the structure with self-tapping screws.
Cornice made of metal pipes
Simple but beautiful design - round cornice
for curtains, making such a product with your own hands is quite simple. Consider an option made of metal elements. For work we will need: metal pipes and rods, plugs, clamps, hinges, an angle grinder, paint of the desired color. Let's start making the cornice:
- Preparing metal parts. We cut the pipes to the required length. We will need two parts. The first is 25 mm in diameter, the second is 19 mm.
- We make holders for the crossbar. To do this, we cut a 12-mm rod into three pieces 25 cm long. We make grooves for fastening on each part. The first is cut at a distance of 1.5 cm from the edge of the rod. It is designed for a 25mm diameter structure, so it must have an appropriate width. At a distance of about 8 cm from the first groove, we cut out the second. It will be smaller, since it is intended for a pipe with a diameter of 19 cm. We sand the surface
of the holders with sandpaper, prime them and paint them. You can apply a layer of varnish on top. - We make plugs. They are made from round wooden handles or removed from an old cornice. In the first case, we purchase round parts and use a sharp knife to cut holes in them for metal rods.
- We install the structure. We mark the mounting locations on the wall, and then drill holes for the holders. We fix the rods in these holes; if they are not held very tightly, we fix
them with putty. We lay the pipes on the holders and insert the plugs.
How to make a curtain rod with your own hands using metal pipes is now clear. However, there is an even simpler option - a design made of plastic pipe. To make it you will need plastic parts and special fasteners for plastic pipes. The latter are attached to the wall and perfectly hold the improvised cornice
.
Types and classification of wooden cornices
The most popular option for cornices are wooden curtains. They, in turn, differ:
- The type of wood used for production. Models made from hardwood are distinguished by their high strength and noble shade. But products consisting of several rows may be too heavy, so additional, reinforced fixation will be required. The advantage of softwood cornices is the ability to apply carved patterns to their surface. And modern technologies allow you to give the product absolutely any shade.
- Type of fastening. They can be attached to the wall or ceiling. When choosing a ceiling mount, you need to pay attention to the weight of the curtain, especially if the surface is suspended. This option is preferable for an apartment with low ceilings or rooms in which there is no space between the window and the ceiling. The wall method is simpler, but is used mainly in rooms with a high ceiling and a significant distance from the window to the horizontal surface.
- Appearance. Today the trend is complex systems with a large bar on the front side. The fastening mechanism is hidden behind it. Models in the form of a rod, which may have additional sections for tulle and curtains, also remain relevant.
- Number of functional rows. If one curtain is enough, for example, in the kitchen, choose single-row models. Double row is more popular. It is suitable for tulle and curtains. Three-row ones are needed when it is necessary to hang a complex structure with a lambrequin.
Cornices differ in the type of wood, fastenings and appearance.
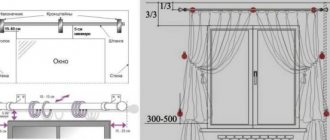
The wood cornice is a decorative element. To attract attention to it, you need to choose one whose length exceeds the width of the window opening by more than 10-12 cm. And in order for the structure to have a finished look, special decorative overlays are used.
A wooden cornice is a decorative element of the interior.
Wood
The following types of wood can be used to produce a wooden cornice:
- deciduous (oak, beech, cherry, walnut, birch);
- needles (pine, larch, juniper);
- exotic (wenge, ebony, zebran).
Deciduous, coniferous and exotic types of wood can be used for production. The cheapest are pine and spruce. At the same time, they have a fairly attractive appearance and fit well into any interior.
Products made from pine and spruce are considered the most budget-friendly. Oak is recognized as valuable and beautiful. It is difficult to work with, but the product can last a very long time.
Oak cornices are very durable. Cherry is light in weight and easy to process, so models made from this wood are often decorated with patterns.
Products made from cherry are very light. Exotic wood species can highlight the status of a room. But such products are very expensive. And it’s almost impossible to find discounts and promotions on them.
Cornices made of exotic woods emphasize the status of the room.
Form
There are 2 forms of wooden curtain rods: round and rectangular. Round ones are more common. Thanks to their shape, they can make the interior softer, and the movement of fasteners along the bar is smoother and more convenient.
Round cornices make rooms more comfortable. Rectangular ones represent a bar.
Rectangular cornices look like planks. Their design allows you to create a romantic atmosphere in the room by adding additional lighting to the cornice.
Lighting allows you to give the room a special romantic atmosphere.
Dimensions
The length of the curtain rod is selected individually for each room and depends on its area, type and material from which the curtains will be made. For a small apartment, not very wide options in light shades without threads are suitable.
Narrow cornices are suitable for small rooms. When decorating a room in a classic or modern style, choose wide cornices with beautiful carvings.
Wide carved cornices are suitable for decorating a room in a classic style.
Color
Today, when producing products from natural wood, it is possible to paint it in a variety of colors. When choosing the colors of the cornice, you need to build on the colors that are used in the interior.
When choosing a cornice, take into account the colors of the overall interior of the room. Light-colored products are suitable for decorating a room in Provence, minimalism or eco styles. They are hung in rooms with a small area and low ceilings.
Light cornices fit perfectly into Provence, minimalism, and eco styles. Dark products decorated with carvings are used to accentuate classical, modern, baroque and empire styles.
Such carved products are suitable for Art Nouveau, Baroque and Empire styles.
You cannot buy products in a shade that sharply contrasts with the decoration of the room! But it is allowed to choose tones that are very different from the color of the curtains.
String system
Making a string cornice with your own hands is quite simple. We carry out the work in the following sequence:
- We make wall mounts. We take a metal sheet 2 mm thick and use a grinder to cut out two 60x240 strips from it. We sand the edges of the parts. Then we bend one edge at a right angle in one direction, the second in the other. The length of the fragment facing the wall should be about 70 mm, the section facing the eaves should be 35 mm. First we mark the fold lines
, then we clamp the part in a vice and bend it with a heavy hammer. We drill holes for the screws. On the long platform we make three holes for the string, on the short platform - four for fasteners. - We install the cornice. We mark the places for fastening the structure on the wall, drill holes, and install fasteners. We take a thin wire or fishing line, thread it into the prepared holes and pull it tight. We make small loops at the ends of the fishing line or wire and thread sticks through them, which will secure the tensioned structure
.
A self-made string cornice may not seem aesthetically pleasing enough. Then the structure can be covered with a decorative strip. If you wish, you can make several planks of different designs and change them periodically.
Homemade design for Japanese curtains
Japanese curtains, consisting of several panels, resemble vertical blinds
. Let's consider the option when you need to secure four such panels. We will need to purchase 4 plastic slats about 25-30 cm wide, a two-row plastic curtain rod of the required length, narrow curtain tape, Velcro tape and transparent Moment glue. Let's get started:
- We cut eight pieces of the required length from the rail. We immediately put four aside. We will use them to make weights for the lower part of the panels.
- On the front part of each of the remaining four elements we glue a rigid base of Velcro tape, and on the back - curtain tape with the thread removed for assembly. To prevent the braid sections from falling off, we first melt
them over the fire. - We insert the guides into the cornice, two elements per rail. We install the structure in place.
- We prepare the panels by attaching the soft part of the Velcro tape to the top of the product, and attach weights at the bottom. We fix the panels on the guides. The cornice for Japanese curtains with your own hands is ready for use.
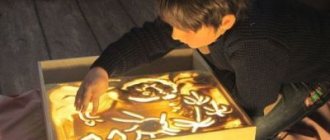
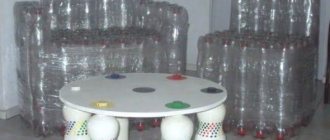
What might happen
In order to have an idea of what designs can be assembled without purchasing ready-made kits and using a little imagination, below are several photos of examples of cornices assembled with your own hands.
As you can see, all the curtain options presented above will look very good. Some of them are suitable only for traditionally decorated interiors, while others can be used when decorating rooms in modern styles.
How to make a product special
Using wallpaper and paint, you can achieve a variety of decorative effects and make the most ordinary design original and beautiful. This hand-made cornice will harmonize perfectly
with the decoration of the room. There can be many decor options. The simplest is to paint the product in the color of the walls or curtains. Interesting color effects can be obtained when applying paint with a rag swab or sponge. You can also use special adhesive paints of several colors.
The cornice can be decorated with stripes or left plain and individual elements painted: fleurons, brackets or rings. An original product will be obtained by covering the bar with wallpaper that harmonizes with the curtains. Drawing lovers can cover the design with hand painting
. It is very important to choose the right paints. Vinyl or silk emulsions and water-based compositions are suitable for wooden cornices. For metal rods, it is best to use enamel, spray or special metal paint. The finished decor is varnished.
Even a novice home craftsman can make a cornice with his own hands. Accuracy and patience will help you make a good, practical thing. And if you show your imagination and decorate your product in an original way, you will get an exclusive masterpiece. You can come up with the design of the cornice yourself, but it is better to look for interesting decor ideas and choose the best. A lot of interesting design solutions are collected on the WESTWING website; it’s definitely worth a look. Develop a project for an original cornice
and bring your idea to life. Your home should be the most beautiful, make it that way!
Beautiful DIY curtains from sheets
When choosing fabric for a curtain, you must be guided by the room for which it will be used. Bright and cheerful colors, appliques, fairly large floral patterns, images of animals and fairy-tale characters are suitable for a children's room.
Curtain pattern drawing.
For the bedroom, it is best to give preference to calm shades and soft patterns. Bright colors are suitable for the kitchen, creating the necessary mood. Thick tree branches can be used as a cornice for such curtains. This decoration element is ideal for country style.
You need to decide on the size and mounting option on the cornice. The following can be used as fasteners:
- rings or clothespins that will be attached to the top of the fabric;
- fabric loops, which are sewn to the curtain with one part and secured with Velcro tape with the other;
- The upper edge of the curtain can be folded up and a solid pocket can be made on top through which the curtain rod will be threaded.
Any convenient option is chosen, it depends on the design features of the cornice. Even at the planning stage, you need to decide whether decorations will be used, that is, tassels, fringe, etc. Since the curtain will be sewn from a sheet, it is best to use applique, large and beautiful buttons.
Step-by-step instruction
The sewing process itself is as follows:
An example of a pattern for a classic curtain with a lambrequin.
- First you need to take measurements of the cornice and window opening, determine exactly what length is needed for the future curtain. Often at this stage it turns out that one sheet is not enough; it is best to use 2-3 so that the curtain forms beautiful and neat folds.
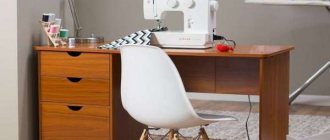
- After this, all the tools for work and curtains are prepared. You should start sewing on a table that is level and free from foreign objects. All the necessary accessories are placed right next to it so as not to interrupt the process during work.
- First you need to rip all the seams. This work is easy, but it takes a lot of time, you need to be prepared for it.
- The diameter of the cornice is measured if a pocket or loops will be made for fastening. In the first case, you need to consider how long it will be necessary to wrap the fabric, and in the second, prepare pieces of fabric or tape that will be needed for sewing loops.
- To make a pocket, add 7 mm to the diameter, fold the fabric and sew it to the main fabric. If 2 or more sheets will be used, then they must first be sewn together, after which you can start processing the seams on 3 sides.
- If loops made from ribbons are used, you need to sew one side of them to the top edge of the fabric, then fold it over and sew a neat seam. Pieces of Velcro tape are sewn onto the other part of the tapes and onto the base of the loops, with the help of which the loops will be attached. You can also use beautiful buttons for this; in this case, they can go to the front side, creating an unusual decoration.
- All seams are carefully ironed, the curtain fabric is ironed, after which it can be hung on the window.
Related article: How to ground a garage with your own hands