Stretch ceilings are increasingly decorating private houses, apartments, and offices. This is understandable. They do not require maintenance, do not lose their properties over time, last a long time, and have an attractive appearance. To emphasize the original design of the ceiling structure, you need to choose the right curtains. The ideal option would be a hidden curtain, which is installed before installing the suspended ceiling structure itself. The features of such cornices and their installation are described in more detail in this article.
Stucco cornice and heavy velvet curtain in combination with a matte stretch ceiling - elegant and noble
Short description
Ceiling cornice hidden under the ceiling module
There are no special types of cornices or curtains for hanging structures. They are a regular thin barbell. It can be mounted on the wall or on the base ceiling. Not only the functionality, but also the aesthetic effect depends on the method of fastening. By installing a curtain for curtains under a suspended ceiling, you will be able to visually increase the height of the room and hide unsightly structural details. This is also an excellent opportunity to install lighting in a niche. This will give a special chic to the interior.
Niche and cornice parameters
The dimensions of a niche in the ceiling for curtains are calculated using several initial data. First of all, you need to decide which cornice will hold the textiles. Since decorative qualities do not play a role, the cornice is chosen taking into account the complexity (multi-layers) of the drapery and its weight.
For example, if the window will be decorated with light cotton curtains and tulle, you can limit yourself to a string cornice, and the width of the technological gap will be minimal. If the decor is heavy curtains in combination with transparent muslin and a lambrequin, the niche will be much wider.
Finished niche for a hidden cornice Source paslaugos.lt
See also: Catalog of companies that specialize in interior redevelopment
Designers recommend choosing a cornice that covers the entire width of the wall, and not just the window opening, and setting the size of the niche accordingly. This forethought will allow you to beautifully drape the curtains along the wall, rather than pressing them around the window when you want to let the sun into the room. When choosing a cornice, you can use the following recommendations:
- If the textiles are too heavy (corduroy, velor, velvet), it is better to choose an aluminum cornice. In other cases, the best option would be a durable and budget model made of plastic.
- The width of the niche depends on the width of the cornice, and that, in turn, on the number of rows of textiles. Standard models are two-row, but a three- or four-row option may be required.
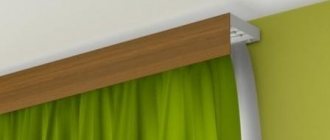
Sectional design Source severdv.ru
- In order for the curtains to drape beautifully, the calculations must include the width of the heating radiator or window sill (depending on what protrudes further). If the window sill protrudes too far, do not go to extremes and move the cornice 30 cm from the window - the space of the room is more important than impeccable drapery.
- For mounting in a niche, a ceiling cornice is usually chosen. This is technologically more justified; moreover, with this method of fastening, another dust collector surface is not formed.
- If the installation of the cornice is not carried out close to the wall, the place where it will be installed is puttied and painted with white paint. A bare concrete surface is not something you want to see after the renovation is complete.
- If you plan to install an LED strip, it is convenient to switch it on separately; the second option is on the remote control.
Finished design Source potolok495.ru
Kinds
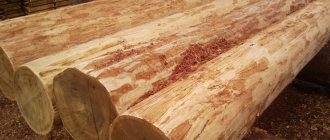
Using wooden products you can create a more luxurious interior
Plastic curtain rods are considered the cheapest of all and are light in weight
| Varieties | a brief description of |
| Wooden | They are a massive, heavy structure. They have a presentable appearance. Fits perfectly into the classic style of the interior. |
| Plastic | They have good strength, low weight, and an affordable price. |
| Aluminum | They can take different forms. They are characterized by high strength and elasticity. Usually complemented with decorative overlays. |
| Steel | Characterized by excellent strength. Capable of withstanding heavy loads. Suitable for massive curtains. |
Aluminum cornices are durable, reliable, installed in a hidden way or with a decorative overlay
Steel products are relevant in cases where it is necessary to hang heavy curtains
What types of curtain rods are there for suspended ceilings?
Cornices can be divided into two large groups:
- Ceiling.
- Wall-mounted.
In this case, installation is carried out in an open or closed way.
Wall-mounted models are mounted on two brackets. If the length is more than two meters, then additional fasteners are used every 1.5 m.
The material for making the cornice can be anything.
- Plastic . Affordable price and universal installation, a rich palette of shades and textures provide ample opportunities for interior design. At the same time, for wall-mounted models mounted on brackets, you need to use lightweight fabrics with low weight.
- Aluminum . Painted and laminated models covered with a thin layer of plastic are available. They are stronger than plastic curtain rods and can withstand massive three-layer lambrequins. Lightweight and durable metal puts virtually no load on the floor.
- Tree . Rich texture and noble shades suit classical and national styles. Chic carved models look rich. Wooden cornices can easily withstand heavy light-proof fabrics, as well as lambrequins with massive folds. Hardy and durable option.
- Steel. The ideal and practically the only option when you need to decorate windows above 3 meters with heavy fabrics. It is steel models that are used for textile decoration of scenes with numerous curtains.
- Forged. An exquisite option for Provence, country, Russian hut. Can easily fit into classic and country style. The powerful load-bearing capacity allows the use of heavy fabrics with the visual lightness of the cornice.
There are combined models. For example, with an aluminum base and a plastic coating.
In addition, regardless of the material and method of fastening, curtain rods can accommodate from one to 4 sets of curtains. Those. The design provides for the possibility of hanging light tulle, curtains, soft and hard lambrequins.
If necessary, you can increase the number of tracks by combining models.
How to hang a curtain?
Attaching a ceiling curtain to a suspended ceiling is quite simple. First of all, you need to buy a cornice with all the components: hooks, plugs, decorative tape. Next, you need to select the desired installation method. There are only two of them:
- traditional;
Scheme of open fastening using a wooden beam - hidden.
Installation diagram in a niche - hidden method
The first method involves attaching curtains to a suspended ceiling. More precisely, on the site where the mortgage was previously installed. The mortgage is a special platform made of timber, plywood, and plastic.
External, overhead cornice, on a suspended ceiling
With hidden installation, the structure is attached to a small rough section of the ceiling. It is specially left by the builders.
Curtain hidden in a special niche behind the stretch ceiling module
Curtain rods - a method for installing ceiling models
There are two ways to attach the cornice to the ceiling. Which one to choose depends on the design project, the qualifications of the installers and the client’s wallet.
Outdoor installation
With the open fastening method, the cornice is in plain sight. It is attached directly to the ceiling film. However, the thin fabric is not able to hold a cornice with heavy curtains. The ceiling will simply deteriorate. What should I do?
- Before calling the craftsmen to install the ceiling structure, you need to decide on a specific model of cornice and purchase it.
- This will allow the workers to make the correct markings and install the embedded beam, to which the fasteners will be carried out.
- After stretching the film using self-tapping screws, the cornice is attached to the embedded element.
Video: Installation of ceiling cornice in 10 minutes
Closed installation
If you want the curtains to flow straight from the ceiling, then you need to make a niche in front of the wall. This will visually raise the ceiling. Here you can use both ceiling and wall models.
- So, the suspended ceiling will end 15-20 cm from the wall. The indentation is needed so that the curtains do not rub against the ledge of the ceiling structure when moving.
- The width of the niche is calculated by the depth of the folds in the fabric that will form when the curtains are opened. If you like models with eyelets, then calculate in advance how much space they will take up when folded.
- Since the profile is not attached to the wall, you need to build a stop to which the harpoon that tensions the film will be attached. To do this, a specialized profile or an ordinary wooden beam is attached to the ceiling.
- After installing the canvas, the cornice is attached. Of course, it is more convenient to install it before the film is stretched. But with hot installation there is a risk of damaging the plastic.
- A cornice of any design can be installed in a niche, from a string to a complex design of Japanese sliding models. The main thing is that you feel comfortable using it.
- Small hooks hold the tulle well and are completely invisible. Rings and clothespins are easier on your hands.
Installation instructions
Traditional way.
- First you need to purchase a cornice and prepare a mortgage.
Having done this in advance, you will not have to disassemble the ceiling structure later. Wooden beams (less commonly, metal profiles) are usually used as a mortgage. It is set according to level. The corners and edges of the timber must be carefully sanded. Scheme for attaching the ceiling cornice directly to the stretch ceiling fabric - Fastening the mortgage.
For fastening, use a hammer drill and dowels. Support block for subsequent installation of the cornice - Marking.
At this stage, you need to try the cornice on the canvas and mark the locations of the fasteners. The places where the curtain will be attached must coincide with the location of the mortgages. Marking the surface for installation - calculating the width of the niche - Installation.
Installation is carried out using self-tapping screws. It is better to additionally protect the attachment points with reinforcing tape. Installation of a mortgage under a ceiling curtain
Note! The traditional method is easier to fasten metal products. Their high rigidity allows you to make fewer mortgages.
A plastic tire is installed on a suspended ceiling using an embed
Attaching a hidden cornice.
- Buying a cornice. In modern kitchens, bedrooms, and living rooms, cornices are increasingly hidden from prying eyes in special niches. In a niche you can install a curtain made of any material you like. You only need to focus on the weight of the curtains.
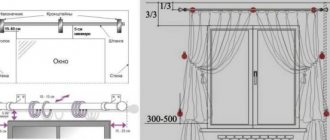
Three-row plastic cornice is well suited for installation in a nicheThe optimal distance of the inner edge of the niche from the wall with a window is 100-200 mm, depth 100 mm
- Installation of stretch ceiling. At this stage, the niche itself is formed. When installing the ceiling, you need to leave a small rough area near the window. It will be possible to install lighting there in the future. It will make the interior of the room more attractive.
Scheme for attaching a ceiling cornice in a niche under the cornice without bending the canvasLayout of a hidden cornice behind a suspended ceiling in a niche under the cornice with a bend in the canvas
- Installation of cornice.
For this, use ordinary self-tapping screws. By disguising the curtain, you can create an interesting design effect - flowing curtains. Such a hidden curtain looks amazing even in the photo. The niche-cornice for a suspended ceiling looks very impressive
How to hide a curtain under a suspended ceiling
To prevent the cornice from being visible, a hidden niche is installed in front of the window. The dimensions are determined by the dimensions of the curtain, the width of the window sill and radiator, as well as ease of use (it is difficult to work with a tool in a too narrow space). Usually a width of 20-25 cm is sufficient. The length of the hidden pocket can be slightly larger than the window or occupy the entire wall.
To create an invisible niche, do this:
- Markings are applied.
- At a given distance from the window, a wooden beam is attached to the ceiling (the same as when installing mortgages).
- A frame is assembled from profiles (just below the edge of the beam).
- Stretch the fabric.
- Cover the cracks with decorative plugs.
After this, you can hang the cornice and curtains.
Features: A more durable metal profile BP-40 is sometimes used as a separator. This is more convenient, since the baguette already has space for attaching the canvas. You can also build a narrow plasterboard box.
Current installation tips, photo examples
Method of installing curtain rods designed to mask decorative lighting
Hidden cornice for illuminating a stretch ceiling
To hang the product correctly and securely, you should know a few useful tricks. When marking, you must check how the cornice will be positioned in relation to the window. From an aesthetic point of view, it should be placed strictly parallel. For reliable fixation, the spacing of the screws should not be more than 50 centimeters. If you plan to install lighting in the future, the wires should be laid in advance.
Important! You can highlight current ideas for installing and decorating curtains in the photos posted in this article.
Dimensions and depth of niches for curtains
First of all, the dimensions depend on the chosen cornice and its location in the room. For a lightweight design designed for tulle and thin curtains, a width of a few centimeters is sufficient. For a wider one, on which two or three types of fabric of different weights are hung, you will need at least 10 cm.
Other factors also influence the parameters of a niche for a curtain in a suspended ceiling:
- When determining the width, take into account the dimensions of the window sill and the position of the battery. In order for the curtains to hang evenly, they should not touch the radiator. But too much indentation reduces the usable area of the room. As a rule, the optimal width is 20-25 cm.
- The length most often coincides with the length of the wall. But it may decrease depending on the layout of the room, for example, when the window is located in the corner of the room. The minimum size is slightly wider than the window, at least 10-15 cm on each side, while the curtains should cover the edges of the window sill.
- The depth of the eaves niche depends on the installation method and frame parameters. The minimum distance from the rough ceiling to the suspended ceiling is 5-7 cm. Additionally, it is necessary to take into account the dimensions of the cornice, hooks and curtain tape; they must be completely hidden behind the canvas. In addition, about 8 cm should be added to compensate for the viewing angle, since we are looking at the niche from bottom to top. Thus, the optimal depth is 15-20 cm. It is also important to provide additional space if you plan to install a hidden lighting system.
Note! In a niche that is too deep (for example, in two-level structures, the indentation can reach 40-50 cm) it is inconvenient to attach the crossbar and hang curtains.
Wall or ceiling curtains: which is better?
Wall and ceiling cornices for rooms with suspended ceilings
When choosing a mounting method, pay attention to the following important points.
- It is better to choose wall curtains if you want to hang multi-layer, heavy curtains. This is true for classic interiors.
- If you want to emphasize the curtains in a special way, it is better to choose a ceiling cornice and install it in a niche. This will make it possible to build in the backlight.
- Ceiling models can be installed at almost any distance from the window opening.
- The problem with modern apartments is the small height of the rooms. By placing curtains on the ceiling, this defect can be dealt with. Curtains will visually make the room taller and more comfortable. Wall structures, on the contrary, will help cope with the problem of rooms that are too high.
It is better not to use wall mounts for curtains in low and cramped rooms.
Cornice design
When thinking about the future design of the window area of the room, you must immediately decide on the design of the cornice. There are several main options:
- string cornice It is a stretched wire with hooks to which the curtain is attached. Most models are equipped with a string tension regulator. An excellent minimalist option, but such a curtain rod is unlikely to withstand heavy curtains;
- tire cornice It looks like a flat plate with several slots for mounting hooks. Several layers of curtains can be attached to one such curtain rod;
- profile cornice made of aluminum. Thanks to its high flexibility, it can be bent almost any way, which allows you to use profile cornices to design semicircular window openings;
- Separately, it is worth highlighting the flexible cornice , which is made of plastic. It can be given absolutely any shape, creating an unusual trajectory for the curtains. Such cornices are often used not even when decorating a window opening, but for zoning space and creating a screen;
- baguette cornice It is distinguished by the presence of a decorative strip around the curtain fastening system, i.e. the hooks will not be visible at all. Sometimes LED lighting is mounted under the bar, obtaining an original result. A good option for open ceiling or wall mounting.
Cornices also differ in the number of guides. The most popular models are those with two guides: you can hang tulle and curtains on such a cornice. If it is necessary to decorate the structure with a lambrequin, choose a cornice with three guides. If blinds are chosen to darken the room, and only translucent tulle will be attached to the cornice, then you can take the simplest and cheapest option with one guide.
There is a classification according to the control method:
- mechanical curtain rods are a true classic. To open and close the curtains, you need to pull the cord. Everything is simple and reliable;
- A motorized curtain rod allows you to open and close curtains simply by pressing a button. The decision is justified if the curtains are long, wide, heavy, and you regularly manipulate them.
Separately, it is worth highlighting the so-called. “smart” curtain rods , which, thanks to a controller and a sensor system, can open and close themselves according to a certain schedule or depending on the light level in the room. In some cases, you can enable the effect of presence when no one is at home.
Photo examples of ceiling cornices attached in different ways to a suspended ceiling:
Methods for creating a niche in a suspended ceiling
The shape of the structure can be the entire length of the wall or the size of a window with straight or rounded corners. There are several ways to make a niche for curtains in a suspended ceiling. They differ in design, manufacturing complexity, appearance and installation technology. To install a hidden cornice, use a plasterboard box, a timber frame or a special profile for suspended ceilings. Let's consider each method in detail.
Plasterboard box
A box is erected along the wall made of gypsum plasterboard and a metal profile, which separates the place where the cornice is attached from the rest of the room. A suspended ceiling is subsequently attached to it. This design allows you to install spotlights and decorate the ledge with a decorative baguette.
Box dimensions:
- length corresponds to the dimensions of the room;
- width - 5-10 cm; to install spotlights, you will need at least 30 cm;
- depth - slightly below the level at which the canvas will be stretched.
Installation is carried out as follows:
- Mark where the box should be located.
- At this point, a guide profile for plasterboard is screwed to the ceiling.
- Bends are made to the walls along the depth of the structure.
- A horizontal jumper with attachment points in the partitions is mounted to them.
- The guides are fixed together with vertical sections of the ceiling profile in increments of about 60 cm.
- At the level of the future stretch ceiling, the box is reinforced. To do this, an additional guide profile is mounted between the vertical jumpers. A baguette for the stretch ceiling will be attached to it in the future.
- Sew up the frame with plasterboard, starting from the vertical sides.
- Seal the seams with putty, then paint. After this, they begin to stretch the fabric.
If spotlights need to be built into the box, a wider structure will be required (approximately 30-50 cm). In this case, the assembly of the frame becomes more complicated. To increase the strength of the structure, additional horizontal jumpers are installed from the ceiling profile, which connect the lower guides. The fastening step is approximately 60 cm. The lintels are additionally fixed to the floor slab using direct hangers or sections of the ceiling profile. There is still room inside to place lights and wires.
Features: if the niche is narrow (20-30 cm), installing drywall in it will be inconvenient. Then the order of work changes. First, they assemble the wall on the floor from the window side, then attach it to the ceiling. The remaining part of the frame is attached to it and sheathed.
The advantage of a plasterboard box is that when hanging curtains there is no contact with the suspended ceiling. That is, the possibility of accidentally damaging the canvas is eliminated. But there are also disadvantages. The big disadvantage of a plasterboard box is that its assembly takes a lot of time, after which it still requires finishing in the form of putty and painting. In addition, you have to wait for the paint to dry before you start stretching the canvas.
Timber mortgage
This method of installing a hidden niche has two options. Let's look at a simpler one first.
The first step is to install the embedded beam. To do this, take a wooden beam that is the same length as the wall or slightly shorter. Usually a section of 30x30, 40x40 or 50x50 cm is suitable. The timber is attached to the rough floor strictly horizontally. A level or a thread stretched from one wall to another will help with this. A ceiling or wall molding is screwed to the bottom edge, into which PVC film is subsequently tucked. The beam itself should be located 5-10 mm above the level of the stretch ceiling. The gap is closed with an F-shaped decorative insert.
To install the mortgage, it is convenient to use reinforced metal corners. Then the tree can be located either close to the ceiling or at some distance. The mortgage will be on the same level, even if the floors are uneven. In addition, the resulting gap will serve to ventilate the space under the ceiling. Mold will not appear there, and the film will not be retracted when opening and closing the doors. But if the surface of the ceiling is flat, you can fasten it with long self-tapping screws through the mortgage directly to the floor slab.
Attention! It is better to use laminated veneer lumber; it practically does not deform from moisture, and over time the structure will not “lead.”
This method of installing a hidden cornice in a suspended ceiling is easy to implement. From the side of the room, the structure looks flawless. But it is not without its drawbacks. The fact is that on the reverse side there is a visible gap, mortgage and fastenings. They rarely look at them on purpose, raising their heads up near the window. But if the apartment has a balcony or loggia, then this drawback will be visible.
To hide the “wrong side”, choose a more complex option with a bend in the fabric. To do this, a fender profile is attached to the bottom of the beam, and a ceiling molding is attached to the vertical plane on the side of the window. The gap for mounting the canvas should be located flat against the ceiling. Then, when stretching, the PVC film is bent over the bumper and tucked into the baguette.
Thus, the canvas hides all structural elements and the niche looks aesthetically pleasing from any angle. In fact, it turns out to be a two-level ceiling, in which the lower tier occupies almost the entire room. But making such a design is more difficult and longer than the previous version.
If a hidden pocket is required not for the entire wall, but only for the size of the window, a U-shaped embed is assembled from timber.
Note! It is important that there are no burrs, damage or noticeable joints at the bend. When stretching the fabric, it is necessary to avoid wrinkles or folds. It is recommended to start installation from this area.
Special profile for cornices
In the finished version, the curtain pocket looks the same as with a fold and fold of the fabric; the structural elements are not visible and are completely covered by the stretch ceiling. But instead of timber, a special metal profile BP-40 is used.
It is a square aluminum pipe with a gap for inserting the blade. Available in a length of 2.5 m and a size of 40x40 mm, the bend height is 3 cm. Unlike timber, an aluminum profile makes it easy to create a niche with rounded corners. To do this, cuts are made in the bending areas every 5-10 mm.
Installation is similar to the method with timber, but takes less time, since there is no need to screw on additional baguettes. This option of creating a niche for a cornice in a suspended ceiling is somewhat more expensive. But many choose it because of the simplicity and greater reliability of metal compared to wood.
Niche profile
The previous methods are not designed to cover a hidden pocket with a suspended ceiling; the surface of the recess will have to be painted. A special baguette, “Nisha Plus,” will help you avoid this. The profile has a width sufficient to install a cornice on it. There are gaps on both sides for fixing the canvas, one of which is lowered below to hide the structure.
Profile length - 2.5 meters. This is enough for small rooms; in wider rooms the baguettes will have to be joined. It is important to ensure that there are no gaps or differences in level at the joints.
Installation is quite simple: metal corners are screwed to the ceiling, then a profile is mounted to them (with the low part towards the room). Subsequently, a ceiling cornice is attached to this structure, and the niche is covered with a piece of tension fabric. The material can be the same as in the rest of the room or simpler and cheaper.
Curtain profile
This is another way to cover the top of a curtain niche with a stretch fabric. The method is even simpler, since a baguette with built-in fastenings for curtains is used - curtain profile PK-5.
The product is a white-painted aluminum tire with three rows of roller hooks. There is no need to additionally attach the cornice. On both sides of the profile there are grooves for fixing the tension fabric and one elongated edge to hide the niche. The standard size is 3.2 m, the height of the bumper is 5.5 cm. Installation is similar to the previous option.