Convenience of building plasterboard niches in living rooms
The living space in apartment buildings built in the second half of the twentieth century and in many modern municipal high-rise buildings is so small that residents worry about every extra centimeter given up when covering the walls in the hall for frame fastenings. To some extent, you can compensate for this loss by making niches from plasterboard in the living room. Thus, you can achieve several positive results at once:
- Reduce the amount of wasted space, since shelves can be made in the spaces between structural elements.
- Give individuality to the room, make its design special.
- Save a large amount of money by ordering furniture based on a personal project.
Wall recesses, or niches, have been used by people since biblical times. Despite the passage of time, they still have not lost their relevance. Thanks to the plasticity of drywall, they can be given any shape and structures of different sizes can be made. In the living room, a niche can be used:
Options for plasterboard shelves
Organizing space in the living room or bedroom may require the installation of an expensive furniture set. It can be replaced by plasterboard racks, niches or partitions with shelves. Often, niches built into walls are illuminated, imitating window openings or simply creating an accent on decorative items. Such shelves serve as an additional source of diffused lighting for the room. Openwork partitions help to zone a large studio or combined room.
The hall will have convenient combined shelving, including shelves for a plasterboard TV. Dishes, books, home theater items or other equipment are placed on adjacent stands. A large structure that occupies the entire wall serves as an analogue of a furniture wall. Unlike cabinet cabinets, you can independently design the product in accordance with your needs and the overall style of the room.
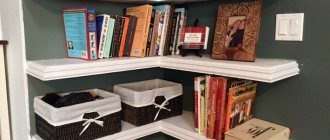
In a small room, a corner shelf would be appropriate: it is easy to cut out parts of the desired size and shape from plasterboard. The compact rack can be used in the kitchen, in the nursery, and in the hallway. And even in the living room you can decorate an empty corner using plasterboard products (shelves, racks, flower beds, false fireplaces, etc.).
Types of shelves
Today, a huge number of different shelves for the hallway are manufactured, which can be selected based on the size of the corridor and its style. Modern shelves reveal the flight of designer imagination - they not only look stylish, but also save useful space. The following materials are used for their manufacture: metal, wood, plastic, chipboard and MDF.
A shelf for clothes or shoes can be supplemented with various horizontal surfaces to accommodate accessories
Shelves can have different surfaces:
- matte;
- glossy;
- varnish.
Also differ in the variety of color palette: from white to beige, from light brown to black. Both domestic and foreign manufacturers are represented on the market. With the right selection of materials, fittings and decorative elements, they can become the highlight of any hallway. Shelves vary depending on their purpose.
A hallway with shelves looks neater, because shoes are not scattered around the room, but are compactly installed in a specially designated place
Shoe shelves
They definitely come to the attention of any person - anyone entering the house must take off their shoes. They can be retractable or telescopic and are usually combined in 2 or 3 pieces. The advantage of such shelves is that this design allows you to install one shelf on top of another and get a convenient place to store shoes for the whole family, saving space.
In a folding shoe rack, shoes are in a vertical position, which means they take up minimal space. Retractable structures are very convenient, but are most appropriate for large corridors.
Shoe racks vary in design style and number of shoe compartments
The organizer shelf is very relevant for the hallway. They can be made from various materials, there are even fabric options. They may look like a suitcase or a large box made of thick fabric with compartments for shoes or storing things.
DIY organizer shelf made from plastic pipes
The next type of shoe shelves in the hallway are the most common open ones, which can look like racks. This design is the most common and is installed in a designated location. They can be straight and consist of several segments (cells) of different sizes, or inclined - this option is very convenient and saves space.
The height of the bench with shelves for shoes should ensure comfortable changing of shoes
Quite often, the upper part of such shelves is designed in the form of a soft ottoman, which facilitates the process of putting on shoes. The simplest and most convenient option is a bench shelf. It includes several tiers of ledges and a seat.
All of the listed shoe shelves will not only provide order and comfort, but may well become the hallmark of the hallway.
For clothes
Shelves for clothes can be in the form of ordinary racks. And for more convenient storage of small items or items that are not often worn, you can use elegant wicker baskets or boxes, which will also serve as decoration.
Shelves for storing hats are usually combined with an open hanger for casual clothes
Pull-out shelves and trays for storing things are very popular. They are easy to use, allow you to pack them as compactly as possible and quickly find the right thing, but this option is more suitable for spacious rooms.
For accessories
A shelf for hats in the hallway can be supplemented with hooks at the bottom, which is very convenient for placing outerwear. The structures are either wall-mounted or suspended.
Shelves for storing accessories can be of a wide variety of designs
Hats and scarves located on open hanging shelves look quite stylish and original. They can consist of several tiers, which is very convenient for a family of several people. Children can occupy the lower shelves, and adults - the upper ones.
Original wooden shelf with a secret compartment for storing keys
Shelves with drawers
The design, consisting of a mirror with a shelf and several convenient drawers, will allow you to hide various necessary little things: cosmetics, keys, gloves. Under the same shelf you can place a key holder or a wooden plank with hooks for placing keys.
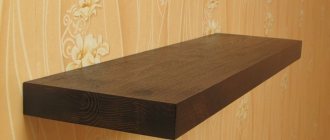
Wall shelf with drawer made of natural wood
A very practical and convenient key holder in the form of an elegant small cabinet with hooks, shelves, drawers and a door. You can also store wallets and gloves in it. This shelf is suitable for storing small items and maintaining order in the hallway.
Shelf lighting
This interior detail will look more impressive if it is supplemented with lighting. It can illuminate not only the shelf itself, but also part of the room. The light emitted can be of a wide variety of colors.
Properly selected lighting will become a feature of the room’s interior, its “highlight”.
This solution can be implemented both with the help of lamps and with the help of LED strip. To insert the lamp you will need a drill with a crown attachment.
Using the tool, we cut a hole in the shelf and insert our lamp into it. Afterwards all that remains is to connect the electrical wiring. (see also the article Drywall niches in the bedroom: create a unique effect in your room)
But the LED strip looks most impressive. Its price can vary greatly depending on the brightness of the light and the number of functions.
It illuminates only the surface to which it is attached. It is very flexible, so it can also be installed on curved surfaces. In addition, it consumes little electricity. (see also the article DIY plasterboard niche with lighting: decorating the ceiling with LEDs)
It is also compact and easy to install. You can attach it using ordinary tape.
Interesting design ideas
Bookshelves for the kitchen, made of plasterboard material, carry not only a practical function, but are also an original decorative solution. With the help of such structures you can correct defects in the room. In a room with a low ceiling, it is not recommended to install high-height cabinets, but an open shelf will look original and appropriate.
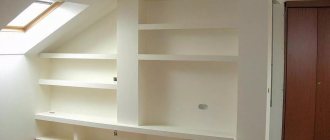
The use of plasterboard to create an arched structure with shelves is justified in those rooms where, for some reason, there is no door. This could be a small apartment. Arches not only correct the shortcomings of doorways, but also serve as a zoning element in the room.
The old walls are replaced by partitions, shelves and niches, which, after installation, look elegant and make even the oldest bedroom modern. On such shelves you can install a TV and books, and you can also place figurines or lamps.
Shelves can be installed on the wall, next to the window, and plants can be placed in them. This is a convenient and practical design idea for those housewives who prefer the exciting hobby of growing plants. In addition to aesthetics, flower pots on such shelves can hide uneven walls.
A shelf made of plasterboard would be appropriate in the hallway. The main thing is to strengthen it efficiently
This is important because designers suggest placing many objects on it to create a cozy atmosphere in the hallway
Built-in bookshelves made of plasterboard can fit into any interior and give it individuality, combined with a stylish interior. Experienced craftsmen recommend additionally installing lighting on such products. This will add additional lighting to the room.
Original shelves and niches made of plasterboard in the video:
How can you make a shelving unit in your garage with your own hands? Photos, drawings of homemade shelves
A garage is more than just a place to park a car. Very often, it is in the garage that we store certain things that we do not need at the moment, but will definitely need a little later.
avoid clutter inside the garage , it is very important to use the storage space correctly. Therefore, no good garage is complete without a reliable storage system. .
A shelving unit is one of the most important attributes of a garage, and if for some reason your garage does not yet have one, then let’s find out how to make a shelving unit for your garage with your own hands from a corner, from a profile, from metal and wood.
First, let's figure out what types of racks there are and what materials they can be made from.
By type of design, racks are divided into:
- Not mobile (stationary) shelves. Such shelves are firmly attached to the garage wall and can stand for a long time. This is the most stable type of shelving that can support the heaviest items and tools.
- Modular shelving systems. Such shelving systems are sold in many construction and furniture stores. They can be quickly and easily assembled and disassembled. You can also add new segments to them if you wish.
- Mobile (movable) racks on wheels. They are small in size and have limited weight. They are convenient because they can be moved to another place at any time without dismantling the rack.
- Hanging shelves. Mounted on walls or under the ceiling. Not intended for storing heavy items.
- Small rotating racks. They are very convenient for storing small tools, parts, cables and other necessary items. But you can rarely find them on sale.
Garage storage systems can be made from different materials:
- metal. The strongest and most durable type of shelving. They are not afraid of temperature changes, do not burn and can withstand any weight;
- tree. Such racks are cheaper than metal ones and less durable due to frequent changes in temperature and humidity levels inside the garage;
- plastic. Structures with shelves made of this material are the cheapest and lightest in weight. Designed for storing light items;
- combination of several materials. For example, a wooden frame and plastic shelves.
The required type of structure is chosen based on the weight of things and the amount of free space for storing which shelves and racks are made in the garage.
What do-it-yourself garage shelving looks like - photo :
Forms
The layout of portals for a TV involves the use of various forms. The latter can be completely different, unusual, bizarre and even mysterious. It all depends on the imagination of the designer.
The choice of shape and size primarily depends on the characteristics of the room being designed and its style.
To add a touch of exclusivity to the design, specialists in the field of design art use the following types of tricks:
- Arrangement of additional shelves for installation of decorative elements on them.
- Adding emphasis by painting some surfaces with bright, eye-catching colors.
- Installation of colored lamps that allow you to give a glow to large surfaces of the walls.
- Installation of small LED lamps to illuminate the silhouettes of decorative figurines, vases and other trinkets.
- Using the capabilities of gypsum plasterboard sheets to create unusual arched shapes.
- The layout of additional partitions, side walls and partitions for zoning a hallway, bedroom or living room.
- Creating architectural compositions along the entire wall where the TV, home theater and other media devices are located.
- Layout of niches involving upholstered furniture. The results are truly extraordinary creations of design art.
The photo shows the kitchen interior and a plasterboard niche with a curved TV, decorated with a frame made of moldings.
The main advantage of niches made of plasterboard sheets is the possibility of arranging a unique, individual and creative design option for the room. If there are no other features in your bedroom or living room, installing a gypsum plasterboard structure will bring a large amount of exclusivity to your home.
TV in a plasterboard niche lined with white brick.
Thanks to its unique structure, gypsum board allows you to organize completely unusual, mysterious portals. The universal properties of this material were appreciated by masters in the field of design art. The pliable base of drywall can be bent to unimaginably small radii.
Features of plasterboard shelves: advantages and disadvantages
Before you begin installing plasterboard shelves, you need to know the strengths and weaknesses of the material. This information will help you use and install it correctly.
The advantages of plasterboard shelves include:
- Diversity. You can install shelves of any shape and size yourself. During installation, you must immediately take into account all the nuances and adjust the dimensions of the product. Shelves should not be made bulky and bulky.
- Easy to install. Anyone can install plasterboard shelves. This does not require any specific skills or special expensive tools. Installation training occurs on the job.
- Combination with other materials. Drywall combines well with glass, regular chipboard, plastic and other materials that are used in the finishing process.
- Strength. If the shelves are installed correctly and the frame is strengthened, they can withstand a lot of weight.
- Interesting design. Shelves made of plasterboard are hollow inside. You can install an LED strip or other type of lighting equipment here to complement the interior of the room or place accents in it, highlighting some objects favorably.
- Price. The products will cost much less than furniture made at a factory or in a private company.
Shelves can perform not only the function of storing and arranging items in a room, but also participate in zoning the space.
This option is appropriate to use in small apartments, where every centimeter counts. From plasterboard sheets you can make not only one simple shelf, but even a rack or a designer partition with niches. The main thing is to correctly take into account the load and thoroughly strengthen the frame. Drywall has several important disadvantages that should definitely be taken into account when making shelves. These include:
- Fragility. The material should be handled extremely carefully at every stage of work: during transportation, installation, and during further use. It is recommended not to plan plasterboard shelves on walls where heavy loads are expected. If you plan to install a TV or similar equipment on it, you must use a double layer of drywall.
- Lack of sound insulation. If the shelf serves as a partition, then absolutely all sounds will be heard through it. For good sound insulation, additional material should be installed inside. For example, mineral wool.
Making your own shelves
The materials and tools are prepared, you can start making the shelves. The entire process of their creation is divided into several stages.
Creation of a drawing and calculation of materials. At this stage, the design of future shelves is considered, a diagram of the future structure is drawn, a drawing is drawn up with a dimensional grid.
It is important to immediately determine the future load on the shelves, because... the type, quantity and quality of the purchased material will depend on this.
Creating a frame from a galvanized profile. First, the main elements of the drawing are transferred from paper to the wall
It is very important here that strict parallelism and perpendicularity of the lines are maintained. A plumb line and level will help you with this. After applying the marking mesh, it is necessary to drill holes into which the profile is secured using dowels. The sequence of installation of the frame is as follows: first, the ceiling and floor guides are installed, then the wall vertical guides, followed by the crossbars and slats. Also at this stage, installation of electrical wiring occurs, if any is planned in plasterboard shelves or niches.
Installation of a plasterboard structure. Based on the drawing, plasterboard sheets are cut into rectangular or other shaped structural elements of the required size. The open outer edge of the workpieces is rubbed with sandpaper to give smooth lines. The structural elements are fixed to the profile using self-tapping screws. At this stage, special attention should be paid to the joints of the sheets; they must be done clearly. In addition, if shelves with an increased load on them are planned, then this fact is provided for at this stage: such shelves are made of a double layer of plasterboard or by introducing an additional layer between them made of plywood sheet.
Finishing plasterboard shelves. At this stage, all joints and irregularities in the structure are sealed using putty. All joints are glued with a special tape (fiberglass), all outer sides of the shelves are strengthened using a perforated corner. Then the entire structure can be puttyed in two layers. After applying and drying the first layer, the entire surface is sanded using coarse sandpaper, and after the second - fine sandpaper.
Finishing the shelves. After the putty has dried, all surfaces of the shelves should be primed, and then either painted or covered with wallpaper.
The shelves are ready, all that remains is to choose the design of the shelves for a particular room.
Finish coating of the finished shelf
How to finish a plasterboard shelf? A variety of materials can be used for this, but paint and wallpaper are most often used. Working with wallpaper is very difficult and takes a long time. It will take a lot of nerves, but you may not achieve results. Although if you trim and hide everything correctly, it will turn out very beautiful. Moreover, the wallpaper will also hide drywall cracks if they arise. Wallpaper is usually used for painting.
If you paint the shelves right away, you will need water-based paint. If you use thick paint, you can create streaks on the top of the shelf with a brush, creating unique patterns. In any case, before painting plasterboard shelves, they need to be prepared. To do this, all joints and screw heads are puttied. At the joints of the gypsum boards, you need to create a right angle, because problems with leveling the surface often arise there. It is the putty that will help make the shelves completely even, and not just top and bottom.
To make the edges more durable, paint corners are used, which are attached with putty. You can coat the edges with putty and then press in the corner. It will stick like that. If the shelves are arched, then the painting corner will not hold on so easily; it will have to be secured with a stapler, and then putty. This technique will allow you to get absolutely even shelves, ready for the further finishing layer. Their edges will become strong and will not crumble in the event of an accidental impact. After the putty has dried, you will need to sand it using sandpaper. The surface will come out completely smooth.
Check out examples of plasterboard shelves that you can make yourself.
How to decorate?
If you still have old furniture - modular shelves or a closet, then try changing their design. The rethought item will become the compositional center of the space and save at least 10,000 rubles.
Let's look at several ways to restore old items:
Paint with white or unexpectedly bright paint: light green, blue, red. If the surface size allows, you can make a color stretch or paint with acrylic. To transform Soviet-era modular shelves into modern ones, simply remove the back wall and repaint it.
- Decorate using decoupage technique, decorate with carvings, mosaics or fabric. The result will be lovely additions to a rustic or ethnic style interior.
- Change the design: from one old shelf you will get at least two new ones. A wardrobe or bookcase can be converted into a shelving unit. To do this, you need to remove the doors and legs (if there were any) and install the missing shelves. All that remains is to update the surface.
How to build a rack
Now let's figure out how to make a rack from a metal profile with your own hands. For simplicity, we will divide the process into two parts - preparation and the work itself. First, you need to stock up on the necessary materials and tools, and only then can you begin assembling the rack.
Materials and tools
The rack is assembled from the following materials:
Dimensions are selected based on the loads to which the structure will be subjected.
Advice! It is better to take options with a sharp tip. A drill screw punches a very wide hole in the metal, causing the fastener to hold less well.
- Regular board 20-30 mm thick;
- Plywood with a thickness of 10 mm;
- OSB sheets with a thickness of 12 mm or more;
- Moisture-resistant plywood, as in the photo, is the best solution, but its price is the highest.
The tool you need is the following:
Build process
If you have everything you need at hand, then assembling a shelving unit from a metal profile with your own hands will not be difficult.
The process looks like this:
Also decide in advance on the height of the shelves and location.
Important! The width between the posts should not exceed 100 cm. The greater the load on the structure, the smaller the distance needs to be.
- First, an incision is made from one side and the other to the very base;
- Next, the element is bent;
- The profile can be cut easily and evenly along the bend
If there are bends inward on the inside of the profile, then they also need to be cut off.
It is important to set everything level so that the connections are at right angles.
Note! When assembling shelves from a profile with your own hands, it is very important to control the position of the elements during work: if they move, the structure will turn out to be skewed.
- The lower jumpers are installed first;
- Next, the upper crossbars are attached;
- The geometry is checked, and if everything is normal, then all other jumpers are fixed.
Advice! Checking the geometry is simple: measure the diagonals, they should be even.
You need to mark the middle, then determine the height of the leg that needs to be cut.
Advice! Do not forget that the leg should be folded to the sides for fastening.
Note! It is best to fasten wood or plywood to the profile using fine-pitch drywall screws.
The finished structure is installed where it will be located. If the floor is uneven, you need to place pieces of plywood or boards under the supports to level the structure.
For safety, some craftsmen additionally attach the rack to the wall using dowels. This prevents the rack from tipping over even under high loads.
Advice! If the walls are made of foam or cinder blocks, special anchor bolts will be required.
Braces can be added to the rear to provide additional rigidity. They prevent the racks from warping and ensure ideal rack geometry, even if there is a lot of weight on it.
How to create a niche
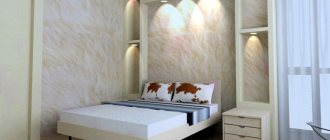
In many layouts you can find a niche. Someone considers this a flaw in the room and begins to rack their brains: how to decorate it. According to professional designers, a niche is a bonus for apartment owners. After all, with its help you can not only create a unique interior of its kind, but also add functionality to the room, especially if the apartment is small. So what to do with a niche? One option: place a sofa or bed in a niche.
An intimate niche made of plasterboard and a bed in it is an ideal solution for a small room.
The room does not always have openings in the wall, so if you wish, you can make partitions from plasterboard. The main thing is to use every centimeter of space; you can equip shelves around the sofa and place books or souvenirs on them.
Even if the niche is very small and you won’t be able to equip a full-fledged sleeping place, still, build a small sofa. For this you will need a mattress and a couple of pillows.
Since the space in the niche will be darker than in the main room, take care of additional lighting.
If it so happens that there is a window in the niche, even the smallest one, believe me, you are very lucky. Although additional lighting will still have to be done, you are guaranteed an unusual, cozy atmosphere.
Shelves in a niche
To be fair, it is worth noting that owners of square meters with niches prefer to equip them with a storage system. This decision is considered more correct and closer to the realities of life. How to make shelves in a niche with your own hands?
Shelves can be made of wood, plywood, veneered chipboard, covered with stain or painted.
In fact, the simple classic design is extremely easy to make. Especially since you don't have to create the sides. Buy a board from a hardware store, then cut it into pieces of the size you need. Sand the resulting wooden shelves well. This can be done either with sandpaper or with a sander. After this, coat the boards with a primer and then paint or varnish.
To install shelves in place, holders or small brackets are most often attached to the end parts of the niche.
Niches are an ideal location for built-in shelves and shelving as the walls of the niche provide the support required, especially for heavy loads.
If you want to make the shelves closed, and the desired model requires the presence of doors, then it is better to turn to specialists, since without certain skills it is difficult to cope with such a design.
Choosing a style
It would seem that a shelf is the simplest detail of the interior, however, in order for the overall appearance to be decent, it is important that the shelves are consistent with a specific stylistic solution
- Classic.
This style is characterized by the use of natural materials. Therefore, it is better if the shelves are made of natural wood. The structures can be attached to the wall, or located in a niche (if there is one). The color scheme should either echo the general palette, or, conversely, become a bright accent in the interior. When choosing a shape, give preference to conventional rectangular designs. Carvings can be used as decoration. - Modern.
For modern design solutions in this style, closed glazed wall models are best suited. Matte or transparent shelves with multi-colored inserts or lighting complement the interior well. Thanks to such decorative tricks, the interior turns out to be unique and very cozy. - Provence. French country style is perfectly complemented by wooden structures. Just paint the shelf in light colors and age it slightly.
Shelves are important for any room. With their help, the functionality of the space not only increases, it becomes more comfortable and stylish. And proper design of the existing niche will make the room unique in its own way, regardless of what you place in it: shelves or a sofa
General description of the material and advantages
First of all, it is worth deciding on the subject of consideration. Drywall is a finishing material that is a combination of cardboard used as cladding and a solid filler based on gypsum mortar. The material is characterized by high performance characteristics, which, combined with accessibility, makes it the best option for various construction works.
Drywall has long taken pride of place among professionals; choose the appropriate type for your ideas and then the repair process will be very easy
The most significant positive characteristics of drywall include:
- ease of operation. Due to the fact that the material is a composite of cardboard and a mixture of gypsum, it can be easily processed using simple tools. It is easy to saw with a regular hacksaw, and when attaching it, a screwdriver is enough;
- resistance to impacts. Despite the fact that the material does not have high mechanical strength, it copes well with moderate loads. It will not withstand a direct and strong blow, but if reasonable precautions are taken, it will last for a long time;
- versatility. Drywall is supplied to the consumer market in the form of flat sheets of a certain size, which allows it to be used for constructing various interior objects. For example, plasterboard shelves can be made of almost any shape depending on the task;
- durability. Despite some fragility of the material, if the necessary operating conditions are met, it is able to cope with tasks for a long time;
- availability. Drywall is relatively easy to produce, which directly affects its affordability for the consumer. You can buy it in almost every hardware store, which expands the range of applications.
If you have basic skills in handling tools and performing similar work, almost anyone can make plasterboard shelves in a short time.
Self-production
Making a niche out of plasterboard with your own hands is not as difficult as it seems. By following simple instructions step by step, you can get it done in a couple of days. It’s much more pleasant to admire the result when you know that you made such beauty without the help of repair specialists.
First you need to determine the location of the niche and its size. It is necessary to measure the required area, make sure that the TV will fit there without problems, and make markings. For greater clarity and understanding of the process, you can make drawings. We should not forget that the TV should not fit tightly; it is better to leave a little free space for ventilation and subsequent more convenient cleaning.
- You don't have to focus on a rectangular notch. The shape can be any - think about which one will highlight the interior better.
- Next, in accordance with the applied markings, you need to install guide profiles, securing them with self-tapping screws. Such profiles are made of steel tape and serve as a frame for attaching gypsum boards.
- Then you can run wires from the TV, sockets and interior lights, if provided.
- The next step will be laying drywall. When cutting parts, you need to ensure that the joints match exactly and that there are no protrusions or recesses anywhere, even small ones.
- Along the perimeter of the resulting plasterboard sheets, you need to install additional profiles (the same in size as those that were installed previously). This is necessary for additional strength of the product. Using self-tapping screws, we attach all the parts to the guide profile.
- All that remains is to finish finishing the niche. This includes filling joints, priming, sanding, painting, installing lighting and any other finishing necessary in a particular case.
- When the finishing work is completed, you can hang the TV. Usually the kit comes with brackets that need to be attached to the drywall with dowels.
- And, of course, the decor. Candles, decorative figures, vases, flowers, paintings and photographs - everything depends only on resourcefulness and imagination.
Marking
Since we are looking at an example of creating a standard shelf, it will be mounted on a regular wall. That is, the base will be concrete. If you want to learn how to combine shelves with other plasterboard products, then read more articles on our website. This is necessary so that you understand that a shelf is the same plasterboard product as an arch, ceiling, or wall. And accordingly, you need to attach it to these products simply, as an additional element of the main structure, but do not forget that the frame, for example the walls, may not support the shelf.
So, let's start marking. You need to apply the outlines of the structure to the surface to which the shelf will be attached; when working, you will not be able to go beyond them, so you have significantly simplified your task by separating the workspace from the rest. If you plan to store heavy things on the shelf, its design will be larger and the shelves will be much wider than those of a standard shelf; this must be taken into account when marking.
Shelf finishing options
The most common technique is, of course, the standard finishing of drywall with putty and subsequent painting of the surface.
Of course, the drywall must first be well primed, and only then putty and paint. And, by the way, before painting, be sure to carefully (very carefully) also treat the dried putty with a primer. After all, you will constantly touch the shelves, which means that the finishing layers will be subject to constant mechanical stress. That is, simply put, there is a high risk of scratches and chips in the paint.
By the way, if you make shelves in the bathroom from plasterboard with your own hands (or in any room with high humidity), then do not forget that in this case you need to use only moisture-resistant sheets. And, probably, it would not be superfluous to use them in the attic - after all, there, too, the atmosphere is very often cold and damp, and temperature changes are not uncommon.
Shelves in the bathroom
If you want to somehow “revive” the structure, try painting the shelves one color and the racks another – it will turn out unusual and interesting.
By the way, the texture can also be made creative.
For example, if you walk your fingers all over the fresh putty, then after drying you will get a very interesting effect. In addition, this method would be great to use on a sharp corner of a shelf - after such treatment it will become smooth and safe for others.
If this doesn’t suit you, then they very often do this: they point-wise pass over the newly applied putty with a small spatula, as if turning it around its own axis - you get very unusual and beautiful patterns.
And even with the help of an ordinary large brush you can create an interesting design - lightly touch it on top of the just puttied surface - you will get a kind of ripple.
As for what is used to paint, as a rule, acrylic or water-based paint is most often used - it dries quickly and adheres firmly to the surface.
Well, if you don’t want to paint, then there is another good solution - wallpapering the shelves. The main thing here is to glue them firmly, then everything will be fine.
If there is a dilemma about painting or gluing wallpaper onto drywall, the shelves will actually look equally beautiful in both cases, if the work was done carefully.
Fastening profiles to each other
To know how to make plasterboard shelves with your own hands, you need to be able to attach the guides to the rack profile. The rectangular frame is made from one profile and three guides. They need to be connected correctly. This is done in one of two ways:
- using metal screws. Special short screws are used. At the junction of the profile with the guide, they are fastened with two self-tapping screws. That is, you need 4 self-tapping screws to attach the wall profile and the guide profile to each other. Also, the guides are attached to each other according to the same principle;
- using a special cutting tool. It is usually used to temporarily attach two profiles to each other. This tool punches a hole in two profiles attached to each other and slightly bends the metal. Due to this, the profiles stick together. With this method, burrs do not appear, and the drywall fits tightly to the frame. Two notches at one profile connection will be enough to secure them.
Profiles can be attached to each other in a variety of ways.
To increase the strength of the structure, vertical posts can be used. In this case, the guides will be attached to these posts and will have support, and will not “sag” in the air. At this stage, a level and plumb line are used to ensure that the stand is clearly vertical. It can be attached to the floor, ceiling or both at the same time (depending on the chosen layout).
Installation of the structure
In order for the final result to pleasantly please you for many years and not cause unpleasant surprises, be patient and be as attentive as possible. It’s better to double-check it several times, and only then screw it on or cut it off.
So, let's begin.
Our shelves will be located near the wall from floor to ceiling. Therefore, it is necessary to clean as much as possible the entire space around the work site so that nothing interferes.
Let's decide on the depth of the shelves...
This value always depends on what is planned to be placed on them. But let’s assume that we have a specific case and need autonomous plasterboard shelves in the living room, for example, to store books and various accessories (without connecting to the side walls). Their depth will be 50 centimeters, width 1.5 meters, and the distance between the shelves (in height) will also be half a meter.
First you need to install the stands.
Installation of racks
- We mark two points at the corner of the ceiling and wall at a distance of 1.5 meters from each other.
- From each of them we retreat 50 cm along the ceiling plane, focusing on the square, and draw half-meter lines.
- We transfer these lines to the floor using a plumb line.
- Along the wall, using an upholstery cord, we connect the points set in the first step.
As a result, we get 2 lines on the wall, 2 on the floor and 2 on the ceiling. We will attach the guide profile along them. We cut off pieces of the required size with a grinder or metal scissors, take a hammer drill and attach the guides.
Guide profile UW
Next, we will need two stand-up, load-bearing profiles, which we will insert vertically along the edges of the already screwed guides and connect them together.
We now have two vertical rectangular racks, between which horizontal shelves will subsequently be located.
Vertical racks for shelves
But before attaching the shelves themselves, you need to cover the racks on both sides with plasterboard. We take a knife and a tape measure, cut pieces 50 cm wide along the sheet and screw them to the frame.
After the drywall is screwed in, we will need half-meter pieces of the guide profile - we attach them from the bottom up along the inside of each rack every half meter. The grooves of the pieces should be facing inward, towards each other - since it is in them that we will insert the supporting horizontal profile for the shelves.
By the way, before attaching the pieces of guides to the racks, take a water level and check whether the horizon of the future shelves is even. However, it is not necessary to check absolutely all shelf labels in this way. It is enough to check one lower level, and all other marks can be moved up using a tape measure.
So, we screw the horizontal pieces of the cut guide profile in the right places directly on top of the drywall - after that you can proceed to the next stage.
Shelf stands
Installation of shelf frames
- We measure the distance from one inner part of the rack to the other.
- For each shelf we cut two supporting profiles of the appropriate size.
- We insert one supporting profile into the grooves of the guide pieces, move it to the wall and screw it to its plane and to the racks.
- We insert the second supporting profile into the grooves and leave it on the outer edge of the racks and screw it on. It should look like the photo below.
Shelves made of profiles in unsheathed gypsum board form
- Now you need to make jumpers for each shelf (if the depth of the shelves were less than 50 cm, then you could do just fine without jumpers). We measure the distance between the parallel supporting profiles and cut off as many pieces of the supporting profile as needed to place them every half meter.
Embedded lintels in shelves
- We insert the cut pieces inside the future shelves and screw them.
In principle, this completes the assembly of the frame, and you can cover everything with plasterboard.
And finally, let's look at the simplest and most popular ways to decorate such structures and how to decorate them.
Different tasks - different designs
Depending on their purpose, shelves and niches made of plasterboard are divided into decorative and functional. The task of the first is to complement the design, its diversity. Basically, such products are a secondary element that is used as decoration. They are fragile. The products do not have additional supporting structures. You can put small light objects on them: souvenirs, flowers, small toys, etc. The design of the shelves can be different: circular placement, corner placement, near a window opening.
Functional shelving is not designed for beauty, but for the need to place products, objects, things. They are made more durable so that they do not deform under the weight of objects placed on top. Can be wall-mounted, corner or built-in.
Wall-mounted ones are placed close to the walls: this can be in the center, on the side or near the window. Their main task is the beneficial use of the territory. If the walls are curved, corner products are suitable. They perfectly hide uneven surfaces and allow you to rationally use free space. Such products can be on one side, on both sides, have one section or several. Built-in structures are made for the kitchen, closet, pantry or for niches in the bathroom. They are installed during wall covering, so the products visually resemble cells.
When installing racks from a plasterboard profile with your own hands, take into account their future location. The lifespan of such structures is also affected by humidity, which is higher in certain rooms than in others.
For a kitchen, a niche with shelves must be strong, since the dishes are heavy and bulky. For this room, as for the bathroom, special attention is paid to the moisture resistance of the material.
A plasterboard shelf in the living room can have both functional and decorative purposes. The rack is often designed for a TV, for books, or as a partition that divides a room into zones. End-to-end systems are great for this task. Corner and built-in structures are often used in corridors.
Under TV
Drywall TV shelves must be strong, reliable and of sufficient size. The structure can be strengthened using 2 guide profiles. This can make the thickness of the shelf itself greater and the permissible load higher.
The design of the product can have 1 compartment or consist of many parts of various shapes and sizes. For example, a central reinforced shelf for a TV is installed, and small compartments for decorative or functional purposes are placed around it.
For books
To make bookshelves, you need to calculate the expected load. Books are not an easy subject. During installation, the structure must be strengthened to avoid damage.
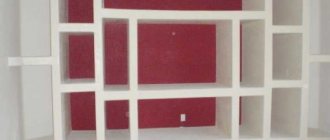
Shelving can be placed not only in a standard order, but in the form of geometric shapes, smooth lines or in the form of a pattern. They can occupy the entire wall or a small area in a corner, near a window or in the center of the wall. It all depends on the idea and possibilities. Shelves with lighting look great. In addition, they are an additional element of room lighting, which contributes to the visual expansion of the space.
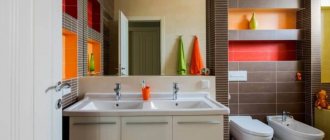
Under the sink
Today, designers present ways to place plasterboard shelves in the bathroom, in the photo. Depending on the size of the bathroom, a frame is designed, which can have one compartment or several. With the help of gypsum boards, all communications in the room are hidden and the box is supplemented with a small shelving unit. This makes the room look more comfortable.
For a shelf in a plasterboard bathroom, it is recommended to choose moisture-resistant gypsum board. The humidity level in this room is higher than the permissible norm, so simple material will lose its appearance and properties in a short time.
A shelf in a plasterboard bathroom can be located under the sink, in a corner or in another convenient place. The first option is most common. This way you can hide the pipes and use the free space functionally.
RESULTS: RESULTS: CONTENT
RESULTS, RESEARCH, RESEARCH registry, regurgitation ¸ÑÑ, обклееннÑй каÑÑоном, Ð¿Ð¾Ð´Ð¾Ð¹Ð´ÐµÑ Ð½Ðµ Ð´Ð»Ñ Ð»Ñбого помеÑениÑ. RESULTS, RESPONSIBILITIES, RESEARCHES µ Ð²Ð¸Ð´Ñ ÑÑого маÑеÑиала.
RESEARCH, RESEARCH RESULTS:
- RUR ROOM The ÑпалÑнÑе, кÑÑни, пÑиÑожие).
- RESULTS RESULT (response) › RESULTS.
› RESULTS лами можно оÑнеÑÑи:
- RESULTS ºÑаÑиÑÑ ÐµÐ³Ð¾ в лÑбой ÑвеÑ.
- RESULTS + RESULTS а).
- RESULTS ³ÑÑÐ²Ð°ÐµÑ Ñ Ð´ÐµÑевÑннÑÑ.
- Sorry. RESULTS ASSURANCE ASSURANCE знаÑи RESEARCH ² магазине.
- RESULTS. RESULTS днÑми веÑеÑÑвами.
REPORT
RESULTS ¸Ð· гипÑокаÑÑонРdegrees RESULTS – RESULTS °Ð¶Ð½Ð¾. RESULTS 1/2 ¾ÑоÑое б ÑÐ´ÐµÑ ÑолÑко в ваÑем инÑеÑÑеÑе. RESULTS ºÑ конÑÑÑкÑии можно пÑоводиÑÑ ÑазнÑми Ð¼Ð°Ñ ÐµÑиала › нÑеÑÑеÑ.
REPORT ºÑ из гипÑокаÑÑона Ñвоими ÑÑкР°Ð¼Ð¸.