How to remake an old cabinet with your own hands
To ensure that the cabinet fits harmoniously into the updated interior of the room, it can be redone by changing its appearance. The following options can be offered:
- Pasting with film. Modern films on a self-adhesive basis are presented in a huge assortment: they can be plain or with an ornament, with a stylish pattern or imitate wood, stone, etc.
The film allows you to completely renew the facades of furniture, and no special skills are required to work with it.Note! Before applying the film, the surface of the cabinet must be degreased or sanded and coated with a primer.
- Wallpapering. The range of wallpapers is several times larger than the film varieties and is also represented by matte and embossed samples. You can also use photo wallpaper, which not only looks attractive, but also allows you to visually increase the space. Wallpaper is applied using wallpaper glue or PVA to the prepared surface. As the latter, you can use not only the facade, but also shelves and the back wall.
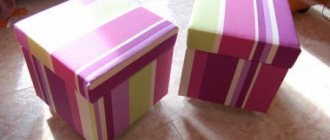
Wallpapering a closet is the most affordable design technique that does not require skills or investment. - Covered with fabric. The fabric looks more textured and smooth than film or wallpaper. It is better to cover large elements like sashes with it. You can secure it with glue or a furniture stapler. To give your closet a luxurious look, you can use faux leather instead of fabric. To create coziness or decorate a children's room, fabrics using the patchwork technique are suitable.
You can cover furniture with new fabric using a regular stapler. - Painting. This is a very common restoration method, before using which the surface is sanded and covered with a thin layer of primer. You can either do the work in monocolor or paint a picture. For the latter, a stencil will be convenient.
Painting furniture yourself is not a very difficult process if you follow the technology.Note! To create smooth lines and geometric shapes, you can use masking tape to limit paint penetration.
- Arranging the slate surface. It will allow you to make the design extremely variable, and can also be convenient for everyday notes. A slate coating can be obtained by gluing a special film or painting with a composition with the appropriate effect.
Furniture with a similar finish looks non-trivial and easily fits into a modern interior. - Mosaic decoration. You can make your own mosaic from broken tiles or purchase a ready-made version in blocks. This option would be optimal for a Mediterranean style.
- Aging. A cabinet with this effect will be appropriate in Provence, vintage and shabby chic styles.
Artificially aged furniture with a vintage look will add interesting notes to the interior design of your home. - Decoration with rivets. Can be used in addition to painting or covering with fabric. Any metal fittings will do: rivets, staples, nails with decorative heads.
- Use of mirrors. Mirrors can be mounted either on the entire surface of the cabinet or only on individual parts. They allow you not only to hide furniture imperfections, but also to add light and visually enlarge the space.
Note! Instead of a solid mirror, you can use a mirror mosaic. It will create nice highlights.
Adding mirror strips or inserts to the finish will transform the furniture to your advantage. - Use of volumetric parts. You can stick both stucco and wooden slats, as well as various inscriptions. Also, a three-dimensional texture is created using colored sawdust, which is applied to a glue-coated surface and then fixed with varnish.
We restore an old shelf and decorate it in shabby chic style
In this master class we will show the process of transforming an old hanging shelf. The topic of decorating furniture in Provence, shabby chic, and vintage styles never ceases to be relevant. More and more French provincial and English country interiors are appearing in the homes of connoisseurs. It is not always possible to buy new furniture from branded studios and workshops, but you can always try to realize your fantasies in interior details, taking a used item as a basis, and thereby giving it a new life!
To work, we will need any shelf with curly details and smooth shapes; carved decor is welcome, as well as materials for restoration and decoration:
- abrasive sponges or sandpaper with different grains;
- metal and rubber spatula;
- wood putty or universal putty;
- nails, screws, canopies, glue Moment - if major repairs are necessary;
- acrylic interior paint, colors, acrylic varnish, brushes, rollers, gloves;
- stucco decoration made of wood or polyurethane;
- clamps and polymer glue for gluing decor.
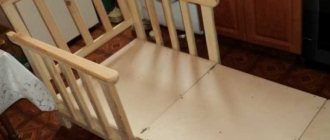
1. We repair the shelf, if necessary, in our case it was quite strong, only the original finials were lost, but we made new ones. We sand the entire surface, I didn’t completely get rid of the old paint, since I need the old dark one to be visible from under the new beige color, otherwise the shabby or scuffed effect cannot be conveyed... But I don’t need the old varnish at all, I remove it, if necessary, you can use acetone, solvent or special. paint remover.
Next we putty all the cracks, holes, chips, etc. There were also some foreign hooks on ours, they had to be removed...
Let the shelf dry and sand again to a perfectly smooth surface in the grout areas. Now we try on the stucco decor and place it where it is appropriate. We glue the stucco molding with glue and press it with clamps for 12 hours.
Add a brown or beige color to the white paint, giving it a little the desired shade and paint the entire shelf, let it dry for 4-6 hours.
I painted the shelf in one layer, I was quite happy with it, there are gaps, just what I needed... Now we tint the remaining paint more intensely, we will use it for patination and painting... In this decoration option I did not use wax, since the surface was smooth enough, but the paint had not dried enough, I created abrasions using a rough washcloth, wrapped it around my finger, and washed it with chaotic movements in those places where there were obvious gaps... You can do this with a sharp object, for example, a spatula, but this is a long procedure...
We shade all the molded elements, first we completely paint over them, and then we wash them carefully, with an almost dry soft cloth or paper towel, we draw shadows at the junctions of the parts, and somewhere we use a smaller brush. This needs to be done quickly, while the new layer of paint has not yet dried; to do this, you need to apply it thickly, if you need to dilute the paint thinner.
We blend everything with a cloth so that it looks like dust, clogged with time - we want everything to look natural, and not sequential.
Then, with an almost dry brush and the same dark paint, I depict “aging” across the entire surface with long, even strokes in one direction, depicting the structure of the wood fibers.
We walk over the entire surface.
I still have holes where I will later glue the finials, machined specifically for this product. I'll paint them accordingly.
For a larger volume of structure and color, you can finish with pure white paint, leaving thin strokes on the most prominent places, it will be juicier.
At the end, we cover everything with acrylic varnish with a matte brush or from a spray can, this will be the last fixing stage. I painted the entire shelf with 2 layers of VGT acrylic matte varnish. And now you can hang this functional decorative element in your home, apartment, studio, etc. It will play the role of a shelf and a hanger at the same time.
Thank you all for watching, I will be glad if the master class inspired or helped you in any way!
See you again!
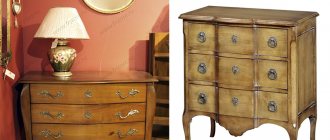
Remaking an old sideboard with your own hands
To restore the appearance, eliminate defects and update an old sideboard, you can use one of the following methods:
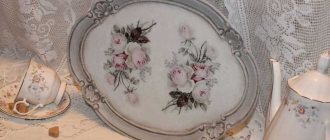
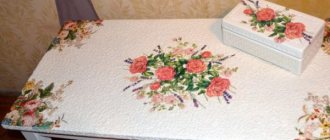
- Decoupage. Its essence lies in sticking appliqués made of fabric or paper onto the surface of the sideboard. Very often, beautiful table napkins with a relief structure that can be preserved are used for work. Before gluing, the surface is degreased. The material is glued with decoupage glue or regular PVA, and after drying it is varnished.
- Painting. A pattern, ornament or design is applied with thin brushes to old sanded paint or a freshly painted surface. The last option is suitable if the painting area is small. You can use both acrylic paints and moisture-resistant tempera, which must be opened with a transparent varnish.
- Artificial aging. Quite a popular restoration method. It is easiest to implement on colored surfaces. You can use paint or a special varnish that cracks when dry.
- Repainting. The simplest option, for its high-quality implementation it is necessary to properly prepare the surface: clean it of old paint, sand it and prime it.
Note! A common painting technique is the grading method, in which the painting gradually changes the intensity of the color.
How to remake Soviet furniture
Remaking old Soviet furniture with your own hands, which before and after has fundamental external differences, includes several stages:
- replacement of accessories;
- cleaning, removal of plaque, soot and dirt;
- repairs to eliminate cracks, abrasions and chips;
- decoration.
Using all your imagination, you will decide for yourself how best to use certain parts of the sets, what new purpose the table, chair, chest of drawers, etc. will have.
Padding
Reupholstery is used for old chairs, sofas and armchairs as an addition to frame restoration. For it you need to choose a fabric for the new upholstery. It can be velor, crepe, barakan, natural or artificial leather or any other material, depending on style and preferences. Also for work you will need a construction stapler, staples for it and a piece of foam rubber if the old one has become unusable.
It's no secret that over time, the upholstery of upholstered furniture loses its original appearance.
After removing the old upholstery and damaged foam, you need to attach a new one using small nails. With its help you can give the furniture the desired volume. Afterwards, the upholstery material is attached using a stapler.
Reupholstering furniture is a fun activity that does not present any particular difficulties.
Note! For ease of work, you can use fabric stitched to the foam rubber.
Aging
This is a fairly popular method of giving old furniture nobility and elegance. The following materials can be used for aging:
- Antique wax. Suitable for wooden surfaces that have been previously cleaned, degreased and stained. After it dries (after about seven hours), wax is rubbed in, on top of which a pattern can be applied. Finally, the surface is opened with varnish.
- Acrylic paint. Can be used for furniture made of any material. The required effect is achieved by combining two paints of similar shades, several layers of which are applied sequentially.
To obtain various types of aging, you can use acrylic paint, bitumen varnish, various waxes, and dry pigments.
Important! To achieve the effect, each layer must dry completely.
The paint is applied with a sponge. After finishing painting, you can go over it with sandpaper.
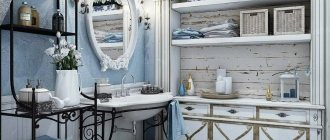
Do-it-yourself furniture restoration in Provence style involves artificial aging of surfaces.
Film
Using self-adhesive film you can decorate a wide variety of objects and surfaces. It is durable and resistant to mechanical stress, moisture and temperature changes. Before gluing, the surface is cleaned and degreased. After gluing, the film is leveled with a spatula to eliminate all bubbles.
For pasting furniture, films with a polymer-based outer layer are most often used.
Painting
This extremely popular method should only be used on furniture made from cheap wood, otherwise its value will be lost. Before painting, you need to prepare the surface:
- soften the old paint layer with a solvent;
- remove the swollen paint with a spatula;
- sand the surface with sandpaper;
- apply a layer of primer;
- After the primer has dried, carry out additional sanding.
You can update your closet, chairs, shelves, racks or kitchen facades with your own hands - just repaint them.
Next, the oil paint must be applied with light movements to create a thin layer. You should move along the wood fibers. After complete drying (after about 12 hours), the surface is sanded, cleaned of dust and covered with a second layer of paint.
Having decided to paint furniture, you should take care of selecting new fittings that will match the style of the updated product.
Master class on decoupage shelves
Shelf decoupage can be done using napkins, fabric and even old newspapers. Getting started will be the same in all cases.
In order to decoupage an old shelf, you will need:
- fine sandpaper (so-called “zero”) or sanding machine;
- priming;
- acrylic paint;
- PVA glue;
- three-layer napkins or fabric with a suitable pattern, old newspapers;
- brush;
- scissors;
- glossy or matte varnish, craquelure.
Prepare the surface as indicated above. If necessary, paint the shelf in the desired color.
While the paint is drying, start preparing the material with which you plan to decorate.
Decorating a shelf with fabric
You can decorate a shelf not only with paper, but also with fabric. To do this, take a piece of fabric that fits the size of the shelf, or combine the decoupage technique with patchwork and use scraps. You will need the same materials as when working with paper.
The fabric should be chosen only cotton. The prepared flaps should be soaked in the adhesive solution for about 30 minutes. Then glue them onto the prepared surface and let dry.
The finished product must be coated with several layers of varnish to protect it from environmental influences.
Decoupage is a very interesting technique. Restoring shelves using this technique does not require large material costs. With its help you can easily breathe life into old objects. The top shelf in the kitchen, decorated in this way, will become a feature of your interior.
Decoupage shelves in Provence style
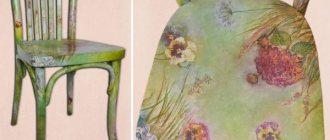
Decoupage of a shelf in the Provence style involves the use of discreet paint (for example, lavender or ivory color is suitable), the presence of plant or floral prints, as well as aging. Abrasion and roughness will give an aged look. You can apply the paint in two layers, then lightly sand it, thus giving the shelf an antique look.
Choose a napkin with a suitable image. Separate the layer with the pattern from the other layers, cut out the desired element with scissors. Instead of using scissors, you can carefully tear out the design along the contour. In this case, the edge will turn out uneven and when gluing it will look more like a painting.
Take PVA glue; if it is too thick, dilute it with water. Apply glue to the napkin and to the shelf. Apply the picture and brush or roller over it, smoothing it thoroughly. Movements should be directed from the center to the edges in order to remove excess air.
After the product has dried, go along the edge of the napkin with a sponge dipped in paint of a suitable color. With this technique you will hide the edges of the napkin, and the transition from the motif to the base will be smooth.
The surface must be allowed to dry and then varnished. Since gloss is inappropriate in the Provencal style, use matte varnish. If you need to get cracks, dry the varnish with a hairdryer or use a special one - craquelure.
Decoupage shelves with newspapers
To work, you will need a prepared kitchen shelf and a stack of old newspapers. It is recommended to use the most interesting newspaper clippings; it is better if they have a different font and headline size. Foreign newspapers will be interesting.
The technique for applying newspapers to a wooden shelf is the same as for applying napkins. You can cover individual areas or the entire shelf. In the latter case, the edges of the newspaper clippings should be glued slightly overlapping. Let the shelf dry very well and cover it with several layers of varnish.
Remaking the book table
To update the appearance of a book-table, you can use the following methods:
- Pasting with film. You can choose any color to match your new interior. Glue should be on a dry surface, cutting with a margin. After gluing, the corners are closed using a sponge pointed at the hair dryer.
- Painting. The surface, cleared of the old coating layer, is painted using acrylic paints. If there are cracks or other damage, they are eliminated in advance using putty.
- Decoration with lace. The design is applied using curtains or tulle. The material is fixed to the freshly painted surface, after which a second coat of paint of a different color is applied over it.
- Decoupage. Can be performed either on a just primed or on a freshly painted table. It is made using a paper napkin or special paper, and at the end the surface is covered with varnish.
- Replacing with laminate. Old countertops are replaced with laminated ones.
Before you remake old furniture with your own hands, you should decide on the desired style solution. Based on this, the optimal material is selected that will give the furniture a second life.
By restoring interior items, you can save a significant amount of money than by purchasing new furniture.
Updating the kitchen
Kitchen remodeling is one of the most expensive renovation or design options. The housewife spends quite a lot of time in the kitchen, so you want your ideas not to become her disappointment, but, on the contrary, to inspire her to new culinary masterpieces.
There are many technologies for updating kitchen furniture, but the main condition is compliance with the following rules:
- Materials used in the kitchen must be environmentally friendly.
- If you plan to change the color of surfaces, select only high-quality paint that is resistant to mechanical stress, temperature changes and moisture, so that the updated furniture does not lose its presentation too quickly.
- Resistance to aggressive chemicals is also required if the housewife uses it when cleaning.
- Remember that matte surfaces do not show dirt and fingerprints as much.
- Finishing materials should not absorb odors.
- It is necessary to ensure that the places that get dirty most often in kitchen furniture are made of easy-to-clean materials.
- The number of finishing details should be minimal. Keep the cleaning process simple. In addition, a pile of decorative elements can simply tire the housewife in the end.
- The back and ends of the furniture should be treated as carefully as clearly visible surfaces: doors, walls, fittings. This will extend the life of the cabinets.
- If the existing fittings are comfortable, there is no need to replace them. Just adjust. Often Soviet kitchen furniture contains quite good locks and interesting vintage handles.
Option to update an old kitchen
Kitchen cabinet, chest of drawers. Let's start with them
A housewife who is accustomed to order, who knows the place of every kitchen utensil, will only be grateful to you if her favorite kitchen cabinet, all the drawers, doors and shelves of which she already knows by touch, does not change its location. If the closet is comfortable, the owner will most likely also be against it if the alteration affects its design.
Therefore, focus on the outer surfaces. The walls of the cabinet can generally be located between other pieces of furniture, but the facade can be made very impressive. Decoupage and acrylic in pastel colors will help you achieve incredible results. A cabinet with decorative leatherette details looks great.
Chests of drawers can also be painted, and the countertops can be covered with ceramic tiles or mosaics. After this design, any tabletop will have a rich appearance and will become more comfortable and practical to use. Now, in order to place a hot kettle on the chest of drawers, you don’t need special stands.
Updated kitchen cabinet
Kitchen cabinet remodel
Table
In the same way as the tabletop on the chest of drawers, you can decorate the work surface of the kitchen table. In addition, this working surface can, if necessary, be increased by using larger fiberboard or plywood, onto which, again, tiles are glued.
Tiles are often leftovers from renovations and can also be purchased on sales in supermarkets or at lower prices from leftovers in hardware stores to save money. After all, this is one of the main goals: remodeling old furniture should save the family budget!
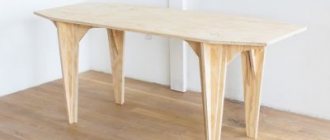
Updated folding Soviet table
If the old table has a round shape and, in your opinion, takes up a lot of space, you can cut it on one side (or on two opposite sides), giving the table an interesting, non-standard shape, and then place it with an even edge close to the wall. Use the cut pieces to make original shelves.
Kitchen table update
Updating a small table
Stools, chairs
The legs of old stools and chairs can be painted or painted to suit your taste. It all depends on the style in which the entire room is designed.
If the seating areas are hard, you can make them more comfortable by using pieces of foam rubber and faux leather. A stapler with metal staples will help you do this job quickly and efficiently.
The upper part of the stools, which has become unusable, can generally be replaced, of course, if the legs are still in good condition. It may remain solid, but its shape can be changed. For example, instead of square, kitchen stools will become round.
Updated chair
Bench made from two old chairs