The armored bed has been known to many since childhood. Just 20-30 years ago it was the main part of the interior in every apartment. Designs with metal mesh were single, one-and-a-half and double. They were purchased for a children's room and for an adult's bedroom. But since then, progress has stepped far forward, and it became possible to create more comfortable furniture. Therefore, the armored bed is a thing of the past. And still, there are now places where such furniture is still used.
The benefits of making it yourself
Do you want to change the decor, introduce original ideas into the interior, so that old furniture sparkles with new colors? Take advantage of the huge number of ideas and methods on how to reconstruct outdated furniture. You will bring your ideas to life and create magnificent things.
And every piece of furniture keeps its own memories and family traditions.
The furniture of old times had its main advantage - it was very strong, durable, and was made from natural wood. Using all your imagination, you will decide for yourself how best to use certain parts of the sets, what new purpose the table, chair, chest of drawers, etc. will have.
You just can’t raise your hand to take such things to a landfill.
You think this is difficult to do. It's actually not that difficult. Read the relevant literature, look on the Internet, talk to friends and acquaintances who are interested in this matter. You will give things a unique look. There are many materials and methods you can use to repurpose your furniture yourself. By restoring interior items, you can save a significant amount of money than by purchasing new furniture.
Take advantage of the huge number of ideas and methods on how to reconstruct outdated furniture.
Before you begin, decide which restoration method you will choose. Purchase the necessary components. Remember, in this matter you need diligence, endurance, and a serious approach. Maybe this will encourage you to start your own business. You will delight not only your relatives, friends and acquaintances with amazing things, but also fulfill orders.
The furniture of old times had its main advantage - it was very strong, durable, and was made from natural wood.
We're working!
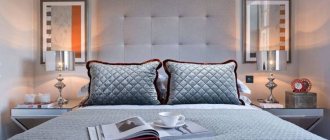
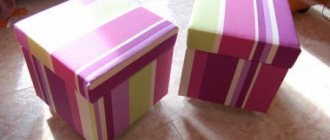
- From the fabric we cut out 18 identical squares measuring 30 by 30 cm.
- We place the plywood on the wrong side of the material so that there is 5 cm left on each side. We make cuts in the corners and bend the fabric. We staple or glue the edges of three sides.
- We insert the padding polyester under the fabric through the remaining unfinished edge, and then glue this edge as well.
- When all 18 squares are ready, use glue to mount them on the headboard.
That's it - your unique design is ready! The most interesting thing is that in the same way you can make a headboard from larger or smaller squares. You can also use rectangles or other shapes to create a unique mosaic. In a word, it’s very easy to create a design using this scheme.
Found a violation? Report content
Living room, study
The living room is considered to be the most important room in the house. Actually, this is where we mostly spend our time, relax, meet friends, and get together with the whole family. If you decide to make repairs or change the interior, take the matter seriously. The environment should be comfortable and multifunctional. If desired, set aside a space for a study. At first glance, this seems to be impossible, because the rooms are small and it is difficult to allocate space for an office. If you work from home, you need to ensure that there are no distractions from your work, and that the conditions correspond to a fruitful, smooth atmosphere. Designers advise to fence off the work area.
You will give things a unique look.
To do this, use partitions. They can serve as racks. To avoid spending significant sums on purchasing furniture for your workplace, use old interior items. You can reconstruct them:
- repaint;
- cover with wallpaper or self-adhesive film;
- change accessories;
- decorate with various objects and attributes;
- arrange books, indoor flowers.
By restoring interior items, you can save a significant amount of money than by purchasing new furniture.
So that the furniture does not take up much space, it can be converted into a transformer or made on wheels. It is compact, moves, folds and unfolds with ease. The remade furniture will completely match the overall decor in the room.
You will delight not only your relatives, friends and acquaintances with amazing things, but also fulfill orders.
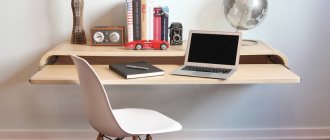
In a small living room, it is important to save more space. Therefore, it is better to use a table-shelf for a work office. It will be more suitable for the overall setting. Convert old furniture into wall shelves, racks, bedside tables, where you will store everything you need for work.
Many houses have old chairs.
colorful chair
Many houses have old chairs. They are worn out, the upholstery has become unusable, do not rush to get rid of them. They can be restored and will last for a long time. By changing their texture, you will regain their former beauty. Now there are many varieties for restoration, be smart.
Now there are many varieties for restoration, be smart.
The first step is to remove the old coating. If the seat is soft, then it is also removed. Then the surface is treated with sandpaper, the grain size can be any. How you sand will determine how the other coating will lay down. The work will be a little easier if you wet the surface. Typically, this procedure results in the old coating becoming viscous. Let the chair dry and sand again with fine-grit sandpaper.
Are you thinking about applying varnish to your chair? It is better to use a colorless primer. You can’t do without it, even if you want to paint a chair. This allows the coating to last longer and apply better. The varnish must be applied in two layers. Before the second coating, the first layer must dry.
If the seat is soft, then it is also removed.
It has become popular to paint furniture white and have the seat draped in contrasting colors. There are many options available.
- The chair will look unique if you use a stencil for decoration. The drawing can be very diverse.
- We completely replace upholstery and foam. Any fabric will do, secured with a stapler.
- Another option is to make a cover. The coating will hide flaws and shortcomings without major rework.
- You can decorate the case in different ways - to suit your taste and color.
- Needlewomen can knit or crochet original upholstery.
Use outdated things in a new way. Unleash your imagination to the fullest.
What is your base?
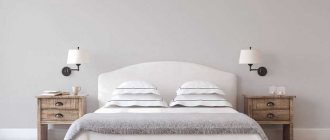
First of all, I want to say that if you want to make a headboard on a bed like mine - very high and wider than the parameters of the bed itself - then there are two solutions. The first is to work on a bed whose headboard is already large and attach decorative elements to it. I was lucky - the bed in our bedroom was exactly like this. Therefore, in order to transform it, I completely unscrewed the lower frame, replaced the mattress with a new, higher one, and then started finishing the headboard. If this part of your old bed is small, you will need a new sheet of plywood. The old headboard will need to be removed or cut down, and a new one of the size you need screwed in its place.
“You devalue him!”: The husband’s relatives demanded that they come up with a different name for their daughter
My favorite pie with cheese, ham and green onions: incredibly delicious pastry
Colds and sports: in what cases can you give physical activity?
Designer chair
Use outdated things in a new way. Unleash your imagination to the fullest. Here are a few options where you can use old chairs.
Many craftsmen can make a bench, bedside table, photo frame, flowerpot, hanging shelf, even a dog feeder
For example, such a necessary item as a wall hanger. It's quite simple to do. You need to separate the back from the chair, paint or decorate it, attach hooks and hang it on the wall. The favorite rocking chair that everyone wants to have, but not many have. It is easy to make, just make semicircular crossbars and attach them to the chair.
An unusual option is a pet bed. First you need to build a box with a mattress. The filler can be foam rubber. The back of the chair will serve as the headboard, and the legs will serve as the base. They will make a wonderful box for magazines and newspapers.
Have you decided to make renovations, change the interior, or purchase furniture that will match the updated design?
Do you like a rustic decor? Towel holders will fit perfectly here. They are made from the backs of chairs, they are quite simple to make, and will look stylish in the kitchen or bathroom.
Designers are looking for this “treasure” and creating real masterpieces.
If the frame is strong, and the legs have become unusable, then the chair can become, to the delight of the children, a swing. First, the furniture must be carefully treated - sanded, coated with an antifungal solution, painted.
Take advantage of the huge number of ideas and methods on how to reconstruct outdated furniture.
Many craftsmen can make a bench, bedside table, photo frame, flowerpot, hanging shelf, even a dog feeder. The chair can be turned into an unusual table for storing various accessories.
The furniture of old times had its main advantage - it was very strong, durable, and was made from natural wood.
Light buffet
Previously, almost everyone had a buffet. Many people kept it, not wanting to throw away an outdated item. It adds a certain charm to the environment. A restored sideboard can be placed in any room. The main thing is that it matches the interior. Before you begin remodeling old furniture, you need to assess its condition and eliminate any defects. Then we clean it - remove the old coating with sandpaper or a tool designed for this purpose, sand it and paint it. It is important not to forget that before any painting the surface must be primed.
Nowadays, light colors are in fashion, but you can give the furniture a bright shade or paint it in a neutral color, apply a pattern, paste it with wallpaper, gift paper, or film. Use new fittings. If you like to draw, put some image on the doors. If you don't have enough patience, stick the stickers on and cover the surface with clear varnish. If the buffet is wooden, it is better to use varnish for painting. You will get a unique thing that will last a long time.
Before you begin remodeling old furniture, you need to assess its condition and eliminate any defects.
How to update an old nightstand
A Soviet-era nightstand is a valuable thing. It is so strong that it can last for more than one year. But her appearance leaves much to be desired. From such a thing you can create a newfangled item.
If you like to draw, put some image on the doors.
You will need the following materials:
- self-adhesive film;
- putty;
- acetone;
- varnish;
- dye.
You will get a unique thing that will last a long time.
We look to see if there are any defects, cracks, or other flaws on the bedside table. We wipe off dust and remove dirt. We dismantle the parts and process them with sandpaper. We putty the damaged areas, let them dry, and sand the surface again. Be sure to degrease with acetone. The next step is pasting with film. We prepare a piece of the required size, plus 3-4 cm. We apply it to the plane, remove the backing from above and carefully glue it. So we cover the entire surface of the bedside table. Next, we repair the decoration elements, attach them to the furniture, change the fittings, and assemble the parts.
Instead of film, you can use wallpaper, gift paper, or simply paint it.
Instead of film, you can use wallpaper, gift paper, or simply paint it.
Features of wall modification
We all remember the old Soviet walls that stood in the houses of our grandmothers and mothers. The furniture, unfortunately, has become dilapidated; chips, scratches and cracks have appeared. Nowadays you can still see these walls in apartments. If they are strong, but outwardly worn out, it is better to remake them in a modern way.
There are many options for DIY furniture modifications.
Here are a few options.
- Pantry. Remove everything unnecessary, and what you need will remain. Move shelves to another location or add several new ones. Place boxes for shoes, containers for linen, change the façade.
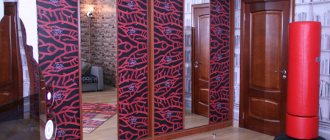
- Wardrobe. We remove the doors, install additional shelves and crossbars for clothes. It’s great if the wall is elongated. Then we change all the doors to sliding doors from floor to ceiling, this will help hide the gaps.
- Or we divide the wall into parts and install it in other rooms. For example, mezzanines - in the corridor or hallway, a wardrobe - in the bedroom or in the nursery, and a sideboard will make a wonderful library.
- You don’t want any changes, but the wall needs updating; you need to completely disassemble it, removing fasteners and fittings. We clean and remove the old coating. Using the necessary pastes and primer, we repair cracks, chips, and scratches. We dry and polish everything. If you are not satisfied with the color of the wall, repaint it, then coat it with matte varnish. After drying, we assemble the wall, change the handles and hinges. If you want, install modern doors.
Keep at it and everything will work out!
Turn on your imagination, and your wall will turn into ultra-fashionable furniture and update the interior of the room.
Manufacturing technology
The general scheme is similar for all options. First of all, the sides and backs are made, then the parts and frame are fastened, then the bottom is installed. At the last stage, additional devices such as drawers or a lifting mechanism for the base are installed.
The following video clearly demonstrates how to make a bed from solid wood with your own hands:
Single
Any bed consists of a supporting frame assembled from wooden beams - at least 50 * 50 mm. The outer part consists of the backs - headboard and footboard, and the sides - drawers. The frame is covered with boards, slats or a sheet of plywood - the bottom. In the latter case, ventilation holes must be drilled in the plywood. Making a single bed with your own hands is as follows.
- The backs and sides, if they were not ordered, are made from chipboard or MDF sheets with a thickness of 25 to 40 mm. The workpieces are edged.
- Tsargi - sidewalls, are cut from ordinary planed boards 40–60 mm thick and 150–200 mm wide. The outside of the boards is painted or varnished.
- The wooden beam is treated with antiseptics, dried, and cut to the size of the frame. The parameters are determined by the design: whether the mattress lies in the lounger or is on top, whether the footboard will be higher than the level of the lounger or coincide with the sides, and so on.
- The corner joints withstand the greatest load in the product, so the fasteners are duplicated here. The boards of the sidewalls and backs are connected with dowels, and the bars are selected in quarters.
- All holes for dowels and screws are drilled in advance and when connecting parts, for example, a bar and a frame, they are coated with glue and held with a clamp for 24 hours.
All holes are blind; through drilling is not allowed.
- The location of the beam on the back and drawer is determined by the design. If the mattress will lie in a lounger, then the distance from the upper edge of the side is the sum of 30–50 mm and the thickness of the bottom - boards or a sheet of plywood. If the mattress is on top, then the indentation will be the thickness of the flooring.
- After the timber is securely glued and secured with self-tapping screws, preliminary assembly is carried out. The backrests are installed vertically - on temporary supports, then the sidewalls are applied, and the resulting frame is checked for squareness.
- The structure is tied with a rope, and on the backs, holes for dowels are marked with a pencil - 2 per end, with an indentation of ? its width. Then the drawers are removed, holes are made in the backs, and the holes are smeared with some kind of coloring compound - at least a felt-tip pen. Again, the drawers and backs are connected so that the space for the counter part of the hole is imprinted on the side boards. The bed is disassembled, holes for holes are drilled in the drawers.
- The holes on the sides are coated with glue, dowels are inserted into the holes and held in place with a clamp. Then the bed is assembled on dowels, that is, the backrest is placed on pins in the drawers and adjusted with a mallet until it fits tightly. In this case, the frame quarters are also lubricated with glue.
- The frame is covered with three turns of rope. For tight tension, pieces of pipe, pieces of wood, etc. are inserted between the rope and the bed. The rope should be very tight. The product remains in this position for 2–4 days.
- Holes for the dowels are drilled in the frame and installed with glue. The covering is not removed. After drying, the corner fastenings are duplicated with metal corners. In a design with backs, legs are not needed, since it rests on the headboard and footboard, but if desired, they can be installed by attaching them to a timber frame.
- Flooring made of boards 20 mm thick and 80–100 mm wide is secured with glue and nails. For each edge - 2 nails. If a slatted bottom is purchased, then the batten holders are distributed along the frame, and the slats are fixed in them.
The following video clearly demonstrates how to make a single bed using the fashionable capito technique:
DIY double bed
A do-it-yourself double bed is made in a similar way, but requires reinforcement - a spar. This is a longitudinal bundle of boards 40*100 mm. Maybe 2 or 3 spars depending on the size of the bed.
It is secured with glue and nails - 2 nails on each side diagonally. The fastening is duplicated with steel corners.
The spar should form one plane with the frame.
The video below will help you make your own fashionable podium bed today:
With lifting mechanism
Assembling a double bed with a lifting mechanism with your own hands is a painstaking, but worthy task. The lifting mechanism consists of two steel bars connected by coil springs or shock absorber springs. It is not difficult to secure the device to the bed, but it is very important to correctly calculate its load capacity. To do this, you need to calculate the weight of the base and mattress, and then choose the appropriate option.
- The design of the bed in this case is different. Legs are not provided here; the drawers and sides touch the floor equally. The timber frame is at the very bottom - with a distance from the bottom edge of 30–50 mm plus the width of the flooring. A plywood bottom is required; it acts as the bottom of the box.
- The base for the mattress is assembled as an independent product - a wooden frame and flooring slats.
- The steel bar of the lifting mechanism is screwed to the timber frame of the bed, the second bar is installed on the base frame.
- When lowered, the frame is laid on thrust bars: they are cut from the same wood as the bed frame and secured to it with glue and self-tapping screws. There must be at least two bars for each side.
Schemes for creating a bed with a lifting mechanism with your own hands
Scheme 1
Scheme 2
Scheme 3
Scheme 4
Wardrobe bed
You can also make a wardrobe bed with your own hands. The design consists of the same 3 elements - a frame with a mattress, a bed box and a lifting mechanism. But at the same time, these elements are located differently and carry a different load.
The frame for the mattress is called the face frame and includes a timber frame, transverse and longitudinal crossbars. The structure is assembled using glue, and the fastening is duplicated with nails. All crossbars and frame must form one plane.
- Since the front frame is part of the cabinet when closed, higher requirements are placed on its design. Typically, the cabinet door imitates a laminated chipboard sheet.
- Folding legs are attached to the frame.
- The box - preferably made of boards, not chipboard, is assembled with glue and nails. A longitudinal board is mounted at the bottom. After assembly, this part of the bed is securely fixed to the wall.
- A lifting mechanism is installed - one strip is fixed to the side of the front frame, the second - to the side of the cabinet.
DIY wardrobe bed
Making a bed is quite a task for a home craftsman. With a little extra effort, the product can be given a more elegant look, for example by upholstering it in fabric or leather. Well, if you have experience working on a milling machine, then a homemade bed can be turned into a real masterpiece.
How can you repurpose other items?
You can update any old furniture. It is made of high-quality wood and will always be in demand. After carrying out the necessary remodeling procedures, you will have real works of art in your home. After cleaning, processing, painting, decorating, an old chest of drawers will turn into an elegant thing. You can make a sofa out of it or convert it into a table for a mirror. Repurpose the bottom of the chest of drawers as a place for pets.
It is made of high-quality wood and will always be in demand.
A coffee table will make a wonderful ottoman, a children's changing table will serve as a unique stand in the country. An old chair can be repainted, the upholstery can be changed, an original table can come out of a shabby door, a cozy bench with shelves can be made out of a table for dishes.
You can update any old furniture.
There are many options for DIY furniture modifications. All you need is desire, patience, imagination, ingenuity, and with your own hands you will create special things not only for yourself, but also for relatives, friends, and acquaintances. Keep at it and everything will work out!
Material and price
If you haven’t stopped figuring out how to make a bed with your own hands, it’s time to think about the materials and the overall price tag. Everything is not as simple as it might seem at first glance. It is best to limit yourself to wood.
The reason for this was the process of processing materials and subsequent work with it. For example, with metal you need not only special tools, but also skills to work with it. Metal is good in finished structures, when the parts are light and durable.
How to make shoe racks with your own hands from scrap materials: useful tips, drawings and photo ideasDo-it-yourself sofa: photo and video instructions for the design, design and construction of upholstered furniture
DIY table: overview of the main models and step-by-step instructions on how to make a unique homemade table (130 photos)
At home, this is almost impossible to achieve on your own, and therefore you can abandon metal as the main material.
Many drawings of do-it-yourself beds, which can be easily found on the Internet, are tailored to wooden structures.
This is due to the fact that wood is an environmentally friendly material that, depending on the species, can last for decades.
And working with wood is much easier, even without much experience or training. At the same time, you can look at the simplest store-bought designs and try to repeat them yourself - in the end you will notice that your design will be much cheaper than the finished version.