32057
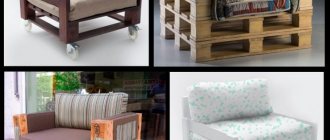
Knitting enthusiasts create unique things, and interior items are no exception. For example, furniture covers help refresh it and maintain its original appearance, and they can be made from any durable yarn. Crocheting covers for chairs and stools is easy, especially when using a step-by-step master class. Using your favorite colors and unique patterns will make the cape unique, and you can choose the pattern to suit your skill level.
Knit a cover for a stool: what is needed for this
If you are thinking about knitting seats, you should decide on the reason for their creation. What function they should perform determines what shape, threads and style to choose in the final result.
Hand-made products will help add individuality to the environment.
Functions and nuances that are worth considering:
- Camouflage function.
Sometimes it happens that furniture acquires a certain defect. To hide the flaws of a stool or even a sofa, you can use homemade capes and covers with a back. In order for the future product to fully cope with its purpose, it is worth considering in advance the size and density of the weaving, so that in the final result the defect will not be visible through the cape. In such a situation, there is an original way out - to make a chair cover. - Decorative function.
If your goal is to create a product “for the soul,” one that will attract the eye and complement the interior, then you need to first of all include the designer’s thinking. In this case, the harmony of the color scheme with the surrounding objects and walls is important, as well as such nuances as ornaments and patterns, which can become the highlight of any style. DIY knitted cover for a stool for the kitchen. - Comfort function.
If the stool is too hard, or, conversely, the sofa is leaky, and because of this it is too soft and low to sit on, then with the help of a seat it is quite possible to smooth out the situation. In order for the product to cope with this, you need to choose the appropriate quality of threads, pay attention to their thickness and weaving density, the number of layers. If there are no balls in the house, you can buy yarn.
We create a rug-cape for a stool from pompoms
Today I want to show you a master class on making a rug-cover for a stool measuring 40x40 cm. Everyone has their own weaving technique and knitting such rugs.
So, to make such a rug I needed:
- 2 skeins of wool (used 100% acrylic 100g/438m);
- frame (made by my husband, I used thick bars 50 cm long and long self-tapping screws, they do not come loose, unlike nails, I already had a disastrous experience; the distance between the screws is 4 cm; we count without touching the corner squares, which are painted over in my photo directly on the frame).
When the yarn is purchased and the frame is made, we move on to the second stage of manufacturing. We tie the end of the thread to the self-tapping screw, as shown in the photo.
And we begin winding the thread according to the snake principle, going around 2 screws. In this way we get to the bottom.
Next comes the transition to vertical weaving.
And we continue to weave according to the same principle, bending around 2 screws. Then again there is a transition to horizontal weaving and we again come to our starting point from where we started weaving.
And we continue to weave according to this principle until the thread runs out. In this case, my rug is a single color, so I weave it in 2 threads at once. If you plan to weave a rug from two colors, each color needs to be wound alternately, unless, of course, you want your pom-poms to be multi-colored later. If you want the rug to be multi-colored, you can wrap all the colors at the same time. I would also like to note that you do not need to wind the thread to the very end. You need to leave a little yarn for further formation of pompoms. You need to finish the weaving on the self-tapping screw with which you originally started weaving. This is what I ended up with after winding 2 skeins of yarn:
Then we move on to the third, most labor-intensive stage of weaving. Before starting, I wrap all my fingers with adhesive tape to avoid the appearance of calluses on my fingers in the future. I know that many people do this step with a special, arc-shaped needle, but it’s not convenient for me to use it and I do everything with my own hands 
After preparing the fingers from the set aside wool of the same color, I cut threads about 20 cm long. Since I have 88 intersections on this frame, I need the same amount of thread, even more, since sometimes the thread can break due to too much tension. We begin to bandage each intersection of the horizontal and vertical rows. You need to bandage tightly and with a double cross, that is, each intersection is criss-crossed. Pull the intersection tightly and tie a double knot.
This is the most time-consuming work. It takes me a little over an hour. This is what our rug looks like after bandaging all the intersections.
Next begins the easiest and most exciting stage, for me personally. This is the formation of pompoms and the mat itself. To begin with, we cut off all the excess threads from the ligation of intersections, but not just under the knot, but leaving small tails.
After removing the excess “tails” we proceed to making the pompoms themselves. If you are making a rug from two colors, then you will only cut the top color, and the bottom one will remain untouched and will be the basis of the rug. Since my rug is a single color, I cut the pompoms by eye. The main thing is that a small part of the threads remains untouched under the cut.
To ensure that the pompoms are even, we cut the yarn in the middle between each knot, without touching the yarn that goes to the screws. It will later become the lush tassels of the rug.
And so we continue until we make cuts between each node, both in vertical and horizontal rows.
The photo shows that the outermost pom-poms are made of three cuts. Next, we begin to cut our rug from the frame, thereby we will give our rug beautiful fluffy tails.
We also cut the tails, cut at two triangle corners, exactly in half, and then trim them to match the length of the main tassels. That's all. This is the beauty I got.
I would also like to note that after cutting the rug from the frame, it decreases in size by about 5 cm on each side. The same method can be used to make rugs of any size. I hope someone will like my master class and find it useful! See you!
Tips for beginners
Experienced craftsmen who have been knitting for a long time and know many tricks that will help you spend less money and time on a product and at the same time make it as beautiful and durable as possible. What should a beginner pay attention to?
A set of identical covers for stools, made by yourself.
The basis
To preserve the finished product for as long as possible, it should be based on a dense base. The lining fabric will help not to lose the beauty of its appearance over time and will not allow it to spread out and become shapeless.
Knitted covers for stools in the same style.
Leftover yarn
To create one cape, it is not necessary to buy new skeins of thread. Use the remains in a wide variety of variations and, perhaps, such a work of abstract art will become the most original detail of your home interior.
Knitted round seat cover.
Border
If a novice needlewoman miscalculates in determining the size of the future product and misses by a smaller margin, such a cape can be modified by tying several rows of borders.
Even a beginner in needlework can knit such a cape.
Decoding the scheme
The process of creating covers for stools and chairs may seem difficult for beginning craftswomen. First of all, you need to use detailed crochet tutorials with patterns. The latter consist of symbols that should be carefully studied:
- Oval - air loops (VP).
- Crosses - single crochets (SC).
- T - half double crochet.
- T crossed out - single crochet.
- T crossed out twice - with two double crochets.
- T crossed out three times - with three double crochets.
- X with a loop on top - a twisted column.
- X with a line on top is a connecting loop.
Features of the “growing” Kidfix chair, tips on selection and assembly
Crocheting for beginners requires following some rules. Schemes are always viewed only from bottom to top; circular options are read in the direction from the central part to the edges. Odd rows are determined from right to left, even rows, on the contrary, from left to right. The creation of round capes begins from the middle; thanks to the lifting loops, the optimal parameters of the product are maintained.
A square or round cape for beginners usually consists of 3 types of loops: chain stitches, double crochets and single crochets, and connecting stitches. Despite this, the products turn out to be attractive and interesting.
Knitting methods
What the final product will look like depends primarily on the knitting method. If you need a thinner and airier fabric, use a crochet hook. If you have planned a voluminous stuffed blanket, pick up your knitting needles.
There are many instructions on the Internet, follow them and you will succeed.
Each subsequent required type of loop can be examined and studied in detail in the diagrams used.
What threads to take?
It is better not to choose pure cotton. It quickly deforms. Choose either a yarn that combines natural and artificial threads, or pure synthetics.
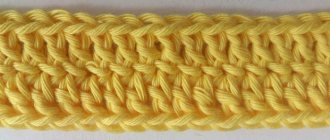
The main thing is to learn how to knit simple pattern elements, which are made from chain loops, simple stitches, and stitches with slip stitches.
Thick napkins, which should become an insulating layer on a bare stool, should be made from wool yarn.
The thickness of the threads should be large enough. It is worth considering the knitting method. If the product is crocheted with your own hands, the threads should not be too thick.
For knitting covers for chairs and stools, you don’t have to limit yourself in the thickness of the yarn.
If the pattern for knitting pillows on a stool involves the use of threads of different colors, their type and brand should still be the same. This will help avoid height changes.
Crocheted rugs for stools: patterns and descriptions
Next, we present a division into subcategories, which will certainly help you decide what shape to choose for the future product and its ornament.
Round bedding
The simplest option is a round knitted chair cover.
For a crocheted stool cover, it is best to use thick acrylic yarn and a large hook.
The thing will be voluminous, softer, and sitting on such a stool will be a pleasure.
Diagrams and descriptions of round-shaped products are based on the following operating procedure:
- pick up air loops and connect them into a ring;
- wrap the ring around the first row of single crochet loops;
- further, this base can subsequently be used for any pattern of a round rug.
DIY knitted cover for a stool with a gradient effect.
Square seat
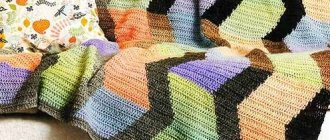
A very interesting and simple option is the scheme for creating a square seat from colored stripes. To do this, you need to knit a pair of stripes of various shades.
Square cover for kitchen stool.
Airy and light case with a floral pattern.
The required strip length is easy to calculate. It should be the same as the length of the seat. The width of the stripes themselves should be the same. It is important to calculate that the total width of half the stripes should be equal to their length. This will create a perfect square from many small squares.
This is where leftover yarn of different colors comes in handy.
Place some of the strips horizontally and the same amount vertically. And intertwine them alternating the top and bottom in a checkerboard pattern. Thus, you will receive a fashionable piece of furniture in the patchwork style.
Rectangular option
To create a rectangular cape, you can use the same pattern as for a square one. Only the stripes will not have to be the same length, but different. The length of half should correspond to the length of the seat, the other - to the width.
Handmade rectangular chair covers.
Chair seat cover
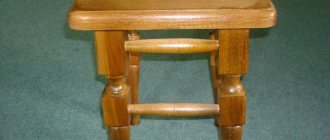
Do-it-yourself chair seats are where you should start. Even if you have never held a hook in your hands before, it is better to try just such a case.
In addition, you only need:
- Yarn of any color. It's best to take regular red, as it's a real classic. By the way, you can use a mixture of different shades, you get a good combination. The yarn itself can be of any quality. This could also include leftovers.
- 3 hook number.
Next you should follow the instructions:
- 5 loops need to be connected with a ring.
- Next, 2 more lifting loops are assembled, and 7 columns are tied in a ring without a cape.
- A blind loop is made above each of the crochet posts. An arch of 2 air loops is constructed between the strips.
- In the next row, 2 half-columns are tied to each arch, 5 air loops are cast on, a cape is made and a long loop is pulled out.
- Then you just need to repeat these instructions. The number of rows depends on the size of the chair. Chair covers can be multi-colored if each row or several changes color.
The chair seat can be even more comfortable if you put an elastic band in the sides. The crocheted cape will pull the chair along the sides and will not move from its place. Without elastic, it should be 1 centimeter less than the diameter of the seat.
Read: Selecting blowers and other vacuum equipment
Instead of elastic bands, you can use tassels. If you put any heavy metal weights there.
Options for floral patterns
- Flowers.
Creating such a rug will require a fairly high level of skill. To create it, you need to knit a sufficient number of individual colors and then connect them, guided by the diagram;
Beautiful chair covers using the African flower knitting motif.
- Hearts.
By connecting four heart-shaped elements together, we end up with a square cape.
To do this, you need to connect so that the bottom of the hearts ends up in the center of the product.
- Leaves.
There are quite a lot of schemes that provide a choice of patterns from small or large leaves.
Creating a new home interior is not a troublesome task.
If you follow the description of the patterns, the time spent knitting will not be onerous work. And by creating an incomparable flower that will soon bloom on your stool or a sofa cover with intricate ethnic or abstract patterns.
By following the instructions, you will not only knit the cover yourself, but also will not have to remake it.