For many, decoupage is the most favorite and affordable way to update old furniture. After all, every home has beautiful fabrics, photographs, old books, newspapers or magazines. If desired, special materials can also be purchased in the store.
Add a little accent to the front of your dresser. Let it be a cute vintage plot. And if the old sideboard has completely acquired an unsightly appearance, restore it entirely with beautiful decoupage prints! For you, we have put together a rich collection of amazing ideas for turning old furniture into a stylish design project.
Vintage style decoupage is perfect as always! It allows you to use a variety of elements associated with the past - an elegant boho-chic style, photos of your favorite film actors of the 70s, cute patterns and prints in the design, delicate pastel colors
Even more convincing, noble antiquity and antiquity can be given to furniture using a special varnish with a magical “craquelure” effect. The varnish forms cracks of different textures, depending on the thickness of the applied layer
Why is vintage style, lovely shabby chic or rustic motifs in decoupage so attractive to us? Or maybe this note of imperfection is the essence of beauty, or maybe antique objects seem so cute and defenseless to us that we just want to find them the best place in the house
Luxurious collection of chests of drawers decorated using decoupage technique
The bright contrast of black and pink, the decor of stones adds a unique glamor to this chest of drawers, and the floral patterns are simply mesmerizing
Unexpected welcome! The designer also took care of the internal beauty of the surface of the drawers.
It’s as if a fairy fairy has turned an antique chest of drawers into a real work of art! Did she really paint and scatter precious stones on it?
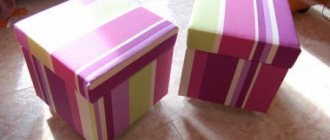
The highlight of the next organizer is the combination of zebra print with an original black pattern on a pink background. And of course, where would we be without our charming stones!
And this single drawer looks like a decoration in itself. Olive color, gold accents and stones are the perfect decor for a luxurious piece of jewelry for an elegant lady.
A magnificent box in a “steampunk” design with a noble sepia color and a pattern in the form of a clock and gears - an exclusive decoration for a ladies’ dressing table
Victorian style box with a stunning decorative flower and stone core. The golden-olive color combination enhances this work like never before.
Thanks to decoupage, this old suitcase has been noticeably transformed! Now it can serve as a full-fledged decorative chest for storing the most intimate
Creative humor in design is something that always delights!
Subtleties of design in the Provence style
If you purchase pictures and images for decoupage in the Provence style, you will be able to fill the item with lightness, antiquity, naturalness, simplicity and rustic motifs. The appearance of such a product will always attract attention with its warmth and comfort.
If you pay attention to the photo of decoupage in the Provence style, it is immediately clear that there are no restrictions for the author: you can add beauty and style to furniture, dishes, wooden, metal, glass objects, walls, doors and more, which creates a huge field of activity and a flight of thought for professionals and amateurs of this business.
Learning this technique is not at all difficult. You can attend a decoupage master class. If we talk about the Provence style, then objects after decoration should look as if they have been used for more than one generation.
In addition, you need to choose the right pictures: rustic motifs, pets, a lot of fresh flowers - in vases, bouquets, baskets, images of meadows, fields, spices, everything sunny and bright, in the end, a retro photo - all this will help create the unique atmosphere of ancient French courtyards.
In this case, special aging paints, textures, play of colors, lace inserts and more are used.
Photos in decoupage
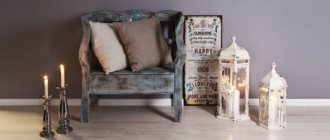
A chic bench in a bohemian style with a soft burlap seat, decorated on the sides with vintage photographs, evokes associations with real antiques
This touching old photo of a married couple, used as decor for decoupage, will once again remind the spouses of love and tenderness
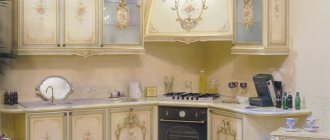
Decoupage of furniture in the Provence style
The most noticeable detail of any room is the furniture. If you decorate it in the Provence style, then you are guaranteed the effect of a simple cozy rural house, furnished with taste.
- Rice paper for decoupage - step-by-step instructions for use, features and subtleties of use (110 photos)
Decoupage of bottles - step-by-step instructions and description of the progress of decorating with various materials (110 photos)
- Napkins for decoupage - manufacturing features and tips for use (85 photos)
To give it even greater exclusivity, they use all sorts of techniques: they create scuffs, shadows with the help of paints, golden or silver leaf to make the paints look faded - they tint the surface with spots of paint of a different color, use craquelure varnish, which cracks after drying, as if the furniture was painted many years ago.
To decorate in the Provence style, it is better to choose furniture with many drawers, curls, and carved elements. Cracks after craquelure should be filled with gold or silver paint; the surface of the furniture, after painting with the main paint and drawings, should be blotted alternately with gold, brown, and black paints.
Paint the contours and corners with gray, highlight the monograms and curls with gold; if they are missing, it’s not difficult to add them using baguette paint.
All these small details will give a second life to old or new furniture - they will create a unique product, imbued with the charm and luxury of yesteryear.
Artistic decoupage
Instructions for Beginners
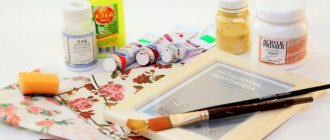
The first step is to acquire the necessary material: select suitable images and pictures for decoupage; as a rule, various napkins are used for this. They can be ordinary, taken from a pack of everyday use, or exclusive, sold in one copy and very expensive. You can take various laces, newspaper clippings, old photos.
When you have decided on the design, you need to stock up on brushes, PVA glue, sponge, acrylic yacht varnish, scissors, sandpaper, primer, and detergent. To create all sorts of small details, you can purchase craquelure varnish, baguette paint, contours, textures, aging paint and more.
To begin with, any surface is cleaned and degreased using detergents. Then it is primed, carefully leveled and dried. If there are significant defects, you will have to smooth them out with putty.
Next, you need to prepare the images by cutting them to size and choosing the desired shape. There may be several of them, with inserted words or inscriptions. To give a brighter effect, you should make a background from plain napkins, leave space for pieces of burlap or lace - everything is very individual and depends on your thoughts and wishes.
The pictures are carefully coated with glue and carefully, slowly, glued to the surface. Using a brush, you need to carefully level the picture, remove bubbles, unevenness, and crumpled areas. When the images are applied, they are again covered with PVA glue.
Using a sponge or a piece of foam rubber and paint of the desired color along the contour of the images, if desired, you can make a couple of strokes - this will create the effect of blurriness and completeness of the picture.
When the glue dries, the product is coated with yacht varnish and several layers - the more layers, the better the product will be protected. If you decorate a kitchen table, it should be protected better than, for example, chairs. When an object requires a smooth surface, excess roughness is removed with sandpaper. This is where the work ends.
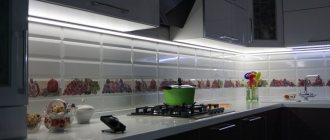
Using the same pictures, but different details and backgrounds, you can create entire sets, each item in which will be in harmony with the others. In addition to furniture, the kitchen has a wide variety of items that, when decoupaged, will take on a new look.
Textile decoupage
Use scraps of fabric to create a wonderful collage
LiveInternetLiveInternet
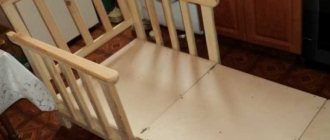
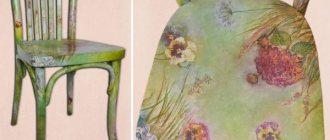
In this article, or master class, I present the idea of decoupage shelves: a combination on one surface of the aging techniques “shabby”, crackle (use of 1 step composition), the use of bitumen (imitation of “burns”), and the peculiarities of using rice paper. The very idea of decorating these shelves can be used both in the restoration of already “used” items and in adding artistic variety to new items. In my case, these are new blank MDF shelves with laminated surfaces, which I decided to “cheer up” in a rustic style. Why in the village? I can't think of any other definition 
A master class on decoupage of these shelves was written at the request of the editors of the International Publishing House "TOLOKA", as well as a master class on decorating the doors of a bedside table and a chair for a musician. Therefore, everything is shown in the diagrams on already completed works, after a while. The home of these shelves is a small cozy office at the university, where the chairs-piano-armchair-pictures-on-the-walls are from Soviet times. All these things have been updated, remade, decorated in a common theme. Accompanying these shelves is a bedside table with restored doors and this chair.
General view of two shelves
Top shelf
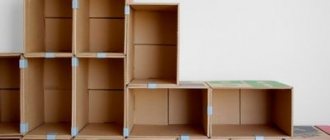
STEP 1: primer-painting
I primed and painted the surfaces (both shelves were done at the same time). Painted in 4 layers, drying after each layer. And they became an even, beautiful “ivory” color. STEP 2: preparing the surface for cracks with 1-step crackle Acrylic artistic paint (burnt umber) painted in one layer only the outer ends and about 1 cm from the ends the upper and lower surfaces of the shelves (this color will then appear from under the “cracks” and “ scuffs" after applying the top coat of ivory paint). I also randomly painted the corners of the shelves in those places where the 1-step crackle would be applied.
Where it is painted over with brown acrylic
STEP 3: we age it using the shabby technique: working with a candle.
I ran a candle along the edges and ends of the shelves (you can get an idea of working with a candle here). Without fanaticism!
STEP 4: distressing with 1-step crackle On the brown paint, where cracks are expected to be, I applied 1-step crackle in 1 layer. I have this on the outer corners: the ends, top and bottom of the shelves (as this usually happens in life). STEP 5: manifestation of cracks and abrasions 1. “Reveal” the cracks. Apply contrasting paint over the tack-dried 1-step crackle. In my case, this is the ivory background paint that the shelves were originally painted with. Here are the cracks showing up! Moreover, the shelves at this stage are painted entirely in ivory color, taking into account the peculiarities of working with 1-step crackle. After this, do not overdry the paint on the shelves, remembering that “shabby” abrasions are best done on a surface that has not completely dried.
Cracks at the end of the shelf
Cracks on top of shelf
2. Make shabby abrasions. Using the blunt side of a knife (I have a serving knife with a wonderful rounded end and teeth there for this purpose - very convenient; a palette knife is generally recommended) I removed the top layer of background paint (I used ivory color) from the edges and ends of the shelves, where I touched it with a candle . Undry paint, as a rule, comes off very well, and in this place the lower, brown layer becomes visible. I use sandpaper in “shabby” carefully: only for grinding surfaces (if necessary), removing burrs from the top layer of paint removed with a palette knife or knife. This produces smooth, imperceptible transitions from color to color, more naturally conveying the effect of a worn (“aged”) surface.
Scuffs with a candle
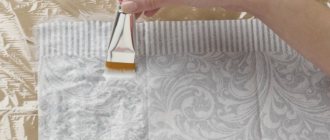
STEP 6: decoupage I chose the thinnest rice paper (14 g/sq m) with roses to match the picture on the doors of the bedside table and the mirror. The motifs pasted over the cracks are, in my opinion, very effective. I glued it dry. The pictures themselves are cut out somewhere, torn out somewhere. I have collected more information about rice paper and how best to use it in the form of my own impressions in a separate article.
Motifs (decoupage) on the top shelf
Motif (decoupage) and abrasions seen very closely
STEP 7: imitation of burns Bituminous varnish will help us with this. Using a cotton swab, I just went over some of the surfaces that appeared in the shabby. The main thing, again, is without fanaticism. We always remember the picture of what the surface of a wooden thing looks like after burns and, following the inner artistic impulses of the soul, we apply bitumen with light tangential movements. In some places I rubbed and rubbed the bitumen with a cotton pad immediately after application, and in others I left the line applied to the edge of the shelf to dry.
Shelf angle
End (edge) of the shelf
Another corner of the shelf
Step 7: finishing coat The shelves are coated with 1 layer of yacht varnish using a “brick” foam sponge. The choice is not accidental. Yacht varnish gives the yellowness of the surface necessary for “aging”, and a coating of 1 layer gives the very unevenness of the coating (yellow stains), emphasizing the effect of a faded or “burnt-out” item. And the shelves are the place where flowers live, which means the protective coating – yacht varnish – is just right.
November 14, 2012 With love, Evgenia Bazhenova
Books, newspapers, magazines, music books...
Colorful “book” decoupage will appeal to true fans of reading and flipping through the pages of fiction
Decorating old furniture with pages from a music book is a great idea for those whose lives are filled with music.
Bright clippings from magazines, comics and children's books are a great idea for decoupage furniture in a children's room.
We experience the brightest emotions when we learn something new from traveling to other countries. Let the world map as home decor always remind us of the best places, events and moments
Decoupage of old furniture not only allows you to save on expensive designer fittings, but is often even cuter and more beautiful. Moreover, you yourself can choose the necessary decorative materials that will most successfully combine with the overall theme of the interior.
What is needed for decoupage?
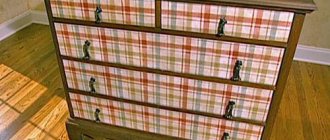
In your work you can use pictures from paper, napkins, textiles, etc. There are no restrictions here. For example, if after renovation there are several rolls of wallpaper left, they can be used to decorate furniture.
Modern technologies have expanded the possibilities for decoupage. Three-dimensional pictures are created and printed on a printer. Thanks to this, the owners do not have difficulties in choosing themes for furniture decoration.
Let's look at some tips for beginners on decoupage furniture. First you need to prepare everything you need for your work:
- Material (paper, textiles);
- Glue;
- Soft bristle brush;
- Acrylic lacquer;
- Sponge/rag.
Naturally, the list of accessories does not end there. Much will depend on the style and technique chosen, as well as the desired effect.