Furniture decorating is not only about creating spectacular and unique items with your own hands.
Such furniture will give a good mood and emotions to the performer and those who will subsequently use it.
Furniture decor will add individuality, brightness and style to its owner’s home.
The brightest and most interesting design ideas can be realized using the decoupage technique, which has recently become increasingly popular. And there are many reasons for this.
What is decoupage
Decoupage is the process of applying an image to an object and securing it for greater durability using special means.
The applied image usually has a paper base. This decoration technique can be used on furniture, dishes, and personal items.
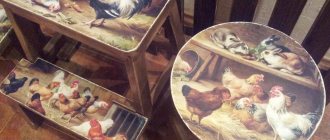
Decorating pieces of furniture, in particular chairs, is used when you want to decorate them, give them new life, and add individuality and a special style to the interior.
The decoupage technique is also used to develop a unified room design.
Note! For decoupage, you can use not only special napkins, but also postcards, gift paper, wallpaper, magazine clippings, printed photographs and drawings.
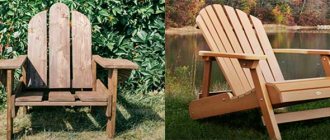
Decoupage - a second life for chairs
Every home has a wooden chair from the last century. Such pieces of furniture have always been distinguished by their quality and durability. After many years of use, the varnish has worn off, the surface of the legs has been scratched, and the colors have faded. You can paint it, varnish it or do something unusual.
Decoupage of an old chair will not only help restore it, but will also allow you to create a masterpiece that decorates the interior.
Main types of decoupage
The decoupage technique can be performed in various variations and in various ways:
- straight, or classic;
- reverse (used on glass);
- artistic (imitating painting);
- decopatch (decoupage in patchwork style);
- volume.
Decoupage furniture
The purpose of decoupage is that with the help of paper pictures, an object acquires a new and vibrant life. The technique itself involves selecting appropriate designs and gluing them onto things with special fixing solutions.
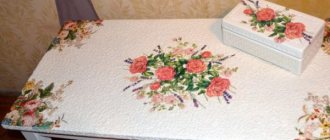
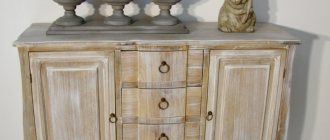
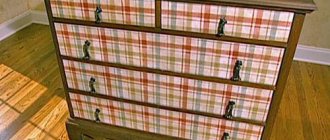
You can decorate dishes, boxes, decorative items and much more in the decoupage style. Recently, it has also become popular to decorate any furniture in this way: tables, chests of drawers, wardrobes, chairs, and so on. This decorative technique allows you to refrain from buying new furniture and introduce individuality into your home design. Decoupage of chairs also helps to diversify the interior.
Decorative effects
To achieve the desired texture, different surface decoration techniques
- craquelure;
- attrition;
- artificial aging ;
- patination;
- toning;
- shading;
- gilding.
As a rule, several decorative effects are used in combination .
You may also be interested in an article on how to make a wooden chair with your own hands. You can find out how to make a highchair here.
Idea for decoupage
Decoupage of chairs (see photo ideas above) can be done either to completely cover the surface or partially. That is, you can decorate the whole seat, back and legs with pictures. But such an appearance will be too overloaded. It is better to focus on partial decor and apply the image only to the seat or back. You can distribute small elements over the entire surface of the chair.
Think in advance about the theme of the future design, and also look for relevant pictures. At this stage you also need to choose a paint shade that matches the illustrations. After all, you need to make a background.
When the design option is ready, you can begin the work itself.
Materials and tools
For any of the techniques, working material is required. A set of objects and tools with which decoupage is performed directly:
- brushes of various widths and densities;
- vinyl glue (can be replaced with regular wallpaper glue);
- napkins with images or printed pictures;
- felt-tip pens, paints, pencils that may be needed to complete the image;
- varnishes for surface coating.
- auxiliary elements for decoration (glitter, stickers, shells);
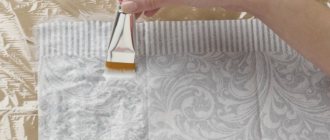
When using images printed on a printer, you need to make the paper with the image as thin as possible.
For this you will need scissors and tape. Place some tape on the back of the image and carefully tear it off. At the same time, he takes with him a certain layer of paper.
It is necessary to repeat the procedure until you obtain a paper base as thick as a napkin..
Decoupage can be done on any surface: wood, plastic, glass and even fabric.
Attention! To prevent your brushes and other tools from becoming disposable, do not forget to thoroughly wash them of paint, glue and varnish immediately after use.
How to make chair seats with your own hands, read this article:
Decoupage master class: chair with photo paper
You can give an old chair a new life using decoupage. To do this, you don’t have to spend money on buying special napkins. You can also do decoupage with plain photo paper.
It is better to print images on photo paper in good resolution - this will make the decoupage high-quality and professional.
To print images, it is best to use a laser printer rather than an inkjet. If you print a picture on an inkjet printer, there is a possibility that when the paper delaminates, the ink will flow. This will not happen with an image printed on a laser printer. But in any case, printed pictures should be varnished.
Using photo paper, you can easily transfer any image you like to a chair.
Step-by-step actions:
- Find and prepare drawings.
- Clean and putty the surface of the chair.
- Peel the photo paper.
- Cut out and paste decoupage images onto the chair.
- If desired, outline the images.
- Cover with varnish.
Paper lamination can be done in several ways. The most famous is to coat the paper with varnish, put the sheet in water for a few minutes, pry it up and remove the bottom layer of paper. You don’t have to do any layering, but the decoupage will turn out to be of lower quality.
Stages of chair decoupage
The decoupage technique is a process consisting of several successive stages.
The result of the work depends on the exact observance of each of them. Decoration stages:
- idea;
- pre-treatment of the chair surface (cleaning, removing old varnish or paint, degreasing);
- primer;
- applying the main background;
- cutting out a pattern;
- gluing the pattern;
- working with paints or auxiliary elements for decoration;
- varnish coating.
Note! To pre-treat a chair when performing any complexity of decoupage, a primer is required, which is available for retail sale in hardware stores.
Before you
start decorating, you need to clean, dry and prime the surface of the chair.
The primer is applied in 1-2 layers and dried thoroughly, preferably naturally.
After priming, paint the chair. It should be taken into account that the napkins will show through, and if the main background is too saturated or dark, the design may lose its colors.
Now you should prepare drawings, pictures, and other decorative elements and visually evaluate the idea.
Then you can start gluing the drawings, finishing with paints, felt-tip pens, applying glitter , etc. At this stage, you can still make some changes or amendments to the decor. The final stage is applying varnish. It is necessary to apply as many layers of coating as required depending on the decoupage technique or the purpose of the chair. After completely dried, the chair is ready for use.
Each stage of decoupage should be treated with special attention, since inaccuracies in execution can hinder the implementation of the idea.
You might be interested in learning how to make a step stool with your own hands. You will find instructions for making a folding fishing chair here.
DIY chair decoupage technique
Do-it-yourself restoration of wooden chairs using the decoupage technique allows you to create interior items in any style - from classic to ultra-modern.
Vintage technique
Vintage items are very popular. They represent a message from the past. This style implies complete authenticity to the chosen period of time. Vintage-style furniture should be emphasized by the effect of aging. Erased edges, faded paint, and small cracks in the coating are welcome.
Ideas for decorating chairs with a backrest should be implemented with the help of old postcards, posters and advertising brochures, images that repeat the decor of household items familiar to us from 50 years ago.
Several techniques are used for decorative aging:
- To give the product a shabby look, it is first painted in darker colors. Then paraffin is applied to the corners and protrusions and painted with the main shade. After the coating has dried, use fine sandpaper to remove the paint in the areas treated with paraffin, and the dark tones come out.
- A simpler method is to remove the top layer of wood with a wire brush and then varnish.
- A wooden product looks impressive, the surface of which seems to have been eaten by bugs. This look is achieved by spattering dark paint.
- The process of creating cracks is considered the most labor-intensive and expensive. A special gel or craquelure varnish is used, which after drying forms cracks on the surface.
In the original shabby chic style
Shabby chic is rooted in ancient English traditions, although products in this style began to be created relatively recently. The basic rule of shabby chic decoupage is complete matching of the shades of the base and the image.
If a pattern of pink flowers is used, then the base should have a light tint of this color. It is mandatory to erase the transitions from the decorative element to the base. It is best to coat such decor with varnish with a matte base.
Decoupage a chair with photo paper
To implement ideas that simply acrylic paints, napkins and wallpaper will not help, you can use images printed on photo paper. This way you can make a chair suitable for any interior. This is especially in demand in high-tech, art deco, and eco-tile.
The main feature is the need to separate the paper. A layer of varnish is applied to the printed surface and allowed to dry. Then the photo is lowered into the water, carefully lifted and the lowest layer is torn off. You can do without delamination, but as a result, the edges of the cut element may protrude above the base.
Provence style
Provence is permeated with floral motifs, soft shades of turquoise, lilac, and beige. This rustic style is expressed in abrasions, which are created by painting selected areas several shades darker than the top layer.
Viennese style
Viennese chairs have existed since the 30s of the 19th century and are still considered the standard of quality, strength and elegance. The main difference between such furniture is the presence of bent wooden parts, which are created under the action of steam and are capable of springing even under strong mechanical stress.
Soft curves of lines and exquisite design will look better if you implement the restoration of the chair in the pro-announced style, a master class in which involves the use of neutral floral shades of the main background, pastel colors of images and decoupage drawings, and smoothing of borders. The classic style can be emphasized by the image of floral and plant elements, openwork textile inserts and frames.
Preparing a chair for decoupage
If you decorate an unprepared chair, the decor will look ugly and will not last long. The same thing will happen with poorly treated furniture. Therefore, this stage of work must be given due attention.
First, the chair needs to be sanded, that is, the old varnish must be removed. For this, fine sandpaper is used. If the varnish is difficult to erase, you will need to use a sanding machine. It is better to work with it outdoors in a special mask. The varnish is removed from the entire chair. Then the chair is wiped with a dry cloth to remove dust.
Now you need to apply the primer. Next, it is advisable to cover the surface with a layer of putty. This is necessary to hide scratches, roughness and unevenness of the chair. You can not cover the entire surface, but only areas with flaws. When the putty has dried, the chair is coated again with primer.
Materials for the chair: design style - Provence
Let's try to decorate and design the material of the chair using the Provence style. To do this, we select pastel colors and a picture for our product. In this case, we will use a vineyard. This chair is perfect for a country house or summer kitchen:
- Paint (Acrylic)
- Images (with picture)
- Wax Varnish (acrylic)
- Brushes
- PVA glue
- Scissors
- Paper (sandpaper)
Decorating an old chair in Provence style
Before you start work, you need to acquire the necessary materials:
- The chair itself.
- Thick upholstery fabric in the color of the interior (if you want to highlight and make a bright accent, pay attention to lavender or blue shades, and if the accent is already on something else, choose upholstery to match the color of the walls or floor).
- Acrylic paint of the desired shade (cream, white, ivory).
- Brushes of various diameters.
- Matt varnish. Choose water-based varnishes; they won’t have a pungent odor and you won’t have to sit by an open window for hours waiting for the room to air out.
- Paint with gilding effect.
- Sandpaper.
When starting to reconstruct a chair, first take care of a comfortable working space. Found it? Let's get started!
- The first step is to remove the old paint from the chair. This can be done using a knife or spatula. If the chair is varnished, and you can even tear the paint off it with your teeth, leave everything in place, don’t suffer.
- The next step is to remove the upholstery from the chair. Usually on old chairs the seat itself can be removed just fine, try it. Assess the scale of the disaster - is it worth changing the seat pad? If you still have to, then you will need to get furniture foam rubber.
- If you are unable to remove the chair cover, try applying paint to a small area. Evaluate whether it fits well. If there are no problems, start covering the entire chair; if there are problems, wait until the layer dries and apply another one on top. Assess the condition of the paint now. If you were unsuccessful again, I hasten to disappoint you - you will still have to remove the coating by sanding the coarse granules with sandpaper.
- After applying two layers of paint, wait until it dries completely and varnish the product. Let's move on to the seat. Remove the upholstery and carefully, with a thin brush, paint the wooden parts of the chair. Next, stretch the new upholstery; you can easily secure it with a construction stapler.
- You're almost done! Secure the seat on the chair with the help of a man. Now you can resort to aging. Use a flat brush to paint all edges with gold paint. Wait for it to dry and use fine-grained sandpaper to carefully sand down the gold fragments. Coat the top with varnish again. Congratulations to you! One piece of furniture is ready!
- It is worth saying that you can not only repaint old interior items, you can decorate them with various ornaments. If you know how to draw, this will not be difficult for you to do. If not, learn the decoupage technique and use it using ready-made cuttings.
Working on a vintage chair
For this action, you need to use sandpaper (paper) , we completely process the outer part of our wooden chair product. When we have removed all roughness on the surface, it is necessary to putty the product. After this, you need to wait until the material dries completely. After this, you need to paint the chair using acrylic paint (white). It is advisable to do this action in several stages (using layers). Before starting work on the next layer, you need to wait for the previous one to dry. After that, take a napkin with the pattern you need for work, cut it out and apply it to the desired place. decoupage glue into the middle of the picture
After this, using a brush, you need to smooth the surface of the paper. After this, wait until all the pictures on your chair product dry. Then, we process the surface using a contour , or draw a contour near the drawing. Also, with the help of special contours, it is possible to work out the pattern of the drawing. Next, let the product dry and use the special property of the varnish to process the product. We wait until the material dries.