What you need to make an ottoman with your own hands
A do-it-yourself rectangular ottoman is usually made from chipboard; if you like everything original, you can try building a frame from bottles. The wooden version is more durable and strong, but bottles will last a long time if handled correctly. The presence of a hinged cover is not necessary, it all depends on the model.
For work use:
- boards 150 cm long and timber 4*4 cm, depending on the design;
- sheets of chipboard or plywood up to 1.3 cm in thickness;
- rollers, if the product is on wheels;
- synthetic winterizer/foam rubber as filler;
- functional decorative upholstery (tapestry, leatherette, etc.);
- self-tapping screws;
- hammer;
- screwdriver, screwdriver;
- furniture nails, construction stapler;
- high-hold adhesive.
To speed up the process, you can use a box with legs. Such products are usually made from beams; self-tapping screws are used for connection.
Important! The hinged lid will expand the functionality of the product. The strength of the finished furniture depends on the reliability of the frame - if you have experience in building beds, then the ottoman will be quite easy to handle
Mobile pouf with drawer
This model with wheels is functional and convenient, since the pouf can travel from room to room without the slightest difficulty, and you can store many small but necessary things in it. However, to make it, minimal skills in working with the material will not interfere.
To produce such furniture you will need:
- laminated chipboard;
- timber (40x80x80 mm);
- upholstery fabric, foam rubber;
- jigsaw (hacksaw), drill;
- furniture rollers;
- hinges for attaching the lid;
- glue, screws;
- sewing machine;
- screwdriver (screwdriver).
Six blanks are cut out of laminated chipboard: 4 identical rectangles (squares) for the sides of the pouf, two square parts for the bottom and lid. 4 parts are made from timber, their length is equal to the height of the walls of the product.
- A box is assembled from four blanks: the elements are connected using glue and self-tapping screws. 4 bars are glued to the inner corners of the future ottoman and secured with fasteners.
- Wait for the parts to dry. Attach the bottom, proceeding in a similar way. Furniture wheels are attached to the corners of the bottom square with self-tapping screws.
- They make the lid: glue a piece of foam rubber to the workpiece. The top is covered with upholstery fabric, future seams are marked at the corners of the ottoman, sewn on a machine, and the edges of the piece are also processed. The finished upholstery is stapled to the chipboard.
- Sew a cover for the pouffe box. If desired, foam rubber is also glued to the sides. The finished seat is connected to the ottoman using furniture hinges.
Design options may be different, but even the simplest one - decorating the lid with decorative buttons - will require additional work: drilling holes in the chipboard for the cord with which the buttons are attached.
What can you make an ottoman from?
A do-it-yourself pouf with a storage box is made from a wooden or plastic (bottle) base. The presence of a box is not necessary; it can be omitted.
The next stage is the choice of upholstery. Available options:
- textiles - usually linen or cotton, easy to care for, wear-resistant, durable, wide range of colors;
- leather - natural material is expensive, does not fit into any interior, but it looks very prestigious, its disadvantages are the need for careful care, high price;
- leatherette - the visual characteristics are identical to leather, but the price is noticeably lower, the solution looks elegant and neat, and the service life is average.
If you want to create an ottoman that will last forever, you can replace the chipboard base with a metal one. Achieving the desired result will not be easy, but it will not disappoint. Forged products with decorative carvings look beautiful.
Important! Working with forging is difficult; this technology should be chosen only by those who have the appropriate skills.
In addition to the fabric for upholstering the ottoman, they prepare beams for constructing the legs, sheets of plywood, fasteners in the form of screws, staples, stain, paint, and thick foam rubber. Additionally, you can sew a protective cover for the ottoman - but this is at the discretion of the master. The main thing is that the fabric is harmoniously combined with the colors and materials of the hallway or other room.
Important! If you are making an ottoman with legs, you should attach a set of 4 wooden slats to its bottom. This is done so that they protrude beyond the edges of the product up to 2 cm.
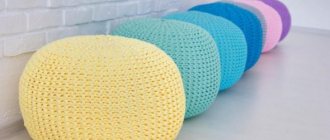
Knitting is not used as an option for upholstering an ottoman, but you can make such a cover
Create a soft ottoman-bag
To work, you need to prepare the following materials:
- Fabric for outer cover.
- Fabric base for the inner bag.
- Filler.
- Decorative elements (ribbons, guipure).
- Pattern.
If the master has a sufficient level of cutting and sewing skills, you can make the template yourself. In another case, patterns of finished models are available on the Internet for studying and downloading.
Step-by-step instructions for the master:
- Using the prepared patterns, we cut out a fabric blank for the inner cover: the outer bag should be larger in volume than the inner cover.
- The inner cover is stuffed with soft filling.
- The outer bag is sewn according to a different principle. Eight parts are made using the templates: two rounded parts for the base and top, six wedge-shaped parts for the sides. This principle of creating elements will allow you to give the pouf a certain shape.
- The wedges are sewn together and with the lower part.
- An inner cover filled with filler is placed inside the formed frame-bag.
- Lastly, the upper rounded element of the pouf is sewn on.
- Be sure to sew in a zipper so that you can remove the outer cover for washing in the future.
The original ottoman is ready for practical use.
Drawings of ottomans
It is inconvenient to make ottomans with your own hands from a photo - drawings are usually used for work. First you need to determine the shape of the product; for this you use your imagination or simply take popular options. There are classic round, square, rectangular ottomans and lamzak-type bags (pancake- or pear-shaped).
Important! The presence of a back on the ottoman is not necessary, but it will increase the comfort of the finished structure.
The design of a standard rectangular pouf with a lid is the simplest
The size of the product depends on personal wishes. Be sure to immediately think about a cover for the ottoman - preferably removable and washable.
Soft ottomans are universal, the main thing is to strictly follow the dimensions in the drawings. An ottoman with a hinged lid is a more functional model, which will provide additional storage space.
Modern ottomans
Nowadays, ottomans are usually used in the corridors of modern apartments and houses and serve for the convenience of putting on shoes. They take up little space and therefore will fit even into a modest-sized room. Now their shapes and sizes, as well as colors, can be varied. Moreover, the pouf can be either extremely simple in execution or decorative and very beautifully decorated. Also, absolutely soft bean bags have now appeared, which, by the way, are used not only as places to sit, but also for the rehabilitation of some patients.
Ottoman in the hallway
A modern pouf can be a great addition to your interior. For example, made in the shape of a ball or an animal, it is perfect for decorating a child’s room.
Original ottoman
The design features of ottomans are as follows.
- In any case, this product occupies an extremely small area, and therefore can stand under a table, cabinet, in a corner, under a hanger and not disturb anyone.
- The pouf does not have a back as such.
- The pouf can have simple wooden or metal legs that are very short. And sometimes instead of legs there is a small platform or wheels.
- Inside the ottoman can have a drawer for storing things. Solid hollow products are also produced that are not intended for storing anything.
- The ottoman is lightweight and mobile; you don’t need to expend much effort to move it from place to place.
- An ottoman can serve as a decorative decoration for any room and will help emphasize style.
The ottoman will decorate any room
On a note! The main purpose of using an ottoman is to simplify a person’s life and make it more comfortable.
The most common use of ottomans is installation in the hallway. As a rule, structures made for this room are no higher than 45 cm in height, but they can have different widths or lengths (for example, they can be longer and look like a couch). As for the appearance, there are so many variations that choosing the most suitable one for the interior is quite simple. Based on their shapes, there are square, corner, round, rectangular ottomans, etc.
Bedside model
How to make a pouf with your own hands
The master classes present different schemes for performing work on constructing homemade pieces of furniture. You can make a round pouf with your own hands, a structure made of wood, bottles, foam rubber. The cost of the finished product will depend on what materials are used to construct it.
Simple DIY ottoman
The simplest work flow looks like this:
- Make a pair of equal-sized round parts from fabric blanks; their measurements should be equal to the upper and lower parts of the product. Allow a few centimeters of seam allowance for the ottoman.
- Measure the diameter of the ottoman tire inside until it thickens, cut a couple of equal rectangles.
- Decorate the seams with ribbon or other means, place rectangles on them along the edge so that a long ribbon comes out.
- Baste the first circle to the ottoman, make a stitch along the seam, and do the same with the other circle.
- Coat each new layer with glue, but do not be too zealous.
- Provide an opening for stuffing at the bottom of the ottoman, carefully select the stuffing material. When the pouf is ready, sew the hole tightly.
The shape of the ottoman is circle or square, at the discretion of the master. To ensure that the product holds its given shape well, dense types of fabrics and foam rubber or synthetic winterizer are used as filler.
How to make an ottoman in the hallway with your own hands
Another simple scheme of actions, when performed, the finished ottoman will be universal, laconic, and durable. For construction, use bottles or boards for the base, thick cardboard, foam rubber, scissors, upholstery fabric, needle, tape, glue.
Work order:
- Make a pair of equal round parts or squares, taking into account the desired shape and optimal dimensions. Immediately make the top and bottom of the ottoman.
- On each bottle, screw the cap tightly; if the base for the ottoman is wooden, sand it to remove burrs.
- Make a couple of round and one rectangular parts for the ottoman from foam rubber, leaving some room for seam allowances. Using strong stitches, connect the pieces. You can replace foam rubber with padding polyester, thick fabric, or insulating material (the fabric is folded in several layers).
- Make a case for the ottoman.
You can add a strap and also decorate the product.
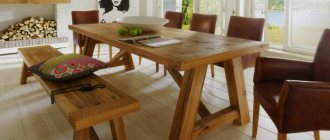
How to make an ottoman from wood with your own hands
A do-it-yourself pouf with a lid is a durable, timeless and fashionable solution, but to create it you need to be able to work with nails and a hammer. The base used is chipboard, wooden beams, furniture wheels with fasteners, wood glue, iron corners, foam rubber, fabric, and self-tapping screws. The finished product will be quite voluminous, with the ability to adjust the softness (if you put more or less foam).
Procedure:
- Construct a box for an ottoman from rectangular chipboard sheets, fastening 4 plates with self-tapping screws and strengthening them using iron corners.
- Fix the beams to the bottom with glue and place the products on wheels.
- Place the base on top of the box.
- Upholster the ottoman according to the standard pattern.
If the ottoman is on wheels, it is not covered with fabric from below. It is more convenient to make a snake fastener rather than a continuous seam.
DIY corner ottoman
For a corner ottoman, use fiberboard and chipboard sheets and fabric. Procedure:
- Make blanks for the frame according to measurements.
- Assemble the base using self-tapping screws.
- Strengthen the corners and radius of the ottoman with wooden beams.
- Nail the fiberboard with nails or a gun to the semicircular radius part.
- Cover the side and corner tops of the pouf with foam rubber.
- Secure the padding polyester to the ottoman.
- Cut out the parts for the cover and sew them.
The fabric is stretched and nailed with a construction gun. The bottom is usually covered with fabric or non-woven fabric.
DIY tire ottoman
A tire pouf is a simple, durable and interesting option in terms of visual characteristics. An old tire is used as a basis; the appearance and dimensions of the finished pouf will depend on its size.
Procedure:
- Measure the inner diameter of the tire to the thickening area, add up to 1 cm - the required radius will be obtained.
- Add a strap to the ottoman cover for easy movement of the product.
- Make markings on a sheet of plywood, cut the blanks with a jigsaw
- Make a couple of circles for the bottom of the ottoman and the seat.
- Glue the rope onto the tire, to create an original pattern, start from the center of the seat, lay out the rope in a snail shape.
For reliable fixation, use strong glue and a stapler. After the glue has dried, the finished ottoman is coated with transparent varnish.
DIY ottoman made from boards
The work scheme is suitable for those who know how to handle a hammer and nails. To construct the frame, chipboard or other plywood sheets, wooden blocks, and furniture wheels with fasteners are taken.
Procedure:
- An ottoman box is made from rectangular chipboard blanks, fastening several plates with self-tapping screws, and strengthening them according to the pattern with metal corners.
- The beams are attached to the bottom of the ottoman structure with glue, then the wheels are installed.
- A base is placed on top of the box (any shape can be chosen).
- The ottoman is upholstered using standard technology.
The bottom for a pouffe on wheels does not need to be made of fabric. The sides are sewn together, it is advisable to provide a snake.
DIY ottoman from a stool
In this scheme, a stool is used as the main frame. Additionally, you need to take a sheet of chipboard (it will cover the side gaps), upholstery fabric, and decor of your choice. The foam rubber is secured with slats so that it does not come out or stick out, so the product will look complete and be stable. The fabric used is dense.
Procedure:
- Trim the legs of the stool and protruding corners, use a level so that the pouffe does not wobble.
- Place sheets of plywood on the corners of the ottoman (4 in total), secure the parts at the bottom and top with self-tapping screws. Cut a separate sheet for the bottom and make the fasteners again.
- Cut a piece of foam rubber slightly larger than the seat, leaving allowances of 6 cm.
- Cut off the top of the chair, do not file the edges.
- Carefully coat the top parts of the ottoman with glue and begin applying the finishing material.
- Secure the remaining parts and form them with staples.
An easy-to-follow and affordable method that will allow you to refurbish an old stool. Furniture that has served its purpose can be given a new life.
DIY bucket ottoman
The bucket makes a durable and inexpensive ottoman. Procedure:
- Prepare a bucket, cut out a couple of round parts and one rectangular one from foam rubber. Leave some extra for allowance.
- Remove the handle from the bucket, place the product upside down and begin to wind the rope tightly. Each stitch can optionally be placed on glue.
- Instead of foam rubber, use thick fabric, insulation or padding poly for the ottoman.
- Make a seat from thick cardboard and fabric, connect the materials with a button in the center.
- Shape the microfiber into a tube, wrap it around the button between the cardboard and the fabric, and secure with a glue gun.
- Secure the top with a stapler from the back of the cardboard.
All that remains is to glue the seat to the base.
DIY plywood ottoman
An ottoman from plywood can be made if you have woodworking skills and sheets from which you can make a frame. Procedure:
- Draw a curved line on the plywood, retreat 7 cm, draw a second one.
- Mark the attachment points on the vertical supports.
- Cut a couple of squares that will serve as the roof and bottom (it’s convenient to use a jigsaw).
- Secure it in the corners of the stand with glue and screws, and install the side sheets.
- Make holes on each side and sand the surfaces and edges.
- Select upholstery material for the ottoman.
- Glue foam rubber onto the top edge, apply wood glue, let it soak for about 20 minutes. You need to press the material firmly at the edges and less in the center (this will create a bulge).
- Cover the upper surface of the headset with fabric and fix the upholstery to the surface.
The final stage is decor. If you don’t want to do it, you can leave everything as is.
DIY egg tray ottoman
Egg trays are a valuable craft material; you can use them to construct a homemade pouf. Of course, the design will not be very durable and strong, but it will turn out nice.
Procedure:
- Make a “battery” from trays, making sure that its components touch as closely as possible.
- Cover egg trays with tape.
- Cover the frame around the perimeter with foam rubber or other fabric (foam rubber is preferable).
- Make a cover.
The number of trays depends on the desired height of the pouf - the more there are, the higher the product.
DIY ottoman for dressing table
The pouf for the dressing table is easy to assemble with your own hands. To complete the work, simple available materials will be sufficient. Procedure:
- Make a frame from sanded chipboard or other blanks if there are no boards.
- Prepare a jigsaw or hacksaw for cutting out small elements.
- Prepare vertical side walls - 2 pieces.
- Make a bottom, measure the perimeter, make sure everything matches.
- Make a cover so that the fabric wraps normally; make an allowance of about 120 mm in height (it is better to remove the excess later than simply not stretch the fabric onto the frame).
- Sew the textile from the inside out and carefully place it on the body.
- Use staplers to secure the top, and secure the bottom using self-tapping screws and small washers.
- Secure 4 rollers with rotary bearings.
- Secure the hinged lid, decorate the pouf according to your own imagination (ruffles, stitching, etc.).
The cover can optionally be cut without sharp protruding parts.
DIY pouf with carriage tie
The carriage screed looks impressive and is an interesting decor in itself. Procedure:
- Prepare a frame from pine beams or plywood.
- Hammer the DVR on the side around the perimeter.
- Place the button fastening areas on the foam.
- Drill holes.
- Stretch the fabric, tighten the buttons into the holes, and secure them from the inside.
- Nail the fabric at the top and bottom around the perimeter.
- Trim off excess material.
- Mark the cover for buttons.
For upholstery, it is convenient to use leatherette or flock-type fabric.
DIY foam ottoman
A frameless pouf is one of the easiest options to implement. To create such a design, perform the following steps:
- Prepare the details according to the pattern and sew them by hand. Make many small squares of fabric, each with triangles at the ends.
- The fragments are sewn together to form a cover, which will gain volume as a result of stuffing.
- The product is filled with padding polyester or other filler.
The shape will hold for a long time if the filler is elastic. In other cases, the product risks quickly losing its appearance. This is a comfortable and practical pouf for feet, which you can make with your own hands in literally an hour.
DIY transformable ottoman
For a transformer type model, use a pair of foam rectangles 20 cm thick. For cutting, take scissors, a sharp knife, a pencil, paper, medium-density fabric and Velcro tape.
Procedure:
- Make patterns for foam rubber and upholstery.
- Pin and stitch the blanks, align the outer corners.
- Fold the long sections of the ribbons so that they meet in the central part, fold, and stitch again.
- Iron the seam allowances, pin again and stitch the remaining parts of the blanks.
- Unscrew the cover and insert it inside the pillow.
The basis for the transformer is a regular pillow that can change shape thanks to the soft foam layer. You can combine a pillow and bottles.
DIY pouf from scrap materials
A master class on a do-it-yourself pouf made from bottles will be of interest to anyone who likes to create practical, beautiful solutions from scrap materials. If everything is done correctly, the finished structure will be durable, strong, and can withstand loads of up to 100 kg or more.
Procedure:
- Build a plastic frame from equal-sized bottles and wide tape in the shape of the future banquette (there are fancy options or standard round ones). Cut off the top parts of each bottle. Insert the second bottle into the “glass” with the lid tightly screwed on until it stops. Tape all joints with tape for maximum reliability.
- Sew the cover according to the given measurements. You shouldn’t do it by eye; it’s better to prepare a pattern in advance.
- Wrap the bottles in corrugated cardboard and secure with tape, this will give the homemade chair reliability.
- Cut out the foam side surfaces and seats, wrap the material around the frame, sew with a needle and regular thread, do not tighten the stitches too much so that the thread does not cut the foam.
At the end, all that remains is to put the decorative cover on the base.
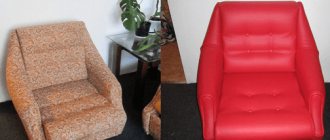
Seat
To make the seat, I cut out foam and fabric similar in size to the old ones. I placed foam rubber on the base, then covered it with a square piece of upholstery. First of all, I fixed the center, and then began to tighten and secure each side.
The first side was without much of a stretch. I folded the edge of the fabric and attached it to the base with a stapler. The gaps can be made arbitrarily, but I decided to make more fastenings so that the fabric does not lie down. After securing one side, I began to work on the opposite.
With the help of 60,000 bees and his skill, the artist sculpted a bust of Nefertiti
Unusual dwarf giraffes found in Namibia and Uganda
The first Brazilian citizens were vaccinated with the Sputnik V coronavirus vaccine
The maximum tension made it possible to make the surface even. Then I processed the third and fourth sides of the square in a similar way. The corners need to be tucked in as tightly as possible so that the diagonal connection looks neat. When everything is ready, trim off any unnecessary edges around the perimeter and corners.
How to decorate a homemade pouf
If you need to decorate a bedside ottoman for the bedroom with your own hands, use any available decor. It is recommended to choose buttons to match the upholstery; their number depends on personal preference. You can use a decorative cover - one or several. It is easy to sew a product on a machine; it can be removed, washed, and changed. The main thing is that the fabric is strong enough and the seams are of high quality and tear-resistant.
Important! Sewing a decorative cover is easy, even a beginner can handle the task - just study the master classes.
The decor of the banquette can be anything, the main thing is that it fits harmoniously into the room
For interiors in Baroque and Empire style, a carriage screed is ideal. Making such a model is not easy, but the result will be presentable and effective. When there are a lot of parts in the pouf (these are backs, shelves, partitions), it makes sense to make a pattern and cut the plywood board according to it.
Decor is a simple task, as is the design of the banquette itself. The main difficulty of the work is their painstaking nature. But if you are patient and follow the instructions, you can achieve excellent results.
Dismantling
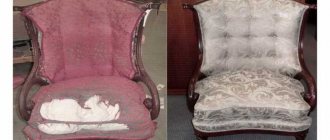
First of all, I started dismantling the old ottomans. I needed a drill, but you can use other tools to completely disassemble the seat. Pay attention to how old the items are. If the seat is worn out, it makes sense to replace the foam with new one. That's exactly what I did. I temporarily left the upholstery and foam rubber in order to cut out new fragments from them. Once everything was removed from the ottoman, I washed the frame and began preparing it for painting.
Which shirt to wear with trousers this winter: models for men and women
Due to verification of a fake page, Lyudmila Artemyeva wants to sue Instagram
Political scientists assessed the availability of vaccination in Russian regions
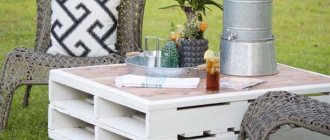
Ottoman made from plastic bottles
Pouf from plastic bottles
A soft home chair can be made from seemingly non-standard things. For example, from plastic bottles. This is a very affordable material, and products made from it are practical and decorative.
Cooking:
- bottles (they must have tightly screwed caps) - 40 pcs.;
- scissors;
- synthetic material for laying;
- wide adhesive tape;
- needles and threads;
- knitting needles or crochet hook;
- yarn;
- stapler;
- beautiful fabric.
Production
We connect the plastic containers to each other using adhesive tape. For reliability, it is recommended to first fasten them in small blocks, which are then tied together.
We make a pattern from the bottom of the box. Place the workpiece with a circumference of 400 mm on the boards and make marks. You need to cut out two pieces from the resulting pattern. Place them on both sides of the pouf and secure with adhesive tape.
Bottles are connected to cardboards with tape
Now it's time to prepare the gasket.
Cut out 2 circles and one rectangle, which will serve to wrap the pouf.
Use a staple gun to attach the foam to the frame.
Wrap polystyrene with padding polyester.
The surface of the resulting frame is covered with padding polyester or foam rubber.
Any suitable thick fabric will be suitable for making the lid.
The final step is to connect the top and sides of the ottoman, stitching them at the bottom.
The pouf is completely ready.