Decoupage furniture in the Provence style is a great way to get inexpensive but very attractive interior items. Various techniques for decorating furniture are used precisely to create truly unique decorative products, and the most optimal solution would be to use decoupage. Such a simple technique can be mastered at home; moreover, you do not need to spend large sums of money on purchasing exclusive furniture. Today we will tell you more about the decoupage technique and its application on furniture.
Decoupage furniture in Provence style
Provençal chic in the interior: the origins of French impeccability
Why exactly the southern French province received the honor of giving the name to the entire direction, no one will remember. Rural motifs, characteristic of the entire suburb, became so fashionable in the mid-19th century that even blue-blooded people willingly posed for portraits as innocent shepherdesses. The azure of blooming lavender, the snow-white gloss of robes, lace and greenery - for the spoiled and rather depraved French court, such themes became the height of grace and a sign of good taste.
Pastoral pictures and tapestries with provincial motifs became an integral attribute of royal boudoirs and bedrooms. Since that time, little has changed: the rural style also relies on natural colors, deliberately rough furniture and floral motifs
. This allows you to independently build a fashionable interior: furniture decor in the Provence style does not require expensive fittings or luxurious fabrics, it is democratic and affordable.
We embody the Provence style in the interior with our own hands
Master class in decoupage technique: design of various furniture
Decorating an old chest of drawers
Using this unusual technique, you can decorate any furniture, including a chest of drawers that is no longer used for its intended purpose due to its unsightly appearance.
You can read about how to make a chest of drawers out of wood with your own hands in our article.
During the work you will need the following:
- white acrylic paints;
- sandpaper;
- cutting tool;
- drawings;
- plates;
- velor roller;
- special sponge;
Step 1. First of all, you need to clean the surface of the chest of drawers from dirt. To do this, wipe it with a damp cloth and detergent. When it dries, you will need to polish the surface with sandpaper until it is perfectly smooth.
The old chest of drawers should first be cleaned of dirt.
Step 2. Then you will need to pour the required amount of white acrylic paint into a disposable plate, and then apply it to the chest of drawers using a velor roller. Water-dispersed paint is distinguished by the fact that it dries very quickly, literally in a few seconds. Only one coat of paint will be applied, so you need to do everything carefully the first time. At the same time, if the dried paint looks translucent, then this is only for the better, because at the aging stage some layer of it is still removed from the surface.
It is better to apply paint in a thick layer to fill all empty spaces
Step 3. You need to paint all sides of the chest, including the sides. It is not forbidden to use a regular paint brush, but a roller applies the paint more evenly. In addition, this significantly speeds up the process. It is worth noting that when decorating any product in the Provence style, you do not have to be particularly careful, because the more careless the coating looks, the better.
Paint the chest of drawers with a roller and acrylic paint
Step 4 . The dresser handles need to be painted. For such purposes, you can take a thin brush or a special sponge (as in our case). It allows you to quickly paint over any small details from all sides. It is worth noting that all family members can be involved in such work. If we are talking about children, then you will need to use only special non-toxic acrylic paint for children's creativity.
Paint the handles with paint
Step 5: After painting the dresser, you should leave it for about 10-15 minutes until it dries. Even though acrylic paint dries very quickly, you should not rush.
Let the chest of drawers dry
Step 6. While the acrylic paint dries, you need to cut out the images. This should be done as carefully as possible so that fewer fragments of the white sheet remain.
Cut out the image exactly according to its outline
Step 7. The next step will be to decorate the chest of drawers in an antique style. To do this, you will need to take fine-grained sandpaper or any hard iron brush. Before starting work, it is recommended to wear rubber gloves to protect your hands. Next, you should move the sandpaper in the direction of the lines on the surface of the wood.
Sand the surface with sandpaper
In this case, it is necessary to apply quite strong pressure so that the surface is non-uniform, because the more careless it looks, the more spectacular the chest of drawers will be.
Prices for popular models of eccentric sanders
Random orbital sander
The result should be a chest of drawers with many different “antique” abrasions.
Step 8. Next, you need to take our blank pictures and coat their back side with PVA glue (the layer should be dense).
Coat the picture with PVA glue
Step 9. Then you need to attach the image to the place where you plan to fix it and coat it with another layer of PVA glue. You can arrange the pictures in any order. The main thing is that they are combined with each other.
Attach the picture to the surface of the chest of drawers
Step 10. It is necessary to carefully coat all sides of the image so that it fits as tightly as possible to the surface. In addition, there should be no air bubbles underneath. If they are, then they need to be removed, moving with sweeping movements from the center to the edge.
It’s convenient to paint over pictures with a small brush.
Step 11. To ensure that the edges of the picture do not stand out from the general background, they will need to be treated with the same white acrylic paint and a thin brush. This should be done with each picture. This method will also help if in some places the image does not adhere very tightly to the surface.
Finish the edges with white acrylic paint
Step 12. Next, you can take colored acrylic paints and add some details to the image. This step is optional and can only be done if desired.
We complement the images with other decorative elements using colored paints
It is important that these details do not stand out from the general background, but are combined with the composition
Step 13. At this stage, the product is considered ready, but in order to preserve it for many years, it is recommended to cover it with several layers of varnish. This can be a regular matte varnish or a special decorative one with a cracking effect. If you choose the second option, you can give the product in the Provence style an additional twist.
Cover the surface with varnish
Video – Decoupage of kitchen furniture
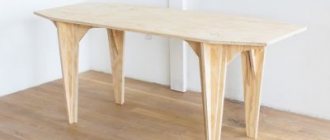
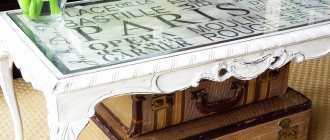
We decorate the table “antique” with French motifs
In this case, an old piece of furniture will also be used - a table that has long lost its aesthetic appearance. We will try to make a unique product out of it.
During the work you will need the following:
- decorative napkins (can be taken with any pattern, in our case they were used with French motifs);
- paint - you need to take acrylic paint of a light shade;
- gold paint for decoration;
- putty;
- sandpaper (fine-grained and coarse-grained);
- brushes
Step-by-step instruction
Step 1. The first step is to remove the old coating from the countertop. In addition, this will remove any contaminants from the surface. This can be done using a grinding machine or a special solvent. Usually everyone chooses the method that will be more convenient for them.
Old varnish needs to be removed
Step 2. Since this is an old table, it may have various chips and damage that will need to be repaired with putty.
In the same way it is necessary to hide the separated seams
Step 3. Now you need to remove the thick layer of varnish from the table legs. Doing this with a grinding machine or solvent is not very convenient due to the design features - there are small carved parts here, so we will use regular coarse sandpaper. It is necessary to remove as much of the wood as possible. After finishing the surface treatment, it must be wiped with a cloth soaked in alcohol. This is done in order to remove all kinds of traces of fat.
Sand the table legs and frame
Step 4. Next, you need to cover the table frame and tabletop with the first layer of white acrylic paint. After 10-15 minutes, you can apply the next layer in order to hide all bald spots.
Prime the base of the table with white acrylic paint
Important point! Since the first coat was used as a primer, it is best to lightly sand it with fine-grit sandpaper before applying the second.
In the same way, you need to paint the tabletop in 2 layers.
Step 5. Next, you need to decorate the table using the darkening method. To do this, some areas should be touched up with black acrylic paint. It is advisable to be careful at this stage to avoid leaving large stains. In this form, the structure must be left for some time to dry.
We create the effect of darkening the surface “antique”
Step 6. Next, you need to take a little wax for creativity or any wax candle and carefully rub all the dark spots. This is done so that the subsequent layer of white paint can be removed without any difficulty with fine-grained sandpaper. After completing the work, a large amount of wax crumb remains on the surface, which must be removed with a brush (it must be hard). It is important to carefully treat every corner. Otherwise, during subsequent painting, unsightly bumps will remain. For these purposes, you can use any brush.
Rub the darkening with wax
Step 7. Apply another layer of white paint over the darkening. Usually one coat of acrylic paint is not enough because shadow marks will show underneath. Therefore, it is necessary to apply another layer.
Cover the surface with another layer of white acrylic paint
Step 8. After applying the second layer, you need to leave the structure for a while to dry.
The edges of the table top are also darkened and painted with acrylic paint
Step 9. Once the second coat of paint has dried, you can begin sanding down the dark spots using fine-grained sandpaper. Thanks to the presence of wax, the paint will come off the surface easily. In this way, it is necessary to carefully process the entire structure of the table and the corners of the table top.
Sanding dark areas
Step 10. Next, using gold paint and a dry brush, we go over the edges of the structure, creating an unusual, decorative look for it. All movements must be very light, otherwise you will only leave stains.
We process the edges with a dry brush and gold paint
There should be a light golden shadow without any oil stains.
Step 11. The next step is to start decorating the tabletop with decoupage. To do this, you need to take decorative napkins and tear them into fragments so that the edges remain uneven.
Tearing napkins
Since the napkins are three-layered, only the translucent top layer with the image will need to be separated from them.
They must be distributed on the tabletop in the order in which they are planned to be glued. This is done in order to have an idea of what the completed drawing should look like.
Step 12. The napkin must be placed on the film and then moistened with water from a spray bottle so that it becomes damp. At this stage, you should manually straighten out any wrinkles that have formed.
Spray with water
Step 13. Next, the picture can be applied to the tabletop along with the film, after which it needs to be straightened with a rag. Next, the picture must be glued to the tabletop using PVA glue. Each side should be processed so that the image fits tightly. When the first layer has dried, you can apply the second. In the same way, you can glue all the pictures on the table, first the largest ones, and then the small ones.
Glue it to the table top
Step 14. Once the layers have dried, they will need to be sanded with fine-grit sandpaper. This is the most labor-intensive process and usually takes a long time.
Rub the surface with sandpaper
Step 15: Next you need to apply additional touches of gold paint (if required). You can also leave dark spots on the tabletop itself, the main thing is not to overdo it with the decor. After all, products in the Provence style should look relaxed.
Finishing the design of the tabletop
Step 16. Upon completion of all work, the structure should be coated with transparent varnish in several layers.
We coat the tabletop with varnish
Prices for various types of wood varnishes
Wood varnish
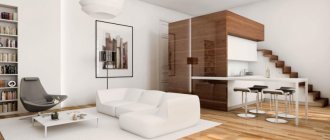
Mandatory requirements for interior design in Provence style
The first and main condition for interior design in the Provence style is naturalness. The flooring should be wooden or stylized as solid wood, natural curtains and tapestries, decorated with embroidery or a careful imitation of it. Furniture that is appropriate is exclusively wooden, a little awkward and rough. The best option: polished even without the use of glossy varnish or painted in a background white color, and then trimmed with naive pictures using the decoupage technique. If you do not take into account the characteristic color scheme, then Provence is not much different from the country style of any other country : bleached linen, embroidery, basic painting of dishes, handmade rugs and numerous thought pillows. The soul of the author can be felt in any of the interior details. There is no place for stamping and flow production in this comfort.
How to do it yourself?
Before you start decoupage, you need to choose the piece of furniture itself (in our case, it’s a chest of drawers). The selected piece of furniture must be suitable for the Provencal interior. It should have elaborate legs and carved elements. For work you will need to prepare the following materials and tools:
- detergent;
- degreasing liquid;
- primer;
- acrylic paints;
- tassels;
- sponges for painting;
- scissors;
- decoupage varnish;
- glue;
- napkins with floral patterns;
- craquelure varnish;
- baguette paste.
ATTENTION: the varnish for furniture decoration is chosen special, intended for decoupage. If this is not available, you can use wood varnish
It must be matte.
Most often, special decoupage napkins are used for gluing drawings, which can be purchased at handicraft stores. They consist of three layers and are sold individually. The range of these products is so wide that the buyer will definitely select the desired ornament for decoupage.
IMPORTANT
Special napkins for decoupage easily blend into work surfaces, and after sanding and applying several layers of varnish, their boundaries are not visible on objects.
Master class on chest of drawers decor
The following preparatory work is carried out:
- All surfaces are cleaned of dust using a damp sponge and detergent.
- After the chest of drawers has dried, the surfaces are sanded with sandpaper until they become perfectly even and smooth, and if necessary, the old layer of paint is removed from them.
- Surfaces are degreased and primed.
- After the primer has dried, the chest of drawers is painted in the main color with acrylic paints (in our case, a beige tone was chosen). To do this, paint is poured into a disposable plate and applied to the chest of drawers with a special velor roller or medium-sized brush. After the paint has dried, you can begin the decoupage technique itself.
- A design is cut out of napkins and laid out in the places where it will be located on the chest of drawers. The base of the chest of drawers is coated with glue in advance.
- The cut and glued napkins are carefully straightened with a brush, and another layer of glue is applied on top of them.
- The edges of the ornament are decorated with paint.
- The piece of furniture is set aside until all layers are completely dry. To speed up the process, you can use a hairdryer.
- Gray paint is used to paint the rims of the drawers and the sides of the chest of drawers.
- Craquelure varnish is applied on top of the beige base in two layers. Before each application, you must wait until the first layer has completely dried.
- The cracks caused by the varnish are filled with gold pigment.
- The entire chest of drawers is treated with aqualac.
- Next, monograms are drawn on the drawers and sides using baguette paste, which are then decorated with gilding.
- All edges of the furniture are treated with a sponge dipped in acrylic paints (gold, green, brown and black alternately).
- The chest of drawers is coated with finishing varnish.
IMPORTANT
The most difficult workflow in the decoupage technique is the careful application of napkins to the surface. They should not form wrinkles or bubbles from air and lumps of glue. When working, it is worth considering that napkins wet from glue are easily torn.
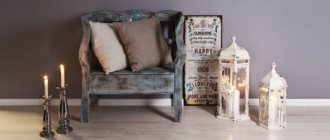
Tired of the sun: characteristic colors of the Provence style
The color scheme of the Provençal interior is defined by designers as pastel with bright accents. Mostly these are shades of blue and lilac, symbolizing sea waves and blooming lavender. Slightly less common are sandy yellow and bleached terracotta. This is a tribute to the sandy beaches and hundred-year-old forests. Greenery is required, but it does not scream, but only modestly reminds of itself with the shades of foliage scorched by the hot sun. All this fits into the white motif that runs through the entire idea. Selecting colors to reupholster or paint pieces of furniture is not difficult: this is one single color added to white in different concentrations. One could call this color scheme boring if it weren’t for the color “highlights”:
- juicy lilac thoughts carelessly thrown on top of a rough linen bedspread;
- bright peonies in a simple clay vase;
- a spectacular additional curtain, slightly released from under the thick curtain;
- knitted bedside rug.
The patterns of southern France are unobtrusive and unpretentious: stripes, small floral motifs, lace and blurry checks. At the same time, the elements do not overload the overall background, but only slightly emphasize it.
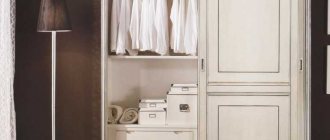
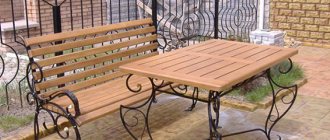
Techniques for effectively transforming furniture with your own hands
Grandma's chest of drawers and floor lamp with a long-burnt lampshade - do they seem like they should go to the landfill? Nothing of the kind, their time has just come. The first will need to change the cracked varnish to a shiny white paint, the second will need to update the gloss and reupholster. Moreover, you don’t even need to buy expensive fabric to update the lampshade: a vintage tablecloth with printed or embroidered flowers along the border, taken from the bottom drawer of the same chest of drawers, will get a second life. The remains of the same tablecloth can be made into chair covers, which will eliminate the need to replace previously purchased modern models with artificially aged samples. The table is covered with a napkin made of coarse linen, and a plain blanket with a lace insert is thrown over the sofa.
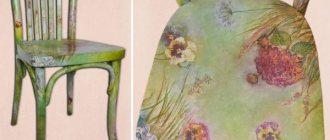
Aging to renew: restoration of Provence furniture
Buying artificially aged furniture is not difficult: the supply generated by demand has suggested a profitable niche to manufacturers. There is another option, thanks to the advice of experts from the WESTWING shopping club, existing furniture is transformed: Provence is accessible even to a novice designer.
Wooden furniture primarily requires improvement.
. Old varnish or paint is removed from it with sandpaper, after which the surface is thoroughly degreased. The abundance of tinting varnishes on sale solves the problem of color selection. The provincial atmosphere is characterized by slightly reddish tones of wood: rowan, oak, apple tree. They will go well with red petals, which are popular in floral motifs. This kind of aging of Provence furniture will only take a couple of days, since with good ventilation the varnish dries in a matter of hours.
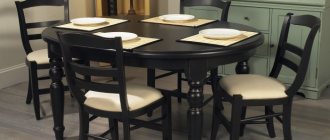
Painting furniture is no more labor-intensive process, but the color needs to be mixed for all prepared surfaces in advance, because even experienced craftsmen rarely manage to get a perfectly identical tone a second time. In extreme cases, the mixed paint should be enough to cover all external surfaces; for internal surfaces, slight discrepancy is not critical. Decoupage of furniture or simple stencil painting will be the most appropriate decoration.
Psychologists say that Provence in the interior is not only fashionable, but also useful. Soothing, gentle tones have a positive effect on sleep quality and reduce anxiety. A romantic setting promotes the expression of the most tender feelings. Provencal style - a corner of France in your own apartment.
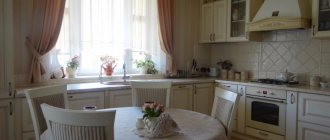
Cozy elegance of decor: French country in the kitchen interior
The Provence style, which is also called the French village style, or French country style, conveys the cozy atmosphere of the sunny southern province. The main features of the Provencal interior are color, light and natural materials. Characteristic features in the kitchen include:
- Light, unevenly plastered walls, covered with wood or covered with wallpaper with floral motifs.
- The ceiling, usually white, is also unevenly plastered with irregularities and roughness. Wooden ceiling beams are visible.
- The floor is made of wooden boards of light wood species.
- Aged furniture and interior items with patina and wear.
- Many small decorative elements: clay and porcelain figurines, vases, flower pots, spice jars.
- Tablecloths, napkins, curtains, curtains made from natural fabrics.
Attention! Toasters, microwaves, juicers and other modern helpers look ridiculous in such a kitchen, so they are hidden behind closing panels. And on the open shelves there are beautiful porcelain dishes and various kitchen utensils.