Types of design and construction
The appearance of the structure itself is very important in the interior of a room. It should not only fit into the overall concept, but also be pleasing to the eye. A special atmosphere in the hallway will be created by wooden wall hangers made from improvised materials with your own hands. To make them, you don’t have to be a master - just show a little creativity, imagination and desire to create.
A wooden hanger made by yourself will look attractive and original, which guests will certainly notice.
You can make the device from any available materials: wire, perfume caps, bottle caps. Also from natural materials, be it an original tree branch or antlers of a deer or elk.
The creator does not need any special skills - anyone can do it.
Before making a hanger, you need to pay attention to the features of the hallway and its shape. For simple rooms, any model is suitable. If the corridor is long enough, it is better to give preference to a long hanger.
The simplest and most common type of construction is considered to be a wooden board with hooks located on it, attached to the wall of the room. There may be shelves designed for hats.
The base of the structure can be made of two or three smaller boards fastened together.
Wooden wall hangers are used not only in the hallway, but also in the bathroom, children's room or kitchen. To add creativity to the interior, you can do it yourself.
The main requirements are strength, lightness, simplicity, compactness, and availability of materials.
Depending on the type of installation, the structure can be ceiling, wall or mobile.
In the wall-mounted version of a do-it-yourself wooden clothes hanger, it is possible to use a corner design. A floor-mounted device can hold more weight than a wall-mounted one. But it should be borne in mind that the floor structure takes up a lot of usable space, so they are not used in the bathroom or kitchen.
An integral part of any corridor, as well as an item that is simply necessary in every apartment.
How to make your own hook
Despite the low cost of a crochet hook for reinforcement, some experienced craftsmen who have worked with reinforcement for many years prefer to use homemade ones rather than purchased ones. This has its advantages.
- When making it yourself, you can give the handle the optimal shape so that it fits comfortably in your hand. Your hand will get less tired and your productivity will increase.
- The choice of steel for production; you often come across factory hooks made of soft metal. As a result, it cannot withstand the load and bends.
- Make a hook for crocheting reinforcement of the required size. There are times when it is impossible to get to the place of tying with a factory hook because of its length.
- Small, but still savings (if materials and tools are available).
We suggest you familiarize yourself with How to properly make a bathhouse from aerated concrete
Wooden hanger and example of a drawing of the device
If you want to show your creativity, you can combine different options. For example, you can design a wall hanger with reinforced, supplemented floor support. You can also create an excellent design for the nursery by making the main part in the form of a cloud or a tree.
An original do-it-yourself fence or antlers hanger will fit into the hallway.
These devices are divided according to the type of hanging clothes:
- with hooks;
- with a barbell under the shoulders.
In the first case, a hanger with hooks takes up less space, but clothes on it may wrinkle. In the second, you can hang any outfit on hangers, and at the same time it will remain neat and not wrinkled.
You can build a wall hanger yourself using all the necessary tools.
The product can be given an original appearance and completeness using various decoration methods:
- decorate with decoupage;
- cover with craquelure or glissal;
- paint.
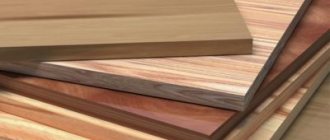
The material option may be different, the best of course is wood.
First, using a wire brush, you need to clean the wooden surface of the hanger from dirt, dust and grease. After cleaning, using a spray bottle or roller, you need to apply a layer of primer, very carefully filling all the cracks.
Using the decoupage method, it is possible to create products that will fit original into any interior.
You can recreate pattern elements on furniture with an antique effect.
For work, use blanks with drawings and scissors. The wrong side of the picture is smeared with glue and placed on a wooden surface and leveled to avoid the formation of air bubbles. After the glue has dried, the surface of the product is coated with furniture varnish. It is better to complete the work using craquelure.
There are more interesting options for this craft.
Glizal is a transparent paint that forms a textured surface. It is diluted with water and applied to the surface using a textured sponge, creating the desired pattern. This must be done quickly, as everything will harden within half an hour.
Craquelure is a type of varnish that is used to achieve the effect of artificially aging wood.
Floor and wall hangers are considered a kind of classic.
Materials and tools for work
The necessary equipment for a homemade wooden hanger can be purchased at any hardware store.
We are preparing a board that will serve as a wall hanger.
Arsenal of tools:
- grinder saw;
- screwdriver or drill;
- dowels;
- self-tapping screws;
- screwdriver;
- level, pencil, tape measure;
- sandpaper;
- hooks, magnets, suction cups, glue;
- jigsaw;
- material for making hangers.
Depending on its condition, we bring it into ideal shape. If necessary, we sand and varnish.
For decoration you will need:
- craquelure or glisal varnish;
- blank drawings for decoupage;
- glue and textured sponge;
- paint brush or roller;
- primer.
Wooden wall hanger: manufacturing
A wall hanger is a fairly simple design. However, you need to take its creation very seriously, and then it will last a long time.
Additionally, there is an option to make a shelf so that you can place a scarf, hat, and other small things there.
The base for the hanger should be chosen from dry, strong wood without cracks. An excellent option is a board or edged timber.
The length of the workpiece must correspond to the length of the structure. To begin with, the wood is treated with an antiseptic. Then it should be treated, for example, with sandpaper to avoid splinters during operation. Afterwards, hooks are attached to the panel in two or rows.
Using different types of hooks you can emphasize a particular interior style.
In the photo you can see drawings for a hanger in the hallway.
Drawing of a wall hanger.
This design is suitable for a hallway, bedroom, pantry or bathhouse. And if you decorate the hanger with images of your favorite fairy-tale or cartoon characters, it will become an excellent addition to the children's room, and children will be happy to look after their clothes.
The word “wood” often means not just wooden material, but pieces of real natural wood.
You should not attach the hanger to a wall covered with plaster, so as not to stain your clothes. It is better to place a sheet of plywood, polyethylene or thick paper under it.
If you approach the creation process creatively, the panel can be made in the form of a sun, heart, oval or wave. Use spools of thread, dry branches or roots as homemade hanger hooks. The finished product is varnished.
Benefits of using hooks
Using coat hooks in the hallway is not only a functional necessity, but also an opportunity to decorate your interior with unusual details, which designers actively use. In addition, some craftsmen make such structures with their own hands, creating a truly unique product.
The hanger is used even for heavy items
Coat hooks are mounted on a wall or hanger, but the main convenience of such accessories is as follows:
- Hooks do not require much space. If it is not possible to allocate space for installing a cabinet or a large wall shelf, then you can always find a free section of the wall for a hanger with hooks. This is necessary in order to always have access to essential items, including: a bag, a key holder, an umbrella, a raincoat, and outerwear.
- It’s not entirely convenient to hold your things in your hands after coming home; it’s much easier to hang them on hooks and only then put them in their places.
- They have a low cost (if we are talking about simple products), so you don’t have to invest a large amount of money in such a purchase.
- Typically, such products are easy to attach, so anyone can handle such actions.
It is also worth highlighting that the hanger with hooks does not require any special care. If necessary, such a structure can be quickly dismantled.
The simplest hanger design
Prices for ready-made options for hangers in the hallway
DIY wardrobe hanger hanger
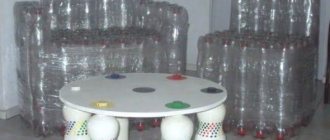
When making a coat hanger for your closet with your own hands, you will need large-section wire, a small plastic bottle placed on a wire base, a metal plate bent at the corners, and a cut-off branch of a suitable shape.
The hanger will undoubtedly attract attention and also brighten up the boring atmosphere of the room.
First you need to wrap the base of the hanger using thin foam rubber. Then cover this base with fabric of a matching color. Then they pick up a hook and hang it in the closet. You can decorate a children's hanger with your own hands using a funny face or decorate it with ribbons and lace.
Plywood coat hanger
There are many different ways to make DIY clothes hangers. This design can be made in half an hour.
For a hanger made of plywood, you will need: whatman paper, sandpaper, a pencil and a jigsaw, and the material itself.
A drawing is made on a sheet of A2 size. The width of the hangers is 40 cm, it is better to use plywood with a thickness of 15 mm.
It is necessary to cut out a template, which is then transferred to a plywood sheet. After this, the pattern applied to the plywood is cut out with a jigsaw. The resulting workpiece is treated with sandpaper - first coarse, then fine.
The finished chipboard hanger can be varnished.
The nuances of installing a hanger
Improper installation of a hanger can lead to the following negative consequences:
- Formation of extra holes in the wall.
- Violation of the integrity of the hanger, the appearance of various cracks, chips and other damage.
- Poor stability of the hook, which is why it quickly falls off.
- Damage to the electrical wiring located in the wall.
- Wrong choice of hook type, due to which the fittings quickly wear out. This usually happens when there is excessive load on the structure.
If you are not confident in your abilities, it is better to contact professional craftsmen who will help you choose the right material and fittings for making the structure.
The heavier the items that will be placed on the hanger, the more reliable the installation should be
From perforated sheet by yourself
A hanger made of perforated sheet will, in every sense, reflect the phrase “I can also cross-stitch.” It will reveal talent and creativity and will become an original decoration for your home.
Materials for production:
- metal or plastic panel with perforation;
- hooks (4 pieces);
- multi-colored floss threads (you can use yarn for knitting);
- scissors.
Perforated sheets can be purchased at any construction or furniture store.
Material of the required size is purchased and cross stitch is performed using embroidery threads. A simple drawing or a word you like will do. The main thing is to calculate everything correctly so that the spaces between the letters are the same, and also not to go beyond the contours of the sheet. After completing the embroidery, you need to secure the hooks in the finished holes of the panel. All that remains is to hang the hanger, again using the already prepared holes in the panel.
Extraordinary ideas for a wooden hanger
Based on the technology of making a hanger from scrap materials, we can derive a single formula for the creativity of creation. The base can consist of any elements - from a finished board to the use of old items.
It is not necessary to buy standard factory hooks for hangers - you can make them yourself from improvised materials or remove them from clothes hangers.
Attached individual hooks on the wall should look like decorative elements.
Hangers for children's clothes in the shape of animal figures can be cut out of plywood (chipboard) with a jigsaw with your own hands and painted with bright colors and decorated with applique.
Old or broken toys can be repurposed to make hooks. This hanger can be made using a couple of screws and a glue gun. It will decorate the hallway or children's room.
Perfume lovers can use caps from any perfume as hooks on a hanger.
This hanger is a very creative solution.
Sea pebbles, which are usually brought from the sea and then don’t know where to put them, will look very stylish on the wall. To assemble such a hanger as easily as possible you will need: a board, screws and metal cylinders (should be a little wider and a little shorter than the screws). They must be inserted into the cylinders and screwed into the base of the board. Then universal glue is applied to the screw heads and the stones are glued.
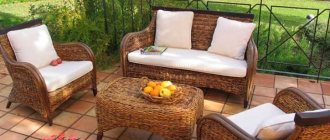
Scandinavian-style wooden hanger hooks can be made from thick forked branches, collected from the park or yard. Such designs are perfect for scarves and hats.
There is nothing easier than picking up a few screws and attaching several wooden spools of old thread to the board.
Give your cutlery a second life and yourself a wonderful, unusual hanger.
An excellent solution for homemade hooks is to use old wrenches. True, in order to bend them, you will first have to heat them red-hot over a fire. A hanger with such hooks will be an excellent decor for a garage or technical station.
Before you start making a new hanger, you should pay attention to the interior style of the hallway or room. Using different types of hooks, you can enhance the emphasis. An extraordinary hanger will undoubtedly attract attention and become a decoration of the room.
What types of hooks are there?
In furniture stores you can find a wide range of different hooks, all of them differ according to the following criteria:
- size;
- number of horns;
- method of fastening to the wall;
- color;
- material;
- registration
Table No. 1. Varieties of hooks by number of horns
| Variety, illustration | Description |
| Typically, such products are intended for hanging large items. They are often used for various bags and heavy outerwear. These hooks should be installed in cases where you don’t have to place a large number of different things on one hanger. At the same time, they are able to withstand heavy loads. | |
| These are the most popular hanger hooks. In addition, they are durable and can accommodate several items at once. They are most often installed in corridors and bathrooms. | |
| Among other similar products, it is considered less popular and durable. Therefore, when installing such products, it is necessary to correctly distribute the load. Otherwise, such a hook will quickly break. |
An equally important criterion is the choice of material from which the hook is made. Therefore, such nuances should be studied before purchasing.
Table No. 2. Materials for making hooks
| Material, illustration | Description |
| This is the cheapest option, which can even be secured with double-sided tape. However, it is not suitable for hanging heavy objects. Typically, such hooks are used for various small items. | |
| Metal products are the most reliable and versatile. They can withstand heavy loads. It is important to choose the most durable options. Thus, aluminum hooks can quickly break off because such material is not durable. Therefore, experts recommend purchasing steel products for hanging heavy bags or jackets. | |
| As in the previous case, this material is durable, which is why it is very popular. In addition, various decorative products are most often made from wood. |
Forged hooks made by hand by craftsmen are of particular value. They are treated on top with special substances to protect the metal from corrosion when exposed to high temperature or humidity. Thanks to such actions, they can last for a considerable number of years without requiring special care efforts.
Forged version of hanger with hooks
Video - The process of making forged hooks
Important point! Most often, hooks are fixed at a distance of 150 to 185 centimeters from the floor level. The exact height will depend on the height of the residents. In addition, you can provide hooks at a distance of 90-100 centimeters from the floor for children's clothing.
If years ago hooks were installed in one or more rows, now designers place them in different orders. They look equally stylish on a wooden or metal hanger.
Different hooks can be used on one hanger
The method of attaching the hook plays an important role. It is this criterion that affects the strength of the structure. Therefore, you should decide in advance what items are supposed to be hung.
You can read about attaching shelves to the wall without visible fasteners in our article.
Table No. 3. Types of hook fastenings
| Variety | Description |
| Self-tapping screws, screws, nails | This is the most reliable method of attaching hooks; it is most often used to fix metal products on a hanger. The only downside is the need to drill holes. |
| Glue | Only suitable for installing hooks made of plastic or wood. However, this method of fastening can hardly be called reliable. |
| Double-sided tape, suction cups | As in the previous case, such a mount is more likely to not withstand heavy loads. The only advantage is that the fittings can be moved to another location at any time. |
| Magnets | Fastening hooks in this way is used extremely rarely. This requires the installation of a metal hanger. |
Designer hanger model