Painted with acrylic paints on wood – more and more novice masters are getting carried away. This type of furniture decoration is used in completely different styles, so it has become very popular among decorators.
Of course, as with any independent decor, painting requires lessons, training and experience. And if you have neither one nor the other, then this material is for you. You will learn the basic styles of furniture painting, basic techniques, and also find interesting ideas for your future works.
What furniture is best to use on?
Of course, there are no restrictions on the choice of subjects. The main factor determining suitability is the material. To implement the plan, old furniture made of wood is better suited. This is precisely where its value lies relative to modern products made from chipboard and fiberboard. “Sawdust furniture” is definitely not suitable.
A wooden surface is easier to work with. Old paint or varnish can be easily removed, various defects (chips, cracks) can be eliminated or left to give an “aging” effect. In addition, most methods of applying patterns are designed specifically for wood. Any pattern or ornament looks good under varnish on wood texture. Furniture covered with natural veneer is suitable. An example of this is an old wardrobe or chest of drawers made of multi-layer veneered plywood. After removing the old varnish or paint, the surface is primed, painted in the required color and a design is applied.
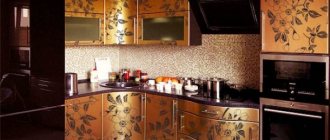
But furniture made from modern materials should not be crossed off the list. MDF facades coated with acrylic can be painted in any style after certain preparation. Acrylic coating is a layer of paint that is polished after drying. This type of coating is often used in the manufacture of kitchen facades.
Modern paints and varnishes allow them to be applied over various coatings. There are also paints designed for painting glass without special preparation.
How to decorate furniture with wallpaper
To work you will need:
- wallpaper:
- sandpaper;
- primer;
- wallpaper glue;
- water based varnish.
If you need to restore or paint wooden furniture, do this before working with wallpaper. Of course, you can immediately glue the wallpaper using wallpaper glue or regular PVA, thereby simplifying the process, but it is possible that all the beauty will soon come off. According to the rules, for a longer service life of such decor, it is necessary to clean the wooden surface, prime it, then stick the wallpaper, preferably with wallpaper glue. If you are covering the front surfaces of furniture that you will often touch (drawers and doors), then it is better to take thick vinyl wallpaper that is easy to clean. Paper wallpaper should be coated with water-based varnish to protect it from damage and dirt. Remember that varnishing will make the color of the wallpaper a couple of shades darker. It is advisable to apply a layer of protective transparent primer or the remaining wallpaper glue under the varnish. As an option, you can use self-adhesive wallpaper or decorate with napkins using the decoupage technique, which is suitable for small areas.
Let's see what options there are for decorating furniture using leftover wallpaper.
Popular painting options
The most common option is simple decorative painting of furniture. Basically this is the application of small elements, ornaments or repeating patterns. For a simple drawing, paint of one color is used, and to simplify the process, templates or stencils are used for painting. This type of decoration is suitable for modern furniture. Gilding is widespread. This type of painting is typical for interiors in classical styles. Curly elements of furniture decoration are decorated with gold.
A more complex option is artistic painting. This is quite a painstaking work; all stages of the bark are performed manually, including the smallest details. Painting on furniture can be in the form of a pattern or a small fragment, or it can also be a complex three-dimensional design. Author's works are especially valued.
A special place is occupied by the production of antique interior items. This also includes the restoration of old furniture. Various painting techniques and styles are used in the work. Surfaces and finishing elements are subjected to “aging” in various ways. Antiques are very popular among wealthy people and collectors. Usually this type of decoration is made to order.
Painting with acrylic paints
Full painting is more suitable for people who can independently create an interesting picture on furniture. But this is not a prerequisite. A simple drawing in the form of a cherry on a children's chair is quite easy for a beginner to do.
Main stages of work:
- It is better to make a preliminary sketch of the painting on paper in order to choose a harmonious color palette that will fit into the overall interior.
- Prepare pencils, paints, brushes, varnish and other available materials.
- The outlines of the drawing are applied to the surface of the furniture with a simple pencil without pressure, so that it does not subsequently show through the acrylic paint.
- First, large elements of the painting are painted, then small details are decorated.
Depending on the desired effect, the base layer of paint is allowed to dry or a different tone is applied on top without waiting for complete drying. Photos will help you appreciate the variety of images that can be used to decorate furniture:
Required tools and materials
Coating paint
The final result directly depends on the choice of paint. The basis for the coating is a primer. It must be designed for woodworking. Acrylic-based primer material does a good job.
Any latex or acrylic paint will be suitable for the top layer. It is better to make the surface matte. Gloss doesn't always look good. A good option would be spray paint. This will allow you to apply it in an even layer.
Artistic paints
Acrylic paints are often used for painting furniture. They are good for drawing various patterns. You can also use oil mixtures. Their traditional purpose is painting.
Varnish
It acts as a protective covering. It is possible to use alkyd or acrylic varnish for furniture. Just like paint, it can be matte or glossy. Applying a layer of varnish over the design is the final stage of the work.
Brushes and roller for painting
A roller may be needed to apply the primer and coat of paint over a large area. A wide brush will help with curly elements.
Paint brushes, pencil, paper and ruler
It is convenient to draw small patterns and lines using thin art brushes. For acrylic paint, it is better to use brushes with synthetic bristles. It won't stick together. Oil paint will require a brush with natural bristles.
A simple pencil, paper and ruler are useful for creating sketches and marking the surface for the drawing. In addition, you may need to make templates or stencils for painting.
Surface preparation tool
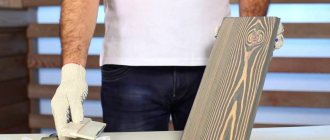
You can remove old varnish or paint from furniture by sanding it with sandpaper. You will need sandpaper of different grain sizes for more thorough surface treatment. In some places, the old coating will have to be removed with a spatula.
You can remove some types of varnish or paint from old furniture using special chemicals. You can find them at any hardware store.
To remove dust, you should stock up on rags. A brush with long, stiff bristles will help sweep dirt out of crevices and other hard-to-reach places.
Mezen wood painting technique
Modern furniture can be decorated using traditional paintings of folk arts and crafts. These paintings - Gorodets, Mezen, Petrikov, Khokhloma, Zhostovo, etc. - are rich in decorative possibilities and can decorate any furniture.
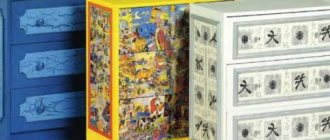
Mezen painting is one of the most beautiful and most ancient examples of artistic crafts. We invite you to master the technique of Mezen wood painting by decorating a chest of drawers.
You'll need:
- dresser;
- acrylic paints:
- synthetic round brush (No. 2 and No. 3) for painting;
- PVA glue;
- alcohol or vodka;
- cotton fabric;
- chalk, ruler, pencil, disposable plate, A4 sheet of paper;
- tracing paper, color carbon copy;
- sample of Mezen painting;
- water container.
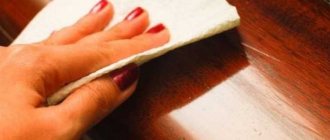
- Before you start painting this wooden chest of drawers, wipe its surface with a cotton cloth soaked in vodka or alcohol.
- Choose a sample of Mezen painting with the ornaments and motifs you like. It can be redrawn on tracing paper, having previously enlarged it.
- Using a ruler and chalk, draw lines on the surface that determine the location of the designs and ornaments.
- In order to draw straight lines on the drawers, and later paint the surface without any problems, remove the handles from the drawers.
- Place copy paper on the surface of the chest of drawers with the ink side down, place the design on top and trace it along the outline.
- The contours of a fragment of the painting are clearly visible on the surface. For better adhesion of the paint to the surface of the chest of drawers, the design can be coated with IVA glue, that is, primed.
- Using paint, using brush No. 2, outline the contours of the design. Add a little water to the paint. Trace the outline of the drawing two or three times.
- Paint the drawing in two or three layers with the resulting color adding a small amount of water. Use brush number 3.
How to create a design and implement an idea correctly
Painting furniture with your own hands is a long and painstaking job. The process may take a long time. Sometimes it takes more than one day or even a week. It is especially difficult if there is no experience in such a matter, it does not matter whether we are painting old furniture or giving a new look to modern objects.
For beginners, a few tips will be useful:
- Any work begins with a sketch or outline. You can develop the design yourself or borrow the idea of painting furniture from a photo on the Internet. In any case, transferring the drawing from paper will be easier than inventing everything on the fly;
- If you have no experience, you should not immediately take on a large amount of work. To begin, paint a small object;
- If it is possible to disassemble the furniture, do it. Individual parts are much easier to work with;
- Free space. There should be enough space to work. Furniture may need to be rotated, tilted or moved;
- Do not neglect the quality of surface preparation. Grinding defects can ruin the appearance of even a very talented painting. Dust and small particles lead to the same result;
- Primer is a must for painting or painting. It is easier to work on a surface covered with soil;
- Each layer of primer, paint or painting requires careful drying. Minimum - a day for each layer.
The process of implementing an idea itself consists of several stages. The first of them is preparation for priming and painting. The classic option with old wooden furniture involves removing the paintwork. To do this, you will need coarse and medium-grain sandpaper or a special chemical agent - a remover and a spatula.
- After cleaning the varnish and paint, the surface must be sanded with fine sandpaper. This will get rid of excessive roughness and minor scratches. If there are large chips and cracks on the furniture, they are puttied and sanded;
- The next stage is applying primer. This is done using a brush or roller. The formation of drops and streaks should be avoided. As a last resort, you can get rid of them using a sponge, or wait until the layer dries and sand it with sandpaper;
- Next comes painting. The paint is applied in two or three thin layers. The result should be a smooth and even surface. After drying, you can begin the most interesting, but no less time-consuming stage - drawing;
- Painted furniture does not necessarily mean an antique wardrobe or chest of drawers, covered with patterns on all sides. More often it is a small design or a repeating pattern. To apply identical patterns, use a stencil or template. These can be simple stencils of butterflies, small patterns, or large templates with complex patterns.
There is more than one way to apply a pattern to furniture. Hand painting is especially appreciated. Painting can be considered the pinnacle of mastery. By combining various painting methods and techniques, it is possible to create truly unique things:
- Those who do not own a brush can use the decoupage technique. This method is usually used on small pieces of furniture, but large surfaces can also be decorated;
- The final stage of work is covering the painting with transparent varnish. It is advisable to apply several layers. This will protect the design from accidental damage and make it possible to wipe or wash the furniture.
The art of painting makes any item unique. You can paint furniture using any traditional or modern direction. Furniture painting in the Russian style is very popular: Khokhloma, Zhostovo, Mezen. Each of them is unique in its own way. And of course, nothing prevents you from creating your own, no less unique style.
Removing old paint
Padding
Painting
painting
Varnish coating
Painted furniture in a modern interior
Hand-painted wooden furniture harmonizes perfectly with the modern decoration of the home. It gives richness, charm and extraordinary creativity to the home environment. Let's look at this with a specific example.
Often, young mothers want to please their child with something special. This also applies to the design of a children's room. If you are interested in painting furniture and interior items as an additional income, you can start painting children's chairs or toy cabinets. Choose stories from your children’s favorite fairy tales or cartoons as a sample. Kids and their mothers will be delighted!
Photo
Making country furniture from wood
The most popular material used to make do-it-yourself garden furniture is traditionally wood. It makes durable benches, tables, benches and chairs. At the same time, it is easy to process.
Basic technical properties of various wood species
For work, you need to use hard, dry wood: boards or logs, but stumps, logs and branches are also suitable. The furniture, made of rough wood with minimal processing, looks stylish and conveys a special rustic charm. In addition to regular wood, you can use chipboard, plywood or fiberboard. To further strengthen the frame, metal rods are often used.
Types of wood for making country furniture
The best wood for country furniture is birch, maple, ash, pine or walnut. Teak wood is also a good choice - it is highly resistant to low temperatures. For assembly, you can use bolts, screws or nails, but they can easily be replaced with glue (special furniture glue or PVC). This decision will be even more correct, since over time the chairs and armchairs will not begin to creak.
After assembly, the finished products need to be processed: first of all, sanded well and coated with a layer of varnish on top. It would be useful to use a special composition that will prevent deformation and rotting of the wood. This measure will extend the service life, so repairs and restoration will be required relatively rarely.
Drill for making wooden furniture
To make furniture from wood, you need to have minimal skills in working with tools. You will need the bare minimum:
- drawing tools (ruler, pencil);
- fasteners (washers, nails, screws);
Planer for making wooden furniture
- power tools (jigsaw, drill);
- hand tools (saw, plane, etc.);
- consumables (glue, drying oil, antiseptic, paint).
It’s good if you have knowledge about the properties of different types of wood and the features of working with them.
Jigsaw for making wooden furniture
Decoupage technique
The technique itself was invented in Ancient China, where decorating furniture or interiors with paper is a tradition. The basic principle of decoupage is the application of paper elements with drawings to the surface and their further securing. The method is very easy and original. For work we will need:
- special paper for decoupage or ordinary paper napkins with a pattern;
- glue (colorless stationery glue is best;
- scissors and a brush of medium hardness;
- acrylic paints and art brushes (if you want to apply additional drawings or emphasize the contours of the composition);
- transparent furniture varnish and sandpaper.
After this, you need to prepare the surface. Using sandpaper, all roughness and unevenness should be removed. Additionally, you can use acrylic paints as a primer or to create the desired background.
Then we cut out the necessary drawings from paper. It is worth noting that photographs can also be used for the decoupage technique, however, they must be well soaked in water to separate the paper base.
We apply the desired design to the prepared surface and begin to carefully apply glue on top of it. As a result, it is necessary to ensure that the paper is completely saturated with office glue and securely fixed to the surface.
When applying glue, you should carefully monitor the paper so that no bubbles or irregularities form on it. If wrinkles appear, they can be smoothed out with a brush, but not with your hands to avoid damage or damage to the design.
After the glue has hardened, you can apply additional decorative elements using acrylic paints. The finally dried surface is treated with a protective varnish.
Reverse decoupage on glass
To decorate kitchen cabinet displays in Provence and country styles, you can use the reverse decoupage technique on glass. It is similar to the direct method, but is done on the back side of the glass, leaving it smooth. Sometimes craftswomen create some kind of 3D effect using manual drawing on the outer surface of the glass, duplicating some elements of the internal picture.
Cabinet decoupage is an excellent opportunity to make your furniture design exclusive. Don’t forget that the furniture should fit into the interior of the room and not look alien.
DIY furniture decoration
If your furniture is worn out, out of fashion, or you’re simply tired of it, don’t rush to throw it away. New furniture will cost a lot of money, but you can always remake the old one with your own hands, turning it into a completely different, stylish thing.
Not everyone you know can boast of exclusive handmade furniture. By following our tips, you can give your old products a second life.
So, what techniques for decorating old furniture with your own hands we will look at in this article.
- Decoupage technique.
- Covered with new fabric.
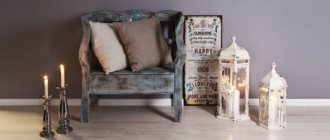
- Aging.
Perky stripes and zigzags
Another way to add color to furniture is to paint stripes on it. These may be fashionable zigzags, but the execution will be a little more difficult. You can't do without masking tape here: paint the item a base color, then stick the tape with the desired pattern and put another color on top. When you peel off the tape, your furniture will be striped. Remember to let the paint dry completely before each step.
Paint with non-standard properties
What may be non-standard is not the ornament or the method of painting, but the material itself. Chalkboard paint, marker board paint, if they also have magnetic particles, will make the furniture original and functional. For example, a cabinet door can be used as a presentation board, and a tabletop for quick notes and a game of tic-tac-toe.