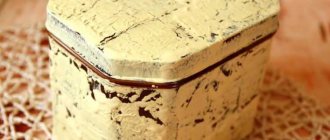
Elegance of form, unusual style, modern design - all these qualities are inherent in the work of master Michael Cullen, who creates original wooden boxes. In this master class we will tell you how to make such wooden boxes with your own hands.
Creative projects do not require a lot of time, complex measurements and planning. The boxes do not have carpentry joints, and the starting material for their manufacture can be unnecessary scraps lying around in the workshop.
The creation of lightweight, durable and elegant boxes is based on extremely simple technology. The products are cut out on a band saw or jigsaw from a single piece of wood, sawn into two parts and glued back together. Plywood allows you to relieve internal stress, eliminating deformation and cracking of the box as the wood dries out. After this, a lid is made and the bottom is glued in.
All boxes are made using the same technology, however, each of them has its own unique style. These projects welcome creativity. Experiment with limitless variations of shape and decoration, creating unusual and stylish boxes for jewelry, rings, watches and other small, and if desired, large items.
Double-walled cherry box
Drawing of a cherry box
Quick sketch . On the processed workpiece, cut lines are drawn with a pencil. A simpler option is to paste a pre-printed drawing with dimensions onto the upper plane of the workpiece. When transferring the sketch, it is important to maintain the longitudinal orientation of the fibers.
Blank for the lid . A flat longitudinal part 15-20 mm thick is sawed off from the main workpiece, which will later become the lid of the box.
Changing the inclination of the saw table . The angle of the table is changed by several degrees.
Cutting out internal waste . Having changed the tilt of the table by 2-3°, the part is cut in two and the internal waste part is cut out, forming a conical cavity of the box.
Plywood . The two halves are glued back together. Plywood allows you to relieve internal stress, preventing deformation and cracking of the wooden box. The glue is applied in a thin and even layer. Excess that bleeds through is very difficult to clean inside the box.
Drying . The glued workpiece is carefully placed under the clamps, carefully checking the absence of displacements and distortions.
Blanks for the lid and bottom . Having returned the table to a horizontal position, two sections are sawed off from the waste part. This will be the lid element and the bottom of the box.
Drawing of the blank for the lid and bottom
Cavity coloring . If you want to decorate a wooden box not only on the outside, but also on the inside, paint its cavity while there is easy access on both sides.
Sawing out the outer walls . Returning the saw table to an inclined position, make cuts along the outer contour.
Bottom gluing . A thin layer of glue is applied to the ends of the bottom and inserted into the lower part of the box, pressing with your fingers until it stops.
Cover stopper . The element intended for the lid of the box is glued onto the blank made at the very beginning.
Sawing out the cover . After the glue has dried, trace the main outline of the lid and cut out this final part.
The presented technology is universal. It allows you to experiment with design and unusual shapes, creating at home beautiful and original boxes that are not similar to each other.
Step-by-step master class on creating a house box for a needlewoman
In this master class we will make a very original box in the shape of a house . It will be made using the cardboard technique with elements of decoupage and you can store various things for needlework in it. The technique does not require special skills, but it is worth showing patience and accuracy.
Fabric dyeing
We will cover the assembled cardboard box for the box with fabric, which we will pre-paint. It is better to take white or 100% cotton with an existing print. In the second case, there is no need to dye the fabric.
In case of painting we will need:
- 100% cotton fabric, size 100x50 cm;
- acrylic paints of the desired shade;
- Bowl;
- gloves;
- plastic cup;
- brush;
- water;
- gloves
- plastic bag or cling film.
First you need to put on gloves, wet the cloth well and squeeze it out as hard as possible. Place in a bowl, crushed. It’s better to choose a bowl that you won’t mind getting dirty.
Pour acrylic paint into a glass, a few level teaspoons at a time. In the master class, white and blue are mixed to achieve a blue tint. It is also better to add a teaspoon of water so that the paint is not completely thick.
We stir the paint and apply it to the fabric with a brush, trying to leave imprints, that is, you need to press down the brush. We perform this movement chaotically over the entire surface, leaving white gaps.
When the paint runs out, crumple the fabric in your hands, saturating it with even more paint. Leave it in this position for several minutes.
Now you need to dry the fabric. On a clothesline we hang the bag or film along the width of the fabric. We straighten the fabric a little and hang it on the bag in a compressed form. It is better to wash all tools immediately, before the paint hardens.
While the fabric is drying, you can assemble a cardboard blank for the box.
After the fabric has completely dried, it needs to be ironed thoroughly. The paint will not remain on your hands and the surface of the iron. The folds need to be ironed so that they become barely noticeable. The fabric is ready for further use.
Assembling a cardboard blank for the box
To create a house box we will need:
- binding cardboard 3 mm thick;
- glue “Moment Crystal”;
- stationery knife;
- cutting mat;
- masking tape;
- ruler;
- pencil;
- whatman;
- glue brush;
- scissors;
- stack;
- PVA glue.
The house will consist of 7 parts. First, cut out the bottom, front and back walls of the given sizes (the same) with a stationery knife.
Next, we cut out two side walls with the indicated dimensions. Only after this do we draw a triangle at the top of the rectangle with a height of 5 cm and cut off the extra corners.
Cut out 2 rectangles of the same size - these are two parts of the roof. We will glue them after we have completely prepared the base of the house.
We begin assembling the box. Apply glue to the edge of the base 20 cm long and attach the edge of the first wall with the same size to it. You need to fix the wall in a perpendicular position for a few seconds until the glue holds the two parts together. We do the same for the opposite side.
Next, we apply glue completely to one edge of the two walls and the bottom, and then glue the side wall. If the sides were slightly oblique, then align them in one straight line.
In order for the structure to last a long time and hold tightly, all joints inside and outside must be sealed with masking tape. For the inside: having cut a piece of the required length, fold it in half and glue it into the corner formed by the walls along the entire length. We form the corners using a stack.
If the cardboard is dark in color and the fabric is light, then it is worth covering the entire outer part of the structure with white Whatman paper. If the fabric is dark or the cardboard is light, then there is no such need.
We cut blanks from whatman paper to the size of all the walls and roof, except the bottom. Apply a very thin layer of PVA glue to the surface and glue the paper. If you overdo it with glue, the main cardboard may bend and then the walls will become deformed.
The surface must be smoothed with a stack to avoid bubbles and swelling.
Pasting a cardboard blank with fabric
We have prepared a cardboard blank for the box. Now we will cover it with fabric. We cut out a strip measuring 73x23 cm from the dyed fabric. We apply glue to one of the walls, but first we need to decide where the back of the house will be in order to hide the joint there. We retreat 1.5 cm from the edge of the fabric on all sides and glue the first side. Next, apply glue to the next wall and glue it to the fabric again. After gluing, the surface of each wall must be leveled with a stack.
At the end, we glue the indentation left at the beginning to the adjacent wall, bend the allowance of the second end inward so that it coincides with the corner line and glue it to the wall.
We cut the corners of the allowances at the bottom at an oblique angle and glue the allowances to the cardboard.
In the same way, we cut off the corners wherever they interfere and glue the allowances. Only inside the structure this must be done extremely carefully so as not to cut off excess. It is better to first take measurements of what it will look like. Glue the seam allowances inside.
On the fabric we draw a rectangle with the dimensions of the bottom, cut it out and cut the corners at an acute angle. Apply glue to the bottom inside the box and glue the fabric, leveling the surface with a stack and forming corners.
We glue two roof blanks onto the fabric with the white side, leaving a distance of several millimeters between the rectangles. This distance will allow the lid of the box to open. We cut the corners at an acute angle, and smooth the fabric surface.
We cut out a strip of fabric measuring 21x5 cm. We bend the short edges by 0.5 cm and glue them.
We glue the allowances along the edges to the inside, and glue the spine in the middle, pressing the hole with the stack.
Pasting a cardboard blank with paper
We will cover the bottom and inside of the box with decorative paper. We will need:
- scrap paper of two colors;
- colored cardboard 20x15 cm;
- glue gun with cartridges;
- curly scissors;
- stack;
- satin ribbon;
- metal pendant in the form of a cage with a loop.
We cut out a rectangle measuring 15x20 cm from colored double-sided cardboard with curly scissors. Apply glue along the edges to the bottom of the box from the outside and very quickly glue the cardboard, pressing down in the places where the glue was applied. It should spread between the layers while it is hot and thus not deform the surface.
We cover the inside with scrap paper in the same way. The blanks must be cut to the size of the inner walls, but only the upper edge must be trimmed with curly scissors. To ensure a smooth surface, glue the paper partially onto hot glue: apply it to one edge, and then glue the paper, pressing down the glue, etc.
From the cardboard from which the structure was made, you can make partitions for the inside of the box. Simply cut out the cardboard to the desired width and height. We cut the fabric the size of two lengths of the partition. We glue the cardboard along one edge, and then cover it with the other half of the fabric. It turns out that the top edge is sealed with fabric, and the remaining edges are attached to the walls and bottom of the box with Moment glue. The fabric along these edges needs to be cut flush.
The main part of the house is ready.
We pass a satin ribbon through the loop, fold it in half and glue it to the edge of the inner side of the roof in the center.
We cover the inside of the roof with scrap paper, hiding the allowances.
Using Moment glue we attach one part of the roof (the back) to the base of the box. Both sides must be placed so that the gap between the two parts is in the center of the side walls. You need to check in advance that the lid opens and closes freely.
Decorating a box-house
We will decorate the box using the decoupage technique. Let's do one of the simplest options, which does not require any special costs or knowledge.
Take a napkin with the desired pattern. Cut out the necessary elements with scissors. We tear off some elements with our hands, since with a smooth edge on our surface they will not look very neat. Remove two extra layers of napkin.
Apply PVA glue to the surface of the box to the size of the picture and level the layer with a brush.
Glue a fragment of a napkin. We very carefully apply glue on top of the napkin and level the surface with our fingers.
We decorate the corners of the roof with a regular openwork napkin. We cut it into 4 parts.
We glue them in the same way using PVA glue, applying it to the surface of the box and on top of the napkin. We glue a fragment of a printed napkin on top or leave it as is.
We glue lace along the edge of the box so that it peeks out a little from under the roof. Additionally, we decorate the box with half beads.
The glued napkins should dry; you can speed up the process by drying them with a hairdryer.
It turns out to be such a cute house in the form of a box, which will be suitable for a needlewoman to store various little things.
See also how to make boxes with your own hands .
In order not to forget the page address and share with friends, add it to your social network:
More interesting:
Simple walnut box
A similar sequence of actions underlies the next project - a four-wall wooden box. Thanks to its unusual curved shape, its design looks stylish and modern.
Drawing of a walnut box
Start with long pieces
To check the machine settings, cut six pieces of the same length from the scraps. To keep your fingers away from the saw blade, use a regular pencil as pressure.
1. Plan blanks with dimensions of 10x64x410 mm for the walls of box A and 6x25x460 mm for the sides of lid B. Using a saw machine with a standard blade, make 3 mm wide tongues on the workpieces on the inside (picture). Then install a 12 mm wide groove disc into the saw machine, attach a wooden pad to the longitudinal fence and move the fence close to the disc. Saw a fold along the outer top edge of the box blank.
2. Install a crosscut blade and cut six 64 mm long pieces from side blank A six 70 mm long pieces from side blank B. Mark the sawn pieces with numbers to join them in the same order as they were placed in the blanks. To adjust the bevel angle, cut six more pieces 70 mm long from the scraps. (Cuttings can be of any thickness.)
3. Insert the anti-splinter insert into the machine table and tilt the disc at an angle of 30°. Attach a wooden pad to the corner (cross) fence. File a bevel at one end of all test scraps, cutting them to a short length. Then attach a stop block to the miter gauge trim and file a bevel on the other end of each piece (Photo A). Dry connect test parts, check the tightness of the joints and, if necessary, change the inclination of the saw blade. Having achieved a tight fit of the test parts to each other, remove the locking block and file a bevel at one end of all walls A and sides B. Re-attach the stop block to the angle stop and saw off the bevels on the walls of the box, giving them a length of 60 mm (picture). Then rearrange the stopper and saw the sides to a length of 64 mm.
Casket with concave lid
Drawing of a box with a concave lid
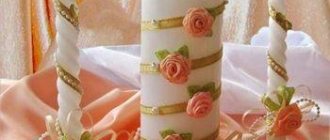
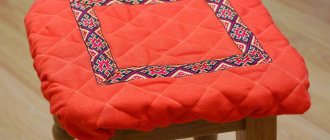
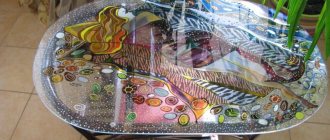
Luxurious box
This decoration option will add a touch of chic, luxury and burlesque to your dressing table.
You will need materials that are in the arsenal of any needlewoman. Our base will be made from plastic bottles, namely from the bottom. You will also need lace braid, black and red fabric, cardboard, beads, satin ribbons and glue.
You can get started, cut out a 2.5 liter bottle with a height of 9-10 cm. And use a gypsy needle to make holes around the entire circumference.
Related article: DIY wire bracelet: master class with photos and videos
Cut out two circles of different diameters from thicker paper or cardboard. The large one will serve as the lid (11.5 cm), the smaller one will serve as the bottom (8.5 cm).
We wrap a large circle with the main fabric. Its diameter should be approximately 5 cm from the diameter of the circle.
Now we make our box more stable. Using hot glue, glue the previously cut cardboard circle to the bottom of the bottle.
From the same main fabric, cut out a circle with a diameter of about 26 cm. Sew light stitches around the circumference, place the box inside and tighten the notes. See detailed photos below.
We fix the clothes of the box with a needle and thread, sewing the fabric to the bottle into pre-made holes at the base. See below for how to do it.
We bend the protruding upper part of the fabric inward and stitch it again.
Now you can leave the box alone and start filling it. Take a piece of red fabric and the same circle. Sew them together and put them inside the box.
Cover the edges with lace braid and that’s it, your box is ready.
Decorate it with a flower on top.
How to decorate a wooden box with your own hands
Despite the external attractiveness of the form, the truly original style of the box acquires after decoration. The technique of relief carving gives unlimited freedom for creativity in this matter.
Using basic carving techniques, unique textures are created on the surface of the boxes. These can be either simple textures or complex ornamental or geometric compositions.
- Using a semicircular chisel to texture the box with small dimples.
- Making the lid of the box with grooves made with an angle chisel.
These photos show more complex decoration options using geometric patterns and complex textures.
How to make your own box
There are several options for making such structures; the choice often depends on the availability of tools in the house and skills in working with wood. We will talk about how to make the simplest wooden box with your own hands.
A few words about the material
First of all, we need to decide what type of wood we will use to make our work of art. Beginning craftsmen, in the first couple of years, should abandon high-strength, expensive varieties such as oak or beech.
Here it is better to take soft wood. The most affordable option in all respects is coniferous species, as well as alder or linden.
Unfinished box.
When choosing a material, you should consider what items or products the product is intended for storing. The fact is that decorative containers for tea or other bulk food products are usually made from hardwood.
Important: pine boards have a specific odor that is easily absorbed. For example, if you put green tea with jasmine in a pine box, then after a week your drink will smell like pine, not jasmine.
For those who are going to treat their box with a specialized stain, imitating expensive types of wood, it is better to give preference to linden. This breed has a light natural color and is well decorated.
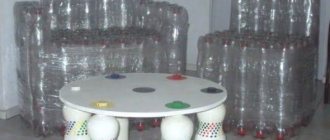
Wine packaging.
Manufacturing highlights
- Wooden gift boxes are often small in size, so we will make just such designs. The instructions here are not complicated. Initially, we will need 4 planks to arrange the walls. Naturally, the thicker the board, the easier it is to work with. But small drawers with thick sides do not always look good; a thickness of 10 mm is considered the best option.
- The material for the bottom and lid is selected depending on the size of the structure. So, under a small box for wine or for a watch, it is easy to choose a monolithic natural board with a thickness of 10 - 15 mm. For covers on larger structures, as a rule, wooden plywood with a thickness of 8 mm or more is used.
Attaching the hinges.
- Any product begins with a sketch; the more carefully you draw it up, the easier it will be for you to work. According to the dimensions specified in the sketch, 4 planks for the walls are cut out. There are 3 ways to connect the sides; which one to choose depends on your professional skills in working with carpentry tools and the availability of this very tool.
- Planks with a thickness of 10 mm or more can be joined end-to-end by inserting 2 side panels between the front and back panels. In this case, the sides are glued together and additionally secured with thin nails or self-tapping screws. The method is quite simple, but it is customary to use it only if the product will be decorated with a continuous, non-transparent layer, for example, decoupage.
- The sides of small gift or jewelry boxes can be glued together by cutting the edges at a 45º angle. Ideally, a miter saw is used for this, but in the absence of one, you can carefully trim with a sharp knife, and then finish it with emery or a file.
Scheme of inclined connection.
- The most difficult thing for beginners is the tongue-and-groove connection. Using a cutter, sampling is done quickly and accurately. If it is not there, then the joints are cut out with a hacksaw or jigsaw, leaving a small margin, which is subsequently adjusted with a file.
Note! The same principle is used to assemble a window frame in a wooden house.
- The bottom can be made exactly to the dimensions of the box, then glued and preferably secured with self-tapping screws. But a wooden box will look more impressive if the bottom and lid are made wider than the frame, equal to the thickness of the side.
Product with a wide bottom.
Tip: in order not to spoil the look with self-tapping screws, you can mark the entry points with an awl and hammer in furniture nails, having previously cut off the heads from them. After which these points are puttied to match the color of the wood.
- Small piano or furniture hinges are used to secure the lid. Nowadays they can be found in hardware stores or departments selling furniture fittings, their price is a pittance. You can remove the hinges from an old box; as a rule, there is similar rubbish in every closet. In order to recess the hinges, grooves are cut in the upper part of the rear side.
Tongue-groove type connection.
Now you're screwed
Now let's move on to cutting out the lid for our box. Undoubtedly, such work is much easier to do than cutting out tenons. But let's not relax. Do not forget to maintain the evenness of the cut and maintain a right angle between the planes of our saw and the surface of the plywood sheet. This is done so that subsequently there are no gaps between the sawn parts of the lid and walls.
This completes the most difficult stage of the work. The next task in order is to assemble a wooden box with your own hands into a single whole from individual elements. If the thorns have difficulty entering the nest or do not enter at all, do not be discouraged. It's worse when they fall through there.