The sink is a necessary element of any kitchen. It should not only be practical and comfortable, but also fit into the overall concept of the interior.
In plumbing stores you can often buy 3 types of sinks:
- invoices (installation of this is very easy);
- mortise (installation of this will take more time, since the fastening to the surface of the kitchen table is done inside the cabinet);
- integrated (mounted flush with the top covering of the table).
When choosing a sink, you should pay attention to how it is installed, whether it is possible to attach it to the countertop yourself or whether you cannot handle the installation of this kitchen sink yourself.
Installation of a mortise sink
First, we make a hole in the kitchen table. Almost all undermount sinks are sold with a template, which can be used to conveniently transfer the dimensions to the countertop to mark the hole.
If you don’t have a template at hand, you can place the sink on the countertop and outline it with a pencil. The hole is cut using a jigsaw; it should be 15 mm smaller than the size of the sink itself.
Types of fasteners for installing a sink
There are two ways to attach the sink to the kitchen table: using sealant or special clamps (usually included in the kit) or.
Adhesive sealant
The reliability of installation and the duration of subsequent operation of the sink depends on the selected sealant. You can buy sealants in construction stores:
- polyurethane silicone;
- silicone acrylic;
- elastic silicone.
Attention! It is better to buy not a universal sealant, but a special one for plumbing work; it contains antibacterial additives.
How to install a sink in the kitchen with your own hands - step-by-step diagram
Step 1: Marking
Most mortise sinks are sold with a ready-made template; it acts as a packaging container.
It is enough to cut out such a template from cardboard and attach it to the countertop at the location of the sink - and the contour of the seat is ready. If there is no template, you will have to make it yourself. To do this, it is better to use thick cardboard (for example, from a TV or monitor). After measuring the inside of the sink, transfer this measurement to the cardboard surface and cut off a few centimeters more. It is better to cut a piece of cardboard several times than to look for a new piece.
Step 2: Location
The proverb about the need to measure seven times before the first cut is very relevant for our work.
You can move the finished template around the tabletop easily and freely - until you start sawing right through it. So consider how the tap will open, where the filter will be, how kitchen utensils will be positioned, etc. The cardboard template should be traced as evenly and accurately as possible. To do this, attach it to the tabletop with ordinary tape and draw one thin line with a pencil. After which the “cardboard assistant” peels off and goes into waste paper; we will no longer need it. We cover the perimeter of the future hole from the outside with masking tape for 8-12 cm in order to prevent it from being damaged by mechanical tools.
Step 3: Drill and saw
Yes, yes, the first mechanical tool will be a drill, not a saw.
A drill with a diameter of 2 mm is selected and several closely spaced holes are drilled in the place where it is convenient to start cutting out the contour. The holes are connected into a single groove using a chisel. It is convenient to saw the tabletop with a wood jigsaw. Just don’t forget to stock up on extra blades - thick tabletops are difficult to saw, and the blade is likely to break if it deviates slightly from the vertical. Take your time and move the jigsaw confidently - it is more difficult to correct a crooked cut than to immediately cut a hole along a plumb line, with a strictly perpendicular cut.
Step 4: Complete the installation
Apply sealant to the end of the fresh mounting hole and insert the sink tightly. We hold the sink under load for 10 to 60 seconds (depending on the type of sealing compound). Carefully remove excess glue from the outside and inside of the sink and wait several hours until the sealant has completely hardened. We connect hoses, pipes, sewerage, install a faucet and use the new sink for your pleasure.
- Author: Mikhail Malofeev
Rate this article:
- 5
- 4
- 3
- 2
- 1
(7 votes, average: 4.1 out of 5)
Share with your friends!
Installing an integrated sink flush with the countertop
Installing an integrated sink is not an easy process, since the fastening is done end-to-end. The hole is made according to the same principle as for a mortise sink.
The difference is that the integrated one is installed so that the edges of the sink and kitchen table are flush. To do this, the seam that is rubbed between them. When dry, the edge is completely hidden, forming one continuous surface with the tabletop.
This creates the impression of a solid surface of the kitchen table.
Sink forms
We will consider only the most famous design solutions.
| Corner sink shape | Brief description of appearance and operational parameters |
Corner with one bowl | Made from sheet stainless steel, there are two wings on the sides of different sizes for kitchen utensils. An individual feature of such sinks is the presence of a second tap for filtered water. |
Stainless steel with two bowls | The bowls come in different sizes, allowing you to wash dishes with minimal water consumption. Glasses are washed in a small bowl after morning tea or coffee, and dishes are washed in large bowls after a family dinner. The length of the mixer spout is selected so that when turned it is enough to fill both bowls with water. |
Corner sink with two bowls made of artificial stone | It is installed in large kitchens, has two full-sized side bowls, and in the center there is a special area for detergents. There is one mixer, installed between the sinks. |
Corner semicircular with two bowls | Made of stainless steel, the unique geometry allows you to make maximum use of the free space of the corner table top. Bowls have different sizes, each used depending on the number of dishes. |
Round ordinary stainless steel | The simplest in terms of manufacturing technology, it belongs to the budget category. Detergents are placed in the corner on a specially made stand. |
Corner with three ceramic bowls | Belongs to the elite category, has three bowls of different sizes for washing. The mixer is installed on a separate platform; additional space is provided for temporary storage of clean dishes. |
As can be seen from the short list, there is plenty to choose from, the main thing is not to make a mistake with the analysis of their actual characteristics.
Prices for corner kitchen sinks
Corner kitchen sink
Features of installing sinks in countertops made of various materials
When choosing the type of sink, you should think in advance what difficulties you may encounter during installation. It is necessary to take into account the specific characteristics of the material from which the surface of the kitchen table is made and how organically the sink will fit into the overall design of the kitchen.
Tree
A kitchen made of solid wood looks stylish. Stone, bronze or ceramics in natural colors go well with wood. The wooden countertop does not cause difficulties when installing any type of sink. Any master can easily cope with this task.
MDF
Only mortise or countertop sinks can be installed on MDF countertops. But you can choose any material for the sink itself. MDF is easy to process and installation in such a kitchen table will not take much time.
Plastic
The ideal solution for a plastic countertop would be an integrated sink made of composite materials. The surface of the kitchen table will look smooth. In a kitchen made from artificial materials, you can install an overhead stainless steel sink.
You can fix the sink on the surface of the plastic kitchen table yourself; it can be easily processed.
Fake diamond
It doesn’t matter whether the surface of the countertop is made of natural stone or artificial. She already looks noble in herself. A sink made of stone or bronze can highlight the beauty of your kitchen set. An integrated model will look good. But it will be difficult to install fasteners on a stone countertop without knowledge and skill.
Installation of an undermount sink
Kitchen furniture consists of different products, each of which performs a specific function. The countertop is one of the main elements of the kitchen. It provides a work surface and can also serve as a frame for a sink. The material from which it is made is important; its ability to withstand loads depends on it. Thin composite panels will only support stainless models. Stone sinks require a massive surface; it must be made of a similar material and have a special design that includes holders.
Installing a sink in a wooden countertop can be done with your own hands; as for granite, it is better to entrust the work to professionals. Of course, you can try to make the cut yourself, following the recommendations for working with a specific material, but this will require a special milling cutter or hydraulic cutting machine, the price of which will be many times higher than the cost of the hole. Let's take a closer look at the method of installing mortise sinks.
Required tools and materials
Before starting work, you should inspect the existing tools and purchase additional ones if necessary. Standard set includes:
- measuring instruments, pencil, marker, cardboard, tape;
- construction knife, glue, sealant, screws;
- adjustable, open-end wrenches, screwdriver, pliers;
- electric drill, drills, jigsaw;
- sink, mixer, siphon, hoses for water supply.
Marking and cutting out a niche
Having determined the location of the product, all that remains is to perform a number of simple steps with the help of which the installation of a sink in the kitchen will be successful. The step-by-step process is as follows:
- Drop-in sinks are sold complete with ready-made cardboard templates and fasteners. If there are none, you will have to cut out the patterns yourself. In this case, the sink itself will become a template. A sheet of cardboard is applied to it, a silhouette is drawn along the contours, and a blank is cut out.
- To determine the internal contour according to which the cut is made, the width of the side is measured. After which this data is transferred to the workpiece to indicate the final type of pattern.
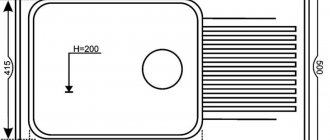
- The drainage area is marked on the countertop. A template is attached to it, secured with tape, and an outline is outlined. In this case, the distance from the front end of the working surface to the side of the sink should be more than 5 cm, and from the rear - 2.5 cm.
- Holes are drilled along the contour of the finished marking using an electric drill. A drill diameter of 10-12 mm is sufficient to pass the jigsaw blade. The number of holes depends on the shape of the bowl being installed. For a round one, the step between them will be 7 cm; for a square, rectangular one, four passes of the drill in the corners are enough. Drilling and cutting work is performed from the front side of the surface. Next, use a jigsaw to cut out a hole for the sink. After which the cut is cleaned of dust and sanded with sandpaper.
- The edges of the cut are treated with silicone-based sealant. It protects uncoated wood from swelling. Insufficient sealing can lead to rotting of the tabletop at the cut site, so it is better to apply a double layer.
Countertops made from artificial stone usually come with a pre-cut hole for the sink. If there is none, but there is an irresistible desire to cut in the sink yourself, instead of a jigsaw you should use a router, or, in extreme cases, a grinder with diamond-coated discs. After cutting the holes, the edges are sanded down with a sander.
The process of installing and connecting the sink
- Using a brush or spatula, apply a layer of transparent silicone to the work surface in the area of the sink rim trim.
- The inside of the sink is treated with sealant. It provides reliable fastening of the objects in question and does not allow liquid to pass through at the junctions of the elements.
- The next step is to install the sink in the cut hole. It is applied from the faucet mounting side. It is gradually pressed until the objects are in complete contact. Excess sealant that appears is removed using a rag.
- Using fasteners, the sink is fixed to the countertop. They can be plastic or metal. Iron clamps are more reliable.
- After the installation is completed, the necessary communications are connected. Usually the sink is mounted with a mixer fixed on it, and the only thing left to do is to screw the water supply hoses (hot, cold) to the water pipes.
- At the final stage, a drain is installed. The siphon outlet is inserted into the sink, and the corrugated pipe is inserted into the sewer.
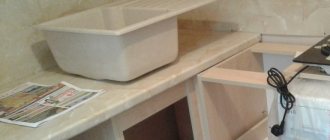
Preparing the sink
Once you have a cabinet on which the overhead sink will be installed, you should first prepare it for the installation process.
Before installation, the sink must be prepared.
To do this, you need to perform the following manipulations:
- Unpack the metal product. The packaging film must be removed very carefully so as not to scratch the surface. Especially if it is glossy.
- Carefully try it on the cabinet and make sure it fits snugly enough. It is important at this moment to analyze whether the sink fits too tightly on the sides and, conversely, whether it is wobbly. If it doesn’t fit, you will have to sharpen the sides a little in the place where it is necessary. If, on the contrary, it dangles too much, then you will have to glue thin wood chips onto the sides.
- After this, to ensure long-term operation, care should be taken to ensure that the ends of the lumber are protected from moisture. To do this, they are treated with special materials that repel liquids or covered with a special edge film.
Preparation of materials and tools
Before installing an overhead stainless steel sink on the cabinet, you should prepare all the necessary tools and consumables. Here's what you'll need to get started:
- Screwdriver or screwdriver.
- A hacksaw, if the pipeline is open, is laid along the outer surface of the wall. In this case, you will need to cut out the walls of the cabinet so that you can move it tightly against the wall.
- Flexible meter, ruler, angles, level, if you need to check the horizontal installation.
You won't be able to install a sink without tools.