Features and types of decor
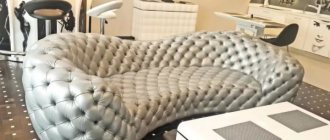
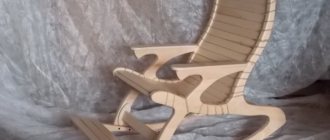
The carriage screed first appeared in the mid-18th century. It has still not lost its relevance and is rightfully considered one of the most luxurious types of interior decoration. Furniture covered with expensive fabric, with voluminous squares or diamonds, decorated with rhinestones or buttons, will not leave anyone indifferent and will decorate any room in the house.
France during the time of Napoleon III was distinguished by a special love for splendor and grace. It is not surprising that this type of decoration appeared there. The screed got its name because it was first used for interior upholstery, as well as for decorating carriages. Soon the technology migrated to the interiors of nobles and began to quickly spread throughout Europe.
In the 19th century, the Chesterfield sofa gained popularity. He still remains one of the most famous representatives of furniture made using this technique. It is difficult to find a more elegant and sophisticated piece of furniture that so well combines beauty with practicality.
Today, the technique of decorating capitone, as carriage technology is also called, has received much greater use. It can be seen on furniture, wall panels, as well as interior and decor items. It is recognizable by its soft fabric upholstery with buttons or furniture studs. The pattern of the screed can be square or diamond-shaped, less often a more complex pattern is used.
Criteria for choosing a bed with a soft headboard, design options
Tools and materials
The basis is any sheet material: plywood, chipboard, MDF, OSB. It must be sanded and adjusted to the desired size.
The geometry of the stitch pattern can be different: in the form of rhombuses, squares, triangles. The template for the drawing is made of cardboard. Use a felt-tip pen to outline the design, then cut out holes in the place of future stitches.
Important. Upholstery material is purchased with a reserve - approximately 50 cm in width and 50 cm in length.
Expert opinion
Mikhailova Maria Vasilievna
Furniture store manager. Knows everything about comfort and interior design
For an elastic gasket you will need foam rubber 5-8 cm thick and padding polyester. They are purchased taking into account a margin of 6-10 cm in length and width for folds. Threads and cords for pulling buttons are selected according to thickness and strength.
For gluing foam rubber and padding polyester, special furniture glue for foam rubber or rubber-based rubber glue are suitable.
Important. Under no circumstances should you use nitro glue, as it can corrode the material.
The drill will require a special attachment - a tsifenbor. When using it, you get neat holes with smooth edges.
You can use various devices with sharpened edges that are pressed and scrolled for the same purpose, but their manufacture requires some skill and dexterity. Holes in the substrate can also be cut with a stationery knife, but in this case the edges are sloppy and torn.
In addition to a drill with a special attachment, you will need a jigsaw, stapler, hammer, and tape measure.
Pros and cons of furniture
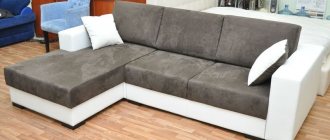
A bed decorated with a carriage frame can make the interior of any bedroom noble. Before purchasing, you should familiarize yourself with the pros and cons of furniture. Advantages of items with this finish:
- Long service life. Due to special technologies, as well as high-quality materials and accessories used in manufacturing, the product will be used without problems for many years. The bed is designed to withstand heavy loads, the parts do not wear out or become loose for a long time.
- Aesthetic appearance. A bed made using the carriage screed technique will always attract increased attention, tell about the refined taste of its owner, and the interior with it will look elegant and rich.
- Suitable for any interior style. All products have their own design features, differ in materials, as well as colors. Thanks to this, they can be used in many famous styles.
Possible disadvantages of furniture:
- Increased space. When choosing a bed with a carriage frame, it is worth considering that this finish adds volume to the furniture and makes it visually larger. It is better to install it in a spacious room, where it will look more harmonious.
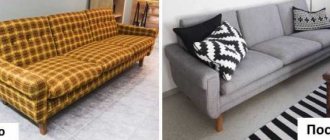
- Fabric trim. Due to stains or careless handling over time, the upholstery can become unusable, especially if there are small children or animals in the house. For this reason, it is better to choose genuine leather instead of fabric.
If you take these nuances into account when choosing, then a bed with a capitonné finish will delight its owners for a long time with its convenience, aesthetic appearance, and give them comfort and coziness. Such furniture is more expensive than conventional models, but it is worth it.
Self-upholstery using carriage screed technology
Some recommendations for working with the carriage screed technique
Before moving directly to a step-by-step examination of carriage screed technology, it makes sense to get acquainted with the general recommendations shared by experienced craftsmen.
The task is not as simple as it may seem initially, and you should not ignore the recommendations of the experts
- The first step is always to prepare a carefully thought-out drawing of the future cladding with the appropriate dimensions. Without this, it is impossible to make a high-quality carriage screed.
- If the carriage screed will be performed for the first time, it is recommended to practice on a small panel, approximately 500x500 mm in size. Otherwise, you can easily ruin the main material.
- The material chosen as the base must have a certain strength and thickness so that during the work there is no deformation or even destruction of the structure. Carrying out a carriage tie still requires the application of certain mechanical forces.
- The foam rubber is glued to the base using a special glue, which is sold in cans or in the form of aerosols. The latter option is more convenient to use and significantly speeds up the work.
Glue for fixing foam rubber on a plywood base
- Holes in foam rubber and plywood, according to the drawn up diagram, can be drilled only after the glue has completely dried.
- To correctly apply markings to foam rubber, it is recommended to first apply it to cardboard of the same size as the panel to be covered.
- If fabric is chosen for covering the panel, it must be dense and of high quality. A thin version of the material will not be suitable for this purpose, since in the area of punctures and fastening nails, especially with inevitable tension, the fabric may “crawl”.
- You should not choose a material with a pattern for upholstery, since the finished panel or piece of furniture will look sloppy.
Instead of round buttons, some craftsmen are trying to come up with something more interesting
- If you need to add special aesthetics and charm to the trim, or make it more harmonious with the rest of the interior, instead of traditionally trimmed buttons, you can use nails with wide heads decorated with rhinestones or other decorative elements.
- To give the cladding a deeper relief and softness, instead of foam rubber, you can use two materials in combination - this is foamed polyethylene, on top of which a thick layer of padding polyester, 30÷50 mm, is laid.
- Before fixing the material to the base, it should be smoothed by hand and the correct folds should be formed. There should be no distortions or deformations on the fabric or leather.
Neatly formed carriage tie pattern
- All buttons must be equally recessed into the facing material, otherwise the geometry of the pattern will be disrupted and the finish will not look smooth and neat.
- The cord for fastening buttons must be strong so that it does not break when attaching buttons and during use of the upholstery. This is especially true for upholstered furniture, which will be subject to very significant mechanical stress.
- If a “test of the pen”, that is, an attempt to perform a carriage tie on a small “training” fragment, is not crowned with success, then it is better not to spoil the material in vain and turn to a professional craftsman. There's nothing you can do - not everyone succeeds well.
Cost of labor and materials for carriage screed
Drawing up an upholstery scheme
In order to purchase the required amount of material and accurately calculate the location of relief elements and fasteners, it is necessary to draw up a sketch project.
An example of a sketch drawing of a future panel cladding using the carriage screed technique
Using the example of the project drawing presented above, you can consider the process of independently carrying out calculations.
To do this, first of all, the actual dimensions of the surface to be finished are determined and transferred to a sheet of paper. Naturally, the drawing must be made to a certain scale.
The figure above shows a panel having linear dimensions of 2000x950 mm with diamond quilting. However, in order to correctly position and calculate the distance between the fasteners, a square is taken as a starting point, the size of which on the panel will be 200x200 mm. The dimensions of the sides of the square determine the height and width of the diamonds.
The carriage screed in the form of diamonds is made only in the upper part of the panel, and in the lower part there are even strips, separated by folds-bridges. The width of the stripes corresponds to the width of the rhombus, that is, 200 mm. On each side of the panel, a 100 mm wide deviation is made for side fastenings - a total of nine vertical stripes are obtained. The height of the strips to the first fasteners is 400 mm. From the top line of the panel to the first row of buttons - 50 mm. Thus, the size and location of the elements of the carriage screed on the base are calculated.
Fabric or leather must also be marked and drawn before its initial installation. The size of the squares on fabric or leather should be 240 × 240 mm, based on this, it turns out that taking into account the bends, which are allocated 100 mm on each side of the panel, the material should have a size of 2600 × 1285 mm.
Expert opinion: Masalsky A.V.
Editor of the “construction” category on the Stroyday.ru portal. Specialist in engineering systems and drainage.
The squares on the material are larger in size by 40 mm than on the base, since this margin is necessary both to ensure the relief of the upholstery and to form folds framing the diamonds.
After all dimensions are determined, they are transferred to a cardboard pattern, which should have the actual dimensions of the panel. You need to very accurately transfer the installation points of the fasteners onto it and cut holes in these places. How accurately they will be marked and cut, as well as how evenly the pattern will be laid on the base, will depend on the evenness and accuracy of the screed.
Materials and tools for covering panels with carriage screed
To carry out the work, you will have to prepare not only the materials necessary for the process of creating the panel, but also the tools.
Materials include the following:
- A sheet of plywood with a thickness of at least 8 mm for making the base. The linear parameters and shape of the base depend on the draft sketch and what the product is specifically intended for.
- The material for cladding is natural or artificial leather or thick, high-quality plain fabric. It will be required approximately one and a half times more than the size of the base.
- A sheet of foam rubber, the dimensions corresponding to the plywood panel, and the thickness - 50÷70 mm. Instead of foam rubber, you can use padding polyester of the same thickness.
- Buttons or nails with a head with a diameter of approximately 15÷20 mm. Their number depends on the size of the panel and the parameters of the selected pattern. Everything is determined according to the drawn up drawing.
- Durable nylon cord for attaching buttons.
- A sheet of cardboard for making a hole pattern.
- Glue for gluing foam rubber to plywood.
The tools you will need to prepare are:
- Metal rulers - long and short.
- Roulette.
- Several markers for marking.
- An electric drill or screwdriver with a tsifenbor attachment with a diameter of 10÷12 mm.
- Electric jigsaw.
- Stapler and staples 8÷10 mm.
- A hook 150÷170 mm long or a needle of the same size.
A few words need to be said about the tsifenbor attachment, since not everyone is familiar with this tool.
Sharp cutting cylindrical nozzle for drilling holes in foam rubber and other soft materials - tsifenbor
So, a tsifenbor is a cutting attachment for a drill or screwdriver, designed for drilling holes, not only in soft, but also in relatively hard materials, for example, wood. Using this device, you can easily and quickly cut neat, even holes of the desired hole diameter in foam rubber.
Materials and accessories
When making a bed using the carriage screed technique, the choice of upholstery material, backing and fittings is crucial. The lifespan of the finished product will depend on their quality, so you shouldn’t skimp on them. For upholstery, high-quality, durable fabric with high density is suitable. The technique involves strong tension, so the thin material will quickly fail. The fabric should be plain. If you choose a small pattern, its lines will be distorted by the screed, and the appearance of the product will be ruined.
Characteristics of beds with drawers, manufacturing and assembly features
What materials are suitable for upholstery:
- Genuine Leather. Durable, wear-resistant material, the disadvantages include high cost.
- Chenille. Durable, wear-resistant material.
- Faux leather. It holds wrinkles well, is wear-resistant, but is inferior in durability to natural fabric.
- Flock. Nice soft pile fabric with a large selection of colors.
- Velours. Velvet material, with its help deep folds are obtained well.
- Jacquard. Luxurious fabric with a large pattern. Products with it look expensive.
The beauty of the design depends entirely on the soft lining. Synthetic padding polyester and foam rubber with a thickness of five to eight centimeters are most often used as a substrate. The depth of the screed will depend on its density, which will affect the appearance of the finished product. You will also need cords or threads to tighten the buttons. They must be durable, the thickness can be selected individually, depending on the screed technique.
The capitonné is decorated with decorative buttons or furniture nails. They can be complemented with bright rhinestones or covered with matching upholstery fabric. The choice depends on the design of the room where the bed will be placed.
It is important to pay attention to the stem of the button; it must be made of metal. The plastic one will not withstand heavy loads and will quickly break off.
Genuine Leather
Chenille
Faux leather
Flock
Velours
Jacquard
Carriage screed - stages of work
First of all, the base is made to the required dimensions. This is done with a jigsaw or circular saw.
Then the plywood is marked using a strip and a marker. Depending on the width of the diamonds, dots are drawn along the long edges every 10 or 15 cm.
Opposite marks are connected by lines indented by one division so that they take a running start. Holes are drilled at their intersections.
At the same time, a full-size stencil is made from cardboard. You will need it later. Next, glue is applied to the entire surface using a roller and foam rubber is applied. Do not press it too hard so that it does not become saturated with the fixing compound - this will put an end to your work.
After drying, dots are also made on it with a pencil (the ink of the marker sometimes appears on the fabric). Using a Zifendorf nozzle, they drill holes the size of your buttons into the filler.
On top, stretching it very carefully (invite someone from your family to help), glue the padding polyester.
The most crucial moment is marking the material. On the cut, an indentation is made from the place of the first tightening to the edge of the base and another plus of 75 millimeters.
Expert opinion
Mikhailova Maria Vasilievna
Furniture store manager. Knows everything about comfort and interior design
A stencil is placed on the back of the fabric and dots are made with it. A piece of thread is threaded into each (through two punctures so that the material can be pulled to the plywood).
Work very carefully at this stage, especially if you have chosen thin, delicate textiles.
The first row is crocheted through the plywood and each loop is nailed from the inside with a stapler. By the way, take only stainless steel brackets for it. Upon completion of the first row, proceed to the next and so on.
If you carried out all the manipulations correctly, then in the end you will get a beautiful surface with neat folds. It is important to work slowly and meticulously, otherwise it is difficult to avoid distortion and defects.
Work always begins from the middle of the future composition - this approach will ensure uniform stretching of the material and eliminate excessive constriction. Only then will the entire product look as elegant as possible.
Diamond-shaped folds are best smoothed out with a stick or knitting needle after a whole row has been formed. Later this will no longer be possible. After this comes the turn of buttons. They are installed before the formation of end folds occurs. Next, the edge of the material is nailed to the plywood with a stapler. The corners are fixed last.
The described option is quite simple to implement, but looks extremely attractive from an aesthetic point of view. You can see from your own experience that the most time and effort is spent on the preparatory stage. Completing work is an easy task, not without its pleasure.
A good master class on carriage screed is shown in this video:
Design and combination with the interior
A bed with a soft carriage frame will add coziness to a bedroom with any interior and will be the main decoration there. The headboard can be a separate element and attached to the wall or form a single structure with the bed frame, made using the same technique. The colors are selected depending on the dominant color of the room, as well as the overall design. Beds with a carriage frame will fit perfectly into the following interior styles:
- Baroque. A pompous style, characterized by luxury and bright, rich colors. The back of the headboard must be in a curved massive frame, with a pattern. It is better to choose upholstery in blue, deep wine-colored velvet.
- Empire style The ideal bed would be a cream or beige color with a backrest in a gilded frame, with forged elements.
- Classic. Preference should be given to beds in white or light beige. The fittings must be upholstered in the main fabric. A little gilding on the back will add luxury and solemnity.
- Modern. A bed with a high back and rounded corners of the headboard is suitable. It is better to choose a calm, neutral color, focusing on the overall tone of the room.
Characteristics of solid pine beds, product classification
There are rules that all manufacturers of upholstered furniture with carriage screed adhere to:
- For a headboard with right angles, use a square or rectangular screed.
- For backs with curved lines, irregular or rounded shapes, the diamond-shaped technique is used.
It doesn’t matter which bed made using the capitonné technique you choose. Any of them will look decent in the interior, become its decoration, and add coziness and comfort. And for those who did not plan to change the furniture in the near future, there is the possibility of making a removable cover for the headboard, made using the carriage tie technique. Moreover, it is easy to do it yourself.
Baroque
Empire style
Classic
Modern
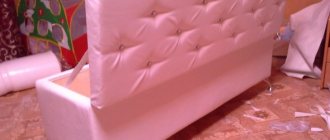
Preparing the base of the headboard
We cut the sheet of foam rubber according to our dimensions and begin to mark it with diamond elements
The first step is to draw a diagram of the future carriage screed on a sheet of foam rubber. The easiest way is to cut out a diamond template of the desired size and mark the entire sheet according to it.
Expert opinion
Mikhailova Maria Vasilievna
Furniture store manager. Knows everything about comfort and interior design
First, you should draw 2 axes intersecting in the center of the sheet - vertical and horizontal. Attach the diamond template with its center to the center of the intersection of the axes and thus outline the entire working area.
Use a Zifenbor bit to cut out shallow holes at the marked fastening points.
The tops of the diamonds will be the tension points for the buttons. In these places it is necessary to make round holes in the foam rubber.
They are done using a special attachment for a drill - “tsifenbor”, however, if not available, it can be replaced with a metal tube of a suitable diameter. It is installed in the right place and straight slits are cut out by hitting the tube.
As a last resort, they can be cut out with a stationery knife, but then the edges of the holes turn out uneven. This is not critical and does not affect the appearance of the product.
Press the mold with the tube and at the same time scrolling it, we make through holes
After all the slots are ready, you need to mark them on a sheet of plywood. To do this, apply the foam rubber to the plywood and mark points at the holes. Using a drill, drill through the plywood panel at each marked point.
We cut a sheet of plywood in accordance with the dimensions of a sheet of foam rubber and transfer the markings to the plywood
Using a drill, drill holes at the intersection points of the diamonds.
Next, you need to glue the foam rubber to the plywood panel, making sure that the edges and all holes of these two parts necessarily coincide. You should not use glue that corrodes the porous structure of foam rubber, otherwise the finished product will not last long.
It is recommended to use special glue for foam rubber, which is safe for health and has high adhesion to various surfaces.
Glue the foam sheet to the plywood using furniture glue
Sometimes it is necessary to wait a certain time for strong bonding. The characteristics of adhesive compositions of different brands differ from each other. You should study the information on the label.
After the foam rubber is firmly glued to the plywood, you need to carefully cover it with thin synthetic padding. Secure the edges of the padding polyester with a stapler to the back of the plywood.
Glue padding polyester to foam rubber using rubber glue